Contents
- Distributed solution and multitenancy
- Distributed solution and multitenancy mode transition scenario
- Modifications of program settings for the distributed solution and multitenancy mode
- Assigning the PCN role to a server
- Assigning the SCN role to a server
- Processing SCN to PCN connection requests
- Viewing information about tenants, PCN and SCN servers
- Adding a tenant to the PCN server
- Deleting a tenant from the PCN server
- Renaming a tenant on the PCN server
- Disconnecting an SCN from PCN
- Modifications of program settings for disconnecting an SCN from PCN
- Decommissioning an SCN server
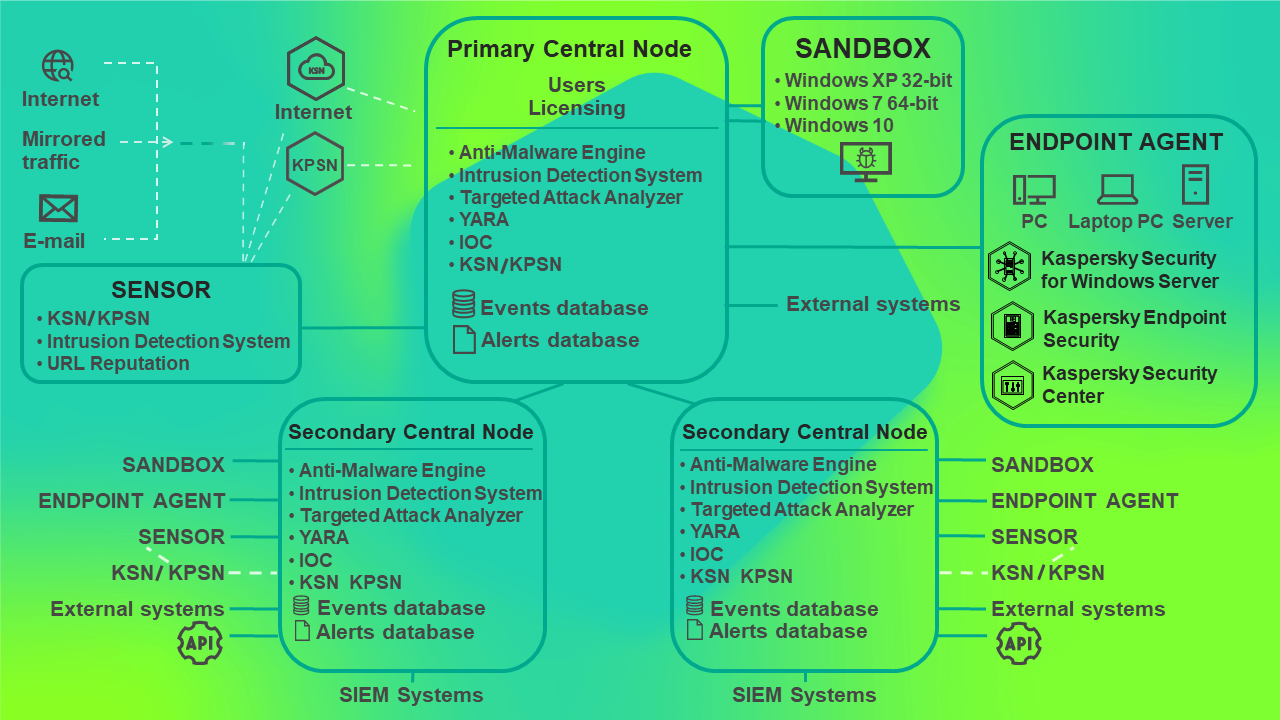
Distributed solution and multitenancy
You can configure settings of each Central Node component individually or manage several components in a centralized way in distributed solution mode.
The distributed solution is a two-tier hierarchy of servers with Central Node components installed. This structure sets apart a primary control server known as the Primary Central Node (PCN) and secondary servers known as Secondary Central Nodes (SCN). Interaction of servers requires connecting SCN to PCN.
If you have deployed the Central Node component as a cluster, the entire cluster takes on the role of a PCN or SCN.
PCN and SCN scan files and objects using the same technology as the individually managed Central Node component.
The distributed solution allows centralized management of the following functional areas of the program:
- Users.
- Alerts.
- Threat Hunting.
- Tasks.
- Prevention.
- Custom rules.
- Storage.
- Endpoint Agents, including network isolation of hosts.
- Reports.
If you are supporting multiple organizations or branch offices of the same organization, you can use the program in multitenancy mode.
Multitenancy mode lets you use the solution to protect the infrastructure of multiple organizations or branch offices of the same organization (hereinafter also referred to as "
") simultaneously. You can install Kaspersky Anti Targeted Attack Platform on one or more Central Node for each tenant. Each tenant can manage the program independently from other tenants. The service provider can manage the data of multiple tenants.For each user account, the number of simultaneous program management sessions is limited to one IP address. If the same user name is used to log in to the program from a different IP address, the earlier session is terminated.
If you are using the distributed solution and multitenancy mode, the limit is enforced for each PCN and SCN server separately.
Operation of the program in distributed solution mode
You can use the distributed solution and multitenancy mode in the following cases:
- To protect more than 10,000 hosts of a tenant
- For centralized management of the program in different departments of the tenant
- For centralized management of the program on servers of multiple tenants
When the program switches to the distributed solution and multitenancy mode, all previously added license keys are deleted from servers with the SCN role. Each connected SCN receives a key from the PCN. If full functionality of the program is used for the PCN (KATA and KEDR key), and partial functionality is used for the SCN (only KATA key or only KEDR key), the SCN server load limit may be exceeded because of the increased volume of data. If partial program functionality is used for the PCN (only KATA key or only KEDR key), and full functionality is used for the SCN (KATA and KEDR key), the program functionality is partially unavailable.
License keys can be managed only on the PCN.
You can use the following scenarios to deploy the program in distributed solution and multitenancy mode:
- Install the Central Node component on new servers and assign PCN and SCN roles to those servers.
- Assign PCN and SCN roles to servers that already have the Central Node component installed.
In this case, you must upgrade the Central Node component to version 5.0.
Before you switch servers with Central Node components installed to distributed solution mode, you should review the changes that will be applied to the system after the operating mode is changed. Assigning the PCN role to a server is irreversible.
Distributed solution and multitenancy mode transition scenario
Switching the program to the distributed solution and multitenancy mode involves the following steps:
- Installing the Central Node components.
- Assigning the PCN role to one of the servers.
- Assigning the SCN role to the rest of the servers and sending requests to connect to the PCN.
- Processing a SCN to PCN connection request.
Modifications of program settings for the distributed solution and multitenancy mode
Modifications of program settings for the distributed solution and multitenancy mode are listed in the following table.
Modifications of program settings for the distributed solution and multitenancy mode
Functional area |
PCN |
SCN |
|---|---|---|
Users |
Users and roles assigned to them are preserved. Additionally, PCN users are granted access rights to work with PCN and all connected SCNs. |
All users are deleted except the user that was created while Central Node was deployed. After that, the SCN requests a list of users from the PCN and uses that list to create local users with the same parameters:
|
Alerts |
Information about all alerts from all connected SCNs is added to the PCN database. |
The user name is no longer displayed in existing alert information. User data are deleted from alert operation history. |
Dashboard |
On the Alerts tab, you can now select the SCNs whose information must be displayed in the widget. On the System health tab, the status of connection of the PCN with connected SCNs is now displayed. |
On the System health tab, the status of connection with the PCN is now displayed. |
Tasks |
Tasks created on the Central Node server before it was assigned the PCN role, as well as tasks created on the PCN after switching to distributed solution mode, apply to all connected SCNs. Tasks created on SCNs are also displayed in the task list. Settings of these tasks cannot be changed on the PCN. |
Tasks created on the PCN are displayed, as well as tasks created on this SCN. Settings of tasks created on the PCN cannot be changed. |
Reports |
Templates and reports created before the switch to distributed solution mode are preserved. A Servers column is added to the report table, containing information about the relevant SCN for the alert. After switching to distributed solution mode, only reports created on a PCN are displayed. |
Templates and reports created before the switch to distributed solution mode are preserved. Information about the user who created the report is preserved if the PCN has a user with the same ID (guid). In other cases user information is deleted. After switching to distributed solution mode, only reports created on an SCN are displayed. |
Prevention |
Policies created on the Central Node server before it was assigned the PCN role, as well as policies created on the PCN after switching to distributed solution mode, apply to all connected SCNs. Policies created on SCNs are also displayed in the policy list. Settings of these policies cannot be changed on the PCN. |
Policies created on the PCN are displayed, as well as policies created on this SCN. Settings of policies created on the PCN cannot be changed. |
Storage |
All files and metadata that were stored on PCNs before the switch to distributed solution mode are preserved. The name of the PCN is displayed for them in the Central Node column. The PCN also keeps the contents of the Storage of all connected SCNs. |
All files and metadata that were stored on SCNs before the switch to distributed solution mode are preserved. |
TAA exclusions |
No changes. |
No changes. |
VIP status |
No changes. |
No changes. |
Notification rules |
No changes. |
No changes. |
Integration with mail sensors |
No changes. |
No changes. |
Threat Hunting |
During threat hunting in the database, the PCN sends a request to all connected SCNs. After the search query is processed, a list of PCN and SCN events of the selected tenant is displayed. |
No changes. |
Custom rules ‑ TAA |
IOC files added on the Central Node server before it was assigned the PCN role are applied to the PCN. TAA (IOA) rules that were added on the Central Node server before it was assigned the PCN role are applied to the PCN. |
IOC files and TAA (IOA) rules added on the PCN, as well as IOC files and TAA (IOA) rules added on this SCN before and after switching to distributed solution mode are displayed. |
Backup of the program |
Backup of the program is only available on a PCN that does not have SCNs connected. To back up the program on a PCN, disconnect all SCNs from the PCN. |
Backup of the program on an SCN is not available. To back up the program on an SCN, disconnect that server from the PCN by switching it to standalone server mode. |
Assigning the PCN role to a server
Assigning the PCN role to a server is irreversible. After changing the server role to PCN, you will not be able to change the role of that server to SCN or standalone server. To change the role of that server you will have to reinstall the program.
To assign the PCN role to the server:
- Log in to the program web interface with the administrator account.
You need to log in to the web interface of the server to which you want to assign the PCN role.
- Select the Operation mode section.
- Click Distributed solution.
- In the Server role drop-down list, select Primary Central Node.
- In the Tenant name field, enter the name of the tenant to which this Central Node server belongs.
- Click Assign the PCN role.
This opens the action confirmation window.
After confirming the action, log in to the program web interface again.
- Click Yes.
The server is assigned the PCN role and the name of the tenant.
After logging in to the program web interface with administrator credentials, the Operation mode section of the program web interface displays the following information:
- Current mode – Distributed solution.
- Server role – Primary Central Node.
- Certificate fingerprint – the fingerprint of the server's certificate required for authentication when establishing connection with an SCN.
- Tenants – information about tenants to which this server and connected SCN servers belong:
- IP – Primary Central Node for this server and IP addresses of SCN servers (after they connect).
- Server – name of this server and names of SCN servers (after they connect).
This name is not related to name of the host where the program is installed. You can change it.
- Certificate fingerprint – blank value for this server and certificate fingerprints of SCN servers (after they connect).
- Status – connection state of SCN servers (after they connect) and the number of servers connected to tenants.
- The Servers pending authorization table contains information about connected SCN.
Assigning the SCN role to a server
To assign the SCN role to the server:
- Log in to the program web interface with the administrator account.
You need to log in to the web interface of the server to which you want to assign the SCN role.
- Select the Operation mode section in the window of the program web interface.
- Click Distributed solution.
- In the Server role drop-down list, select Secondary Central Node.
- In the PCN IP field, enter the IP address of the server that has the PCN role, to which you want to connect the SCN.
- Click Get certificate fingerprint.
A fingerprint of the certificate of the server that has the PCN role is displayed in the workspace.
- Contact the administrator of the PCN and compare the certificate fingerprint you received with the fingerprint displayed on the PCN in the Certificate fingerprint field of the Operation mode section.
- If certificate fingerprints on the SCN and the PCN match, click Send connection request.
This opens the action confirmation window.
- Click Yes.
The server is assigned the SCN role after the PCN administrator accepts the connection request. The SCN server is assigned to the tenant specified by the PCN administrator.
Processing SCN to PCN connection requests
To process a SCN to PCN connection request:
- Log in to the program web interface with the administrator account.
You need to log in to the web interface of the PCN server that you want to use to process connection requests from other servers.
- Select the Operation mode section in the window of the program web interface.
The workspace displays the Servers pending authorization table.
- Contact the SCN administrator who sent the connection request and verify the certificate fingerprint in the Servers pending authorization table. It must match the fingerprint displayed on the SCN in the Certificate fingerprint from request field of the Operation mode section.
- If certificate fingerprints on the PCN and the SCN match, do one of the following:
- If you want to reject the connection request from the SCN, click Reject.
- If you want to accept the connection request from the SCN:
- Click Accept.
This opens the Accept connection request window.
- In the Tenant list, select the tenant to which you want to assign this SCN server. The list includes previously added tenants.
- Click Accept.
- Click Accept.
Accepting connection requests is not recommended if certificate fingerprints do not match. Make sure the data you entered is correct.
If you reject the connection request, the SCN will continue to operate as a standalone Central Node server.
Viewing information about tenants, PCN and SCN servers
In the web interface of the PCN server, you can view information about this server and about all SCN servers that are connected to it.
To view information about PCN and SCN servers in multitenancy mode:
- Log in to the program web interface with the administrator account.
You need to log in to the web interface of the PCN server.
- Select the Operation mode section in the window of the program web interface.
The workspace displays the following information about servers:
- Current mode – Distributed solution.
- Server role – Primary Central Node.
- Certificate fingerprint – certificate fingerprint of the PCN server.
- Tenants – information about tenants to which the server belongs, as well as all SCN servers connected to the PCN.
- IP – Primary Central Node for the PCN server and IP addresses of SCN servers connected to the PCN.
- Server – name of the server and names of SCN servers that connect to the PCN.
This name is not related to name of the host where the program is installed. You can change it.
- Certificate fingerprint – blank value for the PCN server and certificate fingerprints of SCN servers waiting to connect to the PCN.
- Status – connection status of SCN servers and the number of servers connected to the tenant.
- The Servers pending authorization table contains the following information:
- IP – IP address or domain name of the SCN server.
- Server – name of the SCN server that is displayed in the program web interface.
This name is not related to name of the host where the program is installed. You can change it.
- Certificate fingerprint – certificate fingerprint of the SCN server that is sent to the PCN with the connection request.
- Status – status of the SCN to PCN connection.
Adding a tenant to the PCN server
To add a tenant in the PCN server web interface:
- Log in to the program web interface with the administrator account.
You must log in to the web interface of the PCN server for which you want to add a tenant.
- Select the Operation mode section in the window of the program web interface.
- In the right part of the Tenants workspace, click Add.
- In the Name field, enter the name of the tenant that you want to add.
- Click Add.
The tenant is added and is displayed in the list.
Deleting a tenant from the PCN server
To delete a tenant in the PCN server web interface:
- Log in to the program web interface with the administrator account.
You must log in to the web interface of the PCN server for which you want to delete a tenant.
- Select the Operation mode section in the window of the program web interface.
- In the Tenants workspace, select the tenant that you want to delete.
- Click Delete.
This opens the action confirmation window.
The action is irreversible. All global objects as well as reports and report templates of this tenant are lost.
- Click Yes.
The tenant is deleted.
Renaming a tenant on the PCN server
To rename a tenant in the web interface of the PCN server:
- Log in to the program web interface with the administrator account.
You must log in to the web interface of the PCN server for which you want to rename a tenant.
- Select the Operation mode section in the window of the program web interface.
- In the Tenants list, click
 next to the tenant that you want to rename.
This opens a window in which you can rename the tenant.
- In the Name field, enter the new name of the tenant.
- Click Save.
The tenant is renamed.
Disconnecting an SCN from PCN
The SCN can be disconnected from the PCN unilaterally.
If you disconnect an SCN using the SCN web interface, changed settings are only applied to the SCN. The PCN continues to display information about that server.
If you disconnect the SCN using the PCN web interface, information about that server is deleted at the PCN. However, the server with the SCN role will keep trying to connect to the PCN to synchronize settings.
To complete a bilateral disconnect, you must follow both instructions presented below. In this case, the SCN keeps working as a standalone Central Node server, and information about the disconnected SCN is displayed on the PCN.
The administrator of Kaspersky Anti Targeted Attack Platform is responsible for the confidentiality of data on PCN, SCN, and Central Node servers. If you plan to move an SCN server from one tenant to another, you must delete all data remaining on the server after using Kaspersky Anti Targeted Attack Platform and reinstall Kaspersky Anti Targeted Attack Platform before handing over the server to the different tenant.
To disconnect the SCN from the PCN through the PCN web interface:
- Log in to the program web interface with the administrator account.
Log in to the web interface of the PCN server that you want to disconnect the SCN from.
- Select the Operation mode section in the window of the program web interface.
- In the server list, select the SCN that you want to disconnect.
- Click Disconnect.
This opens the action confirmation window.
- Click Yes.
The SCN will attempt to connect to the PCN to synchronize settings.
To disconnecting the SCN from the PCN through the SCN web interface:
- Log in to the program web interface with the administrator account.
Log in to the web interface of the SCN server that you want to disconnect from the PCN.
- Select the Operation mode section in the window of the program web interface.
- Click Disconnect.
This opens the action confirmation window.
- Click Yes.
The SCN is disconnected from the PCN and continues working as a standalone Central Node server.
Modifications of program settings for disconnecting an SCN from PCN
Modifications of program settings after an SCN is disconnected from the PCN are listed in the following table.
Modifications of program settings after disconnecting an SCN from PCN
Functional area |
PCN |
SCN |
|---|---|---|
Users |
The disconnected SCN is not removed from the list of servers to which user rights apply. Information about changes of the user account that has rights on the disconnected SCN is not sent to the SCN. |
User accounts received from the PCN are not deleted. You can create new user accounts again, as well as disable and change passwords for existing user accounts. |
Alerts |
Alert information on the disconnected SCN is deleted. |
Operation history and all alert information is preserved. |
Tasks |
Tasks created on the disconnected SCN are deleted. |
Tasks created on the PCN are deleted. Information about users who created tasks on the SCN is preserved. |
Reports |
All reports created earlier concerning the disconnected SCN are preserved, as well as the ability to filter the report list by this server. |
Templates and reports are not modified. |
Prevention |
Policies created on the disconnected SCN are deleted. |
Policies created on the PCN are deleted. Information about users who created policies on the SCN is preserved. |
Storage |
All objects related to the disconnected SCN are deleted from Storage. |
All objects in the Storage are preserved. The link to the task stops working in information about objects received as part of tasks created on the PCN. |
TAA exclusions |
No changes. |
No changes. |
VIP status |
No changes. |
No changes. |
Notification rules |
No changes. |
No changes. |
Integration with mail sensors |
No changes. |
No changes. |
Threat Hunting |
After the search query is processed, events related to the disconnected SCN are not displayed. |
No changes. |
Custom rules ‑ TAA and IOC |
IOC and TAA (IOA) rules of a disconnected SCN are deleted. |
IOC and TAA (IOA) rules created on the PCN are deleted. |
Backup of the program |
Backup of the program remains unavailable. |
Backup of the program becomes available. |
Decommissioning an SCN server
If you are not planning to subsequently use an SCN server, you can decommission the SCN server by deleting it from the PCN.
The administrator of Kaspersky Anti Targeted Attack Platform is responsible for the confidentiality of data on PCN, SCN, and Central Node servers. If you plan to move an SCN server from one tenant to another, you must delete all data remaining on the server after using Kaspersky Anti Targeted Attack Platform and reinstall Kaspersky Anti Targeted Attack Platform before handing over the server to the different tenant.
Decommissioning an SCN server consists of the following steps:
- Deleting all data on the SCN
- Disconnecting the SCN from the PCN through the PCN web interface
- Disconnecting the SCN from the PCN through the SCN web interface
- Deleting the SCN through the PCN web interface
To delete the SCN through the PCN web interface:
- Log in to the program web interface with the administrator account.
Log in to the web interface of the PCN server from which you want to delete the SCN.
- Select the Operation mode section in the window of the program web interface.
- In the server list, select the SCN that you want to delete.
- Click Delete.
- In the confirmation window, click Yes.
The SCN will be deleted. Information about the deleted SCN will no longer be displayed on the PCN.