Contents
- Configuring Kaspersky Thin Client settings through the Web Console
- Configuring Kaspersky Thin Client basic settings through the Web Console
- Configuring a connection to a Basis.WorkPlace remote environment through the Web Console
- Configuring a connection to a remote environment via RDP through the Web Console
- Configuring a connection to a Web Access remote environment through the Web Console
- Configuring Kaspersky Thin Client power-saving settings through the Web Console
- Configuring the interface language and time zone of Kaspersky Thin Client through the Web Console
- Configuring synchronization between Kaspersky Thin Client and Kaspersky Security Center
- Configuring forwarding of Kaspersky Thin Client logs to a log server
Configuring Kaspersky Thin Client settings through the Web Console
This section contains information about configuring Kaspersky Thin Client settings through the Web Console.
Configuring Kaspersky Thin Client basic settings through the Web Console
In the Web Console, you can configure general settings for one device or for a group of devices running Kaspersky Thin Client.
How to configure the basic settings for one device
- In the main window of the Web Console, select Devices → Managed devices.
- Click the name of the thin client where Kaspersky Thin Client is running. You can view the device name in the Kaspersky Thin Client interface. If the thin client name is not on the list, add it to the Managed devices group.
If a managed device is added to an administration group and an enforced policy is configured for the settings of this group, the settings that were individually configured for this device will not be applied.
- In the window that opens, select the Applications tab.
- Click the name of the Kaspersky Security Management Suite web plug-in.
This opens a window containing information about Kaspersky Thin Client.
- Select the Application settings tab.
- Select the General section (see the figure below).
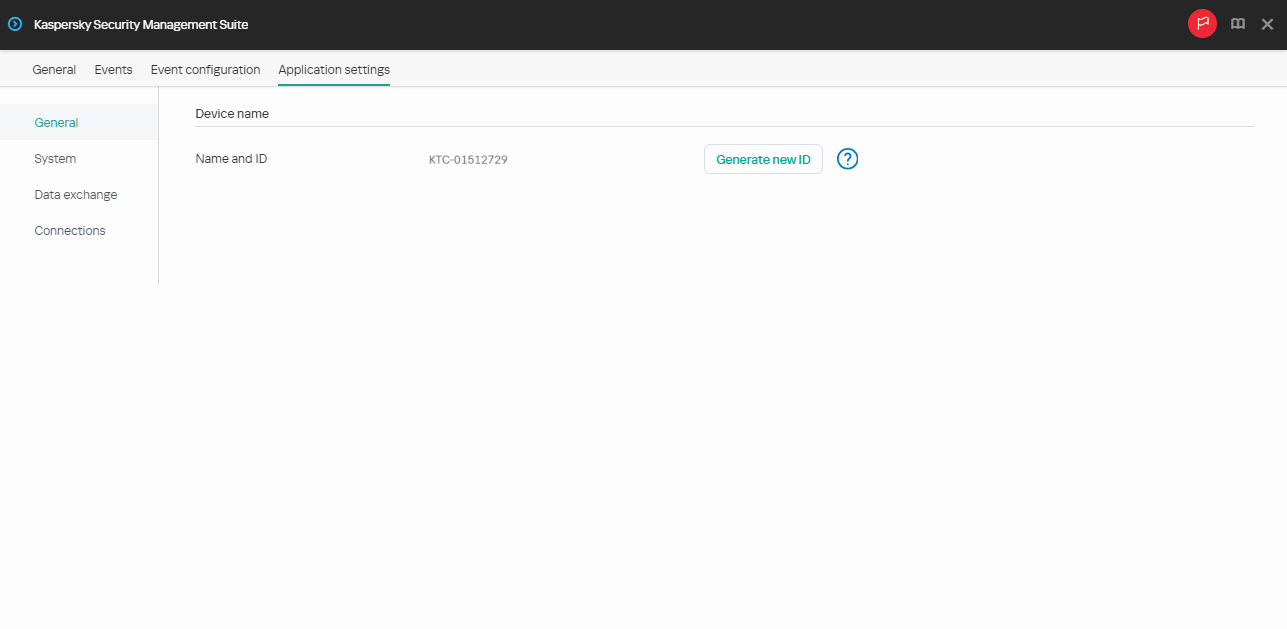
Window for configuring general settings through the Web Console for one device
- If you need to change the ID in the thin client name, click the Generate new ID button in the Device name block. The managed device for which you want to generate a new ID must be added to an administration group, and this group must have a configured and enforced policy for a group device naming rule.
The new ID in the thin client name will be created after the device is synchronized with Kaspersky Security Center.
- Click Save in the lower part of the window to save the changes.
How to configure the basic settings for a group of devices
- In the main window of the Web Console, select Devices → Policies & profiles.
- Click the policy name for the Kaspersky Security Management Suite web plug-in.
- In the window that opens, select the Application settings tab.
- Select the General section (see the figure below).
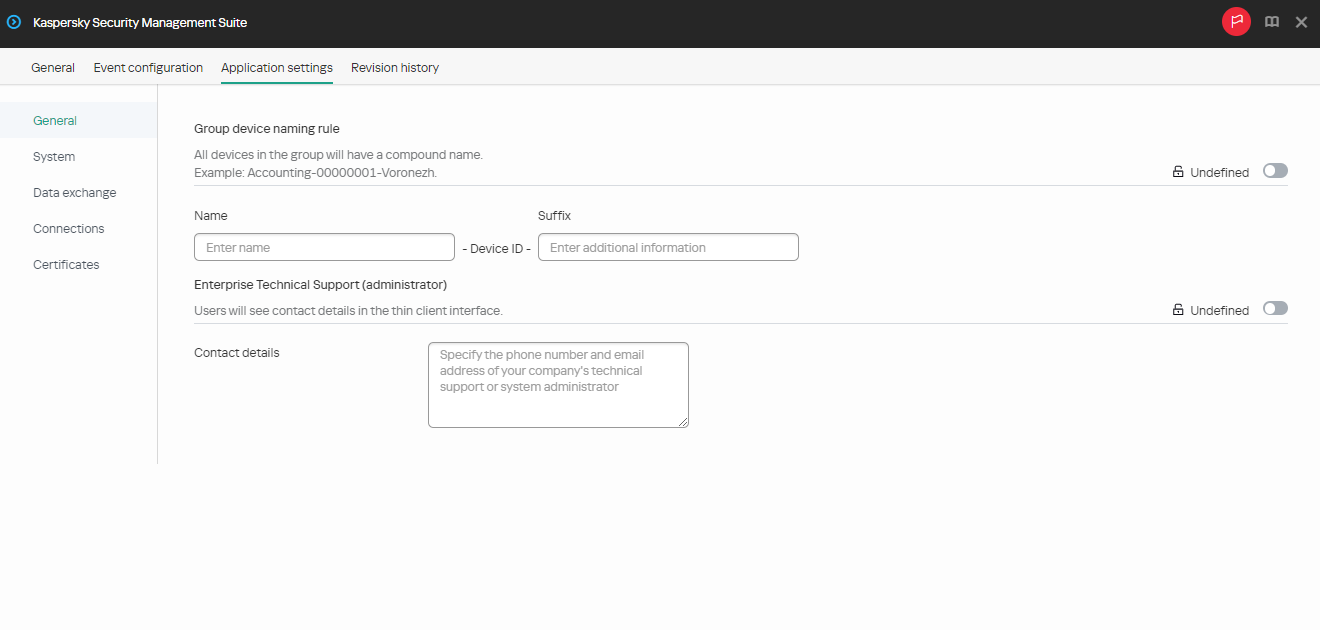
Window for configuring general settings through the Web Console for a group of devices
- If you need to specify a new name format for administration group devices, use the Group device naming rule block to indicate the new group name and additional information. You can use uppercase and lowercase letters of the Latin and Cyrillic alphabets, and special characters. A unique ID (eight characters) will be automatically generated for each device in the group. The number of characters in the device name must not exceed 30 characters.
- Move the toggle button located on the right in the Group device naming rule block to the Enforced position.
If the toggle button next to the name of a group of settings is in the Enforced position (
 ), the defined values of these settings are applied to devices on which the policy is applied, and these settings cannot be changed in the Kaspersky Thin Client interface. If the toggle button next to the name of a group of settings is in the Undefined position (
 ), the defined values of these settings are not applied to devices on which the policy is applied, and these settings can be changed for managed devices in the Kaspersky Thin Client interface under Devices → Managed devices.
 - Add the contact details of the Kaspersky Security Center administrator in the Contact details field. You can specify the last name, first name, phone number, and email address of the administrator. The number of characters in this field must not exceed 80 characters.
The contact details of the Kaspersky Security Center administrator are visible to the user in the main window of Kaspersky Thin Client, in the windows for confirming a reset of Kaspersky Thin Client settings and data and confirming changes to Kaspersky Security Center connection settings, and when the certificate for connecting to Kaspersky Security Center is replaced.
- Move the toggle button located on the right in the Enterprise Technical Support (administrator) block to the Enforced position.
- Click Save in the lower part of the window to save the changes.
Configuring a connection to a Basis.WorkPlace remote environment through the Web Console
You can use the Web Console to configure settings for connecting to a remote environment deployed in a Basis.WorkPlace infrastructure for one device or group of devices running Kaspersky Thin Client.
Instructions for connecting to a remote environment are given in a separate article.
How to configure settings for connecting to a Basis.WorkPlace remote environment for one device
- In the main window of the Web Console, select Devices → Managed devices.
- Click the name of the thin client where Kaspersky Thin Client is running. You can view the device name in the Kaspersky Thin Client interface. If the thin client name is not on the list, add it to the Managed devices group.
If a managed device is added to an administration group and an enforced policy is configured for the settings of this group, the settings that were individually configured for this device will not be applied.
- In the window that opens, select the Applications tab.
- Click the name of the Kaspersky Security Management Suite web plug-in.
This opens a window containing information about Kaspersky Thin Client.
- Select the Application settings tab.
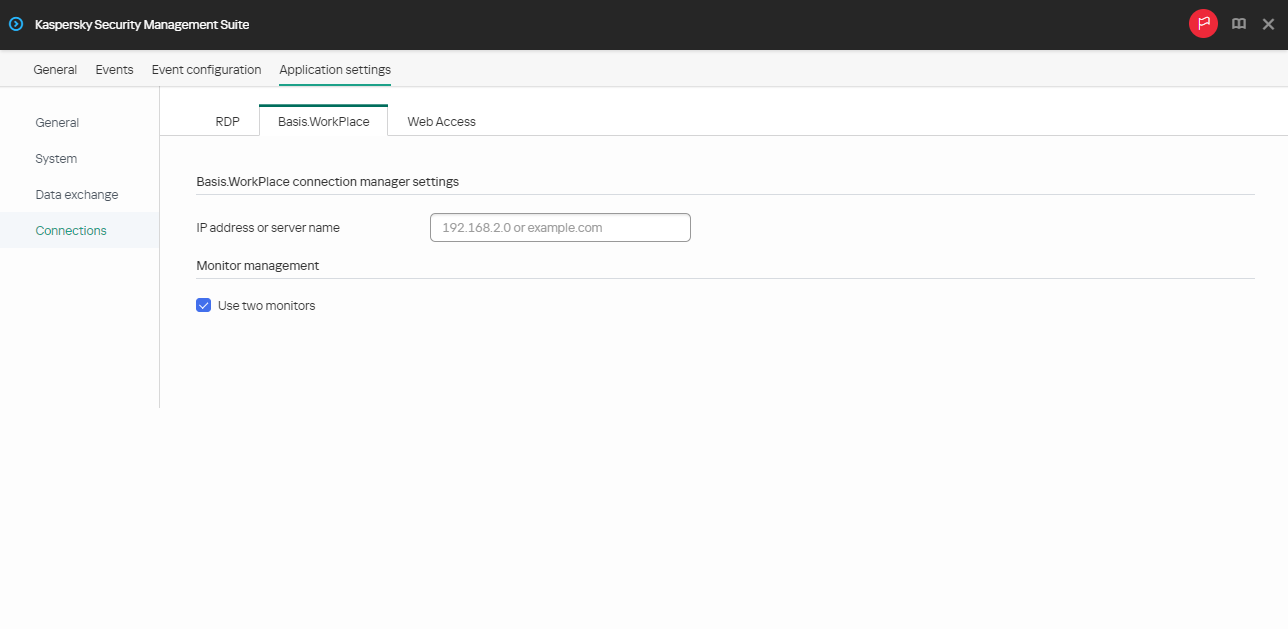
- Select Connections → Basis.WorkPlace.
This opens a window in which you can configure settings for connecting to a Basis.WorkPlace remote environment (see the figure below).
Window for configuring settings for connecting to a remote desktop managed by Basis.WorkPlace through the Web Console for one device
- In IP address or server name, enter the IP address or server name to connect to.
- If two monitors are installed at your workstation and you want a remote desktop image to be displayed on both monitors, select the Use two monitors check box in the Monitor management block.
- Click Save in the lower part of the window to save the changes.
- In the main window of the Web Console, select Devices → Policies & profiles.
- Click the policy name for the Kaspersky Security Management Suite web plug-in.
- In the window that opens, select the Application settings tab.
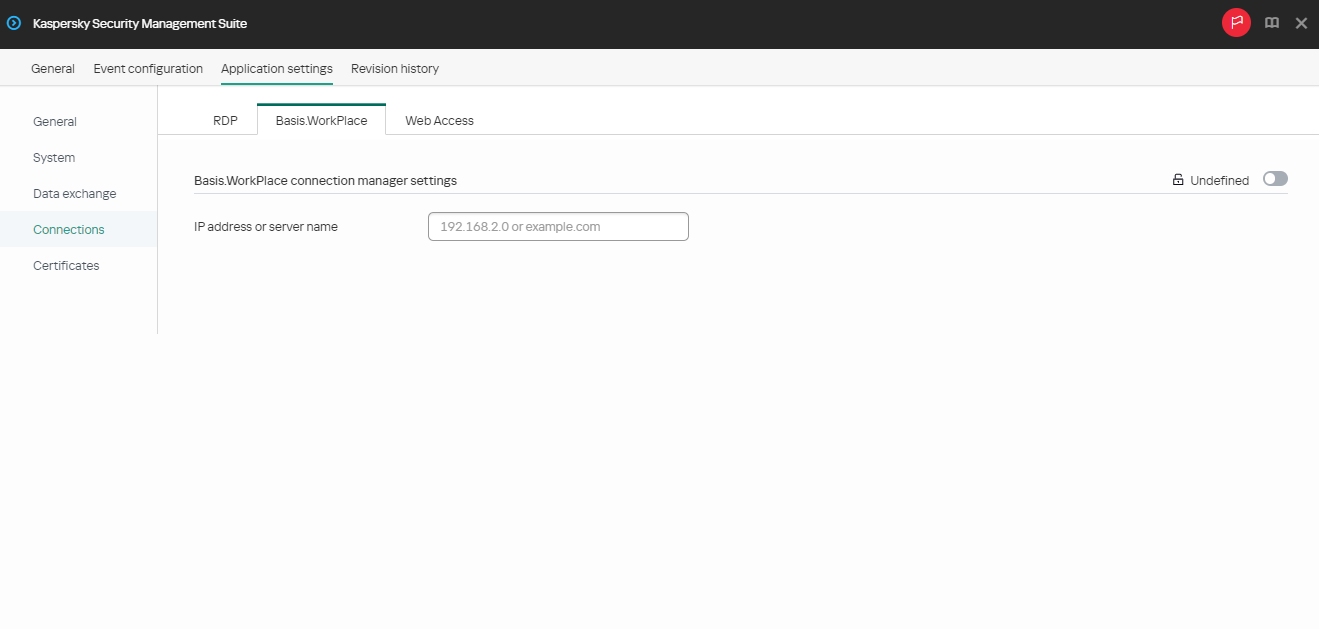
- Select Connections → Basis.WorkPlace.
This opens a window in which you can configure settings for connecting to a remote desktop managed by Basis.WorkPlace (see the figure below).
Window for configuring settings for connecting to a remote desktop managed by Basis.WorkPlace through the Web Console for a group of devices
- In IP address or server name, enter the IP address or server name to connect to.
- Click Save in the lower part of the window to save the changes.
If the toggle button next to the name of a group of settings is in the Enforced position (![]() ), the defined values of these settings are applied to devices on which the policy is applied, and these settings cannot be changed in the Kaspersky Thin Client interface. If the toggle button next to the name of a group of settings is in the Undefined position (
), the defined values of these settings are applied to devices on which the policy is applied, and these settings cannot be changed in the Kaspersky Thin Client interface. If the toggle button next to the name of a group of settings is in the Undefined position (![]() ), the defined values of these settings are not applied to devices on which the policy is applied, and these settings can be changed for managed devices in the Kaspersky Thin Client interface under Devices → Managed devices.
), the defined values of these settings are not applied to devices on which the policy is applied, and these settings can be changed for managed devices in the Kaspersky Thin Client interface under Devices → Managed devices.
When working with Kaspersky Thin Client via Basis.WorkPlace, the following limitations apply:
- Users cannot be authorized with smart cards in the Basis.WorkPlace connection manager.
- Users cannot initiate a password change in Kaspersky Thin Client.
- Simultaneous connection to multiple remote desktops managed by Basis.WorkPlace is not supported.
Configuring a connection to a remote environment via RDP through the Web Console
You can use the Web Console to configure settings for connecting to a remote desktop or virtual environment via RDP for one device or a group of devices running Kaspersky Thin Client.
Instructions for connecting to a remote environment are given in a separate article.
How to configure settings for connecting to a remote environment via RDP for one device
- In the main window of the Web Console, select Devices → Managed devices.
- Click the name of the thin client where Kaspersky Thin Client is running. You can view the device name in the Kaspersky Thin Client interface. If the thin client name is not on the list, add it to the Managed devices group.
If a managed device is added to an administration group and an enforced policy is configured for the settings of this group, the settings that were individually configured for this device will not be applied.
- In the window that opens, select the Applications tab.
- Click the name of the Kaspersky Security Management Suite web plug-in.
This opens a window containing information about Kaspersky Thin Client.
- Select the Application settings tab.
- Select Connections → RDP.
This opens a window in which you can configure settings for connecting to a remote desktop or virtual application via RDP (see the figure below).
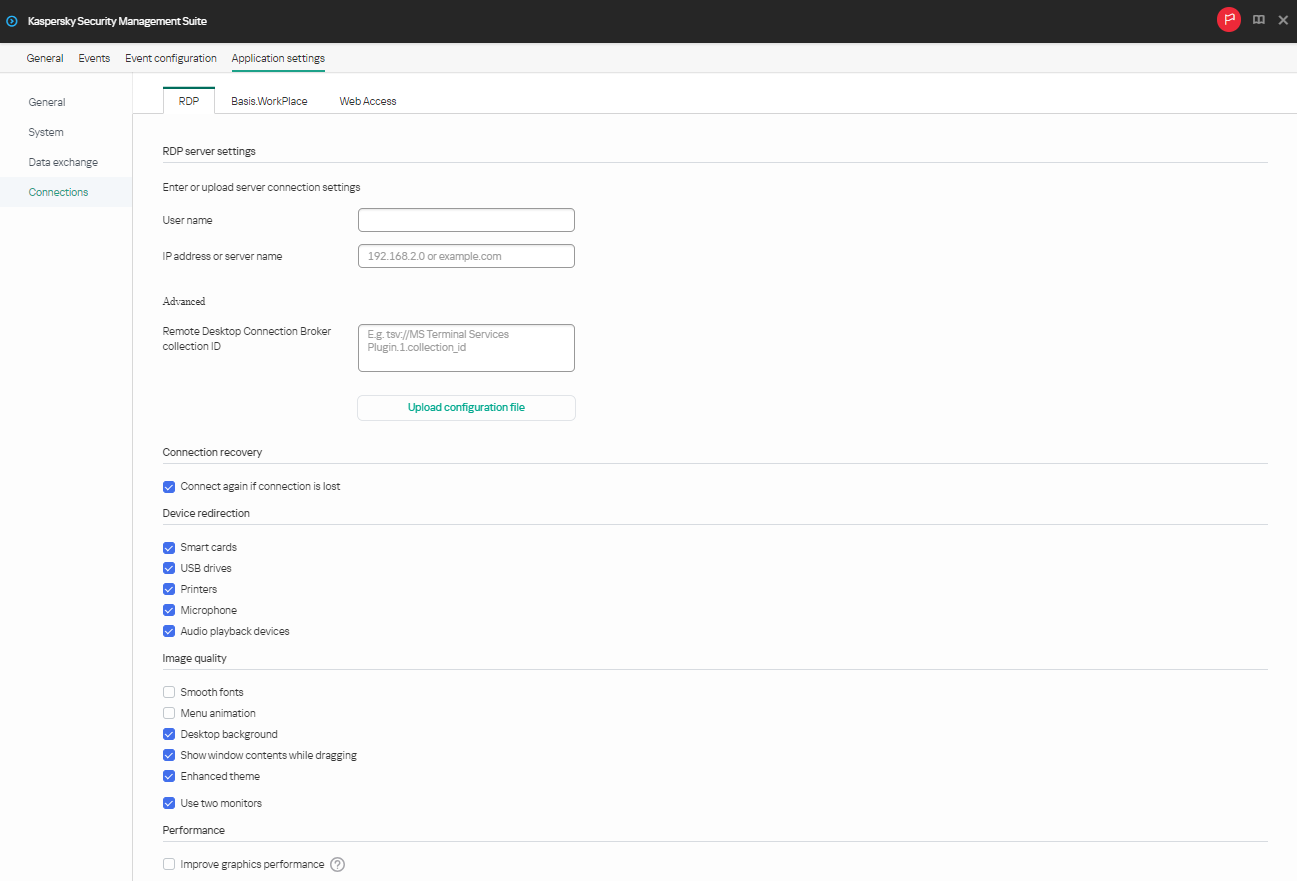
Window for configuring settings for connecting to a remote desktop via RDP through the Web Console for one device
- In the Server field, enter the IP address or name of the Microsoft Remote Desktop Connection Broker server.
- In the User name field, enter the name of the user account that will be used for connecting.
- If you need to use the Microsoft Remote Desktop Connection Broker to connect to a remote desktop, use the Remote Desktop Connection Broker collection ID field to specify the collection ID in the format
tsv://MS Terminal Services Plugin.1.collection_id(collection_idrefers to the specific identifier of the collection).Specify a Remote Desktop Connection Broker collection ID to connect to a virtual application.
- If you need to start a virtual application, specify the application alias in the Application alias field.
Specify a Remote Desktop Connection Broker collection ID to connect to a virtual application.
If you have a configuration file containing the settings for connecting to the Microsoft Remote Desktop Connection Broker and, if needed, the name of the application to open, upload the file by clicking Upload configuration file. In this case, you do not have to complete the Remote Desktop Connection Broker collection ID and Application fields.
- If you want to automatically restore a remote desktop connection that is unexpectedly disconnected, select the Connect again if connection is lost check box.
- In the Device redirection settings block, next to the required devices, select the following check boxes:
- Smart cards if you want to enable redirection of smart cards and tokens.
- USB drives if you want to enable redirection of USB drives.
- Printers if you want to enable redirection of printers.
The remote computer must have the installed driver for the printer that is connected to the thin client.
- Microphone if you want to enable redirection of audio recording devices.
Audio volume and other settings are managed from the remote computer.
- Audio playback devices if you want to enable redirection of headphones or speakers.
Kaspersky Thin Client supports both mono and stereo playback. Audio volume and other settings are managed from the remote environment.
- In the Image quality block, select the check boxes next to the remote desktop graphics settings that you need to use:
- Smooth fonts
- Menu animation
- Desktop background
- Show window contents while dragging
- Enhanced theme
Enabling remote desktop display settings may affect the speed of Kaspersky Thin Client operations.
- If two monitors are installed at your workstation and you want a remote desktop image to be displayed on both monitors, select the Use two monitors check box in the Monitor management block.
- To improve performance when connected to remote desktops or applications, in the Performance block, check Improve graphics performance.
If the user needs to connect to a Microsoft Windows 7 remote desktop, uncheck Improve graphics performance. The feature is not supported for connections to Microsoft Windows 7 remote desktops.
- Click Save in the lower part of the window to save the changes.
How to configure settings for connecting to a remote environment via RDP for a group of devices
- In the main window of the Web Console, select Devices → Policies & profiles.
- Click the policy name for the Kaspersky Security Management Suite web plug-in.
- In the window that opens, select the Application settings tab.
- Select Connections → RDP.
This opens a window in which you can configure settings for connecting to a remote desktop via RDP (see the figure below).
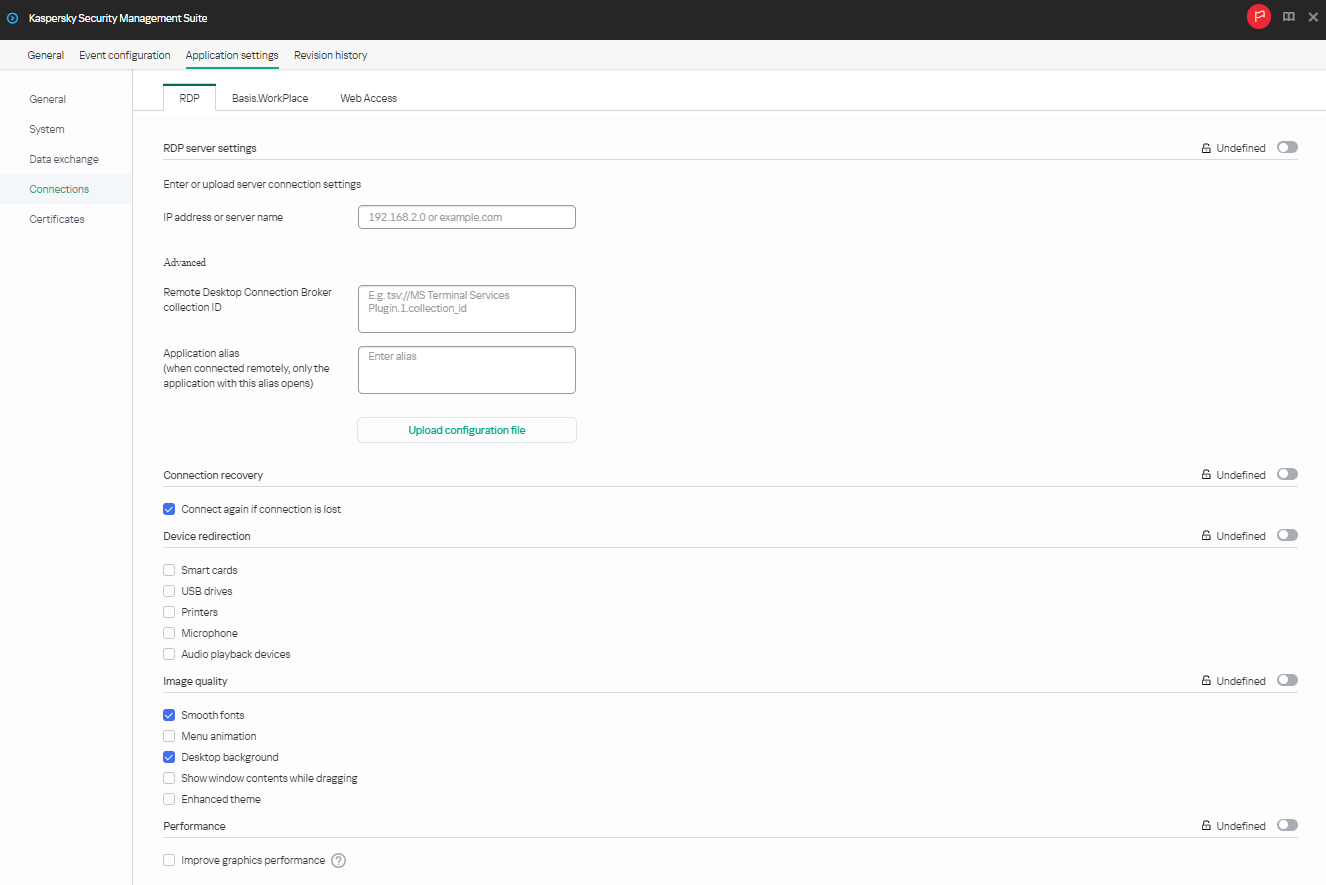
Window for configuring settings for connecting to a remote desktop via RDP through the Web Console for a group of devices
- In the Server field, enter the IP address or server name for connecting to a remote desktop via RDP.
- In the User name field, enter the name of the user account that will be used to connect to the remote desktop via RDP.
- If you need to use the Microsoft Remote Desktop Connection Broker to connect to a remote desktop, use the Remote Desktop Connection Broker collection ID field to specify the collection ID in the format
tsv://MS Terminal Services Plugin.1.collection_id(collection_idrefers to the specific identifier of the collection).Specify a Remote Desktop Connection Broker collection ID to connect to a virtual application.
- If you need to start a virtual application, specify the application alias in the Application alias field.
Specify a Remote Desktop Connection Broker collection ID to connect to a remote application.
If you have a configuration file containing the settings for connecting to the Microsoft Remote Desktop Connection Broker and, if needed, the name of the application to open, upload the file by clicking Upload configuration file. In this case, you do not have to complete the Remote Desktop Connection Broker collection ID and Application fields.
- If you want to automatically restore a remote desktop connection that is unexpectedly disconnected, select the Connect again if connection is lost check box.
- In the Device redirection settings block, next to the required devices, select the following check boxes:
- Smart cards if you want to enable redirection of smart cards and tokens.
- USB drives if you want to enable redirection of USB drives.
- Printers if you want to enable redirection of printers.
The remote computer must have the installed driver for the printer that is connected to the thin client.
- Microphone if you want to enable redirection of audio recording devices.
Audio volume and other settings are managed from the remote computer.
- Audio playback devices if you want to enable redirection of headphones or speakers.
Kaspersky Thin Client supports both mono and stereo playback. Audio volume and other settings are managed from the remote environment.
- In the Image quality block, select the check boxes next to the remote desktop graphics settings that you need to use:
- Smooth fonts
- Menu animation
- Desktop background
- Show window contents while dragging
- Enhanced theme
Enabling remote desktop display settings may affect the speed of Kaspersky Thin Client operations.
- To improve performance when connected to remote desktops or applications, in the Performance block, check Improve graphics performance.
If the user needs to connect to a Microsoft Windows 7 remote desktop, uncheck Improve graphics performance. The feature is not supported for connections to Microsoft Windows 7 remote desktops.
- Click Save in the lower part of the window to save the changes.
If the toggle button next to the name of a group of settings is in the Enforced position (![]() ), the defined values of these settings are applied to devices on which the policy is applied, and these settings cannot be changed in the Kaspersky Thin Client interface. If the toggle button next to the name of a group of settings is in the Undefined position (
), the defined values of these settings are applied to devices on which the policy is applied, and these settings cannot be changed in the Kaspersky Thin Client interface. If the toggle button next to the name of a group of settings is in the Undefined position (![]() ), the defined values of these settings are not applied to devices on which the policy is applied, and these settings can be changed for managed devices in the Kaspersky Thin Client interface under Devices → Managed devices.
), the defined values of these settings are not applied to devices on which the policy is applied, and these settings can be changed for managed devices in the Kaspersky Thin Client interface under Devices → Managed devices.
Configuring a connection to a Web Access remote environment through the Web Console
You can use Web Console to configure settings for connecting to a remote environment in the Web Access application for one device or a group of devices running Kaspersky Thin Client.
In the Web Access application, you can connect to a remote environment deployed in Citrix Workspace and VMware Horizon infrastructures. Web Access supports HTML5 and provides a secure HTTPS connection when connecting.
Instructions for connecting to a remote environment are given in a separate article.
How to configure settings for connecting to a remote environment in Web Access for one device
- In the main window of the Web Console, select Devices → Managed devices.
- Click the name of the thin client where Kaspersky Thin Client is running. You can view the device name in the Kaspersky Thin Client interface. If the thin client name is not on the list, add it to the Managed devices group.
If a managed device is added to an administration group and an enforced policy is configured for the settings of this group, the settings that were individually configured for this device will not be applied.
- In the window that opens, select the Applications tab.
- Click the name of the Kaspersky Security Management Suite web plug-in.
This opens a window containing information about Kaspersky Thin Client.
- Select the Application settings tab.
Select Connections → Web Access.
The window for configuring connection settings opens (see the figure below).
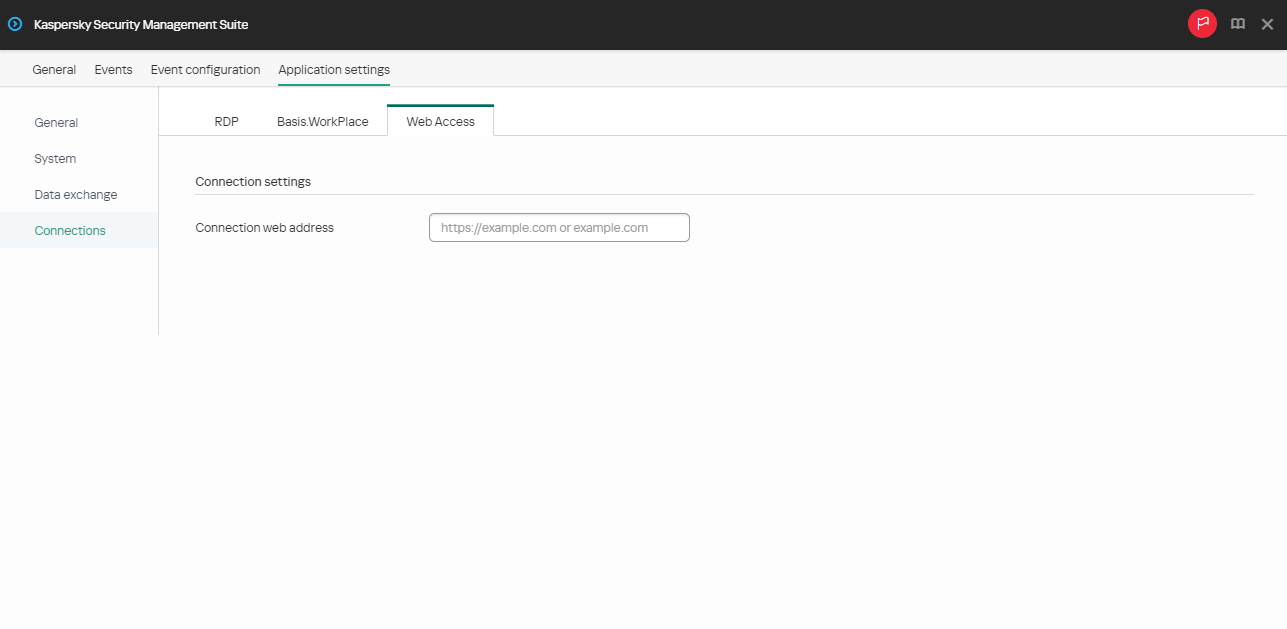
Configuration window for connecting to an environment in Web Access through the Web Console
- In the Connection web address field, enter the server web address for connecting to the required remote environment.
- Click Save in the lower part of the window to save the changes.
- In the main window of the Web Console, select Devices → Policies & profiles.
- Click the policy name for the Kaspersky Security Management Suite web plug-in.
- In the window that opens, select the Application settings tab.
- Select Connections → Web Access.
The window for configuring connection settings opens (see the figure below).
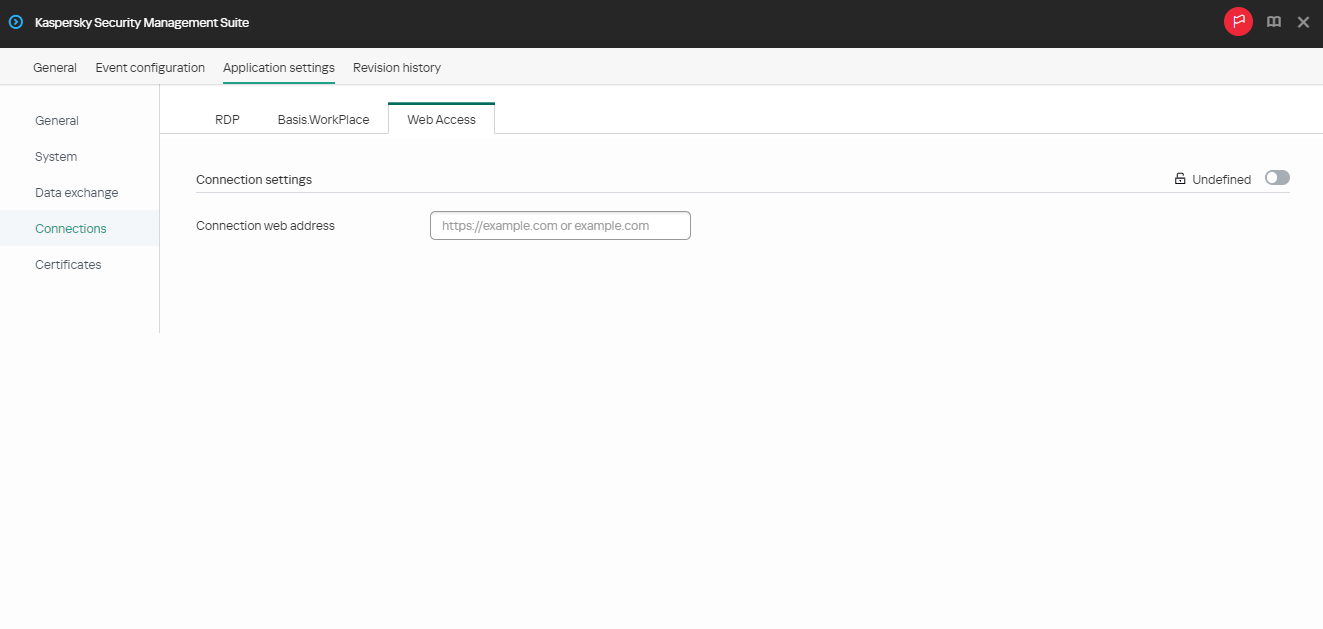
Configuration window for connecting to a remote environment in Web Access through the Web Console
- In the Connection web address field, enter the server web address for connecting to the required remote environment.
- Click Save in the lower part of the window to save the changes.
Kaspersky Thin Client support for Citrix Workspace remote desktops has the following limitations:
- File sharing between thin client and remote desktop is not supported.
- Clipboard sharing between thin client and remote desktop is not supported.
- Redirection of USB drives, smart cards, and USB tokens is not supported.
Configuring Kaspersky Thin Client power-saving settings through the Web Console
In the Web Console, you can configure power-saving settings for one device or for a group of devices running Kaspersky Thin Client.
How to configure power-saving settings for one device
- In the main window of the Web Console, select Devices → Managed devices.
- Click the name of the thin client where Kaspersky Thin Client is running. You can view the device name in the Kaspersky Thin Client interface. If the thin client name is not on the list, add it to the Managed devices group.
If a managed device is added to an administration group and an enforced policy is configured for the settings of this group, the settings that were individually configured for this device will not be applied.
- In the window that opens, select the Applications tab.
- Click the name of the Kaspersky Security Management Suite web plug-in.
This opens a window containing information about Kaspersky Thin Client.
- Select the Application settings tab.
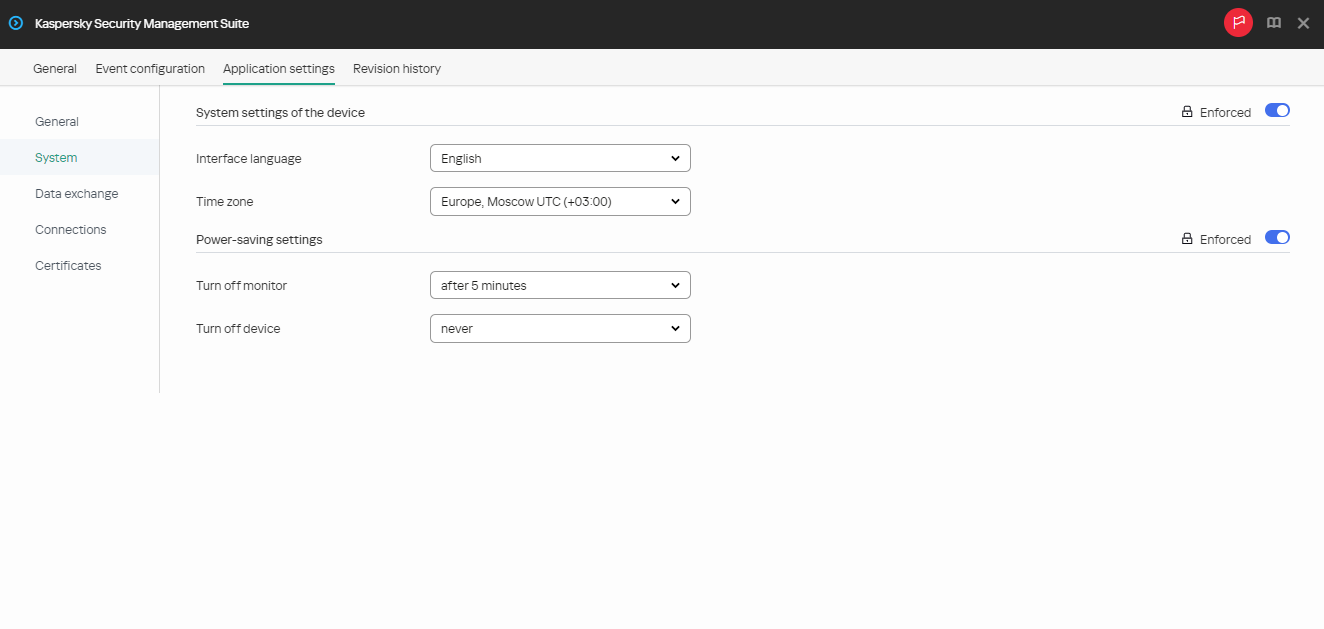
- Select the System section (see the figure below).
Window for configuring power-saving settings through the Web Console for one device
- In the Power-saving settings block, configure the following settings:
- In the Turn off monitor drop-down list, select the system inactivity period after which the monitor will be turned off.
- In the Turn off device drop-down list, select the system inactivity period after which the thin client will be turned off.
- Click Save in the lower part of the window to save the changes.
After Kaspersky Thin Client is synchronized with Kaspersky Security Center, the power-saving settings will be applied to Kaspersky Thin Client.
How to configure power-saving settings for a group of devices
- In the main window of the Web Console, select Devices → Policies & profiles.
- Click the policy name for the Kaspersky Security Management Suite web plug-in.
- In the window that opens, select the Application settings tab.
- Select the System section (see the figure below).
Window for configuring power-saving settings through the Web Console for a group of devices
- In the Power-saving settings block, configure the following settings:
- In the Turn off monitor drop-down list, select the system inactivity period after which the monitor will be turned off.
- In the Turn off device drop-down list, select the system inactivity period after which the thin client will be turned off.
- Click Save in the lower part of the window to save the changes.
After all devices of an administration group are synchronized with Kaspersky Security Center, the power-saving settings will be applied to all Kaspersky Thin Clients included in this group.
If the toggle button next to the name of a group of settings is in the Enforced position (![]() ), the defined values of these settings are applied to devices on which the policy is applied, and these settings cannot be changed in the Kaspersky Thin Client interface. If the toggle button next to the name of a group of settings is in the Undefined position (
), the defined values of these settings are applied to devices on which the policy is applied, and these settings cannot be changed in the Kaspersky Thin Client interface. If the toggle button next to the name of a group of settings is in the Undefined position (![]() ), the defined values of these settings are not applied to devices on which the policy is applied, and these settings can be changed for managed devices in the Kaspersky Thin Client interface under Devices → Managed devices.
), the defined values of these settings are not applied to devices on which the policy is applied, and these settings can be changed for managed devices in the Kaspersky Thin Client interface under Devices → Managed devices.
Configuring the interface language and time zone of Kaspersky Thin Client through the Web Console
In the Web Console, you can configure the interface language and time zone for one device or for a group of devices running Kaspersky Thin Client.
How to configure the interface language and time zone for one device
- In the main window of the Web Console, select Devices → Managed devices.
- Click the name of the thin client where Kaspersky Thin Client is running. You can view the device name in the Kaspersky Thin Client interface. If the thin client name is not on the list, add it to the Managed devices group.
If a managed device is added to an administration group and an enforced policy is configured for the settings of this group, the settings that were individually configured for this device will not be applied.
- In the window that opens, select the Applications tab.
- Click the name of the Kaspersky Security Management Suite web plug-in.
This opens a window containing information about Kaspersky Thin Client.
- Select the Application settings tab.
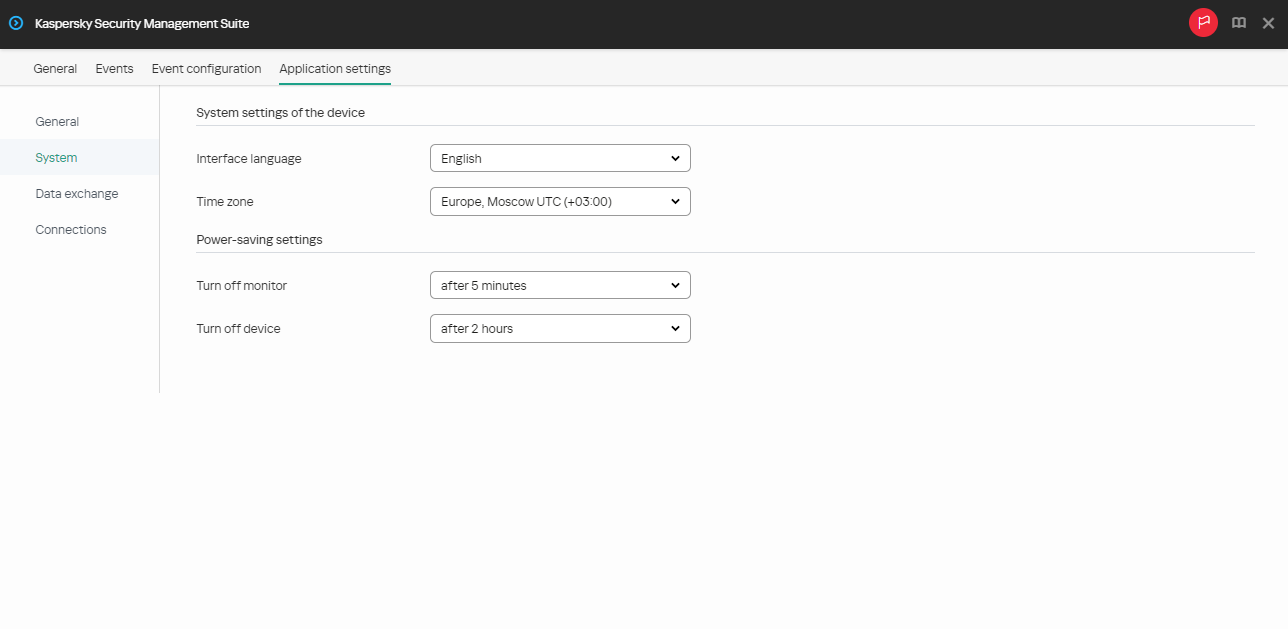
- Select the System section (see the figure below).
Window for configuring the interface language and time zone through the Web Console for one device
- In the System settings of the device block, select the relevant values from the Interface language and Time zone drop-down lists.
- Click Save in the lower part of the window to save the changes.
How to configure the interface language and time zone for a group of devices
- In the main window of the Web Console, select Devices → Policies & profiles.
- Click the policy name for the Kaspersky Security Management Suite web plug-in.
- In the window that opens, select the Application settings tab.
- Select the System section (see the figure below).
Window for configuring the interface language and time zone through the Web Console for a group of devices
- In the System settings of the device block, select the relevant values from the Interface language and Time zone drop-down lists.
- Click Save in the lower part of the window to save the changes.
If the toggle button next to the name of a group of settings is in the Enforced position (![]() ), the defined values of these settings are applied to devices on which the policy is applied, and these settings cannot be changed in the Kaspersky Thin Client interface. If the toggle button next to the name of a group of settings is in the Undefined position (
), the defined values of these settings are applied to devices on which the policy is applied, and these settings cannot be changed in the Kaspersky Thin Client interface. If the toggle button next to the name of a group of settings is in the Undefined position (![]() ), the defined values of these settings are not applied to devices on which the policy is applied, and these settings can be changed for managed devices in the Kaspersky Thin Client interface under Devices → Managed devices.
), the defined values of these settings are not applied to devices on which the policy is applied, and these settings can be changed for managed devices in the Kaspersky Thin Client interface under Devices → Managed devices.
Configuring synchronization between Kaspersky Thin Client and Kaspersky Security Center
In the Web Console, you can configure synchronization with Kaspersky Security Center only for a group of devices running Kaspersky Thin Client.
To configure synchronization between Kaspersky Thin Client and Kaspersky Security Center:
- In the main window of the Web Console, select Devices → Policies & profiles.
- Click the policy name for the Kaspersky Security Management Suite web plug-in.
- In the window that opens, select the Application settings tab.
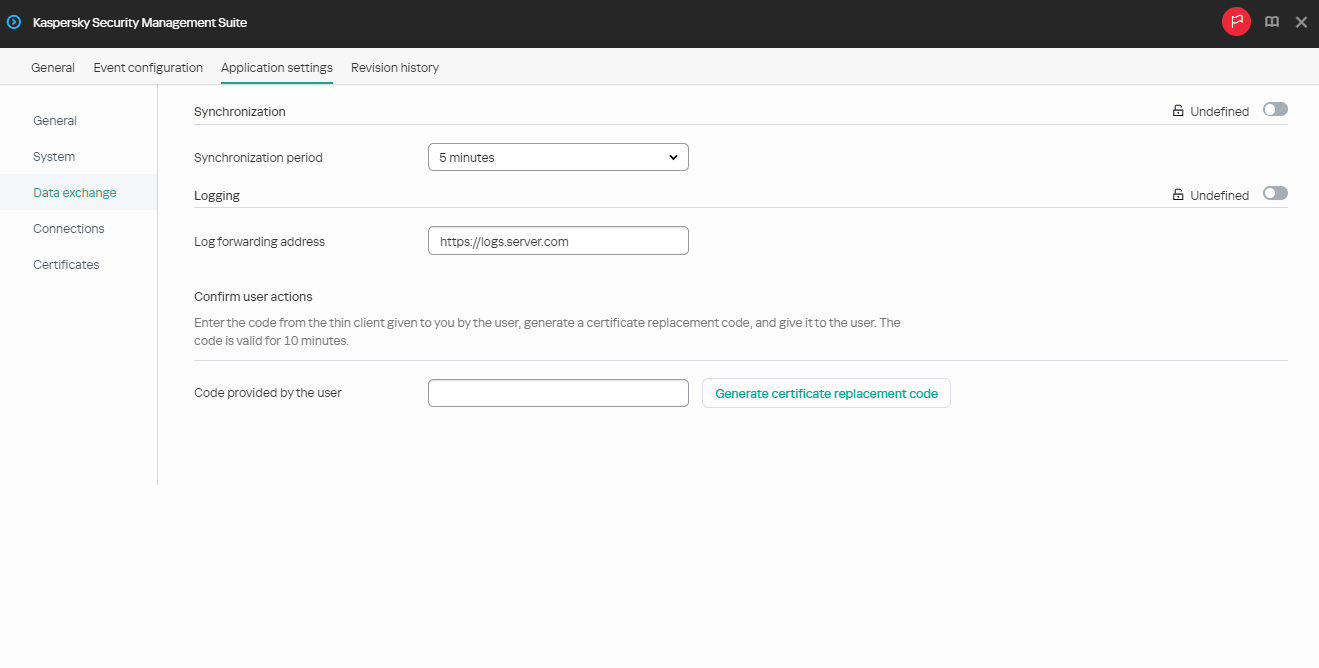
- Select the Data exchange section (see the figure below).
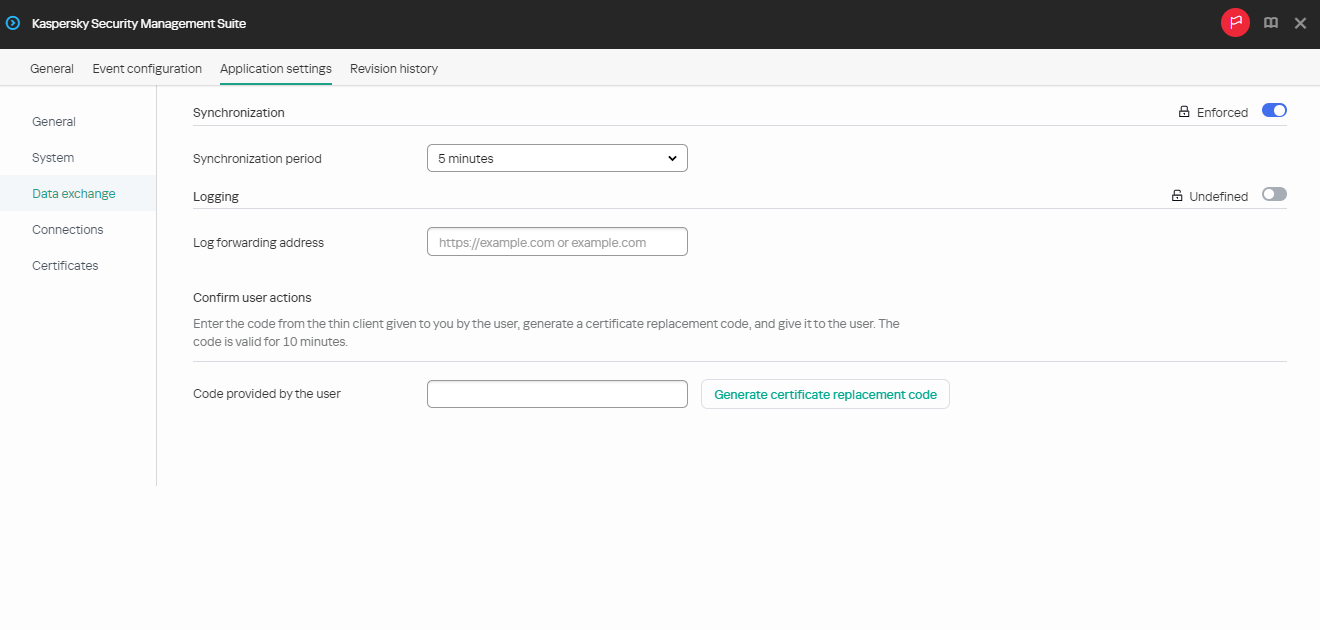
Window for configuring synchronization between Kaspersky Thin Client and Kaspersky Security Center
- In the Synchronization period field, specify the interval for synchronizing Kaspersky Thin Client with Kaspersky Security Center.
- Click Save in the lower part of the window to save the changes.
If the toggle button next to the name of a group of settings is in the Enforced position (![]() ), the defined values of these settings are applied to devices on which the policy is applied, and these settings cannot be changed in the Kaspersky Thin Client interface. If the toggle button next to the name of a group of settings is in the Undefined position (
), the defined values of these settings are applied to devices on which the policy is applied, and these settings cannot be changed in the Kaspersky Thin Client interface. If the toggle button next to the name of a group of settings is in the Undefined position (![]() ), the defined values of these settings are not applied to devices on which the policy is applied, and these settings can be changed for managed devices in the Kaspersky Thin Client interface under Devices → Managed devices.
), the defined values of these settings are not applied to devices on which the policy is applied, and these settings can be changed for managed devices in the Kaspersky Thin Client interface under Devices → Managed devices.
Configuring forwarding of Kaspersky Thin Client logs to a log server
In the Web Console, you can configure forwarding of Kaspersky Thin Client logs to a log server for one device or for a group of devices running Kaspersky Thin Client.
How to configure forwarding of logs for one device
- In the main window of the Web Console, select Devices → Managed devices.
- Click the name of the thin client where Kaspersky Thin Client is running. You can view the device name in the Kaspersky Thin Client interface. If the thin client name is not on the list, add it to the Managed devices group.
If a managed device is added to an administration group and an enforced policy is configured for the settings of this group, the settings that were individually configured for this device will not be applied.
- In the window that opens, select the Applications tab.
- Click the name of the Kaspersky Security Management Suite web plug-in.
This opens a window containing information about Kaspersky Thin Client.
- Select the Application settings tab.
- Select the Data exchange section (see the figure below).
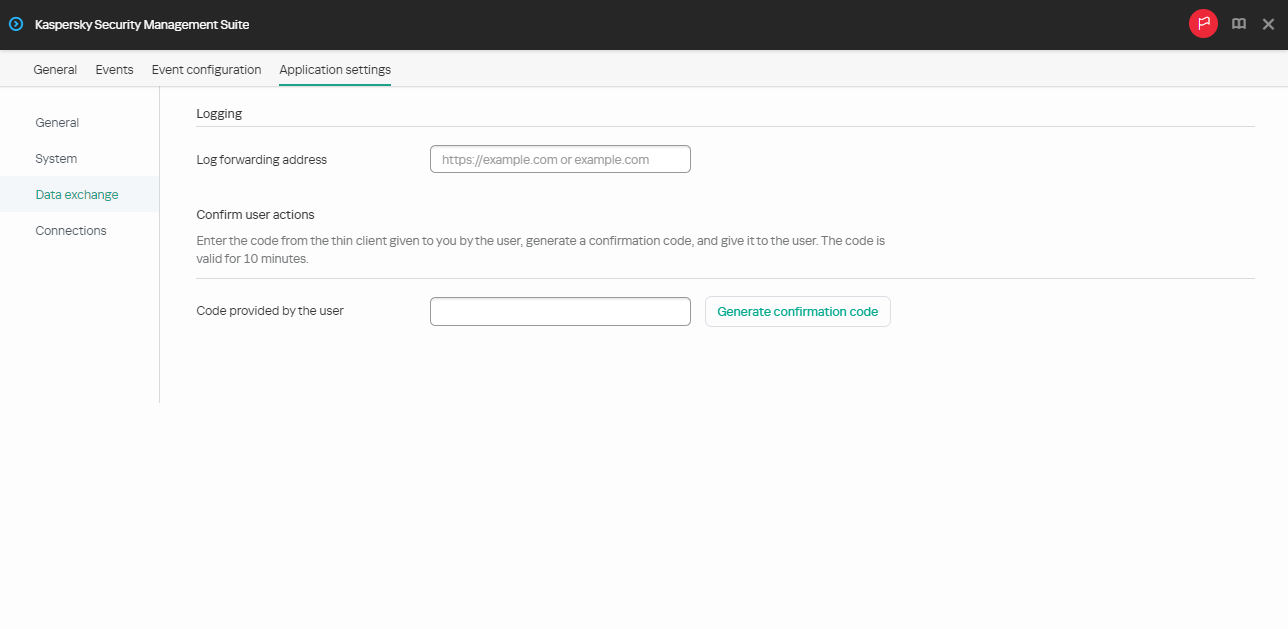
Window for configuring forwarding of Kaspersky Thin Client logs through the Web Console for one device
- In the Log forwarding address field, enter the address of the destination log server in the format https://<server address>. Make sure that a log server compliant with the requirements is deployed in the enterprise infrastructure.
- Click Save in the lower part of the window to save the changes.
How to configure forwarding of logs for a group of devices
- In the main window of the Web Console, select Devices → Policies & profiles.
- Click the policy name for the Kaspersky Security Management Suite web plug-in.
- In the window that opens, select the Application settings tab.
- Select the Data exchange section (see the figure below).
Window for configuring forwarding of Kaspersky Thin Client logs through the Web Console for a group of devices
- In the Log forwarding address field, enter the address of the destination log server in the format https://<server address>. Make sure that a log server compliant with the requirements is deployed in the enterprise infrastructure.
- Click Save in the lower part of the window to save the changes.