Installing and removing KUMA
Expand all | Collapse all
To install KUMA, you need the distribution kit:
- kuma-ansible-installer-<build number>.tar.gz contains all necessary files for installing KUMA without the support for high availability configurations.
- kuma-ansible-installer-ha-<build number>.tar.gz contains all necessary files for installing KUMA in a high availability configuration.
To complete the installation, you need the install.sh installer file and an inventory file that describes your infrastructure. You can create an inventory file based on a template. Each distribution contains an install.sh installer file and the following inventory file templates:
- single.inventory.yml.template
- distributed.inventory.yml.template
- expand.inventory.yml.template
- k0s.inventory.yml.template
KUMA keeps its files in the /opt directory, so we recommend making /opt a separate partition and allocating 16 GB for the operating system and the remainder of the disk space for the /opt partition.
KUMA is installed in the same way on all hosts using the installer and your prepared inventory file in which you describe your configuration. We recommend taking time to think through the setup before you proceed.
The following installation options are available:
- Installation on a single server
Single-server installation diagram

Installation on a single server
Example inventory file for installation on a single server
all:
vars:
deploy_to_k8s: false
need_transfer: false
generate_etc_hosts: false
deploy_example_services: true
no_firewall_actions: false
kuma:
vars:
ansible_connection: ssh
ansible_user: root
children:
kuma_core:
hosts:
kuma1.example.com:
mongo_log_archives_number: 14
mongo_log_frequency_rotation: daily
mongo_log_file_size: 1G
kuma_collector:
hosts:
kuma1.example.com
kuma_correlator:
hosts:
kuma1.example.com
kuma_storage:
hosts:
kuma1.example.com:
shard: 1
replica: 1
keeper: 1
You can install all KUMA components on the same server: specify the same server in the single.inventory.yml inventory file for all components. An "all-in-one" installation can handle a small stream of events, up to 10,000 EPS. If you plan to use many dashboard layouts and process a lot of search queries, a single server might not be sufficient. In that case, we recommend the distributed installation.
- Distributed installation
Distributed Installation diagram
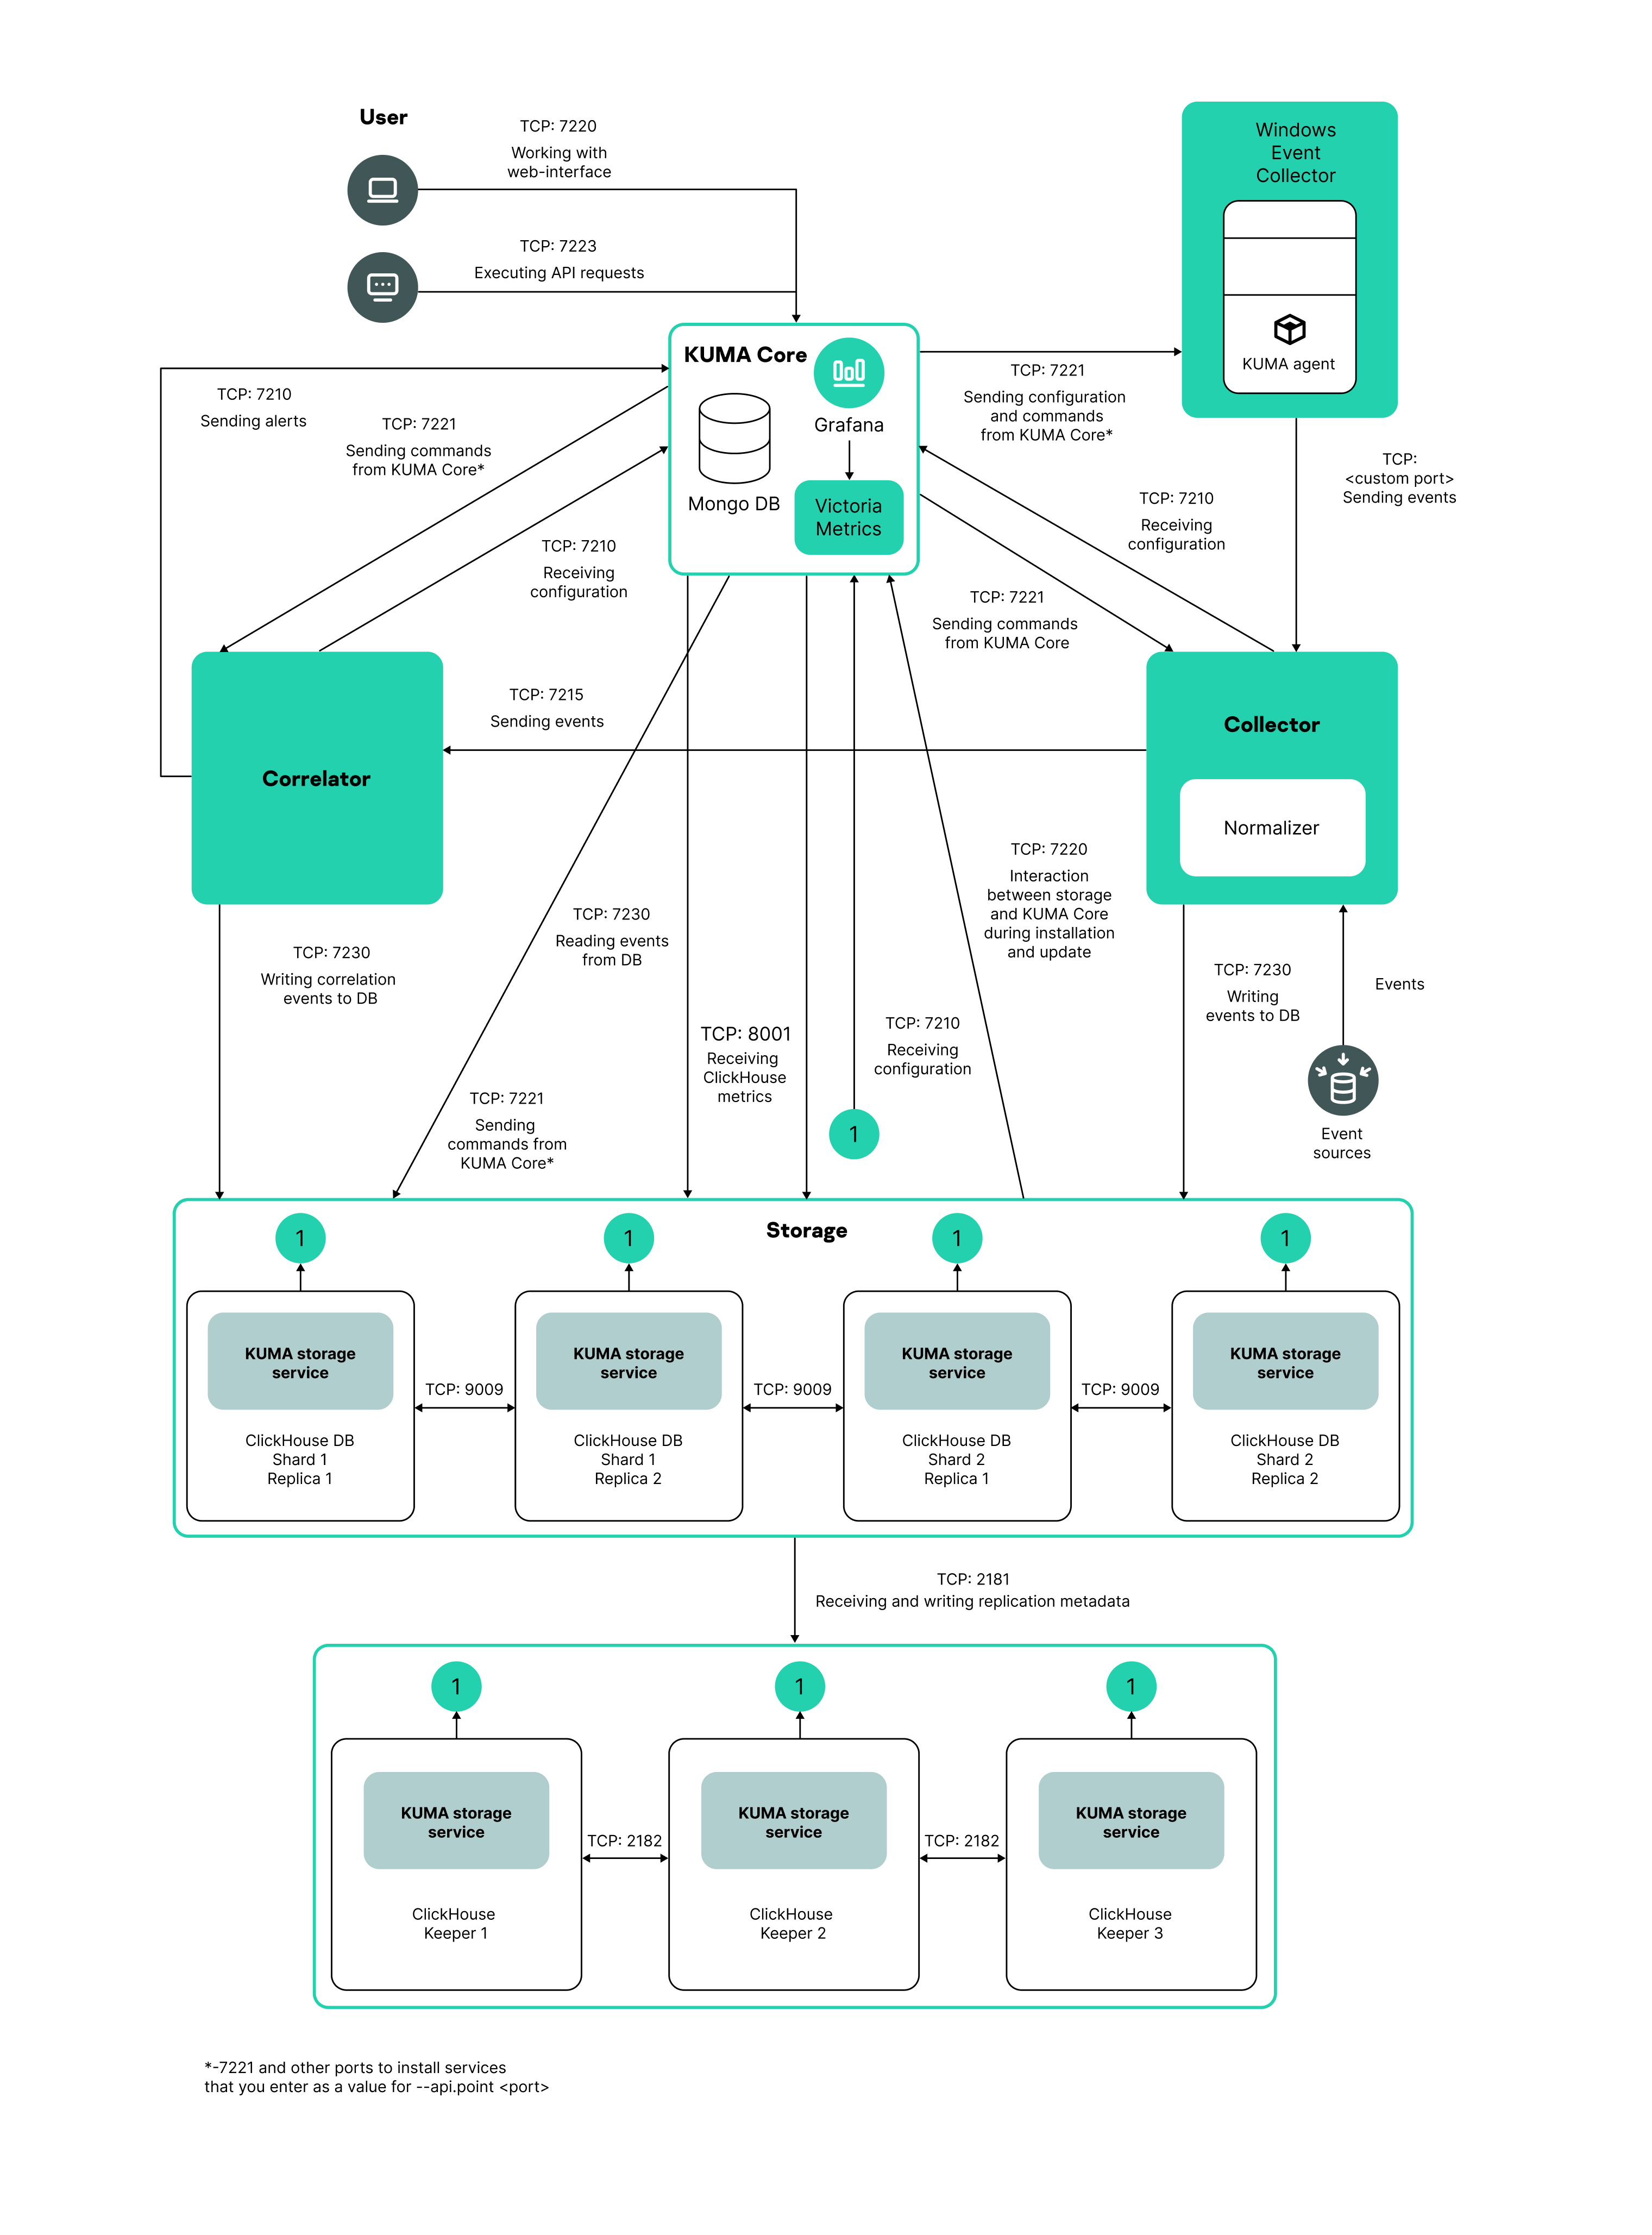
Distributed installation diagram
Example inventory file for distributed installation
all:
vars:
deploy_to_k8s: false
need_transfer: false
generate_etc_hosts: false
deploy_example_services: false
no_firewall_actions: false
kuma:
vars:
ansible_connection: ssh
ansible_user: root
children:
kuma_core:
hosts:
kuma-core-1.example.com:
ip: 0.0.0.0
mongo_log_archives_number: 14
mongo_log_frequency_rotation: daily
mongo_log_file_size: 1G
kuma_collector:
hosts:
kuma-collector-1.example.com:
ip: 0.0.0.0
kuma_correlator:
hosts:
kuma-correlator-1.example.com:
ip: 0.0.0.0
kuma_storage:
hosts:
kuma-storage-cluster1-server1.example.com:
ip: 0.0.0.0
shard: 1
replica: 1
keeper: 0
kuma-storage-cluster1-server2.example.com:
ip: 0.0.0.0
shard: 1
replica: 2
keeper: 0
kuma-storage-cluster1-server3.example.com:
ip: 0.0.0.0
shard: 2
replica: 1
keeper: 0
kuma-storage-cluster1-server4.example.com:
ip: 0.0.0.0
shard: 2
replica: 2
keeper: 0
kuma-storage-cluster1-server5.example.com:
ip: 0.0.0.0
shard: 0
replica: 0
keeper: 1
kuma-storage-cluster1-server6.example.com:
ip: 0.0.0.0
shard: 0
replica: 0
keeper: 2
kuma-storage-cluster1-server7.example.com:
ip: 0.0.0.0
shard: 0
replica: 0
keeper: 3
You can install KUMA services on different servers; you can describe the configuration for a distributed installation in the distributed.inventory.yml inventory file.
- Distributed installation in a high availability configuration
Diagram of distributed installation in a high availability configuration
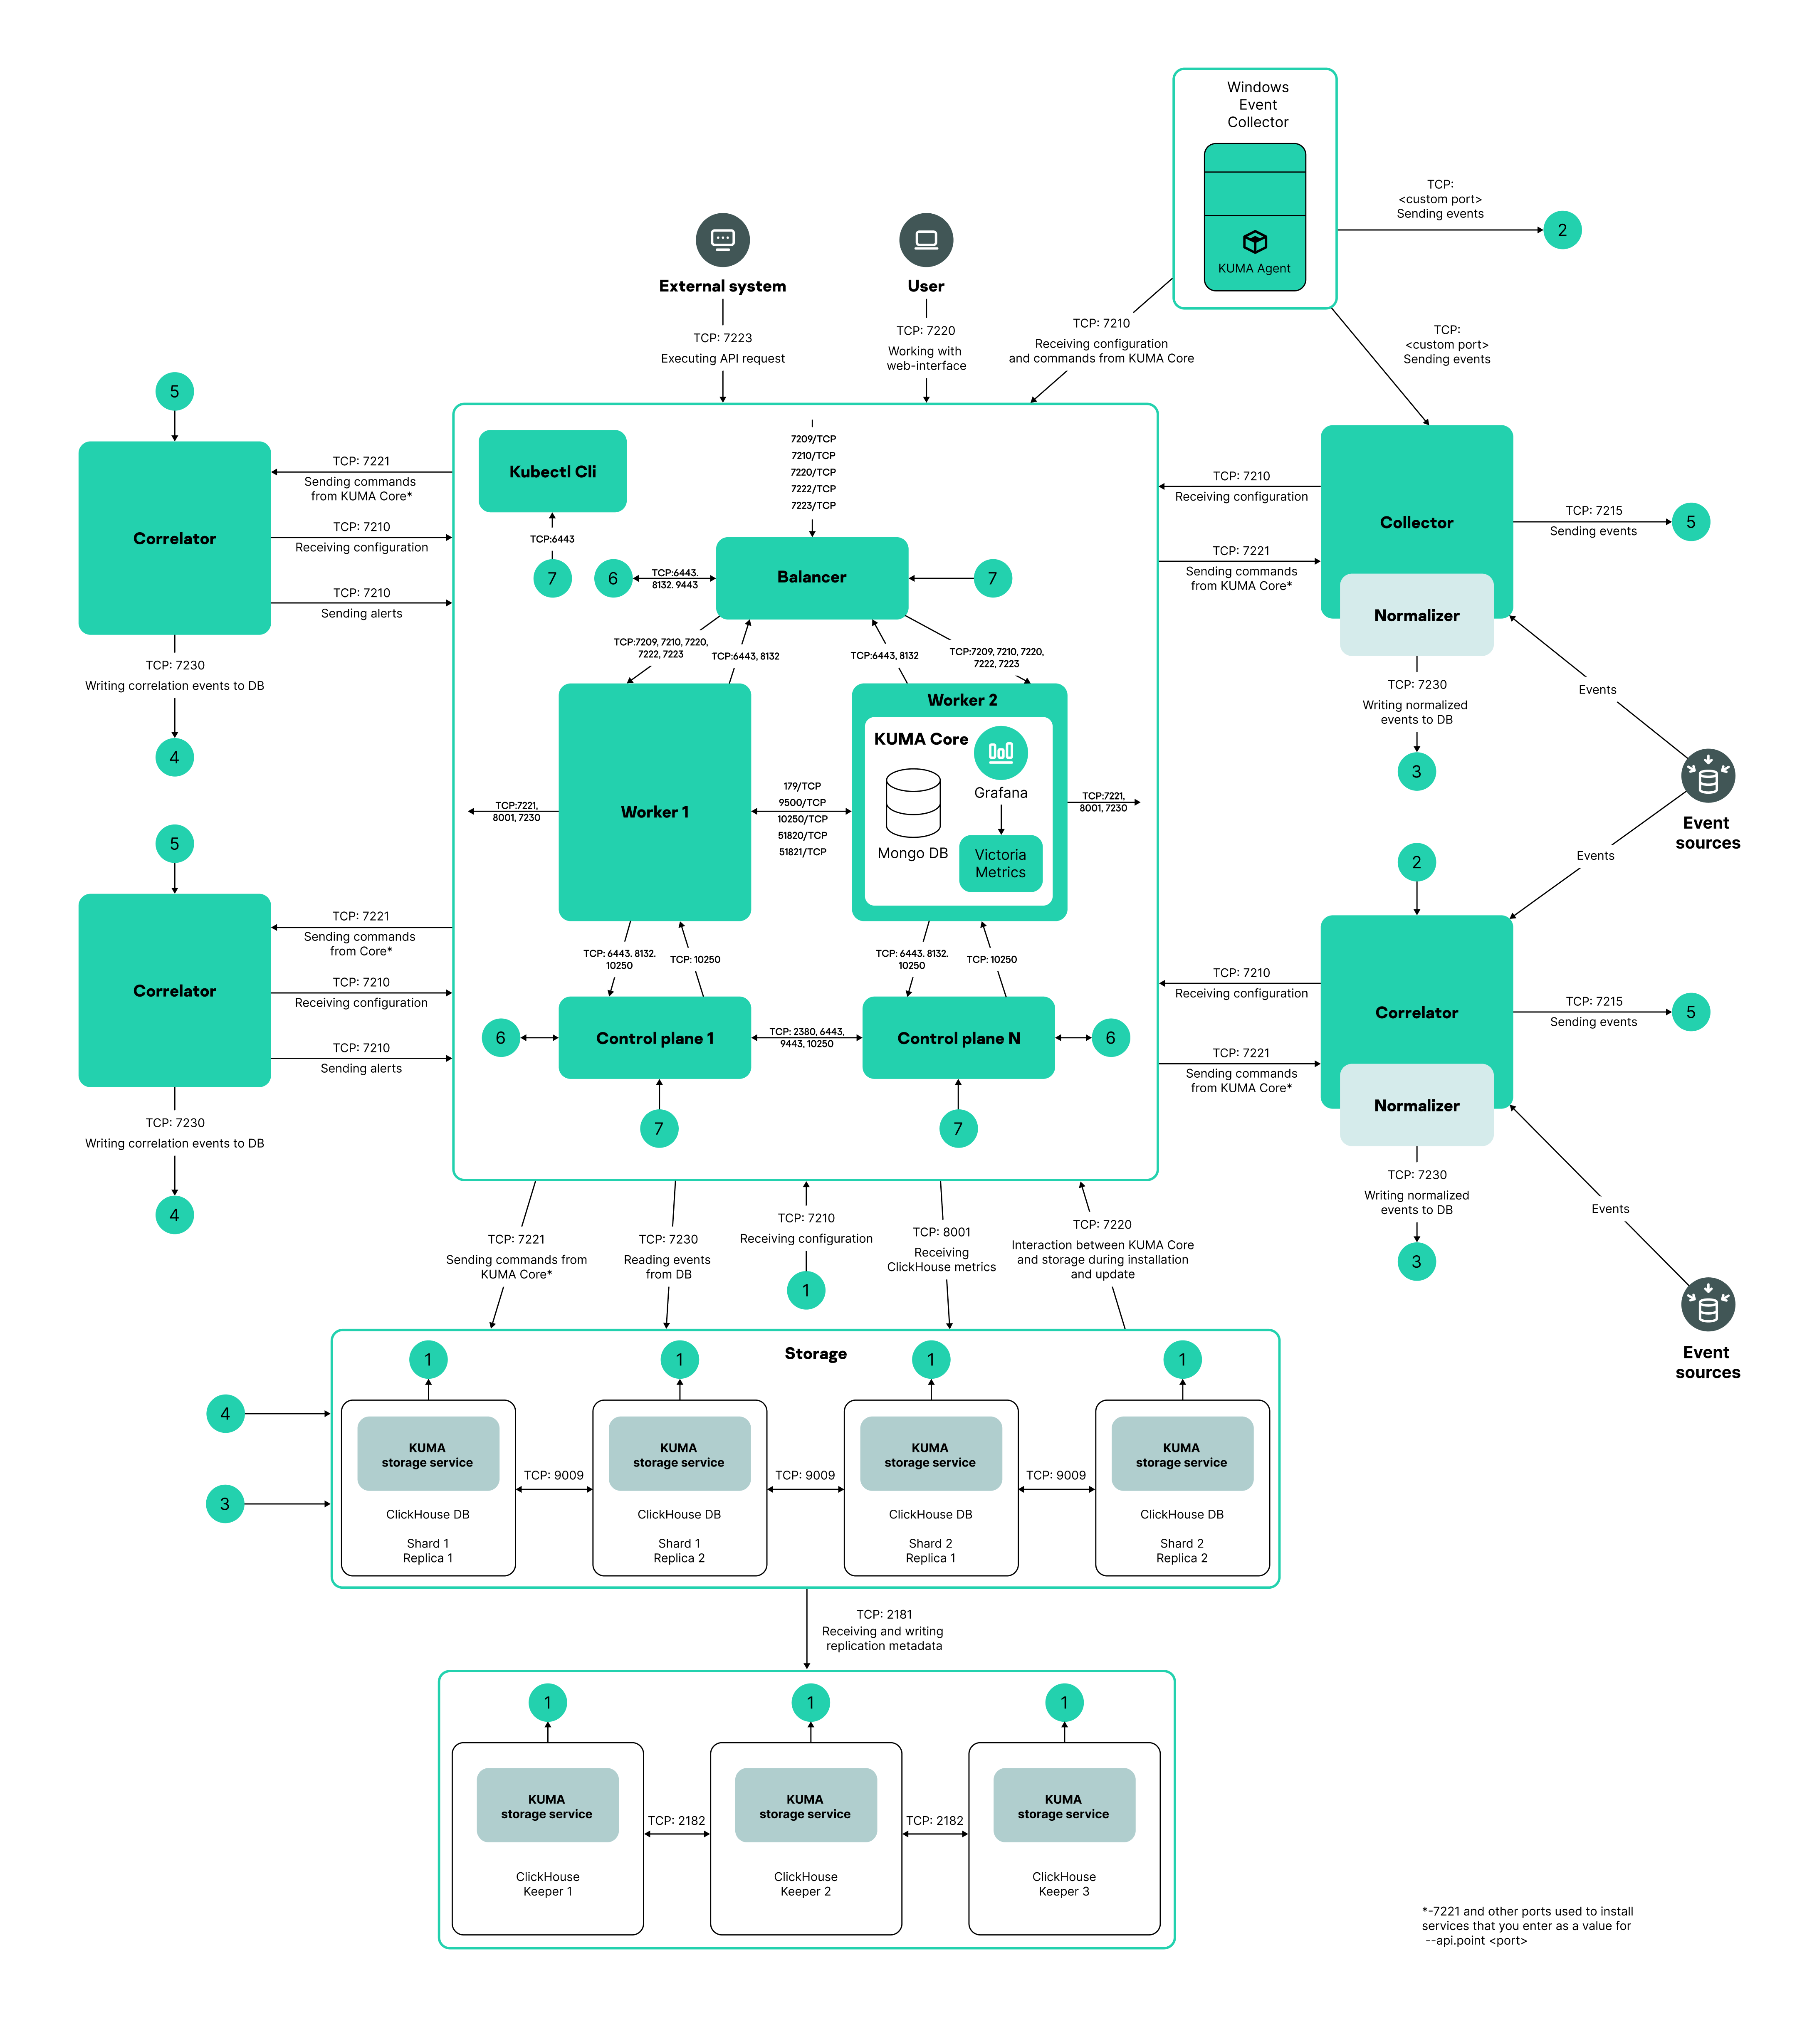
Distributed installation in a high availability configuration
Example inventory file for distributed installation in a high availability configuration
all:
vars:
deploy_to_k8s: true
need_transfer: true
generate_etc_hosts: false
airgap: true
deploy_example_services: false
no_firewall_actions: false
kuma:
vars:
ansible_connection: ssh
ansible_user: root
children:
kuma_core:
hosts:
kuma-core-1.example.com:
mongo_log_archives_number: 14
mongo_log_frequency_rotation: daily
mongo_log_file_size: 1G
kuma_collector:
hosts:
kuma-collector-1.example.com:
ip: 0.0.0.0
kuma-collector-2.example.com:
ip: 0.0.0.0
kuma_correlator:
hosts:
kuma-correlator-1.example.com:
ip: 0.0.0.0
kuma-correlator-2.example.com:
ip: 0.0.0.0
kuma_storage:
hosts:
kuma-storage-cluster1-server1.example.com:
ip: 0.0.0.0
shard: 1
replica: 1
keeper: 0
kuma-storage-cluster1-server2.example.com:
ip: 0.0.0.0
shard: 1
replica: 2
keeper: 0
kuma-storage-cluster1-server3.example.com:
ip: 0.0.0.0
shard: 2
replica: 1
keeper: 0
kuma-storage-cluster1-server4.example.com:
ip: 0.0.0.0
shard: 2
replica: 2
keeper: 0
kuma-storage-cluster1-server5.example.com:
ip: 0.0.0.0
shard: 0
replica: 0
keeper: 1
kuma-storage-cluster1-server6.example.com:
ip: 0.0.0.0
shard: 0
replica: 0
keeper: 2
kuma-storage-cluster1-server7.example.com:
ip: 0.0.0.0
shard: 0
replica: 0
keeper: 3
kuma_k0s:
vars:
ansible_connection: ssh
ansible_user: root
children:
kuma_lb:
hosts:
kuma_lb.example.com:
kuma_managed_lb: true
kuma_control_plane_master:
hosts:
kuma_cpm.example.com:
ansible_host: 10.0.1.10
kuma_control_plane_master_worker:
kuma_control_plane:
hosts:
kuma_cp1.example.com:
ansible_host: 10.0.1.11
kuma_cp2.example.com:
ansible_host: 10.0.1.12
kuma_control_plane_worker:
kuma_worker:
hosts:
kuma-core-1.example.com:
ansible_host: 10.0.1.13
extra_args: "--labels=kaspersky.com/kuma-core=true,kaspersky.com/kuma-ingress=true,node.longhorn.io/create-default-disk=true"
kuma_worker2.example.com:
ansible_host: 10.0.1.14
extra_args: "--labels=kaspersky.com/kuma-core=true,kaspersky.com/kuma-ingress=true,node.longhorn.io/create-default-disk=true"
You can install the KUMA Core on a Kubernetes cluster for high availability. Describe the configuration in the k0s.inventory.yml inventory file.
Page top
[Topic 217904]
Program installation requirements
General application installation requirements
You can install the application on the following operating systems:
- Oracle Linux
- Astra Linux
- Ubuntu
- RED OS
Supported operating system versions are listed in the Hardware and software requirements section.
Supported configurations are Server and Server with GUI support. In the Server with GUI support configuration, you do not need to install additional packages for reporting.
RED OS 8 is supported without high availability (HA). When using RED OS 8 in the Server with GUI support configuration, you need to install the iscsi-initiator-utils package, and then run the following commands:
systemctl enable iscsid
systemctl start iscsid
Before deploying the application, make sure the following conditions are met:
- Servers on which you want to install the components satisfy the hardware and software requirements.
- Ports to be used by the installed instance of KUMA are available.
- KUMA components are addressed using the fully qualified domain name (FQDN) of the host in the hostname.example.com format. Before you install the application, make sure that the correct host FQDN is returned in the
Static hostname field. To do so, run the following command:hostnamectl status
- The name of server on which you are running the installer is not
localhost or localhost.<domain>. - The name of the server on which you are installing KUMA Core does not start with a numeral.
- Time synchronization over Network Time Protocol (NTP) is configured on all servers with KUMA services.
Installation requirements for Oracle Linux, Astra Linux, Ubuntu 22.04 LTS, and RED OS 7.3.4 and 8
|
Oracle Linux
|
Astra Linux
|
Ubuntu 22.04 LTS
|
RED OS 7.3.4 and 8
|
Python version
|
3.6 to 3.11. Versions 3.12 and later are not supported.
|
3.6 to 3.11. Versions 3.12 and later are not supported.
|
3.6 to 3.11. Versions 3.12 and later are not supported.
|
3.6 to 3.11. Versions 3.12 and later are not supported.
|
SELinux module
|
Disabled
|
Disabled
|
Disabled
|
Disabled
|
Package manager
|
pip3
|
pip3
|
pip3
|
pip3
|
Basic packages
|
More on upgrading from Oracle Linux 8.x to Oracle Linux 9.x.
To install the packages, run the following commands:
pip3 install netaddr
yum install firewalld
yum install compat-openssl11
|
To install the packages, run the following command:
apt install python3-apt curl libcurl4
|
- python3-apt
- curl
- libcurl4
- openssl 1.1.1
- acl
To install the packages, run the following command:
apt install python3-apt curl libcurl4 acl
You can download the openssl1.1.1 package from the official website of Ubuntu and install it using the following command:
dpkg -i libssl1.1_1.1.1f-1ubuntu2_amd64.deb
|
To install the packages, run the following commands:
pip3 install netaddr
dnf install firewalld
dnf install compat-openssl11
|
Dependent packages
|
No value.
|
- netaddr
- python3-cffi-backend
To install the packages, run the following command:
apt install python3-netaddr python3-cffi-backend
If you plan to query Oracle DB databases from KUMA, you need to install the Astra Linux libaio1 package.
|
- netaddr
- python3-cffi-backend
To install the packages, run the following command:
apt install python3-netaddr python3-cffi-backend
|
No value.
|
Packages that must be installed on a device with the KUMA Core for correct generation and downloading of reports
|
- nss
- gtk2
- atk
- libnss3.so
- libatk-1.0.so.0
- libxkbcommon
- libdrm
- at-spi2-atk
- mesa-libgbm
- alsa-lib
- cups-libs
- libXcomposite
- libXdamage
- libXrandr
To install the packages, run the following command:
yum install nss gtk2 atk libnss3.so libatk-1.0.so.0 libxkbcommon libdrm at-spi2-atk mesa-libgbm alsa-lib cups-libs libXcomposite libXdamage libXrandr
|
- libgtk2.0.0
- libnss3
- libatk-adaptor
- libdrm-common
- libgbm1
- libxkbcommon0
- libasound2
To install the packages, run the following command:
apt install libgtk2.0.0 libnss3 libatk-adaptor libdrm-common libgbm1 libxkbcommon0 libasound2
|
- libatk1.0-0
- libgtk2.0-0
- libatk-bridge2.0-0
- libcups2
- libxcomposite-dev
- libxdamage1
- libxrandr2
- libgbm-dev
- libxkbcommon-x11-0
- libpangocairo-1.0-0
- libasound2
To install the packages, run the following command:
apt install libatk1.0-0 libgtk2.0-0 libatk-bridge2.0-0 libcups2 libxcomposite-dev libxdamage1 libxrandr2 libgbm-dev libxkbcommon-x11-0 libpangocairo-1.0-0 libasound2
|
- nss
- gtk2
- atk
- libnss3.so
- libatk-1.0.so.0
- libxkbcommon
- libdrm
- at-spi2-atk
- mesa-libgbm
- alsa-lib
- cups-libs
- libXcomposite
- libXdamage
- libXrandr
To install the packages, run the following command:
dnf install nss gtk2 atk libnss3.so libatk-1.0.so.0 libxkbcommon libdrm at-spi2-atk mesa-libgbm alsa-lib cups-libs libXcomposite libXdamage libXrandr
|
User permissions required to install the application
|
No value.
|
You need to assign the required permissions to the user that will be installing the application:
sudo pdpl-user -i 63 <user that will be installing the application>
|
No value.
|
No value.
|
[Topic 231034]
Upgrading from Oracle Linux 8.x to Oracle Linux 9.x
To upgrade from Oracle Linux 8.x to Oracle Linux 9.x:
- Run the following commands to disable KUMA services on the hosts where the services are installed:
sudo systemctl disable kuma-collector-<service ID>.servicesudo systemctl disable kuma-correlator-<service ID>.servicesudo systemctl disable kuma-storage-<service ID>.servicesudo systemctl disable kuma-grafana.servicesudo systemctl disable kuma-mongodb.servicesudo systemctl disable kuma-victoria-metrics.servicesudo systemctl disable kuma-vmalert.servicesudo systemctl disable kuma-core.service
- Upgrade the OS on every host.
- After the upgrade is complete, run the following command to install the compat-openssl11 package on the host where you want to deploy the KUMA Core outside of the cluster:
yum install compat-openssl11
- Run the following commands to enable the services on the hosts where the services are installed:
sudo systemctl enable kuma-core.servicesudo systemctl enable kuma-storage-<service ID>.servicesudo systemctl enable kuma-collector-<service ID>.servicesudo systemctl enable kuma-correlator-<service ID>.servicesudo systemctl enable kuma-grafana.servicesudo systemctl enable kuma-mongodb.servicesudo systemctl enable kuma-victoria-metrics.servicesudo systemctl enable kuma-vmalert.service
- Restart the hosts.
As a result, the upgrade is completed.
Page top
[Topic 267523]
Ports used by KUMA during installation
For the application to run correctly, you need to ensure that the KUMA components are able to interact with other components and applications over the network using the protocols and ports specified during the installation of the KUMA components.
Before installing the Core on a device, make sure that the following ports are available:
- 9090: used by Victoria Metrics.
- 8880: used by VMalert.
- 27017: used by MongoDB.
The table below lists the default ports. The installer automatically opens the ports during KUMA installation.
Network ports used for the interaction of KUMA components
Protocol
|
Port
|
Direction
|
Purpose of the connection
|
HTTPS
|
7222
|
From the KUMA client to the KUMA Core server.
|
Reverse proxy to the CyberTrace system.
|
HTTPS
|
8123
|
Local requests from the storage service to the local node of the ClickHouse cluster.
|
Writing and getting normalized events in the ClickHouse cluster.
|
HTTPS
|
8429
|
From the KUMA agent to the KUMA Core server.
|
Logging KUMA agent performance metrics.
|
HTTPS
|
9009
|
Between replicas of the ClickHouse cluster.
|
Internal data communication between replicas of the ClickHouse cluster.
|
TCP
|
2181
|
From ClickHouse cluster nodes to the ClickHouse keeper replication coordination service.
|
Getting and writing replication metadata by replicas of ClickHouse servers.
|
TCP
|
2182
|
From one ClickHouse keeper replication coordination service to another.
|
Internal communication between replication coordination services to reach a quorum.
|
TCP
|
7210
|
From all KUMA components to the KUMA Core server.
|
Getting the KUMA configuration from the KUMA Core server.
|
TCP
|
7220
|
- From the KUMA client to the server with the KUMA Core component.
- From storage hosts to the KUMA Core server during installation or upgrade.
|
- User access to the KUMA web interface.
- Interaction between the storage hosts and the KUMA Core during installation or upgrade. You can close this port after completing the installation or upgrade.
|
TCP
|
7221 and other ports used for service installation as the value of --api.port <port>
|
From KUMA Core to KUMA services.
|
Administration of services from the KUMA web interface.
|
TCP
|
7223
|
To the KUMA Core server.
|
Default port for API requests.
|
TCP
|
8001
|
From Victoria Metrics to the ClickHouse server.
|
Getting ClickHouse server operation metrics.
|
TCP
|
9000
|
- Outgoing and incoming connections between servers of the ClickHouse cluster.
- From the local client.sh client to the local cluster node.
|
Port of the ClickHouse native protocol (also called ClickHouse TCP).
Used by ClickHouse applications and processes, such as clickhouse-server, clickhouse-client, and native ClickHouse tools Used for inter-server communication for distributed queries. Also used for writing and getting data in the ClickHouse cluster.
|
Ports used by predefined OOTB resources
The installer automatically opens these ports during KUMA installation.
Ports used by predefined OOTB resources:
- 7230/tcp
- 7231/tcp
- 7232/tcp
- 7233/tcp
- 7234/tcp
- 7235/tcp
- 5140/tcp
- 5140/udp
- 5141/tcp
- 5144/udp
KUMA Core traffic in a high availability configuration
The table below lists the initiator (source) of the connection and the destination. The port number of the initiator can be dynamic. Return traffic within the established connection must not be blocked.
KUMA Core traffic in a high availability configuration
Source
|
Destination
|
Destination port
|
Type
|
External KUMA services
|
Load balancer
|
7209
|
TCP
|
External KUMA services
|
Load balancer
|
7210
|
TCP
|
External KUMA services
|
Load balancer
|
7220
|
TCP
|
External KUMA services
|
Load balancer
|
7222
|
TCP
|
External KUMA services
|
Load balancer
|
7223
|
TCP
|
KUMA agents
|
Load balancer
|
8429
|
TCP
|
Worker node
|
Load balancer
|
6443
|
TCP
|
Worker node
|
Load balancer
|
8132
|
TCP
|
Control node
|
Load balancer
|
6443
|
TCP
|
Control node
|
Load balancer
|
8132
|
TCP
|
Control node
|
Load balancer
|
9443
|
TCP
|
Worker node
|
External KUMA services
|
Depending on the settings specified when creating the service.
|
TCP
|
Load balancer
|
Worker node
|
7209
|
TCP
|
Load balancer
|
Worker node
|
7210
|
TCP
|
Load balancer
|
Worker node
|
7220
|
TCP
|
Load balancer
|
Worker node
|
7222
|
TCP
|
Load balancer
|
Worker node
|
7223
|
TCP
|
Load balancer
|
Worker node
|
8429
|
TCP
|
External KUMA services
|
Worker node
|
7209
|
TCP
|
External KUMA services
|
Worker node
|
7210
|
TCP
|
External KUMA services
|
Worker node
|
7220
|
TCP
|
External KUMA services
|
Worker node
|
7222
|
TCP
|
External KUMA services
|
Worker node
|
7223
|
TCP
|
KUMA agents
|
Worker node
|
8429
|
TCP
|
Worker node
|
Worker node
|
179
|
TCP
|
Worker node
|
Worker node
|
9500
|
TCP
|
Worker node
|
Worker node
|
10250
|
TCP
|
Worker node
|
Worker node
|
51820
|
UDP
|
Worker node
|
Worker node
|
51821
|
UDP
|
Control node
|
Worker node
|
10250
|
TCP
|
Load balancer
|
Control node
|
6443
|
TCP
|
Load balancer
|
Control node
|
8132
|
TCP
|
Load balancer
|
Control node
|
9443
|
TCP
|
Worker node
|
Control node
|
6443
|
TCP
|
Worker node
|
Control node
|
8132
|
TCP
|
Worker node
|
Control node
|
10250
|
TCP
|
Control node
|
Control node
|
2380
|
TCP
|
Control node
|
Control node
|
6443
|
TCP
|
Control node
|
Control node
|
9443
|
TCP
|
Control node
|
Control node
|
10250
|
TCP
|
Cluster management console (CLI)
|
Load balancer
|
6443
|
TCP
|
Cluster management console (CLI)
|
Control node
|
6443
|
TCP
|
[Topic 217770]
Downloading CA certificates
In the KUMA web interface, you can download the following CA certificates:
- REST API CA certificate
This certificate is used to authenticate the API server serving the KUMA public API. You can also use this certificate when importing data from MaxPatrol reports.
You can also change this certificate if you want to use your company's certificate and key instead of the self-signed certificate of the web console.
- Microservice CA certificate
This certificate is used for authentication when connecting log sources to passive collectors using TLS, but without specifying your own certificate.
To download a CA certificate:
- Open the KUMA web interface.
- In the lower left corner of the window, click the name of the user account, and in the menu, click the REST API CA certificate or Microservice CA certificate button, depending on the certificate that you want to download.
The certificate is saved to the download directory configured in your browser.
Page top
[Topic 294030]
Reissuing internal CA certificates
The storage location of the self-signed CA certificate and the certificate reissue mechanism have been changed.
The certificate is stored in the database. The previous method of reissuing internal certificates by deleting certificates from the file system of the Core and restarting the Core is no longer allowed. The old method will cause the Core to fail to start. Do not connect new services to the Core until the certificate is successfully reissued.
After reissuing the internal CA certificates in the Settings → General → Reissue internal CA certificates section of the KUMA web interface, you must stop the services, delete the old certificates from the directories of the service, and manually restart all services. Only users with the General Administrator role can reissue internal CA certificates.
The Reissue internal CA certificates option is available only to a user with the General Administrator role.
The process of reissuing certificates for an individual service remains the same: in the KUMA web interface, in the Resources → Active services section, select the service; in the context menu, select Reset certificate, and delete the old certificate from the service installation directory. KUMA automatically generates a new certificate. You do not need to restart running services, the new certificate is applied automatically. A stopped service must be restarted to have the certificate applied.
To reissue internal CA certificates:
- In the KUMA web interface, go to the Settings → General section, click Reissue internal CA certificates, and read the displayed warning. If you decide to proceed with reissuing certificates, click Yes.
As a result, the CA certificates for KUMA services and the CA certificate for ClickHouse are reissued. Next, you must stop the services, delete old certificates from the service installation directories, restart the Core, and restart the stopped services to apply the reissued certificates.
- Connect to the hosts where the collector, correlator, and event router services are deployed.
- Stop all services with the following command:
sudo systemctl stop kuma-<collector/correlator/eventRouter>-<service ID>.service
- Delete the internal.cert and internal.key certificate files from the "/opt/kaspersky/kuma/<
service type>/<service ID>/certificates" directories with the following command:sudo rm -f /opt/kaspersky/kuma/<service type>/<service ID>/certificates/internal.cert
sudo rm -f /opt/kaspersky/kuma/<service type>/<service ID>/certificates/internal.key
- Connect to the hosts where storage services are deployed.
- Stop all storage services.
sudo systemctl stop kuma-<storage>-<service ID>.service
- Delete the internal.cert and internal.key certificate files from the "/opt/kaspersky/kuma/storage/<
ID service>/certificates" directories. sudo rm -f /opt/kaspersky/kuma/storage/<service ID>/certificates/internal.cert
sudo rm -f /opt/kaspersky/kuma/storage/<service ID>/certificates/internal.key
- Delete all ClickHouse certificates from the "/opt/kaspersky/kuma/clickhouse/certificates" directory.
sudo rm -f /opt/kaspersky/kuma/clickhouse/certificates/internal.cert
sudo rm -f /opt/kaspersky/kuma/clickhouse/certificates/internal.key
- Connect to the hosts where agent services are deployed.
- Stop the services of Windows agents and Linux agents.
- Delete the internal.cert and internal.key certificate files from the working directories of the agents.
- Start the Core to apply the new CA certificates.
- For an "all-in-one" or distributed installation of KUMA, run the following command:
sudo systemctl restart kuma-core-00000000-0000-0000-0000-000000000000.service
- For KUMA in a high availability configuration, to restart the Core, run the following command on the primary controller:
sudo k0s kubectl rollout restart deployment/core-deployment -n kuma
You do not need to restart victoria-metrics.
The Core must be restarted using the command because restarting the Core in the KUMA interface affects only the Core container and not the entire pod.
- Restart all services that were stopped as part of the procedure.
sudo systemctl start kuma-<collector/correlator/eventRouter/storage>-<service ID>.service
- Restart victoria-metrics.
sudo systemctl start kuma-victoria-metrics.service
Internal CA certificates are reissued and applied.
Page top
[Topic 275543]
Modifying the self-signed web console certificate
You can use your company's certificate and key instead of the self-signed certificate of the web console. For example, if you want to replace the self-signed CA certificate of the Core with a certificate issued by your corporate CA, you must provide an external.cert and an unencrypted external.key in PEM format.
The following example shows how to replace a self-signed CA certificate of the Core with your corporate certificate in PFX format. You can use the instructions as an example and adapt the steps according to your needs.
To replace the certificate of the KUMA web console with an external certificate:
- If you are using a certificate and key in a PFX container, use OpenSSL to convert the PFX file to a certificate and encrypted key in PEM format:
openssl pkcs12 -in kumaWebIssuedByCorporateCA.pfx -nokeys -out external.cert
openssl pkcs12 -in kumaWebIssuedByCorporateCA.pfx -nocerts -nodes -out external.key
Enter the password of the PFX key when prompted (Enter Import Password).
The command creates the external.cert certificate and the external.key key in PEM format.
- In the KUMA web interface, go to the Settings → Common → Core settings section under External TLS pair, click Upload certificate and Upload key and upload the external.cert file and the unencrypted external.key file in PEM format.
- Restart KUMA:
systemctl restart kuma-core
- Refresh the web page or restart the browser that you are using to manage the KUMA web interface.
Your company certificate and key are replaced.
Page top
[Topic 217747]
Synchronizing time on servers
To configure time synchronization on servers:
- Install chrony:
sudo apt install chrony
- Configure the synchronization of system time with an NTP server:
- Make sure the virtual machine has internet access.
If the virtual machine has internet access, go to step b.
If the virtual machine does not have internet access, edit the /etc/chrony.conf file to replace 2.pool.ntp.org with the name or IP address of your corporate NTP server.
- Start the system time synchronization service:
sudo systemctl enable --now chronyd
- Wait a few seconds and run the following command:
sudo timedatectl | grep 'System clock synchronized'
If the system time is synchronized correctly, the output will contain "System clock synchronized: yes".
Synchronization is configured.
Page top
[Topic 255123]
About the inventory file
You can install, update, or remove KUMA components by changing to the directory with the extracted kuma-ansible-installer and using the Ansible tool and a prepared inventory file. You can specify KUMA configuration settings in the inventory file; the installer then uses these settings when deploying, updating, and removing the application. The inventory file must conform to the YAML format.
You can create an inventory file based on the templates included in the distribution kit. The following templates are provided:
- single.inventory.yml.template can be used when installing KUMA on a single server. This template contains the minimum set of settings optimized for installation on a single device without using a Kubernetes cluster.
- distributed.inventory.yml.template can be used for the initial distributed installation of KUMA without using a Kubernetes cluster, for expanding an all-in-one installation to a distributed installation, and for updating KUMA.
- expand.inventory.yml.template can be used in some reconfiguration scenarios, such as adding collector and correlator servers, expanding an existing storage cluster, or adding a new storage cluster. If you use this inventory file to modify the configuration, the installer does not stop services in the entire infrastructure. If you reuse the inventory file, the installer can stop only services on hosts that are listed in the expand.inventory.yml file.
- k0s.inventory.yml.template can be used to install or migrate KUMA to a Kubernetes cluster.
We recommend saving a backup copy of the inventory file that you used to install the application. You can use it to add components to the system or remove KUMA.
Page top
[Topic 255188]
KUMA settings in the inventory file
The inventory file may include the following blocks:
For each host, you must specify the FQDN in the <host name>.<domain> format and, if necessary, an IPv4 or IPv6 address. The KUMA Core domain name and its subdomains may not start with a numeral.
Example:
hosts:
hostname.example.com:
ip: 0.0.0.0
|
The 'all' block
In this block, you can specify the variables that apply to all hosts listed in the inventory file, including the implicitly specified localhost on which the installation is started. Variables can be overridden at the level of host groups or individual hosts.
Example of overriding variables in the inventory file
all:
vars:
ansible_connection: ssh
deploy_to_k8s: False
need_transfer: False
airgap: True
deploy_example_services: True
kuma:
vars:
ansible_become: true
ansible_user: i.ivanov
ansible_become_method: su
ansible_ssh_private_key_file: ~/.ssh/id_rsa
children:
kuma_core:
vars:
ansible_user: p.petrov
ansible_become_method: sudo
The table below lists all possible variables in the vars section and their descriptions.
List of possible variables in the 'vars' section
Variable
|
Description
|
ansible_connection
|
Method used to connect to target machines.
Possible values:
ssh to connect to remote hosts over SSH.local to establish no connection with remote hosts.
|
ansible_user
|
User name used to connect to target machines and install components.
If root login is blocked on the target machines, choose a user that has the right to establish SSH connections and elevate privileges using su or sudo.
|
ansible_become
|
This variable specifies if you want to elevate the privileges of the user that is used to install KUMA components.
Possible values:
- You must specify
true if ansible_user is not root. false.
|
ansible_become_method
|
Method for elevating the privileges of the user that is used to install KUMA components.
You must specify su or sudo if ansible_user is not root.
|
ansible_ssh_private_key_file
|
Path to the private key in the /<path>/.ssh/id_rsa format. You must specify this variable if you want to use a key file other than the default key file (~/.ssh/id_rsa).
|
deploy_to_k8s
|
This variable specifies whether you want to deploy KUMA components in a Kubernetes cluster.
Possible values:
- The
false value is specified in the single.inventory.yml and distributed.inventory.yml templates. - The
true value is specified in the k0s.inventory.yml template.
If you do not specify this variable, it defaults to false.
|
need_transfer
|
This variable specifies whether you want to migrate KUMA Core to a new Kubernetes cluster.
You need to specify this variable only if deploy_to_k8s is true.
Possible values:
If you do not specify this variable, it defaults to false.
|
no_firewall_actions
|
This variable specifies whether the installer must perform the steps to configure the firewall on the hosts.
Possible values:
true means that at startup, the installer does not perform the steps to configure the firewall on the hosts.false means that at startup, the installer performs the steps to configure the firewall on the hosts. This is the value that is specified in all inventory file templates.
If you do not specify this variable, it defaults to false.
|
generate_etc_hosts
|
This variable specifies whether the machines must be registered in the DNS zone of your organization.
The installer automatically adds the IP addresses of the machines from the inventory file to the /etc/hosts files on the machines on which KUMA components are installed. The specified IP addresses must be unique.
Possible values:
If you do not specify this variable, it defaults to false.
|
deploy_example_services
|
This variable specifies whether predefined services are created during the installation of KUMA.
You need to specify this variable if you want to create demo services independently of the single/distributed/k0s inventory file.
Possible values:
false means predefined services are not created when installing KUMA. This is the value that is specified in all inventory file templates.true means predefined services are created when installing KUMA.
If you do not specify this variable, it defaults to false.
|
low_resources
|
This variable specifies whether KUMA is being installed in an environment with limited computational resources.
This variable is not specified in any of the inventory file templates.
Possible values:
false means KUMA is being installed for production use. In this case, the installer checks the requirements of the worker nodes (CPU, RAM, and free disk space) in accordance with the hardware and software requirements. If the requirements are not satisfied, the installation is aborted with an error message.true means that KUMA is being installed in an environment with limited computational resources. In this case, the minimum size of the KUMA Core installation directory on the host is 4 GB. All other computational resource limitations are ignored.
If you do not specify this variable, it defaults to false.
|
The 'kuma' block
In this block, you can specify the settings of KUMA components deployed outside of the Kubernetes cluster. The kuma block can contain the following sections:
varskuma block. children contains groups of settings for components:kuma_core contains settings of the KUMA Core. You can specify only one host and the following MongoDB database log rotation settings for the host:mongo_log_archives_number is the number of previous logs that you want to keep when rotating the MongoDB database log.mongo_log_file_size is the size of the MongoDB database log, in gigabytes, at which rotation begins. If the MongoDB database log never exceeds the specified size, no rotation occurs.mongo_log_frequency_rotation is the interval for checking the size of the MongoDB database log for rotation purposes. Possible values:hourly means the size of the MongoDB database log is checked every hour.daily means the size of the MongoDB database log is checked every day.weekly means the size of the MongoDB database log is checked every week.
The MongoDB database log is stored in the /opt/kaspersky/kuma/mongodb/log directory.
raft_node_addr is the FQDN on which you want raft to listen for signals from other nodes. This value must be specified in the <host FQDN>:<port> format. If this setting is not specified explicitly, <host FQDN> defaults to the FQDN of the host on which the KUMA Core is deployed, and <port> defaults to 7209. You can specify an address of your choosing to adapt the KUMA Core to the configuration of your infrastructure.
kuma_collector contains settings of KUMA collectors. You can specify multiple hosts.kuma_correlator contains settings of KUMA correlators. You can specify multiple hosts.kuma_storage contains settings of KUMA storage nodes. You can specify multiple hosts as well as shard, replica, and keeper IDs for hosts using the following settings:shard is the shard ID.replica is the replica ID.keeper is the keeper ID.
The specified shard, replica, and keeper IDs are used only if you are deploying demo services as part of a fresh KUMA installation. In other cases, the shard, replica, and keeper IDs that you specified in the KUMA web interface when creating a resource set for the storage are used.
The 'kuma_k0s' block
In this block, you can specify the settings of the Kubernetes cluster that ensures high availability of KUMA. This block is specified only in an inventory file based on k0s.inventory.yml.template.
For test and demo installations in environments with limited computational resources, you must also set low_resources: true in the all block. In this case, the minimum size of the KUMA Core installation directory is reduced to 4 GB and the limitations of other computational resources are ignored.
For each host in the kuma_k0s block, a unique FQDN and IP address must be specified in the ansible_host variable, except for the host in the kuma_lb section. For the host in the kuma_lb section, only the FQDN must be specified. Hosts must be unique within a group.
For a demo installation, you may combine a controller with a worker node. Such a configuration does not provide high availability of the KUMA Core and is only intended for demonstrating the functionality or for testing the software environment.
The minimal configuration that ensures high availability is 3 controllers, 2 worker nodes, and 1 nginx load balancer. In production, we recommend using dedicated worker nodes and controllers. If a cluster controller is under workload and the pod with the KUMA Core is hosted on the controller, if the controller goes down, access to the KUMA Core will be completely lost.
The kuma_k0s block can contain the following sections:
vars contains variables that apply to all hosts specified in the kuma block.сhildren contains settings of the Kubernetes cluster that provides high availability of KUMA.
The following table lists possible variables in the vars section and their descriptions.
List of possible variables in the vars section
|
|
|
Group of variables
|
Description
|
kuma_lb
|
FQDN of the load balancer. You can install the nginx load balancer or a third-party TCP load balancer.
If you are installing the nginx load balancer, you can set kuma_managed_lb=true to automatically configure the nginx load balancer when installing KUMA, open the necessary network ports on the nginx load balancer host (6443, 8132, 9443, 7209, 7210, 7220, 7222, 7223, 7226, 8429), and restart to apply the changes.
If you are installing a third-party TCP load balancer, you must manually configure it before installing KUMA.
|
kuma_control_plane_master
|
The host that acts as the primary controller of the cluster.
|
Groups for specifying the primary controller. You only need to specify a host for one group.
|
kuma_control_plane_master_worker
|
A host that combines the role of the primary controller and a worker node of the cluster. For each cluster controller that is combined with a worker node, in the inventory file, you must specify extra_args: "--labels=kaspersky.com/kuma-core=true,kaspersky.com/kuma-ingress=true,node.longhorn.io/create-default-disk=true".
|
kuma_control_plane
|
Hosts that act as controllers in the cluster.
|
Groups for specifying secondary controllers.
|
kuma_control_plane_worker
|
Hosts that combine the roles of controller and worker node in the cluster. For each cluster controller that is combined with a worker node, in the inventory file, you must specify extra_args: "--labels=kaspersky.com/kuma-core=true,kaspersky.com/kuma-ingress=true,node.longhorn.io/create-default-disk=true".
|
kuma_worker
|
Worker nodes of the cluster. For each cluster controller that is combined with a worker node, in the inventory file, you must specify extra_args: "--labels=kaspersky.com/kuma-core=true,kaspersky.com/kuma-ingress=true,node.longhorn.io/create-default-disk=true".
|
ipAutodetectionMethod
|
If multiple network interfaces are being used on the worker nodes of the cluster at the same time, the ipAutodetectionMethod variable lets you specify a name mask of the network interface to be used for communication between the worker nodes in the cluster.
For example, if you want to use only network interfaces named ethN (where N is the number of the network interface) for communication between worker nodes of the cluster, you can specify the variable as follows:
kuma_k0s:
vars:
ip_autodetection_method: "interface=eth.*"
This makes the cluster use a network interface with a name that matches the eth.* mask.
If the network interface name on each worker node is the same, for example eth0, you can specify the variable without a mask:
kuma_k0s:
vars:
ip_autodetection_method: "interface=eth0"
For more information, please refer to the Calico Open Source documentation.
|
[Topic 244406][Topic 217908]
Preparing the single.inventory.yml inventory file
KUMA components can be installed, updated, and removed in the directory containing the extracted installer by using the Ansible tool and the user-created YML inventory file containing a list of the hosts of KUMA components and other settings. If you want to install all KUMA components on the same server, you must specify the same host for all components in the inventory file.
To create an inventory file for installation on a single server:
- Copy the archive with the
kuma-ansible-installer-<version>.tar.gz installer to the server and extract it using the following command (about 2 GB of disk space is required):sudo tar -xpf kuma-ansible-installer-<version name>.tar.gz
- Go to the KUMA installer directory by executing the following command:
cd kuma-ansible-installer
- Copy the single.inventory.yml.template and create an inventory file named single.inventory.yml:
cp single.inventory.yml.template single.inventory.yml
- Edit the settings in the single.inventory.yml inventory file.
If you want predefined services to be created during the installation, set deploy_example_services to true.
deploy_example_services: true
The predefined services will appear only as a result of the initial installation of KUMA. If you are upgrading the system using the same inventory file, the predefined services are not re-created.
- Replace all
kuma.example.com strings in the inventory file with the name of the host on which you want to install KUMA components.
The inventory file is created. Now you can use it to install KUMA on a single server.
We recommend backing up the inventory file that you used to install the program. You can use it to add components to the system or remove KUMA.
Example inventory file for installation on a single server
all:
vars:
deploy_to_k8s: false
need_transfer: false
generate_etc_hosts: false
deploy_example_services: true
no_firewall_actions: false
kuma:
vars:
ansible_connection: ssh
ansible_user: root
children:
kuma_core:
hosts:
kuma1.example.com:
mongo_log_archives_number: 14
mongo_log_frequency_rotation: daily
mongo_log_file_size: 1G
kuma_collector:
hosts:
kuma1.example.com
kuma_correlator:
hosts:
kuma1.example.com
kuma_storage:
hosts:
kuma1.example.com:
shard: 1
replica: 1
keeper: 1
[Topic 222158]
Installing the program on a single server
You can install all KUMA components on a single server using the Ansible tool and the single.inventory.yml inventory file.
To install Kuma on a single server:
- Download the kuma-ansible-installer-<
build number>.tar.gz KUMA distribution kit to the server and extract it. The archive is extracted into the kuma-ansibleinstaller directory. - Go to the directory with the extracted installer.
- Depending on the type of license activation that you are planning to use, do one of the following:
- If you want to activate your license with a file, place the file with the license key in <installer directory>/roles/kuma/files/.
The key file must be named license.key.
sudo cp <key file>.key <installer directory>/roles/kuma/files/license.key
- If you want to activate with a license code, go to the next step of the instructions.
Activation using a license code is available starting with KUMA 3.4. For earlier versions of KUMA, you must activate the license with a file.
- Run the following command to start the component installation with your prepared single.inventory.yml inventory file:
sudo ./install.sh single.inventory.yml
- Accept the terms of the End User License Agreement.
If you do not accept the terms and conditions of the End User License Agreement, the application cannot be installed.
Depending on the type of license activation, running the installer has one of the following results:
- If you want to activate the license using a file and have placed the file with the license key in "<installer directory>/roles/kuma/files/", running the installer with the "single.inventory.yml" inventory file installs KUMA Core, all services specified in the inventory file, and OOTB resources. If example_services=true is set in the inventory, demo services are installed.
- If you want to activate with a license code or provide a license file later, running the installer with the "single.inventory.yml" inventory file installs only KUMA Core.
To install the services, specify the license code on the command line. Then run the postinstall.sh installer with the "single.inventory.yml" inventory file.
sudo ./postinstall.sh single.inventory.yml
This creates the specified services. You can select the resources that you want to import from the repository.
- After the installation is complete, log in to the KUMA web interface and enter the address of the KUMA web interface in the address bar of your browser, then enter your credentials on the login page.
The address of the KUMA web interface is https://<FQDN of the host where KUMA is installed>:7220.
Default login credentials:
- login: admin
- password: mustB3Ch@ng3d!
After logging in for the first time, change the password of the admin account
All KUMA components are installed and you are logged in to the web interface.
We recommend saving a backup copy of the inventory file that you used to install the application. You can use this inventory file to add components to the system or remove KUMA.
You can expand the installation to a distributed installation.
Page top
[Topic 222159][Topic 217917]
Preparing the test machine
To prepare the control machine for installing KUMA:
- Ensure that hardware, software, and installation requirements of the application are met.
- Generate an SSH key for authentication on the SSH servers of the target machines:
sudo ssh-keygen -f /root/.ssh/id_rsa -N "" -C kuma-ansible-installer
If SSH root access is blocked on the control machine, generate an SSH key for authentication on the SSH servers of the target machines for a user from the sudo group:
If the user that you want to use does not have sudo rights, add the user to the sudo group:
usermod -aG sudo user
ssh-keygen -f /home/<name of the user from the sudo group>/.ssh/id_rsa -N "" -C kuma-ansible-installer
As a result, the key is generated and saved in the user's home directory. To make the key available during installation, you must specify the full path to the key in the inventory file, in the ansible_ssh_private_key_file setting.
- Make sure that the control machine has network access to all the target machines by host name and copy the SSH key to each target machine:
sudo ssh-copy-id -i /root/.ssh/id_rsa root@<host name of the control machine>
If SSH root access is blocked on the control machine and you want to use the SSH key from the home directory of the user from the sudo group, make sure that the control machine has network access to all target machines by host name and copy the SSH key to each target machine:
ssh-copy-id -i /home/<name of the user in the sudo group>/.ssh/id_rsa <name of the user in the sudo group>@<host name of the control machine>
- Copy the installer archive
kuma-ansible-installer-<version>.tar.gz to the control machine and extract it using the following command (approximately 2 GB of disk space is required):sudo tar -xpf kuma-ansible-installer-<version>.tar.gz
The control machine is prepared for installing KUMA.
Page top
[Topic 222083]
Preparing the target machine
To prepare the target machine for the installation of KUMA components:
- Ensure that hardware, software, and installation requirements are met.
- Specify the host name. We recommend specifying a FQDN. For example, kuma1.example.com.
Do not change the KUMA host name after installation: this will make it impossible to verify the authenticity of certificates and will disrupt the network communication between the application components.
- Register the target machine in your organization's DNS zone to allow host names to be resolved to IP addresses.
If your organization does not use a DNS server, you can use the /etc/hosts file for name resolution. The content of the files can be automatically generated for each target machine when installing KUMA.
- To get the hostname that you must specify when installing KUMA, run the following command and record the result:
hostname -f
The control machine must be able to access the target machine using this name.
The target machine is ready for the installation of KUMA components.
Page top
[Topic 217955]
Preparing the distributed.inventory.yml inventory file
To create the distributed.inventory.yml inventory file:
- Go to the KUMA installer folder by executing the following command:
cd kuma-ansible-installer
- Create an inventory file named distributed.inventory.yml by copying distributed.inventory.yml.template:
cp distributed.inventory.yml.template distributed.inventory.yml
- Edit the settings in the distributed.inventory.yml.
We recommend backing up the inventory file that you used to install the program. You can use it to add components to the system or remove KUMA.
Example inventory file for distributed installation
all:
vars:
deploy_to_k8s: false
need_transfer: false
generate_etc_hosts: false
deploy_example_services: false
no_firewall_actions: false
kuma:
vars:
ansible_connection: ssh
ansible_user: root
children:
kuma_core:
hosts:
kuma-core-1.example.com:
ip: 0.0.0.0
mongo_log_archives_number: 14
mongo_log_frequency_rotation: daily
mongo_log_file_size: 1G
kuma_collector:
hosts:
kuma-collector-1.example.com:
ip: 0.0.0.0
kuma_correlator:
hosts:
kuma-correlator-1.example.com:
ip: 0.0.0.0
kuma_storage:
hosts:
kuma-storage-cluster1-server1.example.com:
ip: 0.0.0.0
shard: 1
replica: 1
keeper: 0
kuma-storage-cluster1-server2.example.com:
ip: 0.0.0.0
shard: 1
replica: 2
keeper: 0
kuma-storage-cluster1-server3.example.com:
ip: 0.0.0.0
shard: 2
replica: 1
keeper: 0
kuma-storage-cluster1-server4.example.com:
ip: 0.0.0.0
shard: 2
replica: 2
keeper: 0
kuma-storage-cluster1-server5.example.com:
ip: 0.0.0.0
shard: 0
replica: 0
keeper: 1
kuma-storage-cluster1-server6.example.com:
ip: 0.0.0.0
shard: 0
replica: 0
keeper: 2
kuma-storage-cluster1-server7.example.com:
ip: 0.0.0.0
shard: 0
replica: 0
keeper: 3
[Topic 222085]
Installing the program in a distributed configuration
KUMA is installed using the Ansible tool and a YML inventory file. The installation is performed from the control machine, and all of the KUMA components are installed on target machines.
To install KUMA:
- On the control machine, go to the directory containing the extracted installer.
cd kuma-ansible-installer
- Depending on the type of license activation that you plan to use, do one of the following:
- From the directory with the extracted installer, start the installation of components using the prepared inventory file, distributed.inventory.yml:
sudo ./install.sh distributed.inventory.yml
- Accept the terms and conditions of the End User License Agreement.
If you do not accept the terms and conditions of the End User License Agreement, the application cannot be installed.
Depending on the type of license activation, the installer produces one of the following results:
- If you want to activate the license using a file and have placed the file with the license key in "<installer directory>/roles/kuma/files/", running the installer with the "distributed.inventory.yml" inventory file installs KUMA Core, all services specified in the inventory file, and OOTB resources.
- If you want to activate with a license code or provide a license file later, running the installer with the "distributed.inventory.yml" inventory file installs only KUMA Core.
To install the services, specify the license code on the command line. Then run the postinstall.sh installer with the "distrtibuter.inventory.yml" inventory file.
sudo ./postinstall.sh distributed.inventory.yml
This creates the specified services. You can select the resources that you want to import from the repository.
- After the installation is complete, log in to the KUMA web interface and enter the address of the KUMA web interface in the address bar of your browser, then enter your credentials on the login page.
The address of the KUMA web interface is https://<FQDN of the host where KUMA is installed>:7220.
Default login credentials:
- login: admin
- password: mustB3Ch@ng3d!
After logging in for the first time, change the password of the admin account
All KUMA components are installed and you are logged in to the web interface.
We recommend saving a backup copy of the inventory file that you used to install the application. You can use this inventory file to add components to the system or remove KUMA.
Page top
[Topic 217914]
Distributed installation in a high availability configuration
The high availability configuration of KUMA involves deploying the KUMA Core on a Kubernetes cluster and using an external TCP traffic balancer.
To create a high availability KUMA installation, use the kuma-ansible-installer-ha-<build number>.tar.gz installer and prepare the k0s.inventory.yml inventory file by specifying the configuration of your cluster. For a new installation in a high availability configuration, OOTB resources are always imported. You can also perform an installation with deployment of demo services. To do this, set "deploy_example_services: true" in the inventory file.
You can deploy KUMA Core on a Kubernetes cluster in the following ways:
Minimum configuration
Kubernetes has 2 node roles:
- Controllers (control-plane). Nodes with this role manage the cluster, store metadata, and balance the workload.
- Workers (worker). Nodes with this role bear the workload by hosting KUMA processes.
To deploy KUMA in a high availability configuration, you need:
- 3 dedicated controllers
- 2 worker nodes
- 1 TCP balancer
You must not use the balancer as the control machine for running the KUMA installer.
To ensure the adequate performance of the KUMA Core in Kubernetes, you must allocate 3 dedicated nodes that have only the controller role. This will provide high availability for the Kubernetes cluster itself and will ensure that the workload (KUMA processes and other processes) cannot affect the tasks involved in managing the Kubernetes cluster. If you are using virtualization tools, make sure that the nodes are hosted on different physical servers and that these physical servers are not being used as worker nodes.
For a demo installation of KUMA, you may combine the controller and worker roles. However, if you are expanding an installation to a distributed installation, you must reinstall the entire Kubernetes cluster and allocate 3 dedicated nodes with the controller role and at least 2 nodes with the worker role. KUMA cannot be upgraded to later versions if any of the nodes combine the controller and worker roles.
Page top
[Topic 244396]
Additional requirements for deploying KUMA Core in Kubernetes
If you plan to protect KUMA's network infrastructure using Kaspersky Endpoint Security for Linux, first install KUMA in the Kubernetes cluster and only then deploy Kaspersky Endpoint Security for Linux. When updating or removing KUMA, you must first stop Kaspersky Endpoint Security for Linux using the following command:
systemctl stop kesl
When you install KUMA in a high availability configuration, the following requirements must be met:
- General application installation requirements.
- The hosts that you plan to use for Kubernetes cluster nodes must not use IP addresses from the following Kubernetes ranges:
- serviceCIDR: 10.96.0.0/12
- podCIDR: 10.244.0.0/16
Traffic to proxy servers must excluded for the IP addresses from these ranges.
- Each host must have a unique ID (/etc/machine-id).
- The firewalld or uwf firewall management tool must be installed and enabled on the hosts for adding rules to iptables.
- The nginx load balancer must be installed and configured (for details, please refer to the nginx load balancer documentation). You can install the nginx load balancer using one of the following commands:
sudo yum install nginx (for Oracle Linux)sudo apt install nginx-full (for Astra Linux)sudo apt install nginx libnginx-mod-stream (for Ubuntu)sudo yum install nginx nginx-all-modules (for RED OS)
If you want the nginx load balancer to be configured automatically during the KUMA installation, install the nginx load balancer and allow SSH access to it in the same way as for the Kubernetes cluster hosts.
Example of an automatically created nginx configuration
The installer creates the /etc/nginx/kuma_nginx_lb.conf configuration file. An example of this file contents is provided below. The upstream sections are generated dynamically and contain the IP addresses of the Kubernetes cluster controllers (in the example, 10.0.0.2-4 in the upstream kubeAPI_backend, upstream konnectivity_backend, controllerJoinAPI_backend sections) and the IP addresses of the worker nodes (in the example 10.0.1.2-3), for which the inventory file contains the "kaspersky.com/kuma-ingress=true" value for the extra_args variable.
The "include /etc/nginx/kuma_nginx_lb.conf;" line must be added to the end of the /etc/nginx/nginx.conf file to apply the generated configuration file. If you have a large number of active services and users, you may need to increase the limit of open files in the nginx.conf settings.
Configuration file example:
# Ansible managed
#
# LB KUMA cluster
#
stream {
server {
listen 6443;
proxy_pass kubeAPI_backend;
}
server {
listen 8132;
proxy_pass konnectivity_backend;
}
server {
listen 9443;
proxy_pass controllerJoinAPI_backend;
}
server {
listen 7209;
proxy_pass kuma-core-hierarchy_backend;
proxy_timeout 86400s;
}
server {
listen 7210;
proxy_pass kuma-core-services_backend;
proxy_timeout 86400s;
}
server {
listen 7220;
proxy_pass kuma-core-ui_backend;
proxy_timeout 86400s;
}
server {
listen 7222;
proxy_pass kuma-core-cybertrace_backend;
proxy_timeout 86400s;
}
server {
listen 7223;
proxy_pass kuma-core-rest_backend;
proxy_timeout 86400s;
}
upstream kubeAPI_backend {
server 10.0.0.2:6443;
server 10.0.0.3:6443;
server 10.0.0.4:6443;
}
upstream konnectivity_backend {
server 10.0.0.2:8132;
server 10.0.0.3:8132;
server 10.0.0.4:8132;
}
upstream controllerJoinAPI_backend {
server 10.0.0.2:9443;
server 10.0.0.3:9443;
server 10.0.0.4:9443;
}
upstream kuma-core-hierarchy_backend {
server 10.0.1.2:7209;
server 10.0.1.3:7209;
}
upstream kuma-core-services_backend {
server 10.0.1.2:7210;
server 10.0.1.3:7210;
}
upstream kuma-core-ui_backend {
server 10.0.1.2:7220;
server 10.0.1.3:7220;
}
upstream kuma-core-cybertrace_backend {
server 10.0.1.2:7222;
server 10.0.1.3:7222;
}
upstream kuma-core-rest_backend {
server 10.0.1.2:7223;
server 10.0.1.3:7223;
}
worker_rlimit_nofile 1000000;
events {
worker_connections 20000;
}
# worker_rlimit_nofile is the limit on the number of open files (RLIMIT_NOFILE) for workers.This is used to raise the limit without restarting the main process.
# worker_connections is the maximum number of connections that a worker can open simultaneously.
- An access key from the device on which KUMA is installed must be added to the nginx load balancer server.
- On the nginx load balancer server, the SELinux module must be disabled in the operating system.
- The tar, systemctl packages are installed on the hosts.
During KUMA installation, the hosts are automatically checked to see if they meet the following hardware requirements:
- CPU cores (threads): 12 or more
- RAM: 22,528 MB or more
- Free disk space in the /opt partition: 1000 GB or more.
- For an installation from scratch, the /var/lib partition must have at least 32 GB of free space. If the cluster already has been installed on this node, the size of the required free space is reduced by the size of the /var/lib/k0s directory.
If these conditions are not satisfied, the installation is aborted. For a demo installation, you can disable the check of these conditions by setting low_resources: true in the inventory file.
Additional requirements when installing on Astra Linux or Ubuntu operating systems.
- Installing KUMA in a high availability configuration is supported for Astra Linux Special Edition RUSB.10015-01 (2022-1011SE17MD, update 1.7.2.UU.1). Kernel version 5.15.0.33 or later is required.
- The following packages must be installed on the machines intended for deploying a Kubernetes cluster:
- open-iscsi
- wireguard
- wireguard-tools
To install the packages, run the following command:
sudo apt install open-iscsi wireguard wireguard-tools
Additional requirements when installing on the Oracle Linux, RED OS, or Red Hat Enterprise Linux operating systems
The following packages must be installed on the machines intended for deploying the Kubernetes cluster:
- iscsi-initiator-utils
- wireguard-tools
Before installing the packages on Oracle Linux, you must add the EPEL repository as a source of packages using one of the following commands:
sudo yum install oracle-epel-release-el8 (for Oracle Linux 8)sudo yum install oracle-epel-release-el9 (for Oracle Linux 9)
To install the packages, run the following command:
sudo yum install iscsi-initiator-utils wireguard-tools
Page top
[Topic 244399]
Installing KUMA on a Kubernetes cluster from scratch
The distributed installation of KUMA involves several steps:
- Verifying that the hardware, software, and installation requirements for KUMA are satisfied.
- Preparing the control machine.
The control machine is used during the application installation process to extract and run the installer files.
- Preparing the target machines.
The program components are installed on the target machines.
- Preparing the k0s.inventory.yml inventory file.
Create an inventory file with a description of the network structure of program components. The installer uses this inventory file to deploy KUMA.
- Installing the program.
Install the application and log in to the web interface.
- Creating services.
Create the client part of the services in the KUMA web interface and install the server part of the services on the target machines.
Make sure the KUMA installation is complete before you install KUMA services. We recommend installing services in the following order: storage, collectors, correlators, agents.
When deploying several KUMA services on the same host, during installation, you must specify unique ports for each service using the --api.port <port> parameter.
If necessary, you can change the certificate of KUMA web console to use your company's certificate.
Page top
[Topic 269330]
Preparing the test machine
To prepare the control machine for installing KUMA:
- Ensure that hardware, software, and installation requirements of the application are met.
- Generate an SSH key for authentication on the SSH servers of the target machines:
sudo ssh-keygen -f /root/.ssh/id_rsa -N "" -C kuma-ansible-installer
If SSH root access is blocked on the control machine, generate an SSH key for authentication on the SSH servers of the target machines for a user from the sudo group:
If the user that you want to use does not have sudo rights, add the user to the sudo group:
usermod -aG sudo user
ssh-keygen -f /home/<name of the user from the sudo group>/.ssh/id_rsa -N "" -C kuma-ansible-installer
As a result, the key is generated and saved in the user's home directory. To make the key available during installation, you must specify the full path to the key in the inventory file, in the ansible_ssh_private_key_file setting.
- Make sure that the control machine has network access to all the target machines by host name and copy the SSH key to each target machine:
sudo ssh-copy-id -i /root/.ssh/id_rsa root@<host name of the control machine>
If SSH root access is blocked on the control machine and you want to use the SSH key from the home directory of the user from the sudo group, make sure that the control machine has network access to all target machines by host name and copy the SSH key to each target machine:
ssh-copy-id -i /home/<name of the user in the sudo group>/.ssh/id_rsa <name of the user in the sudo group>@<host name of the test machine>
- Copy the
kuma-ansible-installer-ha-<version number> .tar.gz installer archive to the control machine and extract it using the following command:sudo tar -xpf kuma-ansible-installer-ha-<version number>.tar.gz
The test machine is ready for the KUMA installation.
Page top
[Topic 269332]
Preparing the target machine
To prepare the target machine for the installation of KUMA components:
- Ensure that hardware, software, and installation requirements are met.
- Specify the host name. We recommend specifying a FQDN. For example, kuma1.example.com.
Do not change the KUMA host name after installation: this will make it impossible to verify the authenticity of certificates and will disrupt the network communication between the application components.
- Register the target machine in your organization's DNS zone to allow host names to be translated to IP addresses.
The option of using the /etc/hosts file is not available when the Core is deployed in Kubernetes.
- To get the hostname that you must specify when installing KUMA, run the following command and record the result:
hostname -f
The control machine must be able to access the target machine using this name.
The target machine is ready for the installation of KUMA components.
Page top
[Topic 269334]
Preparing the k0s.inventory.yml inventory file
Expand all | Collapse all
To create the k0s.inventory.yml inventory file:
- Go to the KUMA installer folder by executing the following command:
cd kuma-ansible-installer-ha
- Copy the k0s.inventory.yml.template file to create the expand.inventory.yml inventory file:
cp k0s.inventory.yml.template k0s.inventory.yml
- Edit the inventory file settings in k0s.inventory.yml.
Example inventory file for a distributed installation in a high availability configuration with 3 controllers, 2 worker nodes, and 1 balancer
all:
vars:
ansible_connection: ssh
ansible_user: root
deploy_to_k8s: true
need_transfer: false
generate_etc_hosts: false
deploy_example_services: false
kuma:
children:
kuma_core:
hosts:
kuma-core.example.com:
mongo_log_archives_number: 14
mongo_log_frequency_rotation: daily
mongo_log_file_size: 1G
kuma_collector:
hosts:
kuma-collector.example.com:
kuma_correlator:
hosts:
kuma-correlator.example.com:
kuma_storage:
hosts:
kuma-storage-cluster1.server1.example.com
kuma-storage-cluster1.server2.example.com
kuma-storage-cluster1.server3.example.com
kuma-storage-cluster1.server4.example.com
kuma-storage-cluster1.server5.example.com
kuma-storage-cluster1.server6.example.com
kuma-storage-cluster1.server7.example.com
kuma_k0s:
children:
kuma_lb:
hosts:
kuma-lb.example.com:
kuma_managed_lb: true
kuma_control_plane_master:
hosts:
kuma_cpm.example.com:
ansible_host: 10.0.1.10
kuma_control_plane_master_worker:
kuma_control_plane:
hosts:
kuma_cp2.example.com:
ansible_host: 10.0.1.11
kuma_cp3.example.com:
ansible_host: 10.0.1.12
kuma_control_plane_worker:
kuma_worker:
hosts:
kuma-w1.example.com:
ansible_host: 10.0.2.11
extra_args: "--labels=kaspersky.com/kuma-core=true,kaspersky.com/kuma-ingress=true,node.longhorn.io/create-default-disk=true"
kuma-w2.example.com:
ansible_host: 10.0.2.12
extra_args: "--labels=kaspersky.com/kuma-core=true,kaspersky.com/kuma-ingress=true,node.longhorn.io/create-default-disk=true"
For such a configuration, specify the parameters as follows: need_transfer: false, deploy_example_services: false; in the kuma_storage section, list the servers for the storage cluster. After the installation is complete, you can use the KUMA web interface to assign the shard, replica and keeper roles to the servers specified in the inventory.
Example inventory file for migrating the Core from a distributed installation to a Kubernetes cluster to ensure high availability
all:
vars:
ansible_connection: ssh
ansible_user: root
deploy_to_k8s: true
need_transfer: true
generate_etc_hosts: false
deploy_example_services: false
kuma:
children:
kuma_core:
hosts:
kuma-core.example.com:
mongo_log_archives_number: 14
mongo_log_frequency_rotation: daily
mongo_log_file_size: 1G
kuma_collector:
hosts:
kuma-collector.example.com:
kuma_correlator:
hosts:
kuma-correlator.example.com:
kuma_storage:
hosts:
kuma-storage-cluster1.server1.example.com
kuma-storage-cluster1.server2.example.com
kuma-storage-cluster1.server3.example.com
kuma-storage-cluster1.server4.example.com
kuma-storage-cluster1.server5.example.com
kuma-storage-cluster1.server6.example.com
kuma-storage-cluster1.server7.example.com
kuma_k0s:
children:
kuma_lb:
hosts:
kuma-lb.example.com:
kuma_managed_lb: true
kuma_control_plane_master:
hosts:
kuma_cpm.example.com:
ansible_host: 10.0.1.10
kuma_control_plane_master_worker:
kuma_control_plane:
hosts:
kuma_cp2.example.com:
ansible_host: 10.0.1.11
kuma_cp3.example.com:
ansible_host: 10.0.1.12
kuma_control_plane_worker:
kuma_worker:
hosts:
kuma-w1.example.com:
ansible_host: 10.0.2.11
extra_args: "--labels=kaspersky.com/kuma-core=true,kaspersky.com/kuma-ingress=true,node.longhorn.io/create-default-disk=true"
kuma-w2.example.com:
ansible_host: 10.0.2.12
extra_args: "--labels=kaspersky.com/kuma-core=true,kaspersky.com/kuma-ingress=true,node.longhorn.io/create-default-disk=true"
The kuma_core, kuma_collector, kuma_correlator, kuma_storage sections of your k0s.inventory.yml inventory file must contain the same hosts that were used in the distributed.inventory.yml file when KUMA was upgraded from version 2.1.3 to version 3.0.3 and then to version 3.2, or when a new installation was performed. In the k0s.inventory.yml inventory file, set deploy_to_k8s: true, need_transfer: true, deploy_example_services: false.
We recommend backing up the inventory file that you used to install the program. You can use it to add components to the system or remove KUMA.
Page top
[Topic 269310]
Installing the program in a high availability configuration
KUMA is installed using the Ansible tool and the k0s.inventory.yml inventory file. The installation is performed from the control machine, and all of the KUMA components are installed on target machines.
To install KUMA:
- On the control machine, go to the directory containing the extracted installer.
cd kuma-ansible-installer-ha
- Depending on the type of license activation that you are planning to use, do one of the following:
- From the folder with the unpacked installer, start the installation of components using the prepared distributed.inventory.yml inventory file:
sudo ./install.sh k0s.inventory.yml
- Accept the terms of the End User License Agreement.
If you do not accept the terms and conditions of the End User License Agreement, the application cannot be installed.
Depending on the type of license activation, running the installer has one of the following results:
- If you want to activate the license using a file and have placed the file with the license key in "<installer directory>/roles/kuma/files/", running the installer with the "k0s.inventory.yml" inventory file installs KUMA Core, all services specified in the inventory file, and OOTB resources.
- If you want to activate with a license code or provide a license file later, running the installer with the "k0s.inventory.yml" inventory file installs only KUMA Core.
To install the services, specify the license code on the command line. Then run the postinstall.sh installer with the "k0s.inventory.yml" inventory file.
sudo ./postinstall.sh k0s.inventory.yml
This creates the specified services. You can select the resources that you want to import from the repository.
- After the installation is complete, log in to the KUMA web interface and enter the address of the KUMA web interface in the address bar of your browser, then enter your credentials on the login page.
The address of the KUMA web interface is https://<FQDN of the nginx load balancer>:7220.
Default login credentials:
- login – admin
- password – mustB3Ch@ng3d!
After logging in for the first time, change the password of the admin account
All KUMA components are installed and you are logged in to the web interface.
We recommend saving a backup copy of the inventory file that you used to install the application. You can use this inventory file to add components to the system or remove KUMA.
Page top
[Topic 269337]
Migrating the KUMA Core to a new Kubernetes cluster
To migrate KUMA Core to a new Kubernetes cluster:
- Prepare the k0s.inventory.yml inventory file.
The kuma_core, kuma_ collector, kuma_correlator, kuma_storage sections of your k0s.inventory.yml inventory file must contain the same hosts that were used when KUMA was upgraded from version 2.1.3 to version 3.0.3 and then to version 3.2, or when a new installation was performed. In the inventory file, set deploy_to_k8s: true, need_transfer: true. Set deploy_example_services: false.
- Follow the steps for distributed installation using your prepared k0s.inventory.yml inventory file.
Migrating the KUMA Core to a new Kubernetes cluster
When the installer is started with an inventory file, the installer looks for an installed KUMA Core on all hosts where you plan to deploy worker nodes of the cluster. If a Core is found, it is moved from its host to the newly created Kubernetes cluster.
Resolving the KUMA Core migration error
Migration of the KUMA Core from a host to a new Kubernetes cluster may be aborted due to a timeout at the Deploy Core transfer job step. In this case, the following error message is recorded in the log of core-transfer migration tasks:
cp: can't stat '/mnt/kuma-source/core/.lic': No such file or directory
To prevent this error, before you start migrating the KUMA Core:
- Go to the directory with the extracted installer and open the roles/k0s_prepare/templates/core-transfer-job.yaml.j2 file for editing.
- In the core-transfer-job.yaml.j2 file, find the following lines:
cp /mnt/kuma-source/core/.lic {{ core_k0s_home }}/ &&
cp /mnt/kuma-source/core/.tenantsEPS {{ core_k0s_home }}/ &&
- Edit these lines as follows, making sure you keep the indentation (number of space characters):
cp /mnt/kuma-source/core/{{ core_uid }}/.lic {{ core_k0s_home }}/ &&
cp /mnt/kuma-source/core/{{ core_uid }}/.tenantsEPS {{ core_k0s_home }}/ &&
- Save the changes to the file.
You can then restart the distributed installation using the prepared k0s.inventory.yml inventory file. Migrating the KUMA Core from a host to a new Kubernetes cluster will succeed.
If you started migrating the KUMA Core from a host to a new Kubernetes cluster and the migration failed with an error, follow the steps below to fix the error.
To fix the error after attempting to migrate the KUMA Core from a host to a new Kubernetes cluster:
- On any controller of the cluster, delete the Ingress object by running the following command:
sudo k0s kubectl delete daemonset/ingress -n ingress
- Check if a migration job exists in the cluster:
sudo k0s kubectl get jobs -n kuma
- If a migration job exists, delete it:
sudo k0s kubectl delete job core-transfer -n kuma
- Go to the console of a host from the kuma_core group.
- Start the KUMA Core services by running the following commands:
sudo systemctl start kuma-mongodb
sudo systemctl start kuma-core-00000000-0000-0000-0000-000000000000
- Make sure that the kuma-core-00000000-0000-0000-0000-000000000000 service has been successfully started:
sudo systemctl status kuma-core-00000000-0000-0000-0000-000000000000
- Make sure that the kuma_core group has access to the KUMA interface by host FQDN.
Other hosts do not need to be running.
- Go to the directory with the extracted installer and open the roles/k0s_prepare/templates/core-transfer-job.yaml.j2 file for editing.
- In the core-transfer-job.yaml.j2 file, find the following lines:
cp /mnt/kuma-source/core/.lic {{ core_k0s_home }}/ &&
cp /mnt/kuma-source/core/.tenantsEPS {{ core_k0s_home }}/ &&
- Edit these lines as follows, making sure you keep the indentation (number of space characters):
cp /mnt/kuma-source/core/{{ core_uid }}/.lic {{ core_k0s_home }}/ &&
cp /mnt/kuma-source/core/{{ core_uid }}/.tenantsEPS {{ core_k0s_home }}/ &&
- Save the changes to the file.
You can then restart the distributed installation using the prepared k0s.inventory.yaml inventory file. The migration of the KUMA Core from a host to a new Kubernetes cluster will succeed.
If the component is not detected on the worker nodes, a clean installation of the KUMA Core is performed in the cluster without migrating resources to it. Existing components must be manually recreated with the new Core in the KUMA web interface.
For collectors, correlators and storages from the inventory file, certificates for communication with the Core inside the cluster will be reissued. This does not change the URL of the Core for components.
On the Core host, the installer does the following:
- Removes the following systemd services from the host: kuma-core, kuma-mongodb, kuma-victoria-metrics, kuma-vmalert, and kuma-grafana.
- Deletes the internal certificate of the Core.
- Deletes the certificate files of all other components and deletes their records from MongoDB.
- Deletes the following directories:
- /opt/kaspersky/kuma/core/bin
- /opt/kaspersky/kuma/core/certificates
- /opt/kaspersky/kuma/core/log
- /opt/kaspersky/kuma/core/logs
- /opt/kaspersky/kuma/grafana/bin
- /opt/kaspersky/kuma/mongodb/bin
- /opt/kaspersky/kuma/mongodb/log
- /opt/kaspersky/kuma/victoria-metrics/bin
- Migrates data from the Core and its dependencies to a network drive within the Kubernetes cluster.
- On the Core host, it moves the following directories:
- /opt/kaspersky/kuma/core → /opt/kaspersky/kuma/core.moved
- /opt/kaspersky/kuma/grafana → /opt/kaspersky/kuma/grafana.moved
- /opt/kaspersky/kuma/mongodb → /opt/kaspersky/kuma/mongodb.moved
- /opt/kaspersky/kuma/victoria-metrics → /opt/kaspersky/kuma/victoria-metrics.moved
After you have verified that the Core was correctly migrated to the cluster, you can delete these directories.
If you encounter problems with the migration, check the logs for records of the 'core-transfer' migration task in the 'kuma' namespace in the cluster (this task is available for 1 hour after the migration).
If you need to perform migration again, you must restore the original names of the /opt/kaspersky/kuma/*.moved directories.
If the /etc/hosts file on the Core host contained lines that were not related to addresses in the 127.X.X.X range, the contents of the /etc/hosts file from the Core host is entered into the coredns ConfigMap when the Core is migrated to the Kubernetes cluster. If the Core is not migrated, the contents of the /etc/hosts file from the host where the primary controller is deployed is entered into the ConfigMap.
Page top
[Topic 244734]
KUMA Core availability under various scenarios
KUMA Core availability in various scenarios:
- The worker node on which the KUMA Core service is deployed fails or loses network connectivity.
Access to the KUMA web interface is lost. After 6 minutes, Kubernetes initiates the migration of the Core bucket to an operational node of the cluster. After the deployment, which takes less than one minute, is completed, the KUMA web interface becomes available again at URLs based on the FQDN of the load balancer. To find out which host is hosting the Core now, run the following command in the terminal of one of the controllers:
k0s kubectl get pod -n kuma -o wide
When the failed worker node recovers or its network connectivity is restored, the Core bucket remains on its current worker node and is not migrated back to the recovered node. The recovered node can participate in the replication of the Core service's disk volume.
- A worker node that contains a replica of the KUMA Core disk, and which is not hosting the Core service at the moment, fails or loses network connectivity.
The KUMA web interface remains available at URLs based on the FQDN of the load balancer. The network storage creates a replica of the currently operational Core disk volume on other healthy nodes. There is also no disruption of access to KUMA at URLs based on the FQDNs of currently operational nodes.
- One or more cluster controllers become unavailable, but quorum is maintained.
Worker nodes work normally. Access to KUMA is not disrupted. A failure of cluster controllers extensive enough to break quorum leads to the loss of control over the cluster.
How many machines are needed for high availability
Number of controllers when installing the cluster
|
Minimum number (quorum) of controllers to keep the cluster operational
|
How many controllers may fail without breaking quorum
|
1
|
1
|
0
|
2
|
2
|
0
|
3
|
2
|
1
|
4
|
3
|
1
|
5
|
3
|
2
|
6
|
4
|
2
|
7
|
4
|
3
|
8
|
5
|
3
|
9
|
5
|
4
|
- All controllers of the Kubernetes cluster fail simultaneously.
Control of the cluster is lost, and the cluster is not operational.
- Simultaneous loss of availability of all worker nodes of a cluster with replicas of the Core volume and the Core pod.
Access to the KUMA web interface is lost. If all replicas are lost, information loss occurs.
Page top
[Topic 269307]
Managing Kubernetes and accessing KUMA
When installing KUMA in a high availability configuration, a file named ./artifacts/k0s-kubeconfig.yml is created in the installer directory. This file contains the details required for connecting to the created Kubernetes cluster. An identical file is created on the main controller in the home directory of the user specified as the ansible_user in the inventory file.
To ensure that the Kubernetes cluster can be monitored and managed, the k0s-kubeconfig.yml file must be saved in a location accessible by the cluster administrators. Access to the file must be restricted.
Managing the Kubernetes cluster
To monitor and manage the cluster, you can use the k0s application that is installed on all cluster nodes during KUMA deployment. For example, you can use the following command to view the load on worker nodes:
k0s kubectl top nodes
Access to the KUMA Core
The URL of the KUMA Core is https://<worker node FQDN>:<worker node port>. Available ports: 7209, 7210, 7220, 7222, 7223. Port 7220 is the default port for connecting to the KUMA Core web interface. Any worker node whose extra_args parameter contains the value kaspersky.com/kuma-ingress=true can be used as an access point.
It is not possible to log in to the KUMA web interface on multiple worker nodes simultaneously using the same credentials. Only the most recently established connection remains active.
If you are using an external load balancer in the configuration of the high availability Kubernetes cluster, you must use the FQDN of the load balancer for access to KUMA Core ports.
Page top
[Topic 244730]
Time zone in a Kubernetes cluster
The time zone within the Kubernetes cluster is always UTC+0, so the following time difference must be taken into account when dealing with data created by a high-availability KUMA Core:
- In audit events, the time zone in the
DeviceTimeZone field is UTC+0. - In generated reports, the difference between the report generation time and the browser's time will be displayed.
- In the dashboard, the user will find the difference between the time in the widget (the time of the user's browser is displayed) and the time in the exported widget data in the CSV file (the time of the Kubernetes cluster is displayed).
Page top
[Topic 246518][Topic 222208]
Modifying the configuration of KUMA
The KUMA configuration can be modified in the following ways.
- Expanding an all-in-one installation to a distributed installation.
To expand an all-in-one installation to a distributed installation:
- Create a backup copy of KUMA.
- Remove the pre-installed correlator, collector, and storage services from the server.
- In the KUMA web interface, under Resources → Active services, select a service and click Copy ID. On the server where the services were installed, run the service removal command:
sudo /opt/kaspersky/kuma/kuma <collector/correlator/storage> --id <service ID copied from the KUMA web interface> --uninstall
Repeat the removal command for each service.
- Then remove the services in the KUMA web interface:
As a result, only the KUMA Core remains on the initial installation server.
- Prepare the distributed.inventory.yml inventory file and in that file, specify the initial all-in-one initial installation server in the
kuma_core group.In this way, the KUMA Core remains on the original server, and you can deploy the other components on other servers. In the inventory file, specify the servers on which you want to install the KUMA components.
Example inventory file for expanding an all-in-one installation to a distributed installation
all:
vars:
deploy_to_k8s: false
need_transfer: false
generate_etc_hosts: false
deploy_example_services: false
no_firewall_actions: false
kuma:
vars:
ansible_connection: ssh
ansible_user: root
children:
kuma_core:
hosts:
kuma-core-1.example.com:
ip: 0.0.0.0
mongo_log_archives_number: 14
mongo_log_frequency_rotation: daily
mongo_log_file_size: 1G
kuma_collector:
hosts:
kuma-collector-1.example.com:
ip: 0.0.0.0
kuma_correlator:
hosts:
kuma-correlator-1.example.com:
ip: 0.0.0.0
kuma_storage:
hosts:
kuma-storage-cluster1-server1.example.com:
ip: 0.0.0.0
shard: 1
replica: 1
keeper: 0
kuma-storage-cluster1-server2.example.com:
ip: 0.0.0.0
shard: 1
replica: 2
keeper: 0
kuma-storage-cluster1-server3.example.com:
ip: 0.0.0.0
shard: 2
replica: 1
keeper: 0
kuma-storage-cluster1-server4.example.com:
ip: 0.0.0.0
shard: 2
replica: 2
keeper: 0
kuma-storage-cluster1-server5.example.com:
ip: 0.0.0.0
shard: 0
replica: 0
keeper: 1
kuma-storage-cluster1-server6.example.com:
ip: 0.0.0.0
shard: 0
replica: 0
keeper: 2
kuma-storage-cluster1-server7.example.com:
ip: 0.0.0.0
shard: 0
replica: 0
keeper: 3
- Create and install the storage, collector, correlator, and agent services on other machines.
- After you specify the settings in all sections of the distributed.inventory.yml file, run the installer on the control machine.
sudo ./install.sh distributed.inventory.yml
This command creates files necessary to install the KUMA components (storage, collectors, correlators) on each target machine specified in distributed.inventory.yml.
- Create storage, collector, and correlator services.
The expansion of the installation is completed.
- Adding servers for collectors to a distributed installation.
The following instructions describe adding one or more servers to an existing infrastructure to then install collectors on these servers to balance the load. You can use these instructions as an example and adapt them according to your needs.
To add servers to a distributed installation:
- Ensure that the target machines meet hardware, software, and installation requirements.
- On the control machine, go to the directory with the extracted KUMA installer by running the following command:
cd kuma-ansible-installer
- Create an inventory file named expand.inventory.yml by copying the expand.inventory.yml.template file:
cp expand.inventory.yml.template expand.inventory.yml
- Edit the settings in the expand.inventory.yml inventory file and specify the servers that you want to add in the kuma_collector section.
Example expand.inventory.yml inventory file for adding collector servers
kuma:
vars:
ansible_connection: ssh
ansible_user: root
children:
kuma_collector:
kuma-additional-collector1.example.com
kuma-additional-collector2.example.com
kuma_correlator:
kuma_storage:
hosts:
- On the test machine, run the following command as root from the directory with the unpacked installer:
./expand.sh expand.inventory.yml
This command creates files for creating and installing the collector on each target machine specified in the expand.inventory.yml inventory file.
- Create and install the collectors. A KUMA collector consists of a client part and a server part, therefore creating a collector involves two steps.
- Creating the client part of the collector, which includes a resource set and the collector service.
To create a resource set for a collector, in the KUMA web interface, under Resources → Collectors, click Add collector and edit the settings. For more details, see Creating a collector.
At the last step of the configuration wizard, after you click Create and save, a resource set for the collector is created and the collector service is automatically created. The command for installing the service on the server is also automatically generated and displayed on the screen. Copy the installation command and proceed to the next step.
- Creating the server part of the collector.
- On the target machine, run the command you copied at the previous step. The command looks as follows, but all parameters are filled in automatically.
sudo /opt/kaspersky/kuma/kuma <storage> --core https://<KUMA Core server FQDN>:<port used by KUMA Core for internal communication (port 7210 by default)> --id <service ID copied from the KUMA web interface> --install
The collector service is installed on the target machine. You can check the status of the service in the web interface under Resources → Active services.
- Run the same command on each target machine specified in the expand.inventory.yml inventory file.
- Add the new servers to the distributed.inventory.yml inventory file so that it has up-to-date information in case you need to upgrade KUMA.
Servers are successfully added.
- Adding servers for correlators to a distributed installation.
The following instructions describe adding one or more servers to an existing infrastructure to then install correlators on these servers to balance the load. You can use these instructions as an example and adapt them to your requirements.
To add servers to a distributed installation:
- Ensure that the target machines meet hardware, software, and installation requirements.
- On the control machine, go to the directory with the extracted KUMA installer by running the following command:
cd kuma-ansible-installer
- Create an inventory file named expand.inventory.yml by copying the expand.inventory.yml.template file:
cp expand.inventory.yml.template expand.inventory.yml
- Edit the settings in the expand.inventory.yml inventory file and specify the servers that you want to add in the kuma_correlator section.
Example expand.inventory.yml inventory file for adding correlator servers
kuma:
vars:
ansible_connection: ssh
ansible_user: root
children:
kuma_collector:
kuma_correlator:
kuma-additional-correlator1.example.com
kuma-additional-correlator2.example.com
kuma_storage:
hosts:
- On the test machine, run the following command as root from the directory with the unpacked installer:
./expand.sh expand.inventory.yml
This command creates files for creating and installing the correlator on each target machine specified in the expand.inventory.yml inventory file.
- Create and install the correlators. A KUMA correlator consists of a client part and a server part, therefore creating a correlator involves two steps.
- Creating the client part of the correlator, which includes a resource set and the correlator service.
To create a resource set for a correlator, in the KUMA web interface, under Resources → Correlators, click Add correlator and edit the settings. For more details, see Creating a correlator.
At the last step of the configuration wizard, after you click Create and save, a resource set for the correlator is created and the correlator service is automatically created. The command for installing the service on the server is also automatically generated and displayed on the screen. Copy the installation command and proceed to the next step.
- Creating the server part of the correlator.
- On the target machine, run the command you copied at the previous step. The command looks as follows, but all parameter values are assigned automatically.
sudo /opt/kaspersky/kuma/kuma <storage> --core https://<KUMA Core server FQDN>:<port used by KUMA Core for internal communication (port 7210 by default)> --id <service ID copied from the KUMA web interface> --install
The correlator service is installed on the target machine. You can check the status of the service in the web interface under Resources → Active services.
- Run the same command on each target machine specified in the expand.inventory.yml inventory file.
- Add the new servers to the distributed.inventory.yml inventory file so that it has up-to-date information in case you need to upgrade KUMA.
Servers are successfully added.
- Adding servers to an existing storage cluster.
The following instructions describe adding multiple servers to an existing storage cluster. You can use these instructions as an example and adapt them to your requirements.
To add servers to an existing storage cluster:
- Ensure that the target machines meet hardware, software, and installation requirements.
- On the control machine, go to the directory with the extracted KUMA installer by running the following command:
cd kuma-ansible-installer
- Create an inventory file named expand.inventory.yml by copying the expand.inventory.yml.template file:
cp expand.inventory.yml.template expand.inventory.yml
- Edit the settings in the expand.inventory.yml inventory file and specify the servers that you want to add in the 'storage' section. In the following example, the 'storage' section specifies servers for installing two shards, each of which contains two replicas. In the expand.inventory.yml inventory file, you must only specify the FQDN; you will assign the roles of shards and replicas later in the KUMA web interface as you follow the steps of these instructions. You can adapt this example according to your needs.
Example expand.inventory.yml inventory file for adding servers to an existing storage cluster
kuma:
vars:
ansible_connection: ssh
ansible_user: root
children:
kuma_collector:
kuma_correlator:
kuma_storage:
hosts:
kuma-storage-cluster1-server8.example.com:
kuma-storage-cluster1-server9.example.com:
kuma-storage-cluster1-server10.example.com:
kuma-storage-cluster1-server11.example.com:
- On the test machine, run the following command as root from the directory with the unpacked installer:
./expand.sh expand.inventory.yml
Running this command on each target machine specified in the expand.inventory.yml inventory file creates files for creating and installing the storage.
- You do not need to create a separate storage because you are adding servers to an existing storage cluster. Edit the storage settings of the existing cluster:
- In the Resources → Storages section, select an existing storage and open the storage for editing.
- In the ClickHouse cluster nodes section, click Add nodes and specify roles in the fields for the new node. The following example describes how to specify IDs to add two shards, containing two replicas each, to an existing cluster. You can adapt this example according to your needs.
Example:
ClickHouse cluster nodes
<existing nodes>
FQDN: kuma-storage-cluster1server8.example.com
Shard ID: 1
Replica ID: 1
Keeper ID: 0
FQDN: kuma-storage-cluster1server9.example.com
Shard ID: 1
Replica ID: 2
Keeper ID: 0
FQDN: kuma-storage-cluster1server9.example.com
Shard ID: 2
Replica ID: 1
Keeper ID: 0
FQDN: kuma-storage-cluster1server10.example.com
Shard ID: 2
Replica ID: 2
Keeper ID: 0
- Save the storage settings.
Now you can create storage services for each ClickHouse cluster node.
- To create a storage service, in the KUMA web interface, in the Resources → Active services section, click Add service.
This opens the Choose a service window; in that window, select the storage you edited at the previous step and click Create service. Do the same for each ClickHouse storage node you are adding.
As a result, the number of created services must be the same as the number of nodes being added to the ClickHouse cluster, for example, four services for four nodes. The created storage services are displayed in the KUMA web interface in the Resources → Active services section.
- Now storage services must be installed on each server by using the service ID.
- In the KUMA web interface, in the Resources → Active services section, select the storage service that you need and click Copy ID.
The service ID is copied to the clipboard; you need it for running the service installation command.
- Compose and run the following command on the target machine:
sudo /opt/kaspersky/kuma/kuma <storage> --core https://<KUMA Core server FQDN>:<port used by KUMA Core for internal communication (port 7210 by default)> --id <service ID copied from the KUMA web interface> --install
The storage service is installed on the target machine. You can check the status of the service in the web interface under Resources → Active services.
- Run the storage service installation command on each target machine listed in the 'storage' section of the expand.inventory.yml inventory file, one machine at a time. On each machine, the unique service ID within the cluster must be specified in the installation command.
- To apply changes to a running cluster, in the KUMA web interface, under Resources → Active services, select the check boxes next to all storage services in the cluster that you are expanding and click Update configuration. Changes are applied without stopping services.
- Specify the added servers in the distributed.inventory.yml inventory file so that it has up-to-date information in case of a KUMA update.
Servers are successfully added to a storage cluster.
- Adding another storage cluster.
The following instructions describe adding an extra storage cluster to an existing infrastructure. You can use these instructions as an example and adapt them to suit your needs.
To add a storage cluster:
- Ensure that the target machines meet hardware, software, and installation requirements.
- On the control machine, go to the directory with the extracted KUMA installer by running the following command:
cd kuma-ansible-installer
- Create an inventory file named expand.inventory.yml by copying the expand.inventory.yml.template file:
cp expand.inventory.yml.template expand.inventory.yml
- Edit the settings in the expand.inventory.yml inventory file and specify the servers that you want to add in the 'storage' section. In the following example, the 'storage' section specifies servers for installing three dedicated keepers and two shards, each of which contains two replicas. In the expand.inventory.yml inventory file, you must only specify the FQDN; you will assign the roles of keepers, shards, and replicas later in the KUMA web interface by following the steps of these instructions. You can adapt this example to suit your needs.
Example expand.inventory.yml inventory file for adding a storage cluster
kuma:
vars:
ansible_connection: ssh
ansible_user: root
children:
kuma_collector:
kuma_correlator:
kuma_storage:
hosts:
kuma-storage-cluster2-server1.example.com
kuma-storage-cluster2-server2.example.com
kuma-storage-cluster2-server3.example.com
kuma-storage-cluster2-server4.example.com
kuma-storage-cluster2-server5.example.com
kuma-storage-cluster2-server6.example.com
kuma-storage-cluster2-server7.example.com
- On the test machine, run the following command as root from the directory with the unpacked installer:
./expand.sh expand.inventory.yml
This command creates files for creating and installing the storage on each target machine specified in the expand.inventory.yml inventory file.
- Create and install the storage. For each storage cluster, you must create a separate storage, for example, three storages for three storage clusters. A storage consists of a client part and a server part, therefore creating a storage involves two steps.
- Creating the client part of the storage, which includes a resource set and the storage service.
- To create a resource set for a storage, in the KUMA web interface, under Resources → Storages, click Add storage and edit the settings. In the ClickHouse cluster nodes section, specify roles for each server that you are adding: keeper, shard, replica. For more details, see Creating a resource set for a storage.
The created resource set for the storage is displayed in the Resources → Storages section. Now you can create storage services for each ClickHouse cluster node.
- To create a storage service, in the KUMA web interface, in the Resources → Active services section, click Add service.
This opens the Choose a service window; in that window, select the resource set that you created for the storage at the previous step and click Create service. Do the same for each ClickHouse storage.
As a result, the number of created services must be the same as the number of nodes in the ClickHouse cluster, for example, fifty services for fifty nodes. The created storage services are displayed in the KUMA web interface in the Resources → Active services section. Now you need to install storage services on each node of the ClickHouse cluster by using the service ID.
- Creating the server part of the storage.
- On the target machine, create the server part of the storage: in the KUMA web interface, in the Resources → Active services section, select a storage service and click Copy ID.
The service ID is copied to the clipboard; you will need it for the service installation command.
- Compose and run the following command on the target machine:
sudo /opt/kaspersky/kuma/kuma <storage> --core https://<KUMA Core server FQDN>:<port used by KUMA Core for internal communication (port 7210 by default)> --id <service ID copied from the KUMA web interface> --install
The storage service is installed on the target machine. You can check the status of the service in the web interface under Resources → Active services.
- Run the storage service installation command on each target machine listed in the 'storage' section of the expand.inventory.yml inventory file, one machine at a time. On each machine, the unique service ID within the cluster must be specified in the installation command.
- Dedicated keepers are automatically started immediately after installation and are displayed in the Resources → Active services section with the green status. Services on other storage nodes may not start until services are installed for all nodes in that cluster. Up to that point, services can be displayed with the red status. This is normal behavior when creating a new storage cluster or adding nodes to an existing storage cluster. As soon as the service installation command is run on all nodes of the cluster, all services get the green status.
- Specify the added servers in the distributed.inventory.yml inventory file so that it has up-to-date information in case of a KUMA update.
The extra storage cluster is successfully added.
- Removing servers from a distributed installation.
To remove a server from a distributed installation:
- Remove all services from the server that you want to remove from the distributed installation.
- Remove the server part of the service. Copy the service ID in the KUMA web interface and run the following command on the target machine:
sudo /opt/kaspersky/kuma/kuma <collector/correlator/storage> --core https://<KUMA Core server FQDN>:<port used by KUMA Core for internal communication (port 7210 by default)> --id <service ID copied from the KUMA web interface> --install
- Remove the client part of the service in the KUMA web interface in the Active services → Delete section.
The service is removed.
- Repeat step 1 for each server that you want to remove from the infrastructure.
- Remove the servers from the relevant sections of the distributed.inventory.yml inventory file to make sure the inventory file has up-to-date information in case you need to upgrade KUMA.
Servers are removed from the distributed installation.
- Removing a storage cluster from a distributed installation.
To remove one or more storage clusters from a distributed installation:
- Remove the storage service on each cluster server that you want to remove from the distributed installation.
- Remove the server part of the storage service. Copy the service ID in the KUMA web interface and run the following command on the target machine:
sudo /opt/kaspersky/kuma/kuma <storage> --id <service ID> --uninstall
Repeat for each server.
- Remove the client part of the service in the KUMA web interface in the Resources → Active services → Delete section.
The service is removed.
- Remove servers from the 'storage' section of the distributed.inventory.yml inventory file to make sure the inventory file has up-to-date information in case you need to upgrade KUMA or modify its configuration.
The cluster is removed from the distributed installation.
- Migrating the KUMA Core to a new Kubernetes cluster.
To migrate the KUMA Core to a new Kubernetes cluster:
- Prepare the k0s.inventory.yml inventory file.
The kuma_core, kuma_ collector, kuma_correlator, kuma_storage sections of your k0s.inventory.yml inventory file must contain the same hosts that were used when KUMA was upgraded from version 2.1.3 to version 3.0.3 and then to version 3.2, or when a new installation was performed. In the inventory file, set deploy_to_k8s: true, need_transfer: true. Set deploy_example_services: false.
- Follow the steps for distributed installation using your prepared k0s.inventory.yml inventory file.
Migrating the KUMA Core to a new Kubernetes cluster
When the installer is started with an inventory file, the installer looks for an installed KUMA Core on all hosts where you plan to deploy worker nodes of the cluster. If a Core is found, it is moved from its host to the newly created Kubernetes cluster.
Resolving the KUMA Core migration error
Migration of the KUMA Core from a host to a new Kubernetes cluster may be aborted due to a timeout at the Deploy Core transfer job step. In this case, the following error message is recorded in the log of core-transfer migration tasks:
cp: can't stat '/mnt/kuma-source/core/.lic': No such file or directory
To prevent this error, before you start migrating the KUMA Core:
- Go to the directory with the extracted installer and open the roles/k0s_prepare/templates/core-transfer-job.yaml.j2 file for editing.
- In the core-transfer-job.yaml.j2 file, find the following lines:
cp /mnt/kuma-source/core/.lic {{ core_k0s_home }}/ &&
cp /mnt/kuma-source/core/.tenantsEPS {{ core_k0s_home }}/ &&
- Edit these lines as follows, making sure you keep the indentation (number of space characters):
cp /mnt/kuma-source/core/{{ core_uid }}/.lic {{ core_k0s_home }}/ &&
cp /mnt/kuma-source/core/{{ core_uid }}/.tenantsEPS {{ core_k0s_home }}/ &&
- Save the changes to the file.
You can then restart the distributed installation using the prepared k0s.inventory.yml inventory file. Migrating the KUMA Core from a host to a new Kubernetes cluster will succeed.
If you started migrating the KUMA Core from a host to a new Kubernetes cluster and the migration failed with an error, follow the steps below to fix the error.
To fix the error after attempting to migrate the KUMA Core from a host to a new Kubernetes cluster:
- On any controller of the cluster, delete the Ingress object by running the following command:
sudo k0s kubectl delete daemonset/ingress -n ingress
- Check if a migration job exists in the cluster:
sudo k0s kubectl get jobs -n kuma
- If a migration job exists, delete it:
sudo k0s kubectl delete job core-transfer -n kuma
- Go to the console of a host from the kuma_core group.
- Start the KUMA Core services by running the following commands:
sudo systemctl start kuma-mongodb
sudo systemctl start kuma-core-00000000-0000-0000-0000-000000000000
- Make sure that the kuma-core-00000000-0000-0000-0000-000000000000 service has been successfully started:
sudo systemctl status kuma-core-00000000-0000-0000-0000-000000000000
- Make sure that the kuma_core group has access to the KUMA interface by host FQDN.
Other hosts do not need to be running.
- Go to the directory with the extracted installer and open the roles/k0s_prepare/templates/core-transfer-job.yaml.j2 file for editing.
- In the core-transfer-job.yaml.j2 file, find the following lines:
cp /mnt/kuma-source/core/.lic {{ core_k0s_home }}/ &&
cp /mnt/kuma-source/core/.tenantsEPS {{ core_k0s_home }}/ &&
- Edit these lines as follows, making sure you keep the indentation (number of space characters):
cp /mnt/kuma-source/core/{{ core_uid }}/.lic {{ core_k0s_home }}/ &&
cp /mnt/kuma-source/core/{{ core_uid }}/.tenantsEPS {{ core_k0s_home }}/ &&
- Save the changes to the file.
You can then restart the distributed installation using the prepared k0s.inventory.yaml inventory file. The migration of the KUMA Core from a host to a new Kubernetes cluster will succeed.
If the component is not detected on the worker nodes, a clean installation of the KUMA Core is performed in the cluster without migrating resources to it. Existing components must be manually recreated with the new Core in the KUMA web interface.
For collectors, correlators and storages from the inventory file, certificates for communication with the Core inside the cluster will be reissued. This does not change the URL of the Core for components.
On the Core host, the installer does the following:
- Removes the following systemd services from the host: kuma-core, kuma-mongodb, kuma-victoria-metrics, kuma-vmalert, and kuma-grafana.
- Deletes the internal certificate of the Core.
- Deletes the certificate files of all other components and deletes their records from MongoDB.
- Deletes the following directories:
- /opt/kaspersky/kuma/core/bin
- /opt/kaspersky/kuma/core/certificates
- /opt/kaspersky/kuma/core/log
- /opt/kaspersky/kuma/core/logs
- /opt/kaspersky/kuma/grafana/bin
- /opt/kaspersky/kuma/mongodb/bin
- /opt/kaspersky/kuma/mongodb/log
- /opt/kaspersky/kuma/victoria-metrics/bin
- Migrates data from the Core and its dependencies to a network drive within the Kubernetes cluster.
- On the Core host, it moves the following directories:
- /opt/kaspersky/kuma/core → /opt/kaspersky/kuma/core.moved
- /opt/kaspersky/kuma/grafana → /opt/kaspersky/kuma/grafana.moved
- /opt/kaspersky/kuma/mongodb → /opt/kaspersky/kuma/mongodb.moved
- /opt/kaspersky/kuma/victoria-metrics → /opt/kaspersky/kuma/victoria-metrics.moved
After you have verified that the Core was correctly migrated to the cluster, you can delete these directories.
If you encounter problems with the migration, check the logs for records of the 'core-transfer' migration task in the 'kuma' namespace in the cluster (this task is available for 1 hour after the migration).
If you need to perform migration again, you must restore the original names of the /opt/kaspersky/kuma/*.moved directories.
If the /etc/hosts file on the Core host contained lines that were not related to addresses in the 127.X.X.X range, the contents of the /etc/hosts file from the Core host is entered into the coredns ConfigMap when the Core is migrated to the Kubernetes cluster. If the Core is not migrated, the contents of the /etc/hosts file from the host where the primary controller is deployed is entered into the ConfigMap.
Page top
[Topic 222160]
Updating previous versions of KUMA
The upgrade procedure is the same for all hosts and involves using the installer and inventory file.
Version upgrade scheme:
2.0.х → 2.1.3 → 3.0.3 → 3.2.x → 3.4
2.1.х → 2.1.3 → 3.0.3 → 3.2.x → 3.4
2.1.3 → 3.0.3 → 3.2.x → 3.4
3.0.x → 3.0.3 → 3.2.x → 3.4
Upgrading from version 2.0.x to 2.1.3
To install KUMA version 2.1.3 over version 2.0.x, complete the preliminary steps and then perform the upgrade.
Preliminary steps
- Create a backup copy of the KUMA Core. If necessary, you will be able to recover from a backup copy for version 2.0.
KUMA backups created in versions 2.0 and earlier cannot be restored in version 2.1.3. This means that you cannot install KUMA 2.1.3 from scratch and restore a KUMA 2.0 backup in it.
Create a backup copy immediately after upgrading KUMA to version 2.1.3.
- Make sure that all application installation requirements are met.
- Make sure that MongoDB versions are compatible by running the following commands on the KUMA Core device:
cd /opt/kaspersky/kuma/mongodb/bin/
./mongo
use kuma
db.adminCommand({getParameter: 1, featureCompatibilityVersion: 1})
If the component version is different from 4.4, set the version to 4.4 using the following command:
db.adminCommand({ setFeatureCompatibilityVersion: "4.4" })
- During installation or upgrade, make sure that TCP port 7220 on the KUMA Core is accessible from the KUMA storage hosts.
- If you have a keeper deployed on a separate device in the ClickHouse cluster, install the storage service on the same device before you start the upgrade:
- Use the existing storage of the cluster to create a storage service for the keeper in the web interface.
- Install the service on the device with the dedicated ClickHouse keeper.
- In the inventory file, specify the same hosts that were used when installing KUMA version 2.0.X. Set the following settings to
false: deploy_to_k8s false
need_transfer false
deploy_example_services false
When the installer uses this inventory file, all KUMA components are upgraded to version 2.1.3. The available services and storage resources are also reconfigured on hosts from the kuma_storage group:
- ClickHouse's systemd services are removed.
- Certificates are deleted from the /opt/kaspersky/kuma/clickhouse/certificates directory.
- The 'Shard ID', 'Replica ID', 'Keeper ID', and 'ClickHouse configuration override' fields are filled in for each node in the storage resource based on values from the inventory file and service configuration files on the host. Subsequently, you will manage the roles of each node in the KUMA web interface.
- All existing configuration files from the /opt/kaspersky/kuma/clickhouse/cfg directory are deleted (subsequently, they will be generated by the storage service).
- The value of the LimitNOFILE parameter ('Service' section) is changed from 64,000 to 500,000 in the kuma-storage systemd services.
- If you use alert segmentation rules, prepare the data for migrating the existing rules and save. You can use this data to re-create the rules at the next step. During the upgrade, alert segmentation rules are not migrated automatically.
- To perform the upgrade, you will need the password of the admin user. If you forgot the password of the admin user, contact Technical Support to reset the current password, then use the new password to perform the upgrade at the next step.
Upgrading KUMA
- Depending on the KUMA deployment scheme that you are using, do one the following:
- Use the prepared distributed.inventory.yml inventory file and follow the instructions for distributed installation of the application.
- Use the prepared k0s.inventory.yml inventory file and follow the instructions for distributed installation in a high availability configuration.
If an inventory file is not available for the current version, use the provided inventory file template and edit it as necessary. To view a list of hosts and host roles in your current KUMA system, in the web interface, go to Resources → Active services section.
The upgrade process mirrors the installation process.
If you want to upgrade from a distributed installation to a distributed installation in a high availability configuration, you must first upgrade the distributed installation and then migrate the Core to a Kubernetes cluster.
To migrate KUMA Core to a new Kubernetes cluster:
- Prepare the k0s.inventory.yml inventory file.
The kuma_core, kuma_ collector, kuma_correlator, kuma_storage sections of your k0s.inventory.yml inventory file must contain the same hosts that were used when KUMA was upgraded from version 2.1.3 to version 3.0.3 and then to version 3.2, or when a new installation was performed. In the inventory file, set deploy_to_k8s: true, need_transfer: true. Set deploy_example_services: false.
- Follow the steps for distributed installation using your prepared k0s.inventory.yml inventory file.
Migrating the KUMA Core to a new Kubernetes cluster
When the installer is started with an inventory file, the installer looks for an installed KUMA Core on all hosts where you plan to deploy worker nodes of the cluster. If a Core is found, it is moved from its host to the newly created Kubernetes cluster.
Resolving the KUMA Core migration error
Migration of the KUMA Core from a host to a new Kubernetes cluster may be aborted due to a timeout at the Deploy Core transfer job step. In this case, the following error message is recorded in the log of core-transfer migration tasks:
cp: can't stat '/mnt/kuma-source/core/.lic': No such file or directory
To prevent this error, before you start migrating the KUMA Core:
- Go to the directory with the extracted installer and open the roles/k0s_prepare/templates/core-transfer-job.yaml.j2 file for editing.
- In the core-transfer-job.yaml.j2 file, find the following lines:
cp /mnt/kuma-source/core/.lic {{ core_k0s_home }}/ &&
cp /mnt/kuma-source/core/.tenantsEPS {{ core_k0s_home }}/ &&
- Edit these lines as follows, making sure you keep the indentation (number of space characters):
cp /mnt/kuma-source/core/{{ core_uid }}/.lic {{ core_k0s_home }}/ &&
cp /mnt/kuma-source/core/{{ core_uid }}/.tenantsEPS {{ core_k0s_home }}/ &&
- Save the changes to the file.
You can then restart the distributed installation using the prepared k0s.inventory.yml inventory file. Migrating the KUMA Core from a host to a new Kubernetes cluster will succeed.
If you started migrating the KUMA Core from a host to a new Kubernetes cluster and the migration failed with an error, follow the steps below to fix the error.
To fix the error after attempting to migrate the KUMA Core from a host to a new Kubernetes cluster:
- On any controller of the cluster, delete the Ingress object by running the following command:
sudo k0s kubectl delete daemonset/ingress -n ingress
- Check if a migration job exists in the cluster:
sudo k0s kubectl get jobs -n kuma
- If a migration job exists, delete it:
sudo k0s kubectl delete job core-transfer -n kuma
- Go to the console of a host from the kuma_core group.
- Start the KUMA Core services by running the following commands:
sudo systemctl start kuma-mongodb
sudo systemctl start kuma-core-00000000-0000-0000-0000-000000000000
- Make sure that the kuma-core-00000000-0000-0000-0000-000000000000 service has been successfully started:
sudo systemctl status kuma-core-00000000-0000-0000-0000-000000000000
- Make sure that the kuma_core group has access to the KUMA interface by host FQDN.
Other hosts do not need to be running.
- Go to the directory with the extracted installer and open the roles/k0s_prepare/templates/core-transfer-job.yaml.j2 file for editing.
- In the core-transfer-job.yaml.j2 file, find the following lines:
cp /mnt/kuma-source/core/.lic {{ core_k0s_home }}/ &&
cp /mnt/kuma-source/core/.tenantsEPS {{ core_k0s_home }}/ &&
- Edit these lines as follows, making sure you keep the indentation (number of space characters):
cp /mnt/kuma-source/core/{{ core_uid }}/.lic {{ core_k0s_home }}/ &&
cp /mnt/kuma-source/core/{{ core_uid }}/.tenantsEPS {{ core_k0s_home }}/ &&
- Save the changes to the file.
You can then restart the distributed installation using the prepared k0s.inventory.yaml inventory file. The migration of the KUMA Core from a host to a new Kubernetes cluster will succeed.
If the component is not detected on the worker nodes, a clean installation of the KUMA Core is performed in the cluster without migrating resources to it. Existing components must be manually recreated with the new Core in the KUMA web interface.
For collectors, correlators and storages from the inventory file, certificates for communication with the Core inside the cluster will be reissued. This does not change the URL of the Core for components.
On the Core host, the installer does the following:
- Removes the following systemd services from the host: kuma-core, kuma-mongodb, kuma-victoria-metrics, kuma-vmalert, and kuma-grafana.
- Deletes the internal certificate of the Core.
- Deletes the certificate files of all other components and deletes their records from MongoDB.
- Deletes the following directories:
- /opt/kaspersky/kuma/core/bin
- /opt/kaspersky/kuma/core/certificates
- /opt/kaspersky/kuma/core/log
- /opt/kaspersky/kuma/core/logs
- /opt/kaspersky/kuma/grafana/bin
- /opt/kaspersky/kuma/mongodb/bin
- /opt/kaspersky/kuma/mongodb/log
- /opt/kaspersky/kuma/victoria-metrics/bin
- Migrates data from the Core and its dependencies to a network drive within the Kubernetes cluster.
- On the Core host, it moves the following directories:
- /opt/kaspersky/kuma/core → /opt/kaspersky/kuma/core.moved
- /opt/kaspersky/kuma/grafana → /opt/kaspersky/kuma/grafana.moved
- /opt/kaspersky/kuma/mongodb → /opt/kaspersky/kuma/mongodb.moved
- /opt/kaspersky/kuma/victoria-metrics → /opt/kaspersky/kuma/victoria-metrics.moved
After you have verified that the Core was correctly migrated to the cluster, you can delete these directories.
If you encounter problems with the migration, check the logs for records of the 'core-transfer' migration task in the 'kuma' namespace in the cluster (this task is available for 1 hour after the migration).
If you need to perform migration again, you must restore the original names of the /opt/kaspersky/kuma/*.moved directories.
If the /etc/hosts file on the Core host contained lines that were not related to addresses in the 127.X.X.X range, the contents of the /etc/hosts file from the Core host is entered into the coredns ConfigMap when the Core is migrated to the Kubernetes cluster. If the Core is not migrated, the contents of the /etc/hosts file from the host where the primary controller is deployed is entered into the ConfigMap.
- When upgrading on systems that contain large amounts of data and are operating with limited resources, the system may return the 'Wrong admin password' error message after you enter the administrator password. If you specify the correct password, KUMA may still return this error because of KUMA being unable to start the Core service due to a timeout error and resource limitations. If you enter the administrator password three times without waiting for the installation to complete, the update may end with a fatal error. Resolve the timeout error to proceed with the update.
The final stage of preparing KUMA for work
- After upgrading KUMA, clear your browser cache.
- Re-create the alert segmentation rules.
- Manually upgrade the KUMA agents.
KUMA is successfully upgraded.
Upgrading from version 2.1.x to 2.1.3
To install KUMA version 2.1.3 over version 2.1.x, complete the preliminary steps and then perform the upgrade.
Preliminary steps
- Creating a backup copy of the KUMA Core. If necessary, you will be able to recover from a backup copy for version 2.1.x.
KUMA backups created in versions earlier than 2.1.3 cannot be restored in version 2.1.3. This means that you cannot install KUMA 2.1.3 from scratch and restore a KUMA 2.1.x backup in it.
Create a backup copy immediately after upgrading KUMA to version 2.1.3.
- Make sure that all application installation requirements are met.
- During installation or update, ensure network accessibility of TCP port 7220 on the KUMA Core for the KUMA storage hosts.
- To perform an update, you need a valid password from the admin user. If you forgot the password of the admin user, contact Technical Support to reset the current password, then use the new password to perform the upgrade at the next step.
Upgrading KUMA
- Depending on the KUMA deployment scheme that you are using, do one the following:
If an inventory file is not available for the current version, use the provided inventory file template and edit it as necessary. To view a list of hosts and host roles in your current KUMA system, in the web interface, go to Resources → Active services section.
The upgrade process mirrors the installation process.
If you want to upgrade from a distributed installation to a distributed installation in a high availability configuration, you must first upgrade the distributed installation and then migrate the Core to a Kubernetes cluster.
To migrate KUMA Core to a new Kubernetes cluster:
- Prepare the k0s.inventory.yml inventory file.
The kuma_core, kuma_ collector, kuma_correlator, kuma_storage sections of your k0s.inventory.yml inventory file must contain the same hosts that were used when KUMA was upgraded from version 2.1.3 to version 3.0.3 and then to version 3.2, or when a new installation was performed. In the inventory file, set deploy_to_k8s: true, need_transfer: true. Set deploy_example_services: false.
- Follow the steps for distributed installation using your prepared k0s.inventory.yml inventory file.
Migrating the KUMA Core to a new Kubernetes cluster
When the installer is started with an inventory file, the installer looks for an installed KUMA Core on all hosts where you plan to deploy worker nodes of the cluster. If a Core is found, it is moved from its host to the newly created Kubernetes cluster.
Resolving the KUMA Core migration error
Migration of the KUMA Core from a host to a new Kubernetes cluster may be aborted due to a timeout at the Deploy Core transfer job step. In this case, the following error message is recorded in the log of core-transfer migration tasks:
cp: can't stat '/mnt/kuma-source/core/.lic': No such file or directory
To prevent this error, before you start migrating the KUMA Core:
- Go to the directory with the extracted installer and open the roles/k0s_prepare/templates/core-transfer-job.yaml.j2 file for editing.
- In the core-transfer-job.yaml.j2 file, find the following lines:
cp /mnt/kuma-source/core/.lic {{ core_k0s_home }}/ &&
cp /mnt/kuma-source/core/.tenantsEPS {{ core_k0s_home }}/ &&
- Edit these lines as follows, making sure you keep the indentation (number of space characters):
cp /mnt/kuma-source/core/{{ core_uid }}/.lic {{ core_k0s_home }}/ &&
cp /mnt/kuma-source/core/{{ core_uid }}/.tenantsEPS {{ core_k0s_home }}/ &&
- Save the changes to the file.
You can then restart the distributed installation using the prepared k0s.inventory.yml inventory file. Migrating the KUMA Core from a host to a new Kubernetes cluster will succeed.
If you started migrating the KUMA Core from a host to a new Kubernetes cluster and the migration failed with an error, follow the steps below to fix the error.
To fix the error after attempting to migrate the KUMA Core from a host to a new Kubernetes cluster:
- On any controller of the cluster, delete the Ingress object by running the following command:
sudo k0s kubectl delete daemonset/ingress -n ingress
- Check if a migration job exists in the cluster:
sudo k0s kubectl get jobs -n kuma
- If a migration job exists, delete it:
sudo k0s kubectl delete job core-transfer -n kuma
- Go to the console of a host from the kuma_core group.
- Start the KUMA Core services by running the following commands:
sudo systemctl start kuma-mongodb
sudo systemctl start kuma-core-00000000-0000-0000-0000-000000000000
- Make sure that the kuma-core-00000000-0000-0000-0000-000000000000 service has been successfully started:
sudo systemctl status kuma-core-00000000-0000-0000-0000-000000000000
- Make sure that the kuma_core group has access to the KUMA interface by host FQDN.
Other hosts do not need to be running.
- Go to the directory with the extracted installer and open the roles/k0s_prepare/templates/core-transfer-job.yaml.j2 file for editing.
- In the core-transfer-job.yaml.j2 file, find the following lines:
cp /mnt/kuma-source/core/.lic {{ core_k0s_home }}/ &&
cp /mnt/kuma-source/core/.tenantsEPS {{ core_k0s_home }}/ &&
- Edit these lines as follows, making sure you keep the indentation (number of space characters):
cp /mnt/kuma-source/core/{{ core_uid }}/.lic {{ core_k0s_home }}/ &&
cp /mnt/kuma-source/core/{{ core_uid }}/.tenantsEPS {{ core_k0s_home }}/ &&
- Save the changes to the file.
You can then restart the distributed installation using the prepared k0s.inventory.yaml inventory file. The migration of the KUMA Core from a host to a new Kubernetes cluster will succeed.
If the component is not detected on the worker nodes, a clean installation of the KUMA Core is performed in the cluster without migrating resources to it. Existing components must be manually recreated with the new Core in the KUMA web interface.
For collectors, correlators and storages from the inventory file, certificates for communication with the Core inside the cluster will be reissued. This does not change the URL of the Core for components.
On the Core host, the installer does the following:
- Removes the following systemd services from the host: kuma-core, kuma-mongodb, kuma-victoria-metrics, kuma-vmalert, and kuma-grafana.
- Deletes the internal certificate of the Core.
- Deletes the certificate files of all other components and deletes their records from MongoDB.
- Deletes the following directories:
- /opt/kaspersky/kuma/core/bin
- /opt/kaspersky/kuma/core/certificates
- /opt/kaspersky/kuma/core/log
- /opt/kaspersky/kuma/core/logs
- /opt/kaspersky/kuma/grafana/bin
- /opt/kaspersky/kuma/mongodb/bin
- /opt/kaspersky/kuma/mongodb/log
- /opt/kaspersky/kuma/victoria-metrics/bin
- Migrates data from the Core and its dependencies to a network drive within the Kubernetes cluster.
- On the Core host, it moves the following directories:
- /opt/kaspersky/kuma/core → /opt/kaspersky/kuma/core.moved
- /opt/kaspersky/kuma/grafana → /opt/kaspersky/kuma/grafana.moved
- /opt/kaspersky/kuma/mongodb → /opt/kaspersky/kuma/mongodb.moved
- /opt/kaspersky/kuma/victoria-metrics → /opt/kaspersky/kuma/victoria-metrics.moved
After you have verified that the Core was correctly migrated to the cluster, you can delete these directories.
If you encounter problems with the migration, check the logs for records of the 'core-transfer' migration task in the 'kuma' namespace in the cluster (this task is available for 1 hour after the migration).
If you need to perform migration again, you must restore the original names of the /opt/kaspersky/kuma/*.moved directories.
If the /etc/hosts file on the Core host contained lines that were not related to addresses in the 127.X.X.X range, the contents of the /etc/hosts file from the Core host is entered into the coredns ConfigMap when the Core is migrated to the Kubernetes cluster. If the Core is not migrated, the contents of the /etc/hosts file from the host where the primary controller is deployed is entered into the ConfigMap.
- When upgrading on systems that contain large amounts of data and are operating with limited resources, the system may return the 'Wrong admin password' error message after you enter the administrator password. If you specify the correct password, KUMA may still return this error because of KUMA being unable to start the Core service due to a timeout error and resource limitations. If you enter the administrator password three times without waiting for the installation to complete, the update may end with a fatal error. Resolve the timeout error to proceed with the update.
The final stage of preparing KUMA for work
- After updating KUMA, you must clear your browser cache.
- Manually update the KUMA agents.
KUMA update completed successfully.
Upgrading from version 2.1.3 to 3.0.3
To install KUMA version 3.0.3 over version 2.1.3, complete the preliminary steps and then perform the upgrade.
Preliminary steps
- Creating a backup copy of the KUMA Core. If necessary, you will be able to restore data from backup for version 3.0.3.
KUMA backups created in versions 2.1.3 and earlier cannot be restored in version 3.0.3. This means that you cannot install KUMA 3.0.3 from scratch and restore a KUMA 2.1.3 backup in it.
Create a backup copy immediately after upgrading KUMA to version 3.0.3.
- Make sure that all application installation requirements are met.
- During installation or update, ensure network accessibility of TCP port 7220 on the KUMA Core for the KUMA storage hosts.
Updating KUMA
Depending on the KUMA deployment scheme that you are using, do one the following:
- Use the prepared distributed.inventory.yml inventory file and follow the instructions for distributed installation of the application.
- Use the prepared k0s.inventory.yml inventory file and follow the instructions for distributed installation in a high availability configuration.
If an inventory file is not available for the current version, use the provided inventory file template and edit it as necessary. To view a list of hosts and host roles in your current KUMA system, in the web interface, go to Resources → Active services section.
The upgrade process mirrors the installation process.
If you want to upgrade from a distributed installation to a distributed installation in a high availability configuration, you must first upgrade the distributed installation and then migrate the Core to a Kubernetes cluster.
To migrate KUMA Core to a new Kubernetes cluster:
- Prepare the k0s.inventory.yml inventory file.
The kuma_core, kuma_ collector, kuma_correlator, kuma_storage sections of your k0s.inventory.yml inventory file must contain the same hosts that were used when KUMA was upgraded from version 2.1.3 to version 3.0.3 and then to version 3.2, or when a new installation was performed. In the inventory file, set deploy_to_k8s: true, need_transfer: true. Set deploy_example_services: false.
- Follow the steps for distributed installation using your prepared k0s.inventory.yml inventory file.
Migrating the KUMA Core to a new Kubernetes cluster
When the installer is started with an inventory file, the installer looks for an installed KUMA Core on all hosts where you plan to deploy worker nodes of the cluster. If a Core is found, it is moved from its host to the newly created Kubernetes cluster.
Resolving the KUMA Core migration error
Migration of the KUMA Core from a host to a new Kubernetes cluster may be aborted due to a timeout at the Deploy Core transfer job step. In this case, the following error message is recorded in the log of core-transfer migration tasks:
cp: can't stat '/mnt/kuma-source/core/.lic': No such file or directory
To prevent this error, before you start migrating the KUMA Core:
- Go to the directory with the extracted installer and open the roles/k0s_prepare/templates/core-transfer-job.yaml.j2 file for editing.
- In the core-transfer-job.yaml.j2 file, find the following lines:
cp /mnt/kuma-source/core/.lic {{ core_k0s_home }}/ &&
cp /mnt/kuma-source/core/.tenantsEPS {{ core_k0s_home }}/ &&
- Edit these lines as follows, making sure you keep the indentation (number of space characters):
cp /mnt/kuma-source/core/{{ core_uid }}/.lic {{ core_k0s_home }}/ &&
cp /mnt/kuma-source/core/{{ core_uid }}/.tenantsEPS {{ core_k0s_home }}/ &&
- Save the changes to the file.
You can then restart the distributed installation using the prepared k0s.inventory.yml inventory file. Migrating the KUMA Core from a host to a new Kubernetes cluster will succeed.
If you started migrating the KUMA Core from a host to a new Kubernetes cluster and the migration failed with an error, follow the steps below to fix the error.
To fix the error after attempting to migrate the KUMA Core from a host to a new Kubernetes cluster:
- On any controller of the cluster, delete the Ingress object by running the following command:
sudo k0s kubectl delete daemonset/ingress -n ingress
- Check if a migration job exists in the cluster:
sudo k0s kubectl get jobs -n kuma
- If a migration job exists, delete it:
sudo k0s kubectl delete job core-transfer -n kuma
- Go to the console of a host from the kuma_core group.
- Start the KUMA Core services by running the following commands:
sudo systemctl start kuma-mongodb
sudo systemctl start kuma-core-00000000-0000-0000-0000-000000000000
- Make sure that the kuma-core-00000000-0000-0000-0000-000000000000 service has been successfully started:
sudo systemctl status kuma-core-00000000-0000-0000-0000-000000000000
- Make sure that the kuma_core group has access to the KUMA interface by host FQDN.
Other hosts do not need to be running.
- Go to the directory with the extracted installer and open the roles/k0s_prepare/templates/core-transfer-job.yaml.j2 file for editing.
- In the core-transfer-job.yaml.j2 file, find the following lines:
cp /mnt/kuma-source/core/.lic {{ core_k0s_home }}/ &&
cp /mnt/kuma-source/core/.tenantsEPS {{ core_k0s_home }}/ &&
- Edit these lines as follows, making sure you keep the indentation (number of space characters):
cp /mnt/kuma-source/core/{{ core_uid }}/.lic {{ core_k0s_home }}/ &&
cp /mnt/kuma-source/core/{{ core_uid }}/.tenantsEPS {{ core_k0s_home }}/ &&
- Save the changes to the file.
You can then restart the distributed installation using the prepared k0s.inventory.yaml inventory file. The migration of the KUMA Core from a host to a new Kubernetes cluster will succeed.
If the component is not detected on the worker nodes, a clean installation of the KUMA Core is performed in the cluster without migrating resources to it. Existing components must be manually recreated with the new Core in the KUMA web interface.
For collectors, correlators and storages from the inventory file, certificates for communication with the Core inside the cluster will be reissued. This does not change the URL of the Core for components.
On the Core host, the installer does the following:
- Removes the following systemd services from the host: kuma-core, kuma-mongodb, kuma-victoria-metrics, kuma-vmalert, and kuma-grafana.
- Deletes the internal certificate of the Core.
- Deletes the certificate files of all other components and deletes their records from MongoDB.
- Deletes the following directories:
- /opt/kaspersky/kuma/core/bin
- /opt/kaspersky/kuma/core/certificates
- /opt/kaspersky/kuma/core/log
- /opt/kaspersky/kuma/core/logs
- /opt/kaspersky/kuma/grafana/bin
- /opt/kaspersky/kuma/mongodb/bin
- /opt/kaspersky/kuma/mongodb/log
- /opt/kaspersky/kuma/victoria-metrics/bin
- Migrates data from the Core and its dependencies to a network drive within the Kubernetes cluster.
- On the Core host, it moves the following directories:
- /opt/kaspersky/kuma/core → /opt/kaspersky/kuma/core.moved
- /opt/kaspersky/kuma/grafana → /opt/kaspersky/kuma/grafana.moved
- /opt/kaspersky/kuma/mongodb → /opt/kaspersky/kuma/mongodb.moved
- /opt/kaspersky/kuma/victoria-metrics → /opt/kaspersky/kuma/victoria-metrics.moved
After you have verified that the Core was correctly migrated to the cluster, you can delete these directories.
If you encounter problems with the migration, check the logs for records of the 'core-transfer' migration task in the 'kuma' namespace in the cluster (this task is available for 1 hour after the migration).
If you need to perform migration again, you must restore the original names of the /opt/kaspersky/kuma/*.moved directories.
If the /etc/hosts file on the Core host contained lines that were not related to addresses in the 127.X.X.X range, the contents of the /etc/hosts file from the Core host is entered into the coredns ConfigMap when the Core is migrated to the Kubernetes cluster. If the Core is not migrated, the contents of the /etc/hosts file from the host where the primary controller is deployed are entered into the ConfigMap.
The final stage of preparing KUMA for work
- After updating KUMA, you must clear your browser cache.
- Manually update the KUMA agents.
KUMA update completed successfully.
Known limitations
- Hierarchical structure is not supported in 3.0.2, therefore all KUMA hosts become standalone hosts when upgrading from version 2.1.3 to 3.0.2.
- For existing users, after upgrading from 2.1.3 to 3.0.2, the universal dashboard layout is not refreshed.
Possible solution: restart the Core service (kuma-core.service), and the data will be refreshed with the interval configured for the layout.
Upgrading from version 3.0.x to 3.0.3
To install KUMA version 3.0.3 over version 3.0.x, complete the preliminary steps and then perform the upgrade.
Preliminary steps
- Creating a backup copy of the KUMA Core. If necessary, you will be able to restore data from backup for version 3.0.x.
KUMA backups created in versions earlier than 3.0.3 cannot be restored in version 3.0.3. This means that you cannot install KUMA 3.0.3 from scratch and restore a KUMA 3.0.x backup in it.
Create a backup copy immediately after upgrading KUMA to version 3.0.3.
- Make sure that all application installation requirements are met.
- During installation or update, ensure network accessibility of TCP port 7220 on the KUMA Core for the KUMA storage hosts.
Updating KUMA
Depending on the KUMA deployment scheme that you are using, do one the following:
- Use the prepared distributed.inventory.yml inventory file and follow the instructions for distributed installation of the application.
- Use the prepared k0s.inventory.yml inventory file and follow the instructions for distributed installation in a high availability configuration.
If an inventory file is not available for the current version, use the provided inventory file template and edit it as necessary. To view a list of hosts and host roles in your current KUMA system, in the web interface, go to Resources → Active services section.
The upgrade process mirrors the installation process.
If you want to upgrade from a distributed installation to a distributed installation in a high availability configuration, you must first upgrade the distributed installation and then migrate the Core to a Kubernetes cluster.
To migrate KUMA Core to a new Kubernetes cluster:
- Prepare the k0s.inventory.yml inventory file.
The kuma_core, kuma_ collector, kuma_correlator, kuma_storage sections of your k0s.inventory.yml inventory file must contain the same hosts that were used when KUMA was upgraded from version 2.1.3 to version 3.0.3 and then to version 3.2, or when a new installation was performed. In the inventory file, set deploy_to_k8s: true, need_transfer: true. Set deploy_example_services: false.
- Follow the steps for distributed installation using your prepared k0s.inventory.yml inventory file.
Migrating the KUMA Core to a new Kubernetes cluster
When the installer is started with an inventory file, the installer looks for an installed KUMA Core on all hosts where you plan to deploy worker nodes of the cluster. If a Core is found, it is moved from its host to the newly created Kubernetes cluster.
Resolving the KUMA Core migration error
Migration of the KUMA Core from a host to a new Kubernetes cluster may be aborted due to a timeout at the Deploy Core transfer job step. In this case, the following error message is recorded in the log of core-transfer migration tasks:
cp: can't stat '/mnt/kuma-source/core/.lic': No such file or directory
To prevent this error, before you start migrating the KUMA Core:
- Go to the directory with the extracted installer and open the roles/k0s_prepare/templates/core-transfer-job.yaml.j2 file for editing.
- In the core-transfer-job.yaml.j2 file, find the following lines:
cp /mnt/kuma-source/core/.lic {{ core_k0s_home }}/ &&
cp /mnt/kuma-source/core/.tenantsEPS {{ core_k0s_home }}/ &&
- Edit these lines as follows, making sure you keep the indentation (number of space characters):
cp /mnt/kuma-source/core/{{ core_uid }}/.lic {{ core_k0s_home }}/ &&
cp /mnt/kuma-source/core/{{ core_uid }}/.tenantsEPS {{ core_k0s_home }}/ &&
- Save the changes to the file.
You can then restart the distributed installation using the prepared k0s.inventory.yml inventory file. Migrating the KUMA Core from a host to a new Kubernetes cluster will succeed.
If you started migrating the KUMA Core from a host to a new Kubernetes cluster and the migration failed with an error, follow the steps below to fix the error.
To fix the error after attempting to migrate the KUMA Core from a host to a new Kubernetes cluster:
- On any controller of the cluster, delete the Ingress object by running the following command:
sudo k0s kubectl delete daemonset/ingress -n ingress
- Check if a migration job exists in the cluster:
sudo k0s kubectl get jobs -n kuma
- If a migration job exists, delete it:
sudo k0s kubectl delete job core-transfer -n kuma
- Go to the console of a host from the kuma_core group.
- Start the KUMA Core services by running the following commands:
sudo systemctl start kuma-mongodb
sudo systemctl start kuma-core-00000000-0000-0000-0000-000000000000
- Make sure that the kuma-core-00000000-0000-0000-0000-000000000000 service has been successfully started:
sudo systemctl status kuma-core-00000000-0000-0000-0000-000000000000
- Make sure that the kuma_core group has access to the KUMA interface by host FQDN.
Other hosts do not need to be running.
- Go to the directory with the extracted installer and open the roles/k0s_prepare/templates/core-transfer-job.yaml.j2 file for editing.
- In the core-transfer-job.yaml.j2 file, find the following lines:
cp /mnt/kuma-source/core/.lic {{ core_k0s_home }}/ &&
cp /mnt/kuma-source/core/.tenantsEPS {{ core_k0s_home }}/ &&
- Edit these lines as follows, making sure you keep the indentation (number of space characters):
cp /mnt/kuma-source/core/{{ core_uid }}/.lic {{ core_k0s_home }}/ &&
cp /mnt/kuma-source/core/{{ core_uid }}/.tenantsEPS {{ core_k0s_home }}/ &&
- Save the changes to the file.
You can then restart the distributed installation using the prepared k0s.inventory.yaml inventory file. The migration of the KUMA Core from a host to a new Kubernetes cluster will succeed.
If the component is not detected on the worker nodes, a clean installation of the KUMA Core is performed in the cluster without migrating resources to it. Existing components must be manually recreated with the new Core in the KUMA web interface.
For collectors, correlators and storages from the inventory file, certificates for communication with the Core inside the cluster will be reissued. This does not change the URL of the Core for components.
On the Core host, the installer does the following:
- Removes the following systemd services from the host: kuma-core, kuma-mongodb, kuma-victoria-metrics, kuma-vmalert, and kuma-grafana.
- Deletes the internal certificate of the Core.
- Deletes the certificate files of all other components and deletes their records from MongoDB.
- Deletes the following directories:
- /opt/kaspersky/kuma/core/bin
- /opt/kaspersky/kuma/core/certificates
- /opt/kaspersky/kuma/core/log
- /opt/kaspersky/kuma/core/logs
- /opt/kaspersky/kuma/grafana/bin
- /opt/kaspersky/kuma/mongodb/bin
- /opt/kaspersky/kuma/mongodb/log
- /opt/kaspersky/kuma/victoria-metrics/bin
- Migrates data from the Core and its dependencies to a network drive within the Kubernetes cluster.
- On the Core host, it moves the following directories:
- /opt/kaspersky/kuma/core → /opt/kaspersky/kuma/core.moved
- /opt/kaspersky/kuma/grafana → /opt/kaspersky/kuma/grafana.moved
- /opt/kaspersky/kuma/mongodb → /opt/kaspersky/kuma/mongodb.moved
- /opt/kaspersky/kuma/victoria-metrics → /opt/kaspersky/kuma/victoria-metrics.moved
After you have verified that the Core was correctly migrated to the cluster, you can delete these directories.
If you encounter problems with the migration, check the logs for records of the 'core-transfer' migration task in the 'kuma' namespace in the cluster (this task is available for 1 hour after the migration).
If you need to perform migration again, you must restore the original names of the /opt/kaspersky/kuma/*.moved directories.
If the /etc/hosts file on the Core host contained lines that were not related to addresses in the 127.X.X.X range, the contents of the /etc/hosts file from the Core host is entered into the coredns ConfigMap when the Core is migrated to the Kubernetes cluster. If the Core is not migrated, the contents of the /etc/hosts file from the host where the primary controller is deployed are entered into the ConfigMap.
The final stage of preparing KUMA for work
- After updating KUMA, you must clear your browser cache.
- Manually update the KUMA agents.
KUMA update completed successfully.
Known limitations
For existing users, after upgrading from 3.0.x to 3.0.3, the universal dashboard layout is not refreshed.
Possible solution: restart the Core service (kuma-core.service), and the data refresh interval configured for the layout will be used.
Upgrading from version 3.0.3 to 3.2.x
To install KUMA version 3.2.x over version 3.0.3, complete the preliminary steps and then perform the upgrade.
Preliminary steps
- Creating a backup copy of the KUMA Core. If necessary, you can restore data from backup for version 3.0.3.
KUMA backups created in versions 3.0.3 and earlier cannot be restored in version 3.2.x. This means that you cannot install KUMA 3.2.x from scratch and restore a KUMA 3.0.3 backup in it.
Create a backup copy immediately after upgrading KUMA to version 3.2.x.
- Make sure that all application installation requirements are met.
- Make sure that the host name of the KUMA Core does not start with a numeral. The upgrade to version 3.2.x cannot be completed successfully if the host name of the KUMA Core starts with a numeral. In such a case, you will need to take certain measures to successfully complete the upgrade. Contact Technical Support for additional instructions.
- During installation or update, ensure network accessibility of TCP port 7220 on the KUMA Core for the KUMA storage hosts.
Updating KUMA
Depending on the KUMA deployment scheme that you are using, do one the following:
- Use the prepared distributed.inventory.yml inventory file and follow the instructions for distributed installation of the application.
- Use the prepared k0s.inventory.yml inventory file and follow the instructions for distributed installation in a high availability configuration.
If an inventory file is not available for the current version, use the provided inventory file template and edit it as necessary. To view a list of hosts and host roles in your current KUMA system, in the web interface, go to Resources → Active services section.
The upgrade process mirrors the installation process.
If you want to upgrade from a distributed installation to a distributed installation in a high availability configuration, first upgrade the distributed installation and then migrate the Core to a Kubernetes cluster. For subsequent upgrades, use the k0s.inventory.yml inventory file with the need_transfer parameter set to false, because the KUMA Core already has been migrated to the Kubernetes cluster and you do not need to repeat this.
To migrate KUMA Core to a new Kubernetes cluster:
- Prepare the k0s.inventory.yml inventory file.
The kuma_core, kuma_ collector, kuma_correlator, kuma_storage sections of your k0s.inventory.yml inventory file must contain the same hosts that were used when KUMA was upgraded from version 2.1.3 to version 3.0.3 and then to version 3.2, or when a new installation was performed. In the inventory file, set deploy_to_k8s: true, need_transfer: true. Set deploy_example_services: false.
- Follow the steps for distributed installation using your prepared k0s.inventory.yml inventory file.
Migrating the KUMA Core to a new Kubernetes cluster
When the installer is started with an inventory file, the installer looks for an installed KUMA Core on all hosts where you plan to deploy worker nodes of the cluster. If a Core is found, it is moved from its host to the newly created Kubernetes cluster.
Resolving the KUMA Core migration error
Migration of the KUMA Core from a host to a new Kubernetes cluster may be aborted due to a timeout at the Deploy Core transfer job step. In this case, the following error message is recorded in the log of core-transfer migration tasks:
cp: can't stat '/mnt/kuma-source/core/.lic': No such file or directory
To prevent this error, before you start migrating the KUMA Core:
- Go to the directory with the extracted installer and open the roles/k0s_prepare/templates/core-transfer-job.yaml.j2 file for editing.
- In the core-transfer-job.yaml.j2 file, find the following lines:
cp /mnt/kuma-source/core/.lic {{ core_k0s_home }}/ &&
cp /mnt/kuma-source/core/.tenantsEPS {{ core_k0s_home }}/ &&
- Edit these lines as follows, making sure you keep the indentation (number of space characters):
cp /mnt/kuma-source/core/{{ core_uid }}/.lic {{ core_k0s_home }}/ &&
cp /mnt/kuma-source/core/{{ core_uid }}/.tenantsEPS {{ core_k0s_home }}/ &&
- Save the changes to the file.
You can then restart the distributed installation using the prepared k0s.inventory.yml inventory file. Migrating the KUMA Core from a host to a new Kubernetes cluster will succeed.
If you started migrating the KUMA Core from a host to a new Kubernetes cluster and the migration failed with an error, follow the steps below to fix the error.
To fix the error after attempting to migrate the KUMA Core from a host to a new Kubernetes cluster:
- On any controller of the cluster, delete the Ingress object by running the following command:
sudo k0s kubectl delete daemonset/ingress -n ingress
- Check if a migration job exists in the cluster:
sudo k0s kubectl get jobs -n kuma
- If a migration job exists, delete it:
sudo k0s kubectl delete job core-transfer -n kuma
- Go to the console of a host from the kuma_core group.
- Start the KUMA Core services by running the following commands:
sudo systemctl start kuma-mongodb
sudo systemctl start kuma-core-00000000-0000-0000-0000-000000000000
- Make sure that the kuma-core-00000000-0000-0000-0000-000000000000 service has been successfully started:
sudo systemctl status kuma-core-00000000-0000-0000-0000-000000000000
- Make sure that the kuma_core group has access to the KUMA interface by host FQDN.
Other hosts do not need to be running.
- Go to the directory with the extracted installer and open the roles/k0s_prepare/templates/core-transfer-job.yaml.j2 file for editing.
- In the core-transfer-job.yaml.j2 file, find the following lines:
cp /mnt/kuma-source/core/.lic {{ core_k0s_home }}/ &&
cp /mnt/kuma-source/core/.tenantsEPS {{ core_k0s_home }}/ &&
- Edit these lines as follows, making sure you keep the indentation (number of space characters):
cp /mnt/kuma-source/core/{{ core_uid }}/.lic {{ core_k0s_home }}/ &&
cp /mnt/kuma-source/core/{{ core_uid }}/.tenantsEPS {{ core_k0s_home }}/ &&
- Save the changes to the file.
You can then restart the distributed installation using the prepared k0s.inventory.yaml inventory file. The migration of the KUMA Core from a host to a new Kubernetes cluster will succeed.
If the component is not detected on the worker nodes, a clean installation of the KUMA Core is performed in the cluster without migrating resources to it. Existing components must be manually recreated with the new Core in the KUMA web interface.
For collectors, correlators and storages from the inventory file, certificates for communication with the Core inside the cluster will be reissued. This does not change the URL of the Core for components.
On the Core host, the installer does the following:
- Removes the following systemd services from the host: kuma-core, kuma-mongodb, kuma-victoria-metrics, kuma-vmalert, and kuma-grafana.
- Deletes the internal certificate of the Core.
- Deletes the certificate files of all other components and deletes their records from MongoDB.
- Deletes the following directories:
- /opt/kaspersky/kuma/core/bin
- /opt/kaspersky/kuma/core/certificates
- /opt/kaspersky/kuma/core/log
- /opt/kaspersky/kuma/core/logs
- /opt/kaspersky/kuma/grafana/bin
- /opt/kaspersky/kuma/mongodb/bin
- /opt/kaspersky/kuma/mongodb/log
- /opt/kaspersky/kuma/victoria-metrics/bin
- Migrates data from the Core and its dependencies to a network drive within the Kubernetes cluster.
- On the Core host, it moves the following directories:
- /opt/kaspersky/kuma/core → /opt/kaspersky/kuma/core.moved
- /opt/kaspersky/kuma/grafana → /opt/kaspersky/kuma/grafana.moved
- /opt/kaspersky/kuma/mongodb → /opt/kaspersky/kuma/mongodb.moved
- /opt/kaspersky/kuma/victoria-metrics → /opt/kaspersky/kuma/victoria-metrics.moved
After you have verified that the Core was correctly migrated to the cluster, you can delete these directories.
If you encounter problems with the migration, check the logs for records of the 'core-transfer' migration task in the 'kuma' namespace in the cluster (this task is available for 1 hour after the migration).
If you need to perform migration again, you must restore the original names of the /opt/kaspersky/kuma/*.moved directories.
If the /etc/hosts file on the Core host contained lines that were not related to addresses in the 127.X.X.X range, the contents of the /etc/hosts file from the Core host is entered into the coredns ConfigMap when the Core is migrated to the Kubernetes cluster. If the Core is not migrated, the contents of the /etc/hosts file from the host where the primary controller is deployed are entered into the ConfigMap.
The final stage of preparing KUMA for work
- After updating KUMA, you must clear your browser cache.
- If you are using agents, manually update the KUMA agents.
KUMA update completed successfully.
Known limitations
- For existing users, after upgrading from 3.0.3 to 3.2.x, the universal dashboard layout is not refreshed.
Possible solution: restart the Core service (kuma-core.service), and the data refresh interval configured for the layout will be used.
- If the old Core service, "kuma-core.service" is still displayed after the upgrade, run the following command after installation is complete:
sudo systemctl reset-failed
After running the command, the old service is no longer displayed, and the new service starts successfully.
Upgrading from version 3.2.0 or 3.2.1 to 3.4
To install KUMA version 3.4 over version 3.2.0 or 3.2.1, complete the preliminary steps and then perform the upgrade.
Preliminary steps
- Creating a backup copy of the KUMA Core. If necessary, you will be able to restore data from backup for version 3.2.
KUMA backups created in versions 3.2 and earlier cannot be restored in version 3.4. This means that you cannot install KUMA 3.4 from scratch and restore a KUMA 3.2.x backup in it.
Create a backup copy immediately after upgrading KUMA to version 3.4.
- Make sure that all application installation requirements are met.
- Make sure that the host name of the KUMA Core does not start with a numeral. The upgrade to version 3.4 cannot be completed successfully if the host name of the KUMA Core begins with a numeral. If the hostname of the KUMA Core starts with a numeral, a number of steps are necessary to successfully complete the upgrade. Contact Technical Support for additional instructions.
- During installation or update, ensure network accessibility of TCP port 7220 on the KUMA Core for the KUMA storage hosts.
- For event sources that have a red status in the Source status → List of event sources section, check out how many there are and if they are up to date; for outdated event sources, do one of the following:
- Remove the event sources that you no longer need.
- Edit the settings of monitoring policies that are applied to the outdated event sources to bring them up to date with the current stream of events.
- For monitoring policies applied to outdated event sources, disable notifications.
After KUMA is upgraded, notifications are sent to the configured email addresses for all red-status event sources that have notifications about triggered policies configured.
Updating KUMA
Depending on the KUMA deployment scheme that you are using, do one the following:
- Use the prepared distributed.inventory.yml inventory file and follow the instructions for distributed installation of the application.
- Use the prepared k0s.inventory.yml inventory file and follow the instructions for distributed installation in a high availability configuration.
If an inventory file is not available for the current version, use the provided inventory file template and edit it as necessary. To view a list of hosts and host roles in your current KUMA system, in the web interface, go to Resources → Active services section.
The upgrade process mirrors the installation process.
If you want to upgrade from a distributed installation to a distributed installation in a high availability configuration, first upgrade the distributed installation and then migrate the Core to a Kubernetes cluster. For subsequent upgrades, use the k0s.inventory.yml inventory file with the need_transfer parameter set to false, because the KUMA Core already has been migrated to the Kubernetes cluster and you do not need to repeat this.
To migrate KUMA Core to a new Kubernetes cluster:
- Prepare the k0s.inventory.yml inventory file.
The kuma_core, kuma_ collector, kuma_correlator, kuma_storage sections of your k0s.inventory.yml inventory file must contain the same hosts that were used when KUMA was upgraded from version 2.1.3 to version 3.0.3 and then to version 3.2, or when a new installation was performed. In the inventory file, set deploy_to_k8s: true, need_transfer: true. Set deploy_example_services: false.
- Follow the steps for distributed installation using your prepared k0s.inventory.yml inventory file.
Migrating the KUMA Core to a new Kubernetes cluster
When the installer is started with an inventory file, the installer looks for an installed KUMA Core on all hosts where you plan to deploy worker nodes of the cluster. If a Core is found, it is moved from its host to the newly created Kubernetes cluster.
Resolving the KUMA Core migration error
Migration of the KUMA Core from a host to a new Kubernetes cluster may be aborted due to a timeout at the Deploy Core transfer job step. In this case, the following error message is recorded in the log of core-transfer migration tasks:
cp: can't stat '/mnt/kuma-source/core/.lic': No such file or directory
To prevent this error, before you start migrating the KUMA Core:
- Go to the directory with the extracted installer and open the roles/k0s_prepare/templates/core-transfer-job.yaml.j2 file for editing.
- In the core-transfer-job.yaml.j2 file, find the following lines:
cp /mnt/kuma-source/core/.lic {{ core_k0s_home }}/ &&
cp /mnt/kuma-source/core/.tenantsEPS {{ core_k0s_home }}/ &&
- Edit these lines as follows, making sure you keep the indentation (number of space characters):
cp /mnt/kuma-source/core/{{ core_uid }}/.lic {{ core_k0s_home }}/ &&
cp /mnt/kuma-source/core/{{ core_uid }}/.tenantsEPS {{ core_k0s_home }}/ &&
- Save the changes to the file.
You can then restart the distributed installation using the prepared k0s.inventory.yml inventory file. Migrating the KUMA Core from a host to a new Kubernetes cluster will succeed.
If you started migrating the KUMA Core from a host to a new Kubernetes cluster and the migration failed with an error, follow the steps below to fix the error.
To fix the error after attempting to migrate the KUMA Core from a host to a new Kubernetes cluster:
- On any controller of the cluster, delete the Ingress object by running the following command:
sudo k0s kubectl delete daemonset/ingress -n ingress
- Check if a migration job exists in the cluster:
sudo k0s kubectl get jobs -n kuma
- If a migration job exists, delete it:
sudo k0s kubectl delete job core-transfer -n kuma
- Go to the console of a host from the kuma_core group.
- Start the KUMA Core services by running the following commands:
sudo systemctl start kuma-mongodb
sudo systemctl start kuma-core-00000000-0000-0000-0000-000000000000
- Make sure that the kuma-core-00000000-0000-0000-0000-000000000000 service has been successfully started:
sudo systemctl status kuma-core-00000000-0000-0000-0000-000000000000
- Make sure that the kuma_core group has access to the KUMA interface by host FQDN.
Other hosts do not need to be running.
- Go to the directory with the extracted installer and open the roles/k0s_prepare/templates/core-transfer-job.yaml.j2 file for editing.
- In the core-transfer-job.yaml.j2 file, find the following lines:
cp /mnt/kuma-source/core/.lic {{ core_k0s_home }}/ &&
cp /mnt/kuma-source/core/.tenantsEPS {{ core_k0s_home }}/ &&
- Edit these lines as follows, making sure you keep the indentation (number of space characters):
cp /mnt/kuma-source/core/{{ core_uid }}/.lic {{ core_k0s_home }}/ &&
cp /mnt/kuma-source/core/{{ core_uid }}/.tenantsEPS {{ core_k0s_home }}/ &&
- Save the changes to the file.
You can then restart the distributed installation using the prepared k0s.inventory.yaml inventory file. The migration of the KUMA Core from a host to a new Kubernetes cluster will succeed.
If the component is not detected on the worker nodes, a clean installation of the KUMA Core is performed in the cluster without migrating resources to it. Existing components must be manually recreated with the new Core in the KUMA web interface.
For collectors, correlators and storages from the inventory file, certificates for communication with the Core inside the cluster will be reissued. This does not change the URL of the Core for components.
On the Core host, the installer does the following:
- Removes the following systemd services from the host: kuma-core, kuma-mongodb, kuma-victoria-metrics, kuma-vmalert, and kuma-grafana.
- Deletes the internal certificate of the Core.
- Deletes the certificate files of all other components and deletes their records from MongoDB.
- Deletes the following directories:
- /opt/kaspersky/kuma/core/bin
- /opt/kaspersky/kuma/core/certificates
- /opt/kaspersky/kuma/core/log
- /opt/kaspersky/kuma/core/logs
- /opt/kaspersky/kuma/grafana/bin
- /opt/kaspersky/kuma/mongodb/bin
- /opt/kaspersky/kuma/mongodb/log
- /opt/kaspersky/kuma/victoria-metrics/bin
- Migrates data from the Core and its dependencies to a network drive within the Kubernetes cluster.
- On the Core host, it moves the following directories:
- /opt/kaspersky/kuma/core → /opt/kaspersky/kuma/core.moved
- /opt/kaspersky/kuma/grafana → /opt/kaspersky/kuma/grafana.moved
- /opt/kaspersky/kuma/mongodb → /opt/kaspersky/kuma/mongodb.moved
- /opt/kaspersky/kuma/victoria-metrics → /opt/kaspersky/kuma/victoria-metrics.moved
After you have verified that the Core was correctly migrated to the cluster, you can delete these directories.
If you encounter problems with the migration, check the logs for records of the 'core-transfer' migration task in the 'kuma' namespace in the cluster (this task is available for 1 hour after the migration).
If you need to perform migration again, you must restore the original names of the /opt/kaspersky/kuma/*.moved directories.
If the /etc/hosts file on the Core host contained lines that were not related to addresses in the 127.X.X.X range, the contents of the /etc/hosts file from the Core host is entered into the coredns ConfigMap when the Core is migrated to the Kubernetes cluster. If the Core is not migrated, the contents of the /etc/hosts file from the host where the primary controller is deployed are entered into the ConfigMap.
The final stage of preparing KUMA for work
- After updating KUMA, you must clear your browser cache.
- If you are using agents, manually update the KUMA agents.
KUMA update completed successfully.
Known limitations
- For existing users, after upgrading from 3.2.0 or 3.2.1 to 3.4, the universal dashboard layout is not refreshed.
Possible solution: restart the Core service (kuma-core.service), and the data refresh interval configured for the layout will be used.
- If the old Core service, "kuma-core.service" is still displayed after the upgrade, run the following command after installation is complete:
sudo systemctl reset-failed
After running the command, the old service is no longer displayed, and the new service starts successfully.
If you want to upgrade a distributed installation of KUMA to the latest version of KUMA in a fault tolerant configuration, first upgrade your distributed installation to the latest version and then migrate KUMA Core to a Kubernetes cluster. For further updates, use the k0s.inventory.yml inventory file with the need_transfer parameter set to false, because the KUMA Core already has been migrated to the Kubernetes cluster and you do not need to repeat this.
To migrate KUMA Core to a new Kubernetes cluster:
- Prepare the k0s.inventory.yml inventory file.
The kuma_core, kuma_ collector, kuma_correlator, kuma_storage sections of your k0s.inventory.yml inventory file must contain the same hosts that were used when KUMA was upgraded from version 2.1.3 to version 3.0.3 and then to version 3.2, or when a new installation was performed. In the inventory file, set deploy_to_k8s: true, need_transfer: true. Set deploy_example_services: false.
- Follow the steps for distributed installation using your prepared k0s.inventory.yml inventory file.
Migrating the KUMA Core to a new Kubernetes cluster
When the installer is started with an inventory file, the installer looks for an installed KUMA Core on all hosts where you plan to deploy worker nodes of the cluster. If a Core is found, it is moved from its host to the newly created Kubernetes cluster.
Resolving the KUMA Core migration error
Migration of the KUMA Core from a host to a new Kubernetes cluster may be aborted due to a timeout at the Deploy Core transfer job step. In this case, the following error message is recorded in the log of core-transfer migration tasks:
cp: can't stat '/mnt/kuma-source/core/.lic': No such file or directory
To prevent this error, before you start migrating the KUMA Core:
- Go to the directory with the extracted installer and open the roles/k0s_prepare/templates/core-transfer-job.yaml.j2 file for editing.
- In the core-transfer-job.yaml.j2 file, find the following lines:
cp /mnt/kuma-source/core/.lic {{ core_k0s_home }}/ &&
cp /mnt/kuma-source/core/.tenantsEPS {{ core_k0s_home }}/ &&
- Edit these lines as follows, making sure you keep the indentation (number of space characters):
cp /mnt/kuma-source/core/{{ core_uid }}/.lic {{ core_k0s_home }}/ &&
cp /mnt/kuma-source/core/{{ core_uid }}/.tenantsEPS {{ core_k0s_home }}/ &&
- Save the changes to the file.
You can then restart the distributed installation using the prepared k0s.inventory.yml inventory file. Migrating the KUMA Core from a host to a new Kubernetes cluster will succeed.
If you started migrating the KUMA Core from a host to a new Kubernetes cluster and the migration failed with an error, follow the steps below to fix the error.
To fix the error after attempting to migrate the KUMA Core from a host to a new Kubernetes cluster:
- On any controller of the cluster, delete the Ingress object by running the following command:
sudo k0s kubectl delete daemonset/ingress -n ingress
- Check if a migration job exists in the cluster:
sudo k0s kubectl get jobs -n kuma
- If a migration job exists, delete it:
sudo k0s kubectl delete job core-transfer -n kuma
- Go to the console of a host from the kuma_core group.
- Start the KUMA Core services by running the following commands:
sudo systemctl start kuma-mongodb
sudo systemctl start kuma-core-00000000-0000-0000-0000-000000000000
- Make sure that the kuma-core-00000000-0000-0000-0000-000000000000 service has been successfully started:
sudo systemctl status kuma-core-00000000-0000-0000-0000-000000000000
- Make sure that the kuma_core group has access to the KUMA interface by host FQDN.
Other hosts do not need to be running.
- Go to the directory with the extracted installer and open the roles/k0s_prepare/templates/core-transfer-job.yaml.j2 file for editing.
- In the core-transfer-job.yaml.j2 file, find the following lines:
cp /mnt/kuma-source/core/.lic {{ core_k0s_home }}/ &&
cp /mnt/kuma-source/core/.tenantsEPS {{ core_k0s_home }}/ &&
- Edit these lines as follows, making sure you keep the indentation (number of space characters):
cp /mnt/kuma-source/core/{{ core_uid }}/.lic {{ core_k0s_home }}/ &&
cp /mnt/kuma-source/core/{{ core_uid }}/.tenantsEPS {{ core_k0s_home }}/ &&
- Save the changes to the file.
You can then restart the distributed installation using the prepared k0s.inventory.yaml inventory file. The migration of the KUMA Core from a host to a new Kubernetes cluster will succeed.
If the component is not detected on the worker nodes, a clean installation of the KUMA Core is performed in the cluster without migrating resources to it. Existing components must be manually recreated with the new Core in the KUMA web interface.
For collectors, correlators and storages from the inventory file, certificates for communication with the Core inside the cluster will be reissued. This does not change the URL of the Core for components.
On the Core host, the installer does the following:
- Removes the following systemd services from the host: kuma-core, kuma-mongodb, kuma-victoria-metrics, kuma-vmalert, and kuma-grafana.
- Deletes the internal certificate of the Core.
- Deletes the certificate files of all other components and deletes their records from MongoDB.
- Deletes the following directories:
- /opt/kaspersky/kuma/core/bin
- /opt/kaspersky/kuma/core/certificates
- /opt/kaspersky/kuma/core/log
- /opt/kaspersky/kuma/core/logs
- /opt/kaspersky/kuma/grafana/bin
- /opt/kaspersky/kuma/mongodb/bin
- /opt/kaspersky/kuma/mongodb/log
- /opt/kaspersky/kuma/victoria-metrics/bin
- Migrates data from the Core and its dependencies to a network drive within the Kubernetes cluster.
- On the Core host, it moves the following directories:
- /opt/kaspersky/kuma/core → /opt/kaspersky/kuma/core.moved
- /opt/kaspersky/kuma/grafana → /opt/kaspersky/kuma/grafana.moved
- /opt/kaspersky/kuma/mongodb → /opt/kaspersky/kuma/mongodb.moved
- /opt/kaspersky/kuma/victoria-metrics → /opt/kaspersky/kuma/victoria-metrics.moved
After you have verified that the Core was correctly migrated to the cluster, you can delete these directories.
If you encounter problems with the migration, check the logs for records of the 'core-transfer' migration task in the 'kuma' namespace in the cluster (this task is available for 1 hour after the migration).
If you need to perform migration again, you must restore the original names of the /opt/kaspersky/kuma/*.moved directories.
If the /etc/hosts file on the Core host contained lines that were not related to addresses in the 127.X.X.X range, the contents of the /etc/hosts file from the Core host is entered into the coredns ConfigMap when the Core is migrated to the Kubernetes cluster. If the Core is not migrated, the contents of the /etc/hosts file from the host where the primary controller is deployed is entered into the ConfigMap.
[Topic 222156]
Troubleshooting update errors
When upgrading KUMA, you may encounter the following errors:
- Timeout error
When upgrading from version 2.0.x on systems that contain large amounts of data and are operating with limited resources, the system may return the Wrong admin password error message after you enter the administrator password. If you specify the correct password, KUMA may still return an error because KUMA could not start the Core service due to resource limit and a timeout error. If you enter the administrator password three times without waiting for the installation to complete, the update may end with a fatal error.
Follow these steps to resolve the timeout error and successfully complete the update:
- Open a separate second terminal and run the following command to verify that the command output contains the timeout error line:
journalctl -u kuma-core | grep 'start operation timed out'
Timeout error message:
kuma-core.service: start operation timed out. Terminating.
- After you find the timeout error message, in the /usr/lib/systemd/system/kuma-core.service file, change the value of the
TimeoutSec parameter from 300 to 0 to remove the timeout limit and temporarily prevent the error from recurring. - After modifying the service file, run the following commands in sequence:
systemctl daemon-reload
service kuma-core restart
- After running the commands and successfully starting the service in the second terminal, enter the administrator password again in your first terminal where the installer is prompting you for the password.
KUMA will continue the installation. In resource-limited environments, installation may take up to an hour.
- After installation finishes successfully, in the /usr/lib/systemd/system/kuma-core.service file, set the
TimeoutSec parameter back to 300. - After modifying the service file, run the following commands in the second terminal:
systemctl daemon-reload
service kuma-core restart
After you run these commands, the update will be succeed.
- Invalid administrator password
The admin user password is needed to automatically populate the storage settings during the upgrade process. If you enter the admin user password incorrectly nine times during the TASK [Prompt for admin password], the installer still performs the update, and the web interface is available, but the storage settings are not migrated, and the storages have the red status.
To fix the error and make the repositories available again, update the storage settings:
- Go to the storage settings, manually fill in the fields of the ClickHouse cluster, and click Save.
- Restart the storage service.
The storage service starts with the specified settings, and its status is green.
- DB::Exception error
After upgrading KUMA, the storage may have the red status, and its logs may contain errors about suspicious strings.
Example error:
DB::Exception::Exception(std::__1::basic_string<char, std::__1::char_traits<char>, std::__1::allocator<char>> const&, int, bool) @ 0xda0553a in /opt/kaspersky/kuma/clickhouse/bin/clickhouse
To restart ClickHouse, run the following command on the KUMA storage server:
touch /opt/kaspersky/kuma/clickhouse/data/flags/force_restore_data && systemctl restart kuma-storage-<ID of the storage that encountered the error>
- Expiration of k0s cluster certificates
Symptoms
Controllers or worker nodes cannot connect; pods cannot be moved from one worker node to another.
Logs of the k0scontroller and k0sworker services contain multiple records with the following substring:
x509: certificate has expired or is not yet valid
Cause
Cluster service certificates are valid for 1 year from the time of creation. The k0s cluster used in the high-availability KUMA installation automatically rotates all the service certificates it needs, but the rotation is performed only at startup of the k0scontroller service. If k0scontroller services on cluster controllers run without a restart for more than 1 year, service certificates become invalid.
How to fix
To fix the error, restart the k0scontroller services one by one as root on each controller of the cluster. This reissues the certificates:
systemctl restart k0scontroller
To check the expiration dates of certificates on controllers, run the following commands as root:
find /var/lib/k0s/pki/ -type f -name "*.crt" -print|egrep -v 'ca.crt$'|xargs -L 1 -t -i bash -c 'openssl x509 -noout -text -in {}|grep After'
find /var/lib/k0s/pki/etcd -type f -name "*.crt" -print|egrep -v 'ca.crt$'|xargs -L 1 -t -i bash -c 'openssl x509 -noout -text -in {}|grep After'
You can find the names of certificate files and their expiration dates in the output of these commands.
Fix the errors to successfully complete the update.
Page top
[Topic 247287]
Delete KUMA
To remove KUMA, use the Ansible tool and the inventory file that you have prepared.
To remove KUMA:
- On the control machine, go to the installer directory:
cd kuma-ansible-installer
- Run the following command:
sudo ./uninstall.sh <inventory file>
KUMA and all of its data is removed from the server.
The databases that were used by KUMA (for example, the ClickHouse storage database) and the data therein must be deleted separately.
Special considerations for removing KUMA in a high availability configuration
Which components need to be removed depends on the value of the deploy_to_k8s parameter in the inventory file that you are using to remove KUMA:
- If the setting is
true, the Kubernetes cluster created during the KUMA installation is deleted. - If the setting is
false, all KUMA components except for the Core are removed from the Kubernetes cluster. The cluster itself is not deleted.
In addition to the KUMA components installed outside the cluster, the following directories and files are deleted on the cluster nodes:
- /usr/bin/k0s
- /etc/k0s/
- /var/lib/k0s/
- /usr/libexec/k0s/
- ~/k0s/ (for the ansible_user)
- /opt/longhorn/
- /opt/cni/
- /opt/containerd
While the cluster is being deleted, error messages may be displayed; however, this does not abort the installer.
- You can ignore such messages for the Delete KUMA transfer job and Delete KUMA pod tasks.
- For the Reset k0s task (if an error message contains the following text: "
To ensure a full reset, a node reboot is recommended.") and the Delete k0s Directories and files task (if an error message contains the following text: "I/O error: '/var/lib/k0s/kubelet/plugins/kubernetes.io/csi/driver.longhorn.io/"), we recommend restarting the relevant host and trying to remove KUMA again with the same inventory file.
After removing KUMA, restart the hosts on which the KUMA components or Kubernetes were installed.
Page top
[Topic 217962]