Contents
User interface of the solution
Kaspersky SD-WAN is managed using the orchestrator web interface. You can use the menu sections to configure the components of the solution. When you navigate to a section, an additional menu with subsections is displayed in a collapsed form. To expand the menu, hover your mouse cursor over the icon of one of the subsections. You can click the expand icon ![]() to disable the automatic minimization of the menu.
to disable the automatic minimization of the menu.
Two variants of the orchestrator web interface are supported:
- The administrator portal gives administrators full access to managing the solution components.
- The self-service portal gives tenants access to managing the SD-WAN instances that are deployed for them.
Administrators can log in to the self-service portal of a tenant.
Administrator portal
The menu of the administrator portal is shown in the figure below.
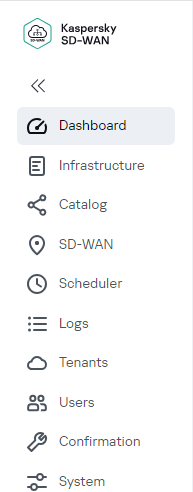
Menu of the administrator portal
Section |
Description |
|---|---|
Dashboard |
Information about the current status of solution components, such as CPE devices, virtual network functions, and physical network functions. |
Infrastructure |
Corporate infrastructure. In this section, you can configure the following components: |
Catalog |
Network service templates for centralized configuration of network services |
SD-WAN |
|
Scheduler |
Tasks that are scheduled to run later. |
Logs |
Logs of solution components, such as CPE devices, virtual network functions, and physical network functions. |
Tenants |
Tenants of the solution. |
Users |
Users of the solution. In this section, you can configure the following components: |
Confirmation |
Confirmation requests for user actions. |
System |
|
The controller has its own configuration menu (see figure below).
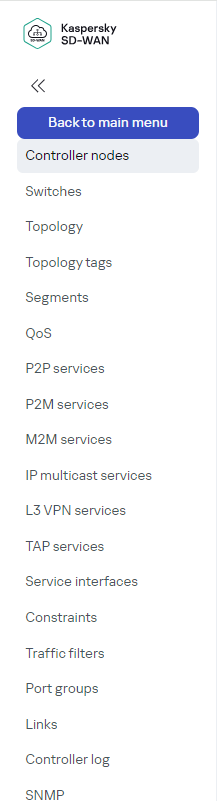
Controller configuration menu on the administrator portal
Section |
Description |
|---|---|
Controller nodes |
|
Switches |
Advanced settings of CPE devices and switches. |
Topology |
|
Topology tags |
Topology tags for establishing links between CPE devices. |
Segments |
Segments formed from CPE devices and switches. |
QoS |
Quality of service settings. In this section, you can configure the following components: |
P2P services |
|
P2M services |
|
M2M services |
|
IP multicast services |
|
L3 VPN services |
|
TAP services |
|
Service interfaces |
Service interfaces of CPE devices and switches. |
Constraints |
Manual-TE constraints and threshold constraints for assuring quality of service. |
Traffic filters |
Traffic filters for enforcing quality of service. |
Port groups |
|
Links |
Links between CPE devices and switches, and links between CPE devices. |
Logs |
|
SNMP |
Settings for monitoring CPE devices, virtual network functions, and physical network functions using SNMP. |
Self-service portal
The menu of the self-service portal is shown in the figure below.
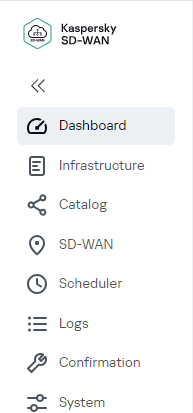
Menu of the self-service portal
Section |
Description |
|---|---|
Dashboard |
Information about the current status of solution components such as CPE devices and network functions. |
Infrastructure |
Corporate infrastructure. In this section, you can configure controllers. |
Catalog |
Network services for traffic transmission and virtualization of network functions. |
SD-WAN |
|
Scheduler |
Tasks that are scheduled to run later. |
Logs |
Logs of solution components, such as CPE devices, virtual network functions, and physical network functions. |
Confirmation |
Confirmation requests for user actions. |
System |
|
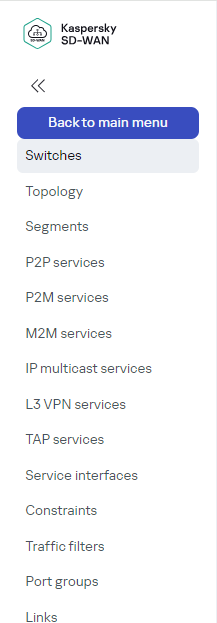
The controller has its own configuration menu (see figure below).
Section |
Description |
|---|---|
Switches |
Advanced settings of CPE devices and switches. |
Topology |
|
Segments |
Segments formed from CPE devices and switches. |
P2P services |
|
P2M services |
|
M2M services |
|
IP multicast services |
|
L3 VPN services |
|
TAP services |
|
Service interfaces |
Service interfaces of CPE devices and switches. |
Constraints |
Manual-TE constraints and threshold constraints for assuring quality of service. |
Traffic filters |
Traffic filters for enforcing quality of service. |
Port groups |
|
Links |
Links between CPE devices and switches, and links between CPE devices. |
Setting and resetting the default page
The default page is a section or subsection of the menu that is automatically displayed after you log into the orchestrator web interface.
To set or reset the default page:
- In the menu, go to the section or subsection of the orchestrator web interface that you want to set as the default page.
- In the lower part of the menu, click the settings icon
 → Set as default page.
 - If you want to reset the default page, click the settings icon → Reset default page.
In the upper part of the page, the
Default page is resetmessage is displayed. The Dashboard section becomes the default page.
Switching between light and dark modes of the orchestrator web interface
To switch between light and dark modes of the orchestrator web interface:
In the lower part of the menu, click the settings icon ![]() → Dark mode or Light mode.
→ Dark mode or Light mode.
Changing the language of the orchestrator web interface
The orchestrator web interface supports English and Russian languages.
To change the language of the orchestrator web interface,
in the lower part of the menu, click one of the following buttons:
- EN to switch the language of the orchestrator web interface to English.
- RU to switch the language of the orchestrator web interface to Russian.
Managing solution component tables
Solution components such as users, network interfaces, and BGP peers are displayed in tables. You can use the following controls to manage tables:
- The settings icon , which you can use to do the following:
- Refresh the table by clicking the settings icon → Reload. You can also refresh the table using the refresh icon
 .
. - Restore default widths of table columns by clicking the settings icon → Reset columns width.
- Select which columns are displayed in the table. To do so, click the settings icon and select the check boxes next to the columns you want to display.
- Refresh the table by clicking the settings icon
- The search icon
 which you can click and enter your search criteria. After entering the search criteria, the table displays the relevant entries.
 - Status filters for displaying entries with the selected status.
- Time filters for displaying entries for the selected period:
- All time
- Last year
- Last month
- Last week
- Last day
You can manually specify the period using the fields in the upper part of the table.
- The Actions button for applying an action simultaneously to all entries with selected check boxes. For example, in the CPE devices table, you can delete multiple CPE devices at the same time.
You can adjust the width of each column of the table using the three-dot icons ![]() between the names of the columns.
between the names of the columns.