Contents
Route exchange over BGP
Kaspersky SD-WAN supports the BGP (Border Gateway Protocol) dynamic routing protocol for exchanging routing information between CPE devices and external network devices. You can establish internal iBGP (internal BGP) sessions as well as external eBGP (external BGP) sessions.
Creation of individual BGP peers and BGP peer groups is also supported. Dynamic TCP sessions are established with BGP peer groups.
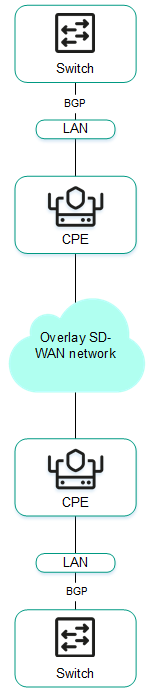
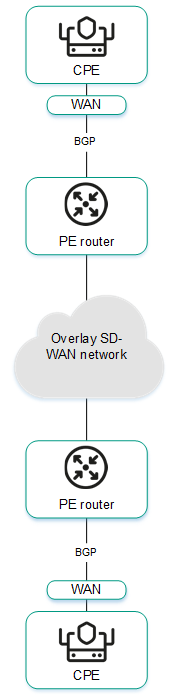
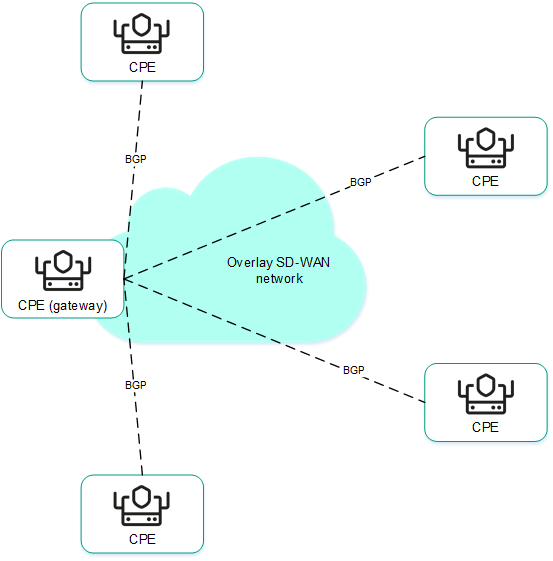
The figures below show examples of BGP being used in the solution:
- Connecting multiple client locations to the L3 SD-WAN network via BGP.
- Connecting CPE devices to the service provider's IP/MPLS network via BGP.
- Using BGP to configure the connectivity of CPE devices within the domain.
Basic BGP settings
You can specify basic BGP settings in a CPE template or on a CPE device. BGP settings specified in the CPE template are automatically propagated to all CPE devices that use this CPE template.
To modify the basic BGP settings:
- Specify basic BGP settings in one of the following ways:
- If you want to edit the basic BGP settings in a CPE template, go to the SD-WAN → CPE templates menu section, click the CPE template, and select the BGP tab.
- If you want to edit the basic BGP settings on a CPE device, go to the SD-WAN → CPE menu section, click the CPE device, select the BGP tab, and select the Override check box.
By default, the General settings tab is selected, which displays the basic BGP settings.
- In the BGP drop-down list, select Enabled. The default value is Disabled.
- If you want to add BGP routes to the specified virtual routing and forwarding table, in the VRF drop-down list, select a created virtual routing and forwarding table.
- In the AS field, enter the autonomous system number of the CPE device. Range of values: 1 to 4,294,967,295.
- In the Router ID field, enter the IPv4 address that you want to assign to the router ID of the CPE device. If you want to assign an IPv4 address from a specified range of IP addresses:
- Select the Router ID from IP pool check box. This check box is cleared by default.
- In the IP pool drop-down list, select a created range of IP addresses.
- If necessary, in the Maximum paths field, enter the maximum number of entries in the routing and forwarding table of the CPE device. Range of values: 1 to 8.
- If necessary, select the following check boxes:
- Select the Always compare MED check box. This check box allows the CPE device to compare the multi-exit discriminator (MED) of routes advertised from different autonomous systems.
You must make sure that this check box is selected on all CPE devices in your autonomous system. Otherwise, exchange of routing information may result in routing loops.
- Select the Graceful restart (helper mode) check box to enable Graceful restart on the CPE device.
These check boxes are cleared by default.
- Select the Always compare MED check box. This check box allows the CPE device to compare the multi-exit discriminator (MED) of routes advertised from different autonomous systems.
- If you do not want the CPE device to exchange IPv4 routes with BGP peers by default, clear the Use default IPv4 unicast routes check box. This check box is selected by default.
- If you want to configure BGP timers:
- Select the BGP timers check box. This check box is cleared by default.
- In the Keepalive field, enter the time interval in seconds that the CPE device uses to send control packets to BGP peers. Range of values: 0 to 65,535.
- In the Holdtime field, enter the time interval in seconds that the CPE device uses when receiving control packets from BGP peers. If no control packets are received from the BGP peer within the specified time, the CPE device considers the peer unavailable. Range of values: 0 to 65,535.
- If you want to configure route redistribution in BGP, under Route redistribution, do the following:
- Select the check boxes next to the route types:
- Kernel to redistribute Kernel routes generated by the operating system of the CPE device.
- Connected to redistribute routes directly connected to network interfaces of CPE device.
- Static to redistribute static routes.
- OSPF to redistribute OSPF routes.
These check boxes are cleared by default.
- In the Route map drop-down list, select a created route map for redistributed routes.
- In the Metric field, enter a metric of redistributed routes. Range of values: 0 to 16,777,214.
- Select the check boxes next to the route types:
- If you want the CPE device to advertise the specified subnet to BGP peers:
- Under Networks, click + Network.
- In the Network field, enter the IPv4 prefix of the subnet.
- In the Route map drop-down list, select a created route map for the subnet.
The subnet is specified and displayed under Networks. You can specify multiple subnets or delete a subnet. To delete a subnet, click the delete icon
 next to it.
 - In the upper part of the settings area, click Save to save the settings of the CPE template or CPE device.
Managing BGP peers
The table of BGP peers is displayed in the CPE template and on the CPE device:
- To display the table of BGP peers in a CPE template, go to the SD-WAN → CPE templates menu section, click the CPE template, and select the BGP → Neighbors tab.
- To display the table of BGP peers on a CPE device, go to the SD-WAN → CPE menu section, click the CPE device, and select the BGP → Neighbors tab.
Information about BGP peers is displayed in the following columns of the table:
- Neighbor IP is the IPv4 address of the BGP peer.
- Name is the name of the BGP peer.
- Description is a brief description of the BGP peer.
- Inherited indicates whether the BGP peer is inherited from the CPE template:
- Yes
- No
This column is displayed only on the CPE device.
- Remote AS is the autonomous system number of the BGP peer.
- Shutdown indicates whether the BGP peer is disabled and no TCP session is established with it:
- Yes
- No
- Weight is the weight of routes advertised by the BGP peer.
- Management contains the actions that can be performed with the BGP peer.
Creating a BGP peer
You can create a BGP peer in a CPE template or on a CPE device. A BGP peer created in the CPE template is automatically created on all CPE devices that use this CPE template. The maximum number of dynamic BGP peers is 512.
To create a BGP peer:
- Create a BGP peer in one of the following ways:
- If you want to create a BGP peer in a CPE template, go to the SD-WAN → CPE templates menu section, click the CPE template, and select the BGP → Neighbors tab.
- If you want to create a BGP peer on a CPE device, go to the SD-WAN → CPE menu section, click the CPE device, select the BGP → Neighbors tab, and select the Override check box.
A table of BGP peers is displayed.
- Click + BGP neighbor.
- This opens a window; in that window, in the Name field, enter the name of the BGP peer. The maximum length of the name is 50 characters.
- If you want to disable a BGP peer and prevent establishing a TCP session with it, select the Disable BGP peer check box. This check box is cleared by default.
- In the Neighbor IP field, enter the IPv4 address of the BGP peer.
- In the Remote AS field, enter the autonomous system number of the BGP peer. Range of values: 1 to 4,294,967,295.
- If necessary, enter a brief description of the BGP peer in the Description field.
- If you want the CPE device to use a password when establishing a TCP session with the BGP peer, in the Password field, enter the password. For a TCP session to be established between two BGP peers, they must use the same password. To see the entered password, you can click the show icon
 .
. - If necessary, in the Loopback interface field, enter the IPv4 address of the loopback interface that the CPE device sends to the BGP peer when establishing a TCP session.
- If the TCP session is not established directly between the CPE device and the BGP peer, in the eBGP hops field, enter the number of hops between the CPE device and the BGP peer. Range of values: 1 to 255.
- If you want to configure BGP timers:
- Select the Custom BGP timers check box. This check box is cleared by default.
- In the Keepalive field, enter the time interval in seconds that the CPE device uses to send control packets to the BGP peer. Range of values: 0 to 65,535.
- In the Holdtime field, enter the time interval in seconds that the CPE device uses when receiving control packets from the BGP peer. If no control packets are received from the BGP peer within the specified time, the CPE device considers this BGP peer unavailable. Range of values: 0 to 65,535.
- If you want to use the BFD protocol to detect loss of connectivity, select the BFD check box. This check box is cleared by default. When the check box is selected, changes you make to the route map are immediately applied to a BGP peer if the BGP peer uses this route map. You can select a route map for the BGP peer at step 14 of these instructions.
- If you want to specify advanced settings for the BGP peer:
- Select the Advanced settings tab.
Advanced settings of the BGP peer are displayed.
- If necessary, select the following check boxes:
- Select the Soft-reconfiguration inbound check box to store routes advertised by the BGP peer locally on the CPE device. Using this feature reduces the amount of memory available on the CPE device. When the check box is selected, changes you make to the route map are immediately applied to a BGP peer if the BGP peer uses this route map. You can select a route map for the BGP peer at step 14 of these instructions.
- Select the Attribute unchanged AS path check box to prevent modifying the 'AS path' attribute of routes that the CPE device advertises to the BGP peer.
- Select the Allow AS in check box to let BGP peers advertise routes to the CPE device with the 'AS path' attribute, whose value is the autonomous system number of the CPE device.
- Select the Attribute unchanged next-hop check box to prevent modifying the 'next hop' attribute of routes that the CPE device advertises to the BGP peer.
- Select the Next-hop self check box to use the IPv4 address of the CPE device as the 'next-hop' attribute value when advertising routes to the BGP peer.
- Select the Attribute unchanged MED check box to prevent modifying the 'MED' attribute of routes that the CPE device advertises to the BGP peer.
- Select the Route reflector client check box to assign the Route Reflector role to the CPE device and the Route Reflector Client role to the BGP peer. You can only select this check box for a BGP peer that is in the same autonomous system as the CPE device.
These check boxes are cleared by default.
- In the Local AS field, enter the number of the local autonomous system that the CPE device sends to the BGP peer. Range of values: 1 to 4,294,967,295.
- In the Weight field, enter the weight of the routes advertised by the BGP peer. The greater the weight of a route, the higher its priority. Range of values: 0 to 65,535.
- In the Maximum prefix field, enter the maximum number of routes that the BGP peer can advertise to a CPE device. Range of values: 1 to 4,294,967,295.
- If you want a CPE device to advertise routes with the 'community' attribute to its BGP peer, select the Send community check box and select the type of the attribute in the drop-down list:
- All covers all available types of the 'community' attribute.
- Standard and extended community.
- Extended community.
- Large community.
- Standard community.
This check box is cleared by default.
- If you want the CPE device to advertise the default 0.0.0.0/0 route to the BGP peer, select the Default originate check box. This check box is cleared by default. You can select the Set route map check box and in the drop-down list that is displayed, select the created route map for the 0.0.0.0/0 default route.
- Select the Advanced settings tab.
- If you want to configure route filtering for the BGP peer:
- Select the Filtering tab.
The route filtering settings are displayed.
- Under Route map, select the created route maps:
- In the Inbound drop-down list, select a route map for the routes that the BGP peer advertises to the CPE device.
- In the Outbound drop-down list, select a route map for the routes that the CPE device advertises to the BGP peer.
- Under Prefix list, select the created prefix lists:
- In the Inbound drop-down list, select a prefix list for the routes that the BGP peer advertises to the CPE device.
- In the Outbound drop-down list, select a prefix list for the routes that the CPE device advertises to the BGP peer.
- Under Access control list, select the created access control lists:
- In the Inbound drop-down list, select an access control list for the routes that the BGP peer advertises to the CPE device.
- In the Outbound drop-down list, select an access control list for the routes that the CPE device advertises to the BGP peer.
- Select the Filtering tab.
- Click Create.
The BGP peer is created and displayed in the table.
- In the upper part of the settings area, click Save to save the settings of the CPE template or CPE device.
Editing a BGP peer
You can edit a BGP peer in a CPE template or on a CPE device. A BGP peer edited in the CPE template is automatically modified on all CPE devices that use this CPE template. You cannot edit a BGP peer that is inherited from a CPE template on a CPE device.
To edit a BGP peer:
- Edit a BGP peer in one of the following ways:
- If you want to edit a BGP peer in a CPE template, go to the SD-WAN → CPE templates menu section, click the CPE template, and select the BGP → Neighbors tab.
- If you want to edit a BGP peer on a CPE device, go to the SD-WAN → CPE menu section, click the CPE device, select the BGP → Neighbors tab, and select the Override check box.
A table of BGP peers is displayed.
- Click Edit next to the BGP peer that you want to edit.
- This opens a window; in that window, if necessary, edit the BGP peer settings. For a description of the settings, see the instructions for creating a BGP peer.
- Click Save.
The BGP peer is modified and updated in the table.
- In the upper part of the settings area, click Save to save the settings of the CPE template or CPE device.
Deleting a BGP peer
You can delete a BGP peer in a CPE template or on a CPE device. A BGP peer deleted in the CPE template is automatically deleted on all CPE devices that use this CPE template. You cannot delete a BGP peer that is inherited from a CPE template on a CPE device.
Deleted BGP peers cannot be restored.
To delete a BGP peer:
- Delete a BGP peer in one of the following ways:
- If you want to delete a BGP peer in a CPE template, go to the SD-WAN → CPE templates menu section, click the CPE template, and select the BGP → Neighbors tab.
- If you want to delete a BGP peer on a CPE device, go to the SD-WAN → CPE menu section, click the CPE device, select the BGP → Neighbors tab, and select the Override check box.
A table of BGP peers is displayed.
- Click Delete next to the BGP peer that you want to delete.
- In the confirmation window, click Delete.
The BGP peer is deleted and is no longer displayed in the table.
- In the upper part of the settings area, click Save to save the settings of the CPE template or CPE device.
Managing BGP peer groups
You can view the table of BGP peer groups in a CPE template and on a CPE device:
- To view the table of BGP peer groups in a CPE template, go to the SD-WAN → CPE templates menu section, click the CPE template, and select the BGP → Peer groups tab.
- To view the table of BGP peer groups on a CPE device, go to the SD-WAN → CPE menu section, click the CPE device, and select the BGP → Peer groups tab.
Information about BGP peer groups is displayed in the following columns of the table:
- Name is the name of the BGP peer group.
- BGP range is the IPv4 prefix of the BGP peer group.
- Description is a brief description of the BGP peer group.
- Inherited indicates whether the BGP peer group is inherited from the CPE template:
- Yes
- No
This column is displayed only on the CPE device.
- Remote AS is the autonomous system number of the BGP peer group.
- Shutdown indicates whether the BGP peer group is disabled and no TCP session is established with it.
- Yes
- No
- Weight is the weight of routes advertised by the BGP peer group.
- Management contains the actions that can be performed with the BGP peer group.
Creating a BGP peer group
You can create a BGP peer group in a CPE template or on a CPE device. A BGP peer group created in the CPE template is automatically created on all CPE devices that use this CPE template.
To create a BGP peer group:
- Create a BGP peer group in one of the following ways:
- If you want to create a BGP peer group in a CPE template, go to the SD-WAN → CPE templates menu section, click the CPE template, and select the BGP → Peer groups tab.
- If you want to create a BGP peer group on a CPE device, go to the SD-WAN → CPE menu section, click the CPE device, select the BGP → Peer groups tab, and select the Override check box.
A table of BGP peer groups is displayed.
- Click + Peer group.
- This opens a window; in that window, in the Name field, enter the name of the BGP peer group. The maximum length of the name is 50 characters.
- If you want to disable a BGP peer group and prevent establishing a TCP session with it, select the Disable BGP peer group check box. This check box is cleared by default.
- In the BGP range field, enter the IPv4 prefix of the BGP peer group.
- In the Remote AS field, enter the autonomous system number of the BGP peer group. Range of values: 1 to 4,294,967,295.
- If necessary, enter a brief description of the BGP peer group in the Description field.
- If you want the CPE device to use a password when establishing a TCP session with the BGP peer group, in the Password field, enter the password. For a TCP session to be established between two BGP peers, they must use the same password. To see the entered password, you can click the show icon .
- In the Loopback interface field, enter the IPv4 address of the loopback interface that the CPE device sends to the BGP peer group when establishing a TCP session.
- If the TCP session is not established directly between the CPE device and the BGP peer group, in the eBGP hops field, enter the number of hops between the CPE device and the BGP peer group. Range of values: 1 to 255.
- If you want to configure BGP timers:
- Select the Custom BGP timers check box. This check box is cleared by default.
- In the Keepalive field, enter the time interval in seconds that the CPE device uses to send control packets to the BGP peer group. Range of values: 0 to 65,535.
- In the Holdtime field, enter the time interval in seconds that the CPE device uses when receiving control packets from the BGP peer group. If no control packets are received from the BGP peer within the specified time, the CPE device considers this BGP peer unavailable. Range of values: 0 to 65,535.
- If you want to use the BFD protocol to detect loss of connectivity, select the BFD check box. This check box is cleared by default. When the check box is selected, changes you make to the route map are immediately applied to a BGP peer group if the BGP peer group uses this route map. You can select a route map for the BGP peer group at step 14 of these instructions.
- If you want to specify advanced settings for the BGP peer group:
- Select the Advanced settings tab.
Advanced settings of the BGP peer group are displayed.
- If necessary, select the following check boxes:
- Select the Soft-reconfiguration inbound check box to store routes advertised by the BGP peer group locally on the CPE device. Using this feature reduces the amount of memory available on the CPE device. When the check box is selected, changes you make to the route map are immediately applied to a BGP peer group if the BGP peer group uses this route map. You can select a route map for the BGP peer group at step 14 of these instructions.
- Select the Attribute unchanged AS path check box to prevent modifying the 'AS path' attribute of routes that the CPE device advertises to the BGP peer group.
- Select the Allow AS in check box to let the BGP peer group advertise routes to the CPE device with the 'AS path' attribute, whose value is the autonomous system number of the CPE device.
- Select the Attribute unchanged next-hop check box to prevent modifying the 'next hop' attribute of routes that the CPE device advertises to the BGP peer group.
- Select the Next-hop self check box to use the IPv4 address of the CPE device as the 'next-hop' attribute value when advertising routes to the BGP peer group.
- Select the Attribute unchanged MED check box to prevent modifying the 'MED' attribute of routes that the CPE device advertises to the BGP peer group.
- Select the Route reflector client check box to assign the Route Reflector role to the CPE device and the Route Reflector Client role to the BGP peer group. You can only select this check box for a BGP peer group that is in the same autonomous system as the CPE device.
These check boxes are cleared by default.
- In the Local AS field, enter the number of the local autonomous system that the CPE device sends to the BGP peer group. Range of values: 1 to 4,294,967,295.
- In the Weight field, enter the weight of the routes advertised by the BGP peer group. The greater the weight of a route, the higher its priority. Range of values: 0 to 65,535.
- In the Maximum prefix field, enter the maximum number of routes that the BGP peer group can advertise to a CPE device. Range of values: 1 to 4,294,967,295.
- If you want a CPE device to advertise routes with the 'community' attribute to the BGP peer group, select the Send community check box and select the type of attribute to be sent in the drop-down list:
- All covers all available types of the 'community' attribute.
- Standard and extended community.
- Extended community.
- Large community.
- Standard community.
This check box is cleared by default.
- If you want the CPE device to advertise the default 0.0.0.0/0 route to the BGP peer group, select the Default originate check box. This check box is cleared by default. You can select the Set route map check box and in the drop-down list that is displayed, select the created route map for the 0.0.0.0/0 default route.
- Select the Advanced settings tab.
- If you want to configure route filtering for the BGP peer group:
- Select the Filtering tab.
The route filtering settings are displayed.
- Under Route map, select the created route maps:
- In the Inbound drop-down list, select a route map for the routes that the BGP peer group advertises to the CPE device.
- In the Outbound drop-down list, select a route map for the routes that the CPE device advertises to the BGP peer group.
- Under Prefix list, select the created prefix lists:
- In the Inbound drop-down list, select a list of prefixes that the BGP peer group advertises to the CPE device.
- In the Outbound drop-down list, select a prefix list for the routes that the CPE device advertises to the BGP peer group.
- Under Access control list, select the created access control lists:
- In the Inbound drop-down list, select an access control list for the routes that the BGP peer group advertises to the CPE device.
- In the Outbound drop-down list, select an access control list for the routes that the CPE device advertises to the BGP peer group.
- Select the Filtering tab.
- Click Create.
The BGP peer group is created and displayed in the table.
- In the upper part of the settings area, click Save to save the settings of the CPE template or CPE device.
Editing a BGP peer group
You can edit a BGP peer group in a CPE template or on a CPE device. A BGP peer group edited in the CPE template is automatically modified on all CPE devices that use this CPE template. You cannot edit a BGP peer group that is inherited from a CPE template on a CPE device.
To edit a BGP peer group:
- Edit a BGP peer group in one of the following ways:
- If you want to edit a BGP peer group in a CPE template, go to the SD-WAN → CPE templates menu section, click the CPE template, and select the BGP → Peer groups tab.
- If you want to edit a BGP peer group on a CPE device, go to the SD-WAN → CPE menu section, click the CPE device, select the BGP → Peer groups tab, and select the Override check box.
A table of BGP peer groups is displayed.
- Click Edit next to the BGP peer group that you want to edit.
- This opens a window; in that window, if necessary, edit the BGP peer group settings. For a description of the settings, see the instructions for creating a BGP peer group.
- Click Save.
The BGP peer group is modified and updated in the table.
- In the upper part of the settings area, click Save to save the settings of the CPE template or CPE device.
Deleting a BGP peer group
You can delete a BGP peer group in a CPE template or on a CPE device. A BGP peer group deleted in the CPE template is automatically deleted on all CPE devices that use this CPE template. You cannot delete a BGP peer group that is inherited from a CPE template on a CPE device.
Deleted BGP peer groups cannot be restored.
To delete a BGP peer group:
- Delete a BGP peer group in one of the following ways:
- If you want to delete a BGP peer group in a CPE template, go to the SD-WAN → CPE templates menu section, click the CPE template, and select the BGP → Peer groups tab.
- If you want to delete a BGP peer group on a CPE device, go to the SD-WAN → CPE menu section, click the CPE device, select the BGP → Peer groups tab, and select the Override check box.
A table of BGP peer groups is displayed.
- Click Delete next to the BGP peer group that you want to delete.
- In the confirmation window, click Delete.
The BGP peer group is deleted and is no longer displayed in the table.
- In the upper part of the settings area, click Save to save the settings of the CPE template or CPE device.