Contents
Reports
This section describes how to use reports, manage custom report templates, use report templates to generate new reports, and create report delivery tasks.
Using reports
The Reports feature allows you to get detailed numerical information about the security of your organization's network, save this information to a file, send it by email, and print it.
Reports are available in the OSMP Console, in the Monitoring & reporting section, by clicking Reports.
By default, reports include information for the last 30 days.
Open Single Management Platform has a default set of reports for the following categories:
- Protection status
- Deployment
- Updating
- Threat statistics
- Other
You can create custom report templates, edit report templates, and delete them.
You can create reports that are based on existing templates, export reports to files, and create tasks for report delivery.
Creating a report template
To create a report template:
- In the main menu, go to Monitoring & reporting → Reports.

The list of the report templates in the Reports subsection
- Click Add.
The New report template wizard starts. Proceed through the wizard by using the Next button.
- Enter the report name and select the report type.

The New report template wizard. Specifying the name and type of the report template
- On the Scope step of the wizard, select the set of client devices (administration group, device selection, selected devices, or all networked devices) whose data will be displayed in reports that are based on this report template.
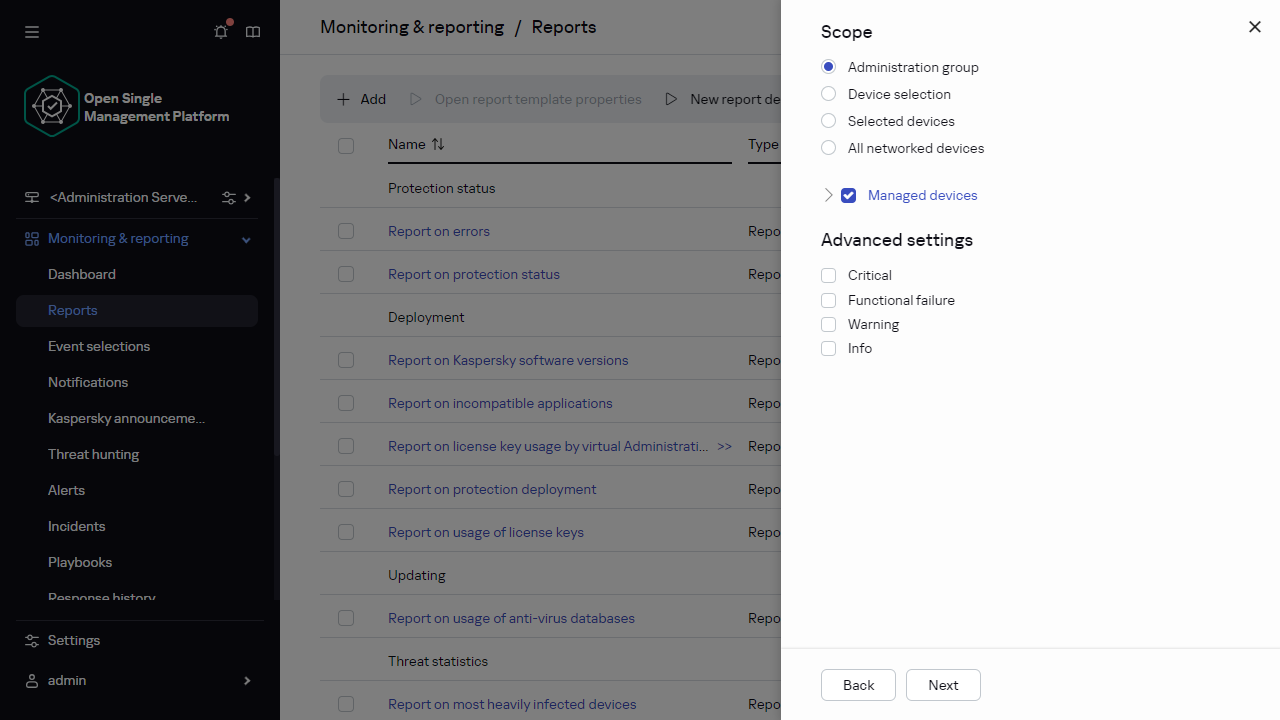
The New report template wizard. Specifying the report template scope
- On the Reporting period step of the wizard, specify the report period. Available values are as follows:
- Between the two specified dates
- From the specified date to the report creation date
- From the report creation date, minus the specified number of days, to the report creation date
This page may not appear for some reports.

The New report template wizard. Specifying the reporting period
- Click OK to close the wizard.
- Do one of the following:
- Click the Save and run button to save the new report template and to run a report based on it.
The report template is saved. The report is generated.
- Click the Save button to save the new report template.
The report template is saved.
- Click the Save and run button to save the new report template and to run a report based on it.
You can use the new template for generating and viewing reports.
Viewing and editing report template properties
You can view and edit basic properties of a report template, for example, the report template name or the fields displayed in the report.
To view and edit properties of a report template:
- In the main menu, go to Monitoring & reporting → Reports.
- Select the check box next to the report template whose properties you want to view and edit.
As an alternative, you can first generate the report, and then click the Edit button.
- Click the Open report template properties button.
The Editing report <Report name> window opens with the General tab selected.
- Edit the report template properties:
- General tab:
- Report template name
- Maximum number of entries to display
- Group
Click the Settings button to change the set of client devices for which the report is created. For some types of the reports, the button may be unavailable. The actual settings depend on the settings specified during creation of the report template.
- Time interval
Click the Settings button to modify the report period. For some types of the reports, the button may be unavailable. Available values are as follows:
- Between the two specified dates
- From the specified date to the report creation date
- From the report creation date, minus the specified number of days, to the report creation date
- Include data from secondary and virtual Administration Servers
- Up to nesting level
- Data wait interval (min)
- Cache data from secondary Administration Servers
- Cache update frequency (h)
- Transfer detailed information from secondary Administration Servers
- Fields tab
Select the fields that will be displayed in the report, and use the Move up button and Move down button to change the order of these fields. Use the Add button or Edit button to specify whether the information in the report must be sorted and filtered by each of the fields.
In the Filters of Details fields section, you can also click the Convert filters button to start using the extended filtering format. This format enables you to combine filtering conditions specified in various fields by using the logical OR operation. After you click the button, the Convert filters panel opens on the right. Click the Convert filters button to confirm conversion. You can now define a converted filter with conditions from the Details fields section that are applied by using the logical OR operation.
Conversion of a report to the format supporting complex filtering conditions will make the report incompatible with the previous versions of Kaspersky Security Center (11 and earlier). Also, the converted report will not contain any data from secondary Administration Servers running such incompatible versions.
- General tab:
- Click Save to save the changes.
- Close the Editing report <Report name> window.
The updated report template appears in the list of report templates.
Page topExporting a report to a file
You can save one or multiple reports as XML, HTML, or PDF. Open Single Management Platform allows you to export up to 10 reports to files of the specified format at the same time.
PDF format is available only if you are connected to the secondary Administration Server in OSMP Console.
To export a report to a file:
- In the main menu, go to Monitoring & reporting → Reports.
- Choose the reports that you want to export.
If you choose more than 10 reports, the Export report button will be disabled.
- Click the Export report button.
- In the window that opens, specify the following export parameters:
- File name.
If you select one report to export, specify the report file name.
If you select more than one report, the report file names will coincide with the name of the selected report templates.
- Maximum number of entries.
Specify the maximum number of entries included in the report file. The default value is 10,000.
You can export a report with an unlimited number of entries. Note that if your report contains a large number of entries, the time required for generating and exporting the report increases.
- File format.
Select the report file format: XML, HTML, or PDF. If you export multiple reports, all selected reports are saved in the specified format as separate files.
PDF format is available only if you are connected to the secondary Administration Server in OSMP Console.
The wkhtmltopdf tool is required to convert a report to PDF. When you select the PDF option, secondary Administration Server checks whether the wkhtmltopdf tool is installed on the device. If the tool is not installed, the application displays a message about the necessity to install the tool on the Administration Server device. Install the tool manually, and then proceed to the next step.
- File name.
- Click the Export report button.
The report is saved to a file in the specified format.
Page topGenerating and viewing a report
To create and view a report:
- In the main menu, go to Monitoring & reporting → Reports.
- Click the name of the report template that you want to use to create a report.
A report using the selected template is generated and displayed.
Report data is displayed according to the localization set for the Administration Server.
In the generated reports, some fonts may be displayed incorrectly on the diagrams. To resolve this issue, install the fontconfig library. Also, please check that the fonts corresponding to your operating system locale are installed in the operating system.
The report displays the following data:
- On the Summary tab:
- The name and type of report, a brief description and the reporting period, as well as information about the group of devices for which the report is generated.
- Graph chart showing the most representative report data.
- Consolidated table with calculated report indicators.
- On the Details tab, a table with detailed report data is displayed.
Creating a report delivery task
You can create a task that will deliver selected reports.
To create a report delivery task:
- In the main menu, go to Monitoring & reporting → Reports.
- [Optional] Select the check boxes next to the report templates for which you want to create a report delivery task.
- Click the Create delivery task button.
- The New task wizard starts. Proceed through the wizard by using the Next button.
- On the first page of the wizard, enter the task name. The default name is Deliver reports (<N>), where <N> is the sequence number of the task.
- On the task settings page of the wizard, specify the following settings:
- Report templates to be delivered by the task. If you selected them at step 2, skip this step.
- The report format: HTML, XLS, or PDF.
PDF format is available only if you are connected to the secondary Administration Server in OSMP Console.
The wkhtmltopdf tool is required to convert a report to PDF. When you select the PDF option, secondary Administration Server checks whether the wkhtmltopdf tool is installed on the device. If the tool is not installed, the application displays a message about the necessity to install the tool on the Administration Server device. Install the tool manually, and then proceed to the next step.
- Whether the reports are to be sent by email, together with email notification settings.
- Whether the reports are to be saved to a folder, whether previously saved reports in this folder are to be overwritten, and whether a specific account is to be used to access the folder (for a shared folder).
- If you want to modify other task settings after the task is created, on the Finish task creation page of the wizard enable the Open task details when creation is complete option.
- Click the Create button to create the task and close the wizard.
The report delivery task is created. If you enabled the Open task details when creation is complete option, the task settings window opens.
Deleting report templates
To delete one or several report templates:
- In the main menu, go to Monitoring & reporting → Reports.
- Select check boxes next to the report templates that you want to delete.
- Click the Delete button.
- In the window that opens, click OK to confirm your selection.
The selected report templates are deleted. If these report templates were included in the report delivery tasks, they are also removed from the tasks.