Contents
Connector settings
This section describes the settings of all connector types supported by KUMA.
Tcp type
When creating this type of connector, you need to define values for the following settings:
Basic settings tab:
- Name (required)—a unique name for this type of resource. Must contain 1 to 128 Unicode characters.
- Tenant (required)—name of the tenant that owns the resource.
- Type (required)—connector type, tcp.
- URL (required)—URL that you need to connect to. Available formats: hostname:port, IPv4:port, IPv6:port, :port.
- Delimiter is used to specify a character representing the delimiter between events. Available values:
\n,\t,\0. If no separator is specified (an empty value is selected), the default value is\n. - Description—resource description: up to 4,000 Unicode characters.
Advanced settings tab:
- Buffer size is used to set a buffer size for the connector. The default value is 1 MB, and the maximum value is 64 MB.
- Character encoding setting specifies character encoding. The default value is
UTF-8. - TLS mode—TLS encryption mode using certificates in PEM x509 format:
- Disabled (default)—do not use TLS encryption.
- Enabled—use encryption without certificate verification.
- With verification—use encryption with verification that the certificate was signed with the KUMA root certificate. The root certificate and key of KUMA are created automatically during program installation and are stored on the KUMA Core server in the folder /opt/kaspersky/kuma/core/certificates/.
- Custom PFX – use encryption. When this option is selected, a certificate must be generated with a private key in PKCS#12 container format in an external Certificate Authority. Then the certificate must be exported from the key store and uploaded to the KUMA web interface as a PFX secret. Add PFX secret.
- If you previously uploaded a PFX certificate, select it from the Secret drop-down list.
If no certificate was previously added, the drop-down list shows No data.
- If you want to add a new certificate, click the
 button on the right of the Secret list.
The Secret window opens.
- In the Name field, enter the name that will be used to display the secret in the list of available secrets.
- Click the Upload PFX button to select the file containing your previously exported certificate with a private key in PKCS#12 container format.
- In the Password field, enter the certificate security password that was set in the Certificate Export Wizard.
- Click the Save button.
The certificate will be added and displayed in the Secret list.
When using TLS, it is impossible to specify an IP address as a URL.
- If you previously uploaded a PFX certificate, select it from the Secret drop-down list.
- Compression—you can use Snappy compression. By default, compression is disabled.
- Debug—a toggle switch that lets you specify whether resource logging must be enabled. By default, this toggle switch is in the Disabled position.
udp type
When creating this type of connector, you need to define values for the following settings:
Basic settings tab:
- Name (required)—a unique name for this type of resource. Must contain 1 to 128 Unicode characters.
- Tenant (required)—name of the tenant that owns the resource.
- Type (required)—connector type, udp.
- URL (required)—URL that you need to connect to. Available formats: hostname:port, IPv4:port, IPv6:port, :port.
- Delimiter is used to specify a character representing the delimiter between events. Available values:
\n,\t,\0. If no separator is specified (an empty value is selected), events are not separated. - Description—resource description: up to 4,000 Unicode characters.
Advanced settings tab:
- Buffer size is used to set a buffer size for the connector. The default value is 16 KB, and the maximum value is 64 KB.
- Workers—used to set worker count for the connector. The default value is 1.
- Character encoding setting specifies character encoding. The default value is
UTF-8. - Compression—you can use Snappy compression. By default, compression is disabled.
- Debug—a toggle switch that lets you specify whether resource logging must be enabled. By default, this toggle switch is in the Disabled position.
Netflow type
When creating this type of connector, you need to define values for the following settings:
- Basic settings tab:
- Name (required)—a unique name for this type of resource. Must contain 1 to 128 Unicode characters.
- Tenant (required)—name of the tenant that owns the resource.
- Type (required)—connector type, netflow.
- URL (required)—URL that you need to connect to.
- Description—resource description: up to 4,000 Unicode characters.
- Advanced settings tab:
- Buffer size is used to set a buffer size for the connector. The default value is 16 KB, and the maximum value is 64 KB.
- Workers—used to set worker count for the connector. The default value is 1.
- Character encoding setting specifies character encoding. The default value is
UTF-8. - Debug—a toggle switch that lets you specify whether resource logging must be enabled. By default, this toggle switch is in the Disabled position.
Sflow type
When creating this type of connector, you need to define values for the following settings:
Basic settings tab:
- Name (required)—a unique name for this type of resource. Must contain 1 to 128 Unicode characters.
- Tenant (required)—name of the tenant that owns the resource.
- Type (required)—connector type, sflow.
- URL (required)—a URL that you need to connect to. Available formats: hostname:port, IPv4:port, IPv6:port, :port.
- Description—resource description: up to 4,000 Unicode characters.
Advanced settings tab:
- Buffer size is used to set a buffer size for the connector. The default value is 1 MB, and the maximum value is 64 MB.
- Workers—used to set the amount of workers for a connector. The default value is 1.
- Character encoding setting specifies character encoding. The default value is
UTF-8. - Debug—a toggle switch that lets you enable resource logging. By default, this toggle switch is in the Disabled position.
nats-jetstream type
When creating this type of connector, you need to define values for the following settings:
Basic settings tab:
- Name (required)—a unique name for this type of resource. Must contain 1 to 128 Unicode characters.
- Tenant (required)—name of the tenant that owns the resource.
- Type (required)—connector type, nats-jetstream.
- URL (required)—URL that you need to connect to.
- Topic (required)—the topic for NATS messages. Must contain Unicode characters.
- Delimiter is used to specify a character representing the delimiter between events. Available values:
\n,\t,\0. If no separator is specified (an empty value is selected), events are not separated. - Description—resource description: up to 4,000 Unicode characters.
Advanced settings tab:
- Buffer size is used to set a buffer size for the connector. The default value is 16 KB, and the maximum value is 64 KB.
- GroupID—the GroupID parameter for NATS messages. Must contain 1 to 255 Unicode characters. The default value is
default. - Workers—used to set worker count for the connector. The default value is 1.
- Character encoding setting specifies character encoding. The default value is
UTF-8. - Cluster ID is the ID of the NATS cluster.
- TLS mode specifies whether TLS encryption is used:
- Disabled (default)—do not use TLS encryption.
- Enabled—use encryption without certificate verification.
- With verification—use encryption with verification that the certificate was signed with the KUMA root certificate. The root certificate and key of KUMA are created automatically during program installation and are stored on the KUMA Core server in the folder /opt/kaspersky/kuma/core/certificates/.
- Custom CA—use encryption with verification that the certificate was signed by a Certificate Authority. The secret containing the certificate is selected from the Custom CA drop-down list, which is displayed when this option is selected.
Creating a certificate signed by a Certificate Authority
When using TLS, it is impossible to specify an IP address as a URL.
To use KUMA certificates on third-party devices, you must change the certificate file extension from CERT to CRT. Otherwise, error x509: certificate signed by unknown authority may be returned.
- Compression—you can use Snappy compression. By default, compression is disabled.
- Debug—a toggle switch that lets you specify whether resource logging must be enabled. By default, this toggle switch is in the Disabled position.
Kafka type
When creating this type of connector, you need to define values for the following settings:
Basic settings tab:
- Name (required)—a unique name for this type of resource. Must contain 1 to 128 Unicode characters.
- Tenant (required)—name of the tenant that owns the resource.
- Type (required)—connector type, kafka.
- URL—URL that you need to connect to. Available formats: hostname:port, IPv4:port, IPv6:port.
- Topic—subject of Kafka messages. Must contain from 1 to 255 of the following characters: a–z, A–Z, 0–9, ".", "_", "-".
- Authorization—requirement for Agents to complete authorization when connecting to the connector:
- disabled (by default).
- PFX.
When this option is selected, a certificate must be generated with a private key in PKCS#12 container format in an external Certificate Authority. Then the certificate must be exported from the key store and uploaded to the KUMA web interface as a PFX secret.
- If you previously uploaded a PFX certificate, select it from the Secret drop-down list.
If no certificate was previously added, the drop-down list shows No data.
- If you want to add a new certificate, click the button on the right of the Secret list.
The Secret window opens.
- In the Name field, enter the name that will be used to display the secret in the list of available secrets.
- Click the Upload PFX button to select the file containing your previously exported certificate with a private key in PKCS#12 container format.
- In the Password field, enter the certificate security password that was set in the Certificate Export Wizard.
- Click the Save button.
The certificate will be added and displayed in the Secret list.
- If you previously uploaded a PFX certificate, select it from the Secret drop-down list.
- plain.
If this option is selected, you must indicate the secret containing user account credentials for authorization when connecting to the connector.
- If you previously created a secret, select it from the Secret drop-down list.
If no secret was previously added, the drop-down list shows No data.
- If you want to add a new secret, click the button on the right of the Secret list.
The Secret window opens.
- In the Name field, enter the name that will be used to display the secret in the list of available secrets.
- In the User and Password fields, enter the credentials of the user account that the Agent will use to connect to the connector.
- If necessary, add any other information about the secret in the Description field.
- Click the Save button.
The secret will be added and displayed in the Secret list.
- If you previously created a secret, select it from the Secret drop-down list.
- GroupID—the GroupID parameter for Kafka messages. Must contain from 1 to 255 of the following characters: a–z, A–Z, 0–9, ".", "_", "-".
- Description—resource description: up to 4,000 Unicode characters.
Advanced settings tab:
- Size of message to fetch—should be specified in bytes. The default value is 16 MB.
- Maximum fetch wait time—timeout for a message of the defined size. The default value is 5 seconds.
- Character encoding setting specifies character encoding. The default value is
UTF-8. - TLS mode specifies whether TLS encryption is used:
- Disabled (default)—do not use TLS encryption.
- Enabled—use encryption without certificate verification.
- With verification—use encryption with verification that the certificate was signed with the KUMA root certificate. The root certificate and key of KUMA are created automatically during program installation and are stored on the KUMA Core server in the folder /opt/kaspersky/kuma/core/certificates/.
- Custom CA—use encryption with verification that the certificate was signed by a Certificate Authority. The secret containing the certificate is selected from the Custom CA drop-down list, which is displayed when this option is selected.
Creating a certificate signed by a Certificate Authority
When using TLS, it is impossible to specify an IP address as a URL.
To use KUMA certificates on third-party devices, you must change the certificate file extension from CERT to CRT. Otherwise, error x509: certificate signed by unknown authority may be returned.
- Debug—a toggle switch that lets you specify whether resource logging must be enabled. By default, this toggle switch is in the Disabled position.
kata/edr type
When creating this type of connector, you need to define values for the following settings:
Basic settings tab:
- Name (required)—a unique name for this type of resource. Must contain 1 to 128 Unicode characters.
- Tenant (required)—name of the tenant that owns the resource.
- Type (required)—connector type, kata/edr.
- URL (required)—URL at which telemetry can be received from the KATA/EDR server. The URL must include the host and the port; the default port is 443. If KATA/EDR is deployed in a cluster, you can specify multiple URLs to ensure high availability of the connection.
- Secret (required) is a drop-down list in which you can select the secret which stores the credentials for connecting to the KATA/EDR server. You can select the secret resource from the drop-down list or create one using the
 button. When creating a secret, you can specify a custom certificate and private key, or automatically generate a new self-signed certificate and private key. You can change the selected secret by clicking
  .
. - External ID—ID for external systems. KUMA generates an ID in this field automatically.
- Description—resource description: up to 4,000 Unicode characters.
Advanced settings tab:
- Debug—a toggle switch that lets you specify whether resource logging must be enabled. By default, this toggle switch is in the Disabled position.
- Character encoding—the source character encoding setting for conversion to UTF-8. We only recommend configuring a conversion if you find invalid characters in the fields of the normalized event. Default value: not selected.
- Number of events—maximum number of events in one request. By default, the value set on the KATA/EDR server is used.
- Events fetch timeout is the time in seconds to wait for receipt of events from the KATA/EDR server. The default value is 0, which means that the value specified on the KATA/EDR server is used.
- Client timeout is the time in seconds to wait for a response from the KATA/EDR server. Default value: 1,800 s; displayed as 0.
- KEDRQL filter—filter of requests to the KATA/EDR server. For more details on the query language, please refer to the KEDR Help.
Http type
When creating this type of connector, you need to define values for the following settings:
- Basic settings tab:
- Name (required)—a unique name for this type of resource. Must contain 1 to 128 Unicode characters.
- Tenant (required)—name of the tenant that owns the resource.
- Type (required)—connector type, http.
- URL (required)—URL that you need to connect to. Available formats: hostname:port, IPv4:port, IPv6:port, :port.
- Delimiter is used to specify a character representing the delimiter between events. Available values:
\n,\t,\0. If no separator is specified (an empty value is selected), events are not separated. - Description—resource description: up to 4,000 Unicode characters.
- Advanced settings tab:
- Character encoding setting specifies character encoding. The default value is
UTF-8. - TLS mode specifies whether TLS encryption is used:
- Disabled (default)—do not use TLS encryption.
- Enabled—encryption is enabled, but without verification.
- With verification—use encryption with verification that the certificate was signed with the KUMA root certificate. The root certificate and key of KUMA are created automatically during program installation and are stored on the KUMA Core server in the folder /opt/kaspersky/kuma/core/certificates/.
When using TLS, it is impossible to specify an IP address as a URL.
- Proxy—a drop-down list where you can select a proxy server resource.
- Debug—a toggle switch that lets you specify whether resource logging must be enabled. By default, this toggle switch is in the Disabled position.
- Character encoding setting specifies character encoding. The default value is
Sql type
KUMA supports multiple types of databases.
When creating a connector, you must specify general connector settings and specific database connection settings.
On the Basic settings tab, you must specify the following settings for the connector:
- Name (required)—unique name of the resource. Must contain 1 to 128 Unicode characters.
- Type (required)—connector type, sql.
- Tenant (required)—name of the tenant that owns the resource.
- Default query (required)—SQL query that is executed when connecting to the database.
- Reconnect to the database every time a query is sent — the check box is cleared by default.
- Poll interval, sec —interval for executing SQL queries. This value is specified in seconds. The default value is 10 seconds.
- Description—resource description: up to 4,000 Unicode characters.
To connect to the database, you must define the values of the following settings on the Basic settings tab:
- URL (required)—secret that stores a list of URLs for connecting to the database.
If necessary, you can edit or create a secret.
- Click the button.
The secret window is displayed.
- Define the values for the following settings:
- Name—the name of the added secret.
- Type—urls.
This value is set by default and cannot be changed.
- URL—URL of the database.
You must keep in mind that each type of database uses its own URL format for connections.
Available URL formats are as follows:
- For SQLite:
sqlite3://file:<file_path>
A question mark (?) is used as a placeholder.
- For MSSQL:
sqlserver://<user>:<password>@<server:port>/<instance_name>?database=<database>(recommended)sqlserver://<user>:<password>@<server>?database=<database>&encrypt=disable
The characters @p1 are used as a placeholder.
- For MySQL:
mysql://<user>:<password>@tcp(<server>:<port>)/<database>
The characters %s are used as a placeholder.
- For PostgreSQL:
postgres://<user>:<password>@<server>/<database>?sslmode=disable
The characters $1 are used as a placeholder.
- For Cockroach:
postgres://<user>:<password>@<server>:<port>/<database>?sslmode=disable
The characters $1 are used as a placeholder.
- For Firebird:
firebirdsql://<user>:<password>@<server>:<port>/<database>
A question mark (?) is used as a placeholder.
- For SQLite:
- Description—any additional information.
- If necessary, click Add and specify an additional URL.
In this case, if one URL is not available, the program connects to the next URL specified in the list of addresses.
- Click the Save button.
- Click the button.
The secret window is displayed.
- Specify the values for the settings that you want to change.
You can change the following values:
- Name—the name of the added secret.
- URL—URL of the database.
You must keep in mind that each type of database uses its own URL format for connections.
Available URL formats are as follows:
- For SQLite:
sqlite3://file:<file_path>
A question mark (?) is used as a placeholder.
- For MSSQL:
sqlserver://<user>:<password>@<server:port>/<instance_name>?database=<database>(recommended)sqlserver://<user>:<password>@<server>?database=<database>&encrypt=disable
The characters @p1 are used as a placeholder.
- For MySQL:
mysql://<user>:<password>@tcp(<server>:<port>)/<database>
The characters
?are used as placeholders. - For PostgreSQL:
postgres://<user>:<password>@<server>/<database>?sslmode=disable
The characters $1 are used as a placeholder.
- For Cockroach:
postgres://<user>:<password>@<server>:<port>/<database>?sslmode=disable
The characters $1 are used as a placeholder.
- For Firebird:
firebirdsql://<user>:<password>@<server>:<port>/<database>
A question mark (?) is used as a placeholder.
- For SQLite:
- Description—any additional information.
- If necessary, click Add and specify an additional URL.
In this case, if one URL is not available, the program connects to the next URL specified in the list of addresses.
- Click the Save button.
When creating connections, strings containing account credentials with special characters may be incorrectly processed. If an error occurs when creating a connection but you are sure that the settings are correct, enter the special characters in percent encoding.
- Click the
- Identity column (required)—name of the column that contains the ID for each row of the table.
- Identity seed (required)—identity column value that will be used to determine the specific line to start reading data from the SQL table.
- Query—field for an additional SQL query. The query indicated in this field is performed instead of the default query.
- Poll interval, sec —interval for executing SQL queries. The interval defined in this field replaces the default interval for the connector.
This value is specified in seconds. The default value is 10 seconds.
On the Advanced settings tab, you need to specify the following settings for the connector:
- Character encoding—the specific encoding of the characters. The default value is
UTF-8.KUMA converts SQL responses to UTF-8 encoding. You can configure the SQL server to send responses in UTF-8 encoding or change the encoding of incoming messages on the KUMA side.
- Debug—a toggle switch that lets you specify whether resource logging must be enabled. By default, this toggle switch is in the Disabled position.
Within a single connector, you can create a connection for multiple supported databases.
If a collector with a connector of the sql type cannot be started, check if the /opt/kaspersky/kuma/collector/<collector ID>/sql/state-<file ID> state file is empty.
If that state file is empty, delete it and restart the collector.
Supported SQL types and their specific usage features
The UNION operator is not supported by the SQL Connector resources.
The following SQL types are supported:
- MSSQL
Example URLs:
sqlserver://{user}:{password}@{server:port}/{instance_name}?database={database}– (recommended option)sqlserver://{user}:{password}@{server}?database={database}
The characters
@p1are used as a placeholder in the SQL query.If you need to connect using domain account credentials, specify the account name in
<domain>%5C<user>format. For example:sqlserver://domain%5Cuser:password@ksc.example.com:1433/SQLEXPRESS?database=KAV. - MySQL
Example URL:
mysql://{user}:{password}@tcp({server}:{port})/{database}The characters
?are used as placeholders in the SQL query. - PostgreSQL
Example URL:
postgres://{user}:{password}@{server}/{database}?sslmode=disableThe characters
$1are used as a placeholder in the SQL query. - CockroachDB
Example URL:
postgres://{user}:{password}@{server}:{port}/{database}?sslmode=disableThe characters
$1are used as a placeholder in the SQL query. - SQLite3
Example URL:
sqlite3://file:{file_path}A question mark (
?) is used as a placeholder in the SQL query.When querying SQLite3, if the initial value of the ID is in datetime format, you must add a date conversion with the sqlite datetime function to the SQL query. For example: select * from connections where datetime(login_time) > datetime(?, 'utc') order by login_time. In this example,
connectionsis the SQLite table, and the value of the variable?is taken from the Identity seed field, and it must be specified in the {date}T{time}Z format (for example, 2021-01-01T00:10:00Z). - Oracle DB
In version 2.1.3 or later, KUMA uses a new driver for connecting to oracle. When upgrading, KUMA renames the connection secret to 'oracle-deprecated' and the connector continues to work. If no events are received after starting the collector with the 'oracle-deprecated' driver type, create a new secret with the 'oracle' driver and use it for connecting.
We recommend using the new driver.
Example URL of a secret with the new 'oracle' driver:
oracle://{user}:{password}@{server}:{port}/{service_name}
oracle://{user}:{password}@{server}:{port}/?SID={SID_VALUE}
Example URL of a secret with the legacy 'oracle-deprecated' driver:
oracle-deprecated://{user}/{password}@{server}:{port}/{service_name}
The
:valSQL variable is used as a placeholder in.When accessing Oracle DB, if the initial ID value is used in the datetime format, you must consider the type of the field in the database itself and, if necessary, add conversions of the time string in the query to ensure correct operation of the sql connector. For example, if the Connections table in the database has a login_time field, the following conversions are possible:
- If the login_time field has the TIMESTAMP type, then depending on the database settings, the login_time field may contain a value in the YYYY-MM-DD HH24:MI:SS format (for example, 2021-01-01 00:00:00). Then, in the Identity seed field, specify 2021-01-01T00:00:00Z, and perform the conversion in the query using the to_timestamp function. For example:
select * from connections where login_time > to_timestamp(:val, 'YYYY-MM-DD"T"HH24:MI:SS"Z"') - If the login_time field has the TIMESTAMP type, then depending on the database settings, the login_time field may contain a value in the YYYY-MM-DD"T"HH24:MI:SSTZH:TZM format (for example, 2021-01-01T00:00:00+03:00). Then, in the Identity seed field, specify 2021-01-01T00:00:00+03:00, and perform the conversion in the query using the to_timestamp_tz function. For example:
select * from connections_tz where login_time > to_timestamp_tz(:val, 'YYYY-MM-DD"T"HH24:MI:SSTZH:TZM')For more details about the to_timestamp and to_timestamp_tz functions, refer to the official Oracle documentation.
To interact with Oracle DB, you must install the libaio1 Astra Linux package.
- If the login_time field has the TIMESTAMP type, then depending on the database settings, the login_time field may contain a value in the YYYY-MM-DD HH24:MI:SS format (for example, 2021-01-01 00:00:00). Then, in the Identity seed field, specify 2021-01-01T00:00:00Z, and perform the conversion in the query using the to_timestamp function. For example:
- Firebird SQL
Example URL:
firebirdsql://{user}:{password}@{server}:{port}/{database}A question mark (
?) is used as a placeholder in the SQL query.If a problem occurs when connecting Firebird on Windows, use the full path to the database file. For example:
firebirdsql://{user}:{password}@{server}:{port}/C:\Users\user\firebird\db.FDB
A sequential request for database information is supported in SQL queries. For example, if you type select * from <name of data table> where id > <placeholder> in the Query field, the Identity seed field value will be used as the placeholder value the first time you query the table. In addition, the service that utilizes the SQL connector saves the ID of the last read entry, and the ID of this entry will be used as the placeholder value in the next query to the database.
File type
The file type is used to retrieve data from any text file. One string in a file is considered to be one event. Strings delimiter: \n. This type of connector is available for Linux Agents.
To set up file transfers from a Windows server for processing by the KUMA collector:
- On the Windows server, grant read access over the network to the folder with the files that you want processed.
- On the Linux server, mount the shared folder on the Windows server (see the list of supported operating systems).
- On the Linux server, install the collector that you want to process files from the mounted shared folder.
When creating this type of connector, you need to define values for the following settings:
- Basic settings tab:
- Name (required)—a unique name for this type of resource. Must contain 1 to 128 Unicode characters.
- Tenant (required)—name of the tenant that owns the resource.
- Type (required)—connector type, file.
- URL (required)—full path to the file that you need to interact with. For example,
/var/log/*som?[1-9].log.File and folder mask templates
- Description—resource description: up to 4,000 Unicode characters.
- Advanced settings tab:
- Character encoding setting specifies character encoding. The default value is
UTF-8. - Debug—a toggle switch that lets you specify whether resource logging must be enabled. By default, this toggle switch is in the Disabled position.
- Character encoding setting specifies character encoding. The default value is
Type 1c-xml
The 1c-xml type is used to retrieve data from 1C application registration logs. When the connector handles multi-line events, it converts them into single-line events. This type of connector is available for Linux Agents.
When creating this type of connector, specify values for the following settings:
- Basic settings tab:
- Name (required)—a unique name for this type of resource. Must contain 1 to 128 Unicode characters.
- Tenant (required)—name of the tenant that owns the resource.
- Type (required)—connector type, 1c-xml.
- URL (required)—full path to the directory containing files that you need to interact with. For example,
/var/log/1c/logs/. - Description—resource description: up to 4,000 Unicode characters.
- Advanced settings tab:
- Character encoding setting specifies character encoding. The default value is
UTF-8. - Debug—a toggle switch that lets you specify whether resource logging must be enabled. By default, this toggle switch is in the Disabled position.
- Character encoding setting specifies character encoding. The default value is
Connector operation diagram:
- The files containing 1C logs with the XML extension are searched within the specified directory. Logs are placed in the directory either manually or using an application written in the 1C language, for example, using the ВыгрузитьЖурналРегистрации() function. The connector only supports logs received this way. For more information on how to obtain 1C logs, see the official 1C documentation.
- Files are sorted by the last modification time in ascending order. All the files modified before the last read are discarded.
Information about processed files is stored in the file /<collector working directory>/1c_xml_connector/state.ini and has the following format: "offset=<number>\ndev=<number>\ninode=<number>".
- Events are defined in each unread file.
- Events from the file are processed one by one. Multi-line events are converted to single-line events.
Connector limitations:
- Installation of a collector with a 1c-xml connector is not supported in a Windows operating system. To set up file transfers of 1C log files for processing by the KUMA collector:
- On the Windows server, grant read access over the network to the folder with the 1C log files.
- On the Linux server, mount the shared folder with the 1C log files on the Windows server (see the list of supported operating systems).
- On the Linux server, install the collector that you want to process 1C log files from the mounted shared folder.
- Files with an incorrect event format are not read. For example, if event tags in the file are in Russian, the collector does not read such events.
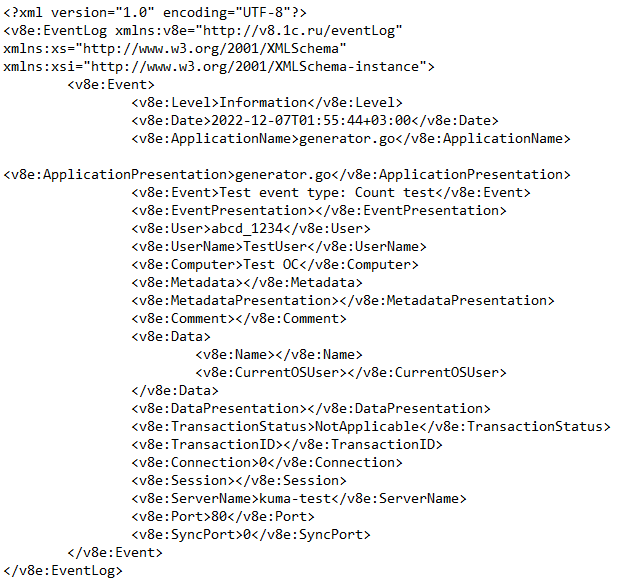
Example of a correct XML file with an event.

- If a file read by the connector is enriched with the new events and if this file is not the last file read in the directory, all events from the file are processed again.
Type 1c-log
The 1c-log type is used to retrieve data from 1C application technology logs. Strings delimiter: \n. The connector accepts only the first line from a multi-line event record. This type of connector is available for Linux Agents.
When creating this type of connector, specify values for the following settings:
- Basic settings tab:
- Name (required)—a unique name for this type of resource. Must contain 1 to 128 Unicode characters.
- Tenant (required)—name of the tenant that owns the resource.
- Type (required)—connector type, 1c-log.
- URL (required)—full path to the directory containing files that you need to interact with. For example,
/var/log/1c/logs/. - Description—resource description: up to 4,000 Unicode characters.
- Advanced settings tab:
- Character encoding setting specifies character encoding. The default value is
UTF-8. - Debug—a toggle switch that lets you specify whether resource logging must be enabled. By default, this toggle switch is in the Disabled position.
- Character encoding setting specifies character encoding. The default value is
Connector operation diagram:
- All 1C technology log files are searched.
Log file requirements:
- Files with the LOG extension are created in the log directory (
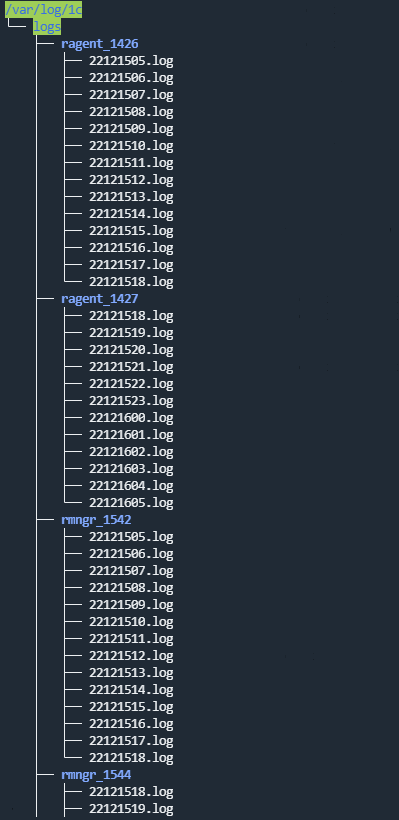
/var/log/1c/logs/by default) within a subdirectory for each process.Example of a supported 1C technology log structure
- Events are logged to a file for an hour; after that, the next log file is created.
- The file names have the following format:
<YY><MM><DD><HH>.log. For example,22111418.logis a file created in 2022, in the 11th month, on the 14th at 18:00. - Each event starts with the event time in the following format: <mm>:<ss>.<microseconds>-<duration_in_microseconds>.
- Files with the LOG extension are created in the log directory (
- The processed files are discarded.
Information about processed files is stored in the file /<collector working directory>/1c_log_connector/state.json.
- Processing of the new events starts, and the event time is converted to the RFC3339 format.
- The next file in the queue is processed.
Connector limitations:
- Installation of a collector with a 1c-log connector is not supported in a Windows operating system. To set up file transfers of 1C log files for processing by the KUMA collector:
- On the Windows server, grant read access over the network to the folder with the 1C log files.
- On the Linux server, mount the shared folder with the 1C log files on the Windows server (see the list of supported operating systems).
- On the Linux server, install the collector that you want to process 1C log files from the mounted shared folder.
- Only the first line from a multi-line event record is processed.
- The normalizer processes only the following types of events:
- ADMIN
- ATTN
- CALL
- CLSTR
- CONN
- DBMSSQL
- DBMSSQLCONN
- DBV8DBENG
- EXCP
- EXCPCNTX
- HASP
- LEAKS
- LIC
- MEM
- PROC
- SCALL
- SCOM
- SDBL
- SESN
- SINTEG
- SRVC
- TLOCK
- TTIMEOUT
- VRSREQUEST
- VRSRESPONSE
Diode type
Used to transmit events using a data diode.
When creating this type of connector, you need to define values for the following settings:
- Basic settings tab:
- Name (required)—a unique name for this type of resource. Must contain 1 to 128 Unicode characters.
- Tenant (required)—name of the tenant that owns the resource.
- Type (required)—connector type, diode.
- Data diode destination directory (required)—full path to the KUMA collector server directory where the data diode moves files containing events from the isolated network segment. After the connector has read these files, the files are deleted from the directory. The path can contain up to 255 Unicode characters.
- Delimiter is used to specify a character representing the delimiter between events. Available values:
\n,\t,\0. If no separator is specified (an empty value is selected), the default value is\n.This setting must match for the connector and destination resources used to relay events from an isolated network segment via the data diode.
- Description—resource description: up to 4,000 Unicode characters.
- Advanced settings tab:
- Workers—the number of services processing the request queue. By default, this value is equal to the number of vCPUs of the KUMA Core server.
- Poll interval, sec —frequency at which the files are read from the directory containing events from the data diode. The default value is 2. The value is specified in seconds.
- Character encoding setting specifies character encoding. The default value is
UTF-8. - Compression—you can use Snappy compression. By default, compression is disabled.
This setting must match for the connector and destination resources used to relay events from an isolated network segment via the data diode.
- Debug—a toggle switch that lets you specify whether resource logging must be enabled. By default, this toggle switch is in the Disabled position.
Ftp type
When creating this type of connector, you need to define values for the following settings:
- Basic settings tab:
- Name (required)—a unique name for this type of resource. Must contain 1 to 128 Unicode characters.
- Tenant (required)—name of the tenant that owns the resource.
- Type (required)—connector type, ftp.
- URL (required)—actual URL of the file or file mask beginning with 'ftp://'. For a file mask, you can use * ? [...].
If the URL does not include the FTP server port, port 21 is inserted.
- URL credentials—for specifying the user name and password for the FTP server. If there is no user name and password, the line remains empty.
- Description—resource description: up to 4,000 Unicode characters.
- Advanced settings tab:
- Character encoding setting specifies character encoding. The default value is
UTF-8. - Debug—a toggle switch that lets you specify whether resource logging must be enabled. By default, this toggle switch is in the Disabled position.
- Character encoding setting specifies character encoding. The default value is
Nfs type
When creating this type of connector, you need to define values for the following settings:
Basic settings tab:
- Name (required)—a unique name for this type of resource. Must contain 1 to 128 Unicode characters.
- Tenant (required)—name of the tenant that owns the resource.
- Type (required)—connector type, nfs.
- URL (required)—path to the remote folder in the format nfs://host/path.
- File name mask (required)—mask used to filter files containing events. Use of masks is acceptable "
*", "?", "[...]". - Poll interval, sec—polling interval. The time interval after which files are re-read from the remote system. The value is specified in seconds. The default value is 0.
- Description—resource description: up to 4,000 Unicode characters.
Advanced settings tab:
- Character encoding setting specifies character encoding. The default value is
UTF-8. - Debug—a toggle switch that lets you specify whether resource logging must be enabled. By default, this toggle switch is in the Disabled position.
vmware type
When creating this type of connector, you need to define values for the following settings:
Basic settings tab:
- Name (required)—a unique name for this type of resource. Must contain 1 to 128 Unicode characters.
- Tenant (required)—name of the tenant that owns the resource.
- Type (required)—connector type, vmware.
- URL (required)—the URL at which the VMware API is available. The URL must include the host and the port. Only one URL can be specified.
- VMware credentials (required) — a secret that stores the username and password for connecting to the VMware API.
- Client timeout is the time to wait after a request that did not return events before making a new request. This value is specified in seconds. The default value is 5 seconds. If value is 0, the default value is used.
- Maximum number of events — number of events requested from the VMware API in one request. The default value is 100. The maximum value is 1000.
- Start timestamp—starting date and time from which you want to read events from the VMware API. The default value is the time when the collector was started. If started after the collector is stopped, the events are read from the last saved date.
Advanced settings tab:
- Debug—a toggle switch that lets you specify whether resource logging must be enabled. By default, this toggle switch is in the Disabled position.
- Character encoding—specifies the character encoding. The default is UTF-8.
- TLS mode—TLS encryption mode using certificates in PEM x509 format:
- Disabled (default)—do not use TLS encryption.
- Enabled means encryption is used, but certificates are not verified.
- Custom CA—this option requires you to add a secret with a certificate to the collector. Not self-signed certificate. The certificate of the server must be signed with the certificate specified in the collector settings.
- Custom CA (required if "Custom CA" is selected for the TLS mode setting) is the secret where the certificate will be stored.
Wmi type
When creating this type of connector, you need to define values for the following settings:
- Basic settings tab:
- Name (required)—a unique name for this type of resource. Must contain 1 to 128 Unicode characters.
- Tenant (required)—name of the tenant that owns the resource.
- Type (required)—connector type, wmi.
- URL (required)—URL of the collector being created, for example:
kuma-collector.example.com:7221.The creation of a collector for receiving data using Windows Management Instrumentation results in the automatic creation of an agent that receives the necessary data on the remote device and forwards that data to the collector service. In the URL, you must specify the address of this collector. The URL is known in advance if you already know on which server you plan to install the service. However, this field can also be filled after the Installation Wizard is finished by copying the URL data from the Resources → Active services section.
- Description—resource description: up to 4,000 Unicode characters.
- Default credentials—drop-down list that does not require any value to be selected. The account credentials used to connect to hosts must be provided in the Remote hosts table (see below).
- The Remote hosts table lists the remote Windows assets that you can connect to. Available columns:
- Host (required) is the IP address or name of the device from which you want to receive data. For example, "machine-1".
- Domain (required)—name of the domain in which the remote device resides. For example, "example.com".
- Log type—drop-down list to select the name of the Windows logs that you need to retrieve. By default, only preconfigured logs are displayed in the list, but you can add custom logs to the list by typing their name in the Windows logs field and then pressing ENTER. KUMA service and resource configurations may require additional changes in order to process custom logs correctly.
Logs that are available by default:
- Application
- ForwardedEvents
- Security
- System
- HardwareEvents
If a WMI connection uses at least one log with an incorrect name, the agent that uses the connector does not receive events from all the logs within this connection, even if the names of other logs are specified correctly. The WMI agent connections for which all log names are specified correctly will work properly.
- Secret—account credentials for accessing a remote Windows asset with permissions to read the logs. If you leave this field blank, the credentials from the secret selected in the Default credentials drop-down list are used. The login in the secret must be specified without the domain. The domain value for access to the host is taken from the Domain column of the Remote hosts table.
You can select the secret resource from the drop-down list or create one using the
button. The selected secret can be changed by clicking on the button.
- Advanced settings tab:
- Character encoding setting specifies character encoding. The default value is
UTF-8. - Debug—a toggle switch that lets you specify whether resource logging must be enabled. By default, this toggle switch is in the Disabled position.
- Character encoding setting specifies character encoding. The default value is
Receiving events from a remote device
Conditions for receiving events from a remote Windows device hosting a KUMA agent:
- To start the KUMA agent on the remote device, you must use an account with the “Log on as a service” permissions.
- To receive events from the KUMA agent, you must use an account with Event Log Readers permissions. For domain servers, one such user account can be created so that a group policy can be used to distribute its rights to read logs to all servers and workstations in the domain.
- TCP ports 135, 445, and 49152–65535 must be opened on the remote Windows devices.
- You must run the following services on the remote machines:
- Remote Procedure Call (RPC)
- RPC Endpoint Mapper
Wec type
When creating this type of connector, you need to define values for the following settings:
- Basic settings tab:
- Name (required)—a unique name for this type of resource. Must contain 1 to 128 Unicode characters.
- Tenant (required)—name of the tenant that owns the resource.
- Type (required)—connector type, wec.
- URL (required)—URL of the collector being created, for example:
kuma-collector.example.com:7221.The creation of a collector for receiving data using Windows Event Collector results in the automatic creation of an agent that receives the necessary data on the remote device and forwards that data to the collector service. In the URL, you must specify the address of this collector. The URL is known in advance if you already know on which server you plan to install the service. However, this field can also be filled after the Installation Wizard is finished by copying the URL data from the Resources → Active services section.
- Description—resource description: up to 4,000 Unicode characters.
- Windows logs (required)—Select the names of the Windows logs you want to retrieve from this drop-down list. By default, only preconfigured logs are displayed in the list, but you can add custom logs to the list by typing their name in the Windows logs field and then pressing ENTER. KUMA service and resource configurations may require additional changes in order to process custom logs correctly.
Preconfigured logs:
- Application
- ForwardedEvents
- Security
- System
- HardwareEvents
If the name of at least one log is specified incorrectly, the agent using the connector does not receive events from any log, even if the names of other logs are correct.
- Advanced settings tab:
- Character encoding setting specifies character encoding. The default value is
UTF-8. - Debug—a toggle switch that lets you specify whether resource logging must be enabled. By default, this toggle switch is in the Disabled position.
- Character encoding setting specifies character encoding. The default value is
To start the KUMA agent on the remote device, you must use a service account with the “Log on as a service” permissions. To receive events from the operating system log, the service user account must also have Event Log Readers permissions.
You can create one user account with “Log on as a service” and “Event Log Readers” permissions, and then use a group policy to extend the rights of this account to read the logs to all servers and workstations in the domain.
We recommend that you disable interactive logon for the service account.
Page topsnmp type
To process events received via SNMP, you must use json normalizer.
It is available for Windows and Linux Agents. Supported protocol versions:
- snmpV1
- snmpV2
- snmpV3
When creating this type of connector, you need to define values for the following settings:
- Basic settings tab:
- Name (required)—a unique name for this type of resource. Must contain 1 to 128 Unicode characters.
- Tenant (required)—name of the tenant that owns the resource.
- Type (required)—connector type, snmp.
- SNMP version (required)—This drop-down list allows you to select the version of the protocol to use.
- Host (required)—hostname or its IP address. Available formats: hostname, IPv4, IPv6.
- Port (required)—port for connecting to the host. Typically 161 or 162 are used.
The SNMP version, Host and Port settings define one connection to a SNMP resource. You can create several such connections in one connector by adding new ones using the SNMP resource button. You can delete connections by using the
 button.
- Secret (required) is a drop-down list to select the secret which stores the credentials for connecting via the Simple Network Management Protocol. The secret type must match the SNMP version. If required, a secret can be created in the connector creation window using the button. The selected secret can be changed by clicking on the button.
- In the Source data table you can specify the rules for naming the received data, according to which OIDs, object identifiers, will be converted into keys with which the normalizer can interact. Available table columns:
- Parameter name (required)—an arbitrary name for the data type. For example, "Site name" or "Site uptime".
- OID (required)—a unique identifier that determines where to look for the required data at the event source. For example, "1.3.6.1.2.1.1.5".
- Key (required)—a unique identifier returned in response to a request to the asset with the value of the requested setting. For example, "sysName". This key can be accessed when normalizing data.
- Description—resource description: up to 4,000 Unicode characters.
- Advanced settings tab:
- Character encoding setting specifies character encoding. The default value is
UTF-8. - Debug—a toggle switch that lets you specify whether resource logging must be enabled. By default, this toggle switch is in the Disabled position.
- Character encoding setting specifies character encoding. The default value is
snmp-trap type
The snmp-trap connector is used in agents and collectors to passively receive SNMP trap messages. The connector receives and prepares messages for normalization by mapping the SNMP object IDs to the temporary keys. Then the message is passed to the JSON normalizer, where the temporary keys are mapped to the KUMA fields and an event is generated.
To process events received via SNMP, you must use json normalizer.
It is available for Windows and Linux Agents. Supported protocol versions:
- snmpV1
- snmpV2
When creating this type of connector, you need to define values for the following settings:
- Basic settings tab:
- Name (required)—a unique name for this type of resource. Must contain 1 to 128 Unicode characters.
- Tenant (required)—name of the tenant that owns the resource.
- Type (required)—connector type, snmp-trap.
- SNMP version (required)—in this drop-down list, select the version of the protocol to be used: snmpV1 or snmpV2.
For example, Windows uses the snmpV2 version by default.
- URL (required) – URL where SNMP Trap messages will be expected. Available formats: hostname:port, IPv4:port, IPv6:port, :port.
The SNMP version and URL parameters define one connection used to receive SNMP Traps. You can create several such connections in one connector by adding new ones using the SNMP resource button. You can delete connections by using the
 button.
- In the Source data table, specify the rules for naming the received data, according to which OIDs (object identifiers) are converted to the keys with which the normalizer can interact.
You can click Apply OIDs for WinEventLog to populate the table with mappings for OID values that arrive in WinEventLog logs. If more data needs to be determined and normalized in the incoming events, add to the table rows containing OID objects and their keys.
Available table columns:
- Parameter name —an arbitrary name for the data type. For example, "
Site name" or "Site uptime". - OID (required)—a unique identifier that determines where to look for the required data at the event source. For example,
1.3.6.1.2.1.1.1. - Key (required)—a unique identifier returned in response to a request to the asset with the value of the requested setting. For example,
sysDescr. This key can be accessed when normalizing data.
Data is processed according to the allow list principle: objects that are not specified in the table are not sent to the normalizer for further processing.
- Parameter name —an arbitrary name for the data type. For example, "
- Description—resource description: up to 4,000 Unicode characters.
- Advanced settings tab:
- Character encoding setting specifies character encoding. The default value is
UTF-8. When receiving snmp-trap events from Windows with Russian localization, if you encounter invalid characters in the event, we recommend changing the character encoding in the snmp-trap connector to Windows 1251. - Debug—a toggle switch that lets you specify whether resource logging must be enabled. By default, this toggle switch is in the Disabled position.
- Character encoding setting specifies character encoding. The default value is
Configuring a Windows device to send SNMP trap messages to the KUMA collector involves the following steps:
- Configuring and starting the SNMP and SNMP trap services
- Configuring the Event to Trap Translator service
Events from the source of SNMP trap messages must be received by the KUMA collector, which uses a connector of the snmp-trap type and a json normalizer.
To configure and start the SNMP and SNMP trap services in Windows 10:
- Open Settings → Apps → Apps and features → Optional features → Add feature → Simple Network Management Protocol (SNMP) and click Install.
- Wait for the installation to complete and restart your computer.
- Make sure that the SNMP service is running. If any of the following services are not running, enable them:
- Services → SNMP Service.
- Services → SNMP Trap.
- Right-click Services → SNMP Service, and in the context menu select Properties. Specify the following settings:
- On the Log On tab, select the Local System account check box.
- On the Agent tab, fill in the Contact (for example, specify
User-win10) and Location (for example, specifydetroit) fields. - On the Traps tab:
- In the Community Name field, enter community public and click Add to list.
- In the Trap destination field, click Add, specify the IP address or host of the KUMA server on which the collector that waits for SNMP events is deployed, and click Add.
- On the Security tab:
- Select the Send authentication trap check box.
- In the Accepted community names table, click Add, enter Community Name public and specify READ WRITE as the Community rights.
- Select the Accept SNMP packets from any hosts check box.
- Click Apply and confirm your selection.
- Right click Services → SNMP Service and select Restart.
To configure and start the SNMP and SNMP trap services in Windows XP:
- Open Start → Control Panel → Add or Remove Programs → Add / Remove Windows Components → Management and Monitoring Tools → Details.
- Select Simple Network Management Protocol and WMI SNMP Provider, and then click OK → Next.
- Wait for the installation to complete and restart your computer.
- Make sure that the SNMP service is running. If any of the following services are not running, enable them by setting the Startup type to Automatic:
- Services → SNMP Service.
- Services → SNMP Trap.
- Right-click Services → SNMP Service, and in the context menu select Properties. Specify the following settings:
- On the Log On tab, select the Local System account check box.
- On the Agent tab, fill in the Contact (for example, specify
User-win10) and Location (for example, specifydetroit) fields. - On the Traps tab:
- In the Community Name field, enter community public and click Add to list.
- In the Trap destination field, click Add, specify the IP address or host of the KUMA server on which the collector that waits for SNMP events is deployed, and click Add.
- On the Security tab:
- Select the Send authentication trap check box.
- In the Accepted community names table, click Add, enter Community Name public and specify READ WRITE as the Community rights.
- Select the Accept SNMP packets from any hosts check box.
- Click Apply and confirm your selection.
- Right click Services → SNMP Service and select Restart.
Changing the port for the SNMP trap service
You can change the SNMP trap service port if necessary.
To change the port of the SNMP trap service:
- Open the C:\Windows\System32\drivers\etc folder.
- Open the services file in Notepad as an administrator.
- In the service name section of the file, specify the snmp-trap connector port added to the KUMA collector for the SNMP trap service.
- Save the file.
- Open the Control Panel and select Administrative Tools → Services.
- Right-click SNMP Service and select Restart.
To configure the Event to Trap Translator service that translates Windows events to SNMP trap messages:
- In the command line, type
evntwinand press Enter. - Under Configuration type, select Custom, and click the Edit button.
- In the Event sources group of settings, use the Add button to find and add the events that you want to send to KUMA collector with the SNMP trap connector installed.
- Click the Settings button, in the opened window, select the Don't apply throttle check box, and click OK.
- Click Apply and confirm your selection.
Predefined connectors
The connectors listed in the table below are included in the OSMP distribution kit.
Predefined connectors
Connector name |
Comment |
[OOTB] Continent SQL |
Obtains events from the database of the Continent hardware and software encryption system. To use it, you must configure the settings of the corresponding secret type. |
[OOTB] InfoWatch Trafic Monitor SQL |
Obtains events from the database of the InfoWatch Traffic Monitor system. To use it, you must configure the settings of the corresponding secret type. |
[OOTB] KSC MSSQL |
Obtains events from the MS SQL database of the Kaspersky Security Center system. To use it, you must configure the settings of the corresponding secret type. |
[OOTB] KSC MySQL |
Obtains events from the MySQL database of the Kaspersky Security Center system. To use it, you must configure the settings of the corresponding secret type. |
[OOTB] KSC PostgreSQL |
Obtains events from the PostgreSQL database of the Kaspersky Security Center 15.0 system. To use it, you must configure the settings of the corresponding secret type. |
[OOTB] Oracle Audit Trail SQL |
Obtains audit events from the Oracle database. To use it, you must configure the settings of the corresponding secret type. |
[OOTB] SecretNet SQL |
Obtains events from the SecretNet SQL database. To use it, you must configure the settings of the corresponding secret type. |