Contents
- Managing ML models
- About ML models
- About statuses and states of ML models and their elements
- About ML model templates
- About markups
- About conditions included in markups and diagnostic rules
- Scenario: working with ML models
- Search and filter objects in the Models section
- Working with markups
- Working with imported ML models
- Working with manually created ML models
- Creating an ML model
- Adding a predictive element to an ML model
- Modifying an ML model predictive element
- Adding an ML model element based on a diagnostic rule
- Changing an ML model element based on a diagnostic rule
- Adding an elliptic envelope-based ML model element
- Editing an elliptic envelope-based ML model element
- Cloning of the ML model element
- Removing an ML model element
- Cloning an ML model
- Working with ML model templates
- Changing the parameters of an ML model
- Training an ML model predictive element
- Training an elliptic envelope-based ML model element
- Viewing the training results of an ML model element
- Starting and stopping ML model inference
- Viewing the data flow graph of an ML model
- Preparing an ML model for publication
- Publishing an ML model
- Removing an ML model
Managing ML models
This section provides instructions on working with ML models, ML model templates and markups.
The functionality is available after a license key is added.
ML models, templates of ML models and markups are functional elements of the monitored asset hierarchical structure. The hierarchical structure is displayed as an
.
In Kaspersky MLAD, ML models can be imported, created manually, copied, or created based on a template. If you created the ML model manually, cloned a manually created model, or created the model from a template based on a manually created model, you can add predictive elements, elliptic envelope-based elements, and/or diagnostic rule-based elements to the new model.
After training the ML model elements and checking the results of their training, you can run historical or streaming inference on the ML model. As a result of inference, ML model elements register incidents and also generate artifacts that can be viewed under Monitoring and History.
You can publish the ML model if needed. You can run historical or streaming inference on a published ML model.
In the Models section, you can create markups for generating
or . If necessary, you can edit, clone, or delete markups.About ML-models
An ML model is an algorithm based on machine learning methods tasked with analyzing the telemetry of the monitored asset and detecting anomalies.
An ML model is created for a specific monitored asset while taking into account the specifications of the asset and the characteristics of telemetry data. The general structure of the algorithm (architecture) is formed during creation of the ML model. Then the ML model is trained based on historical telemetry data and is thereby adjusted to the behavior of a specific object.
An ML model consists of one or more elements, with each separately analyzing telemetry data to detect anomalies. Normally, the more complex the industrial processes of the monitored asset are, the more elements the ML model will contain. An ML model can include the following elements operating in parallel:
Predictive elements and elements based on elliptic envelopes need to be trained on a dataset. A predictive element learning process may consist of one or several epochs. An epoch is a cycle during which an element is trained on the entire training dataset. The number of training epochs is specified in the element training settings. Elements based on a diagnostic rule do not need to be trained, so they are considered to be pretrained.
The process of using an ML model to analyze telemetry data and detect anomalies is known as inference. In Kaspersky MLAD, ML model inference can be performed on historical data (historical inference) and on telemetry data received in real time (streaming inference). If historical inference is started for multiple ML models, Kaspersky MLAD runs the inference of these ML models in the order of their startup queue. The duration of historical inference is determined by the time interval of the data analyzed by the ML model. If streaming inference is started for multiple ML models, Kaspersky MLAD runs the inference of these ML models simultaneously. Historical inference and streaming inference run in parallel and independently of each other. During the inference process, the ML model registers incidents that can be viewed in the Incidents section.
In addition to incidents, an ML model inference process also generates artifacts. An artifact is a time series of numerical data. An ML model can generate the following artifacts:
- Artifacts associated with tags. An ML model element generates these artifacts for each of its output tags. These artifacts are generated only by the predictive elements of the ML model and represent a predicted tag value and prediction error.
- Artifacts of ML model elements. Each ML model element generates this type of artifact as its primary output. The mathematical nature of an artifact is determined by the analytical algorithms employed by the element. In this context, an artifact for an ML model of any type is uniformly interpreted as the degree to which the behavior of the monitored asset deviates from the expected (normal) behavior. Every artifact has a critical threshold. If this threshold is reached, an incident is recorded.
Any user can view generated artifacts under Monitoring and History.
ML models can be created by Kaspersky specialists or by a certified integrator as part of the Kaspersky MLAD Model-building and Deployment Service. To use such ML models, you must import them to Kaspersky MLAD. You can also create ML models independently and add the necessary elements to them using the model builder.
About predictive ML model elements
Predictive ML model elements predict the behavior of an object from data on its recent behavior. Predictive ML model elements include neural network elements and linear regression-based elements.
Kaspersky MLAD model builder supports the following architectures for ML model predictive elements:
- Dense. Neural network element of an ML model with a fully connected architecture. When creating an ML model element, you must specify the multipliers for calculating the number of neurons on inner layers and the activation functions on them.
- TCN. Neural network element of an ML model with a hierarchical time-based convolutional architecture. When creating an ML model element, you must specify the filter size and number, extensions on layers, activation functions on them and the number of layers in the residual block.
- CNN. Neural network element of an ML model with a convolutional architecture. When creating an ML model element, you must specify the number of neurons on the layers of encoder, the size and number of filters on layers, and the size of the maximum sampling window (MaxPooling).
- RNN. Neural network element of an ML model with a recurrent architecture. When creating an ML model element, you must specify the number of GRU neurons on layers and the number of time-distributed neurons on the layers of the decoder.
- Transformer. Neural network element of an ML model with a transformer architecture. When creating an element of the ML model, the number of attention heads and the number of transformer encoders are specified.
- Linear regression. Element of an ML model based on linear regression.
A predictive element of an ML model generates the following artifacts as a result of inference:
- Predicted tag values. These are displayed in the central part of the Monitoring and History sections on individual graphic areas of the selected preset.
- Individual prediction errors are the differences between the predicted and actual values for each tag. These are displayed in the central part of the Monitoring and History sections on individual graphic areas of the selected preset.
- The total prediction error (cumulative prediction error) is the total discrepancy between the predicted and actual values. Cumulative prediction error and the cumulative prediction error threshold are displayed in the graphic area in the central part of the Monitoring and History sections after the graphic areas of the selected preset and on the ML model element artifact graph located at the bottom of the sections.
If the cumulative prediction error exceeds the cumulative prediction error threshold, predictive element of the ML model considers this a deviation in the behavior of the monitored asset and registers an incident.
About elements of an ML model based on a diagnostic rule
Diagnostic rules describe previously known behavioral traits of the monitored asset that are considered anomalies. Diagnostic rules must be formalized and calculated based on available telemetry data for the object.
Examples of diagnostic rules:
- The level of tag A has changed abruptly (criterion for the behavior of the Step change tag).
- Over the past 12 hours, tag B has trended upward, tag C has trended downward, and tag D has not shown any clear dynamics.
- The value of tag X fell below 2800 after it previously rose higher than 2900.
About elliptic envelope-based ML model elements
Elliptic envelopes are used to detect abnormal states of a monitored asset.
Unlike a predictive element, an elliptic envelope does not attempt to determine how the behavior of the ML model's input tags affects the behavior of its output tags. An elliptic envelope uses the assumption that the set of tags included in the ML model describes the state of the monitored asset at any given moment, and the observable states have a normal distribution (also known as a Gaussian distribution) in the phase space.
During training, the elliptic envelope adjusts the parameters of this normal distribution while considering that the training sample may contain a certain percentage of anomalous states. During the training of an ML model, an elliptical region is formed in the phase space. States that fall within this region are classified as normal, while all other states are categorized as outliers (anomalies). The farther a state is from the boundaries of the ellipse, the more anomalous it is. The tag whose value as part of the anomalous state contributed the most to the deviation from the ellipse is considered the top tag.
An elliptic envelope is simpler to construct than a predictive element, learns more quickly, and requires fewer resources for inference. However, an elliptic envelope only demonstrates good performance when applied to stationary equipment operating modes that do not involve multiple operating ranges or abrupt changes in tag values.
Page topAbout statuses and states of ML models and their elements
The statuses and states of ML models and their elements signify sequences of steps completed by the user under Models.
ML model elements can take the following statuses:
- Not trained. This status is assigned to an ML model element if training has not started or completed with an error. This status is also displayed for elements that were trained previously, but whose settings have been changed. The asset tree displays the
 icon to the left of the untrained element names.
 - Trained. This status is assigned to an ML model element if training has been successfully completed or if the element is not subject to training. The asset tree displays the
 icon to the left of the trained element names.
An ML model can be assigned one of the following statuses:
- Not activated. The ML model is imported but is not activated. The asset tree displays the
 icon to the left of the ML model name.
 - Not trained. The ML model activated or created manually. The ML model contains untrained elements. The asset tree displays the
 icon to the left of the ML model name.
 - Trained. All the elements in the ML model have been trained or no training is required. Inference can be run on a trained ML model. The asset tree displays the
 icon to the left of the ML model name.
 - Ready for publication. The ML model is ready for publishing and cannot be modified. The asset tree displays the
 icon to the left of the ML model name.
 - Published. The ML model is published. Inference can be run on a published ML model. The asset tree displays the
 icon to the left of the ML model name.
The states of ML models and their elements are displayed to the right of the ML model name when viewing a specific ML model, and in the asset tree. The table below lists the states of ML models and their elements in Kaspersky MLAD.
Statuses of ML models and elements of ML models
Name of the state when viewing the ML model |
Symbol of the state in the asset tree |
ML model |
ML model element |
Description |
Not used |
|
|
|
This state is assigned to an ML model unless inferenced or trained earlier, or if the model was viewed after inference or training finished. The asset tree does not display this status. |
Training completed with error |
TRN ERR |
|
|
This state is assigned to ML model elements whose training finished with an error. An ML model is also assigned this state if containing at least one element whose training finished with an error. After viewing the training results, the ML model is assigned a state of Not used. |
Training in progress |
TRN |
|
|
This status is assigned to an ML model element that is currently undergoing training. The model itself is assigned this status if it contains elements that are undergoing training and unless it contains any elements whose training completed with an error. |
Queued for training |
TRN Q |
|
|
An ML model element is assigned this state if the model has started learning, but the training is running for a different element. An ML model is assigned this state if all of its elements are queued for training. |
Training successfully completed |
TRN DONE |
|
|
This state is assigned to a successfully trained ML model element. An ML model is assigned this state if all of its elements have been successfully trained. After viewing the training results, the ML model is assigned a state of Not used. |
Historical inference in progress |
INFR HIST |
|
|
This state is assigned to an ML model running historical inference. You can view the inference results under History. Incidents logged during inference are displayed under Incidents. |
Queued for inference |
INFR Q |
|
|
This status is assigned to an ML model currently running historical inference, while a different model is currently running historical inference. |
Historical inference completed |
INFR DONE |
|
|
This state is assigned to an ML model that has finished historical inference. You can view the inference results under History. Incidents logged during inference are displayed under Incidents. An ML model is assigned a state of Not used after being viewed. |
Streaming inference in progress |
INFR STRM |
|
|
This state is assigned to the ML model running streaming inference. You can view the inference results under Monitoring. Incidents logged during inference are displayed under Incidents. |

About ML model templates
ML model templates are created on the basis of ML models previously added to Kaspersky MLAD or created using the model builder functionality. ML model templates preserve the algorithm structure, set of elements, and the state of the ML model used to create the template. The training state of the created ML model will match the training state of the source ML model when the template was created.
Using templates, you can add ML models of the same type to Kaspersky MLAD. These models will analyze data received from equipment of the same type with a similar set of tags. When creating an ML model from a template, you can configure the use of other tags in the ML model by specifying tag IDs that differ from the ones in the source ML model.
Page topAbout markups
Markup is the tool for selecting time intervals. Markups are used to generate learning indicators and
of the ML model. Markups that form part of learning indicators define the data time intervals from which the ML model takes data for training. Markups that form part of inference indicators define the time intervals during which the ML model performs the inference.A markup may utilize two types of criteria: conditions on the behavior of specific tags (time intervals are selected where these conditions are met) and a time filter (time intervals are selected independently of tag behavior).
Markup is a functional element of the hierarchical structure. Markups can be created manually or imported into Kaspersky MLAD together with an ML model.
Page topAbout conditions included in markups and diagnostic rules
The selection of data time intervals for learning or inference indicators in the markup, and the execution of a diagnostic rule in the ML model are governed by the conditions that are set when creating a markup and/or ML model element based on a diagnostic rule. While creating a markup or an ML model element based on a diagnostic rule, you can specify the following condition types:
- Time filter.
The time filter defines a sequence of recurring calendar intervals, such as an interval that considers the number of business days in a week and work hours, or a set of intervals with precisely defined start and end times.
In the absence of defined tag behavior conditions, the filtered intervals will be a product of the markup or a diagnostic rule. The rule will be considered fulfilled at all UTG nodes within the selected intervals.
- Tag behavior conditions.
The tag behavior conditions are checked at the UTG nodes that fall within the time intervals selected by the filter. Without time filtering enabled, tag behavior conditions are evaluated at all UTG nodes.
Tag behavior criteria are described in condition blocks and linked by the logical operators AND and/or OR. The operator AND tracks the simultaneous fulfillment of all related criteria, and the operator OR tracks the fulfillment of at least one linked criterion. The negation operator NOT can be applied individually to the criteria in the condition block to track behavior opposite to that described in the criterion. Condition blocks themselves can also be linked with the logical operators AND and/or OR.
Evaluating any condition yields one of three possible outcomes:
- Positive (TRUE) if the condition is met. If the criteria are linked by the logical operator OR and the evaluation of the criteria resulted in TRUE and UNDEFINED, then the evaluation of the entire condition block will yield a positive result.
- Negative (FALSE) if the condition is not met.
- Undefined (UNDEFINED) if it is impossible to check if the condition was met (for example, when there is not enough data). Evaluation of the entire block of conditions produces an undefined result in the following cases:
- If the criteria within the block of conditions are connected by the logical operator OR and the evaluation of individual criteria produced FALSE and UNDEFINED.
- If the criteria within the block of conditions are connected by the logical operator AND and the evaluation of individual criteria produced UNDEFINED and/or FALSE.
You can link two condition blocks with the temporal operators Wait or If ahead if required. The condition block that precedes the temporal operator is called a precondition. The condition block that follows the temporal operator is called a post-condition. Unlike the logical operators AND and OR, which require simultaneous evaluation of conditions, the temporal operator connects blocks of conditions that are evaluated at different points in time.
A precondition is evaluated at one UTG node. A postcondition is evaluated at one or more consecutive UTG nodes. The interval between the pre-condition check node and the node where the post-condition is checked corresponds to the waiting interval. The post-condition check is controlled with the following settings:
- Minimum waiting interval is the interval between the pre-condition check node and the UTG node where the post-condition check will start.
- Maximum waiting interval is the interval between the pre-condition check node and the UTG node where the post-condition check will finish.
- A group operator that specifies whether the postcondition needs to hold at every postcondition check node or at just one.
A FALSE or UNDEFINED result of a precondition check causes the entire temporal operator to return the same value. If the pre-condition check evaluates to TRUE, then the post-condition check is performed at each UTG node between the minimum and maximum wait intervals. The result of applying the temporal operator is determined by the results of the post-condition checks and considers the value of the group operator.
If more than one condition check is performed with the temporal operator, then the output of the previous temporal operator is a precondition for each subsequent temporal operator.
The result of applying the temporal operator If ahead is generated at the precondition check node. The temporal operator If ahead can only serve as a training indicator component, as it requires future data, which is not yet available during the inference process.
The result of applying the temporal operator Wait is generated in the last UTG node of the post-condition check. Since all nodes involved in the operator are in the past at this point, the Wait operator can be used as part of both a training indicator and an inference indicator.
The overall result of evaluating all markup conditions or a diagnostic rule can be either TRUE or FALSE. If a UTG node produces an UNDEFINED result when evaluating all specified tag behavior conditions, the overall outcome of applying markup or diagnostic rule for that node is determined by the Treat inconclusive result as positive setting.
Scenario: working with ML models
This section describes the sequence of actions required to work with ML models.
The functionality is available after a license key is added.
The scenario for working with ML models consists of the following steps:
- Adding markups
If you need to select specific time intervals for the data that ML models must use for training or inference, create markups.
- Adding an ML model
You can add an ML model to Kaspersky MLAD in one of the following ways:
- Import an ML model created by Kaspersky specialists or by a certified integrator as part of the Kaspersky MLAD Model-building and Deployment Service. If the ML model uses markups, they will be incorporated into the same asset as the model itself. After an ML model is imported, it must be activated.
- Manually create an ML model. Add predictive elements, elliptic envelope-based elements, and/or diagnostic rules-based elements to the new ML model.
- Create an ML model from a template. Create a template based on the relevant ML model in advance. If the original ML model used for the template was created manually, you can add predictive elements, elliptic envelope-based elements, and/or diagnostic rule-based elements to the new ML model.
- Clone a previously added ML model. After cloning an ML model that was created manually or from a template based on a manually created ML model, you can add predictive elements, elliptic envelope-based elements, and/or diagnostic rule-based elements to the new ML model.
- Training ML model elements
The ML model needs to be trained before you can run inference on it. To do this, all predictive elements and elliptic envelope-based elements within the ML model must be pretrained. ML model elements based on diagnostic rules do not need to be trained, so they are considered to be pretrained.
An ML model imported to Kaspersky MLAD has been previously trained by Kaspersky Lab experts or a certified integrator. ML models that are created from a template of an imported ML model or by cloning an imported ML model are also considered to be already trained. If necessary, you can change their training settings and retrain the elements.
To generate a learning indicator, specify the created markup in the element training settings.
After training the elements, examine the training results, adjust the training settings and retrain the elements, if necessary.
- ML model inference
Run a historical or streaming inference on the ML model. Examine the artifacts under History and Monitoring, and incidents inferenced by the ML model.
For better ML model performance, adjust the parameters of the model and/or markups. Re-train the elements of the ML model as needed. Run a repeat inference on the ML model. When restarting an inference on previously inferenced data, previous inference results will be deleted.
- Preparing an ML model for publication
If you need to save the parameters of an ML model and its elements, prepare the ML model for publication after completing training and checking the inference results.
- Publishing an ML model
After preparing the ML model for publication, notify the officer responsible for publishing the ML model that the ML model is ready, or publish the ML model if you have the required permissions. If necessary, the system administrator can create a role that has the right to publish ML models and assign this role to the relevant employee.
- Inferencing a published ML model
Start inference of the ML model. During the inference process, published ML model analyzes telemetry data and log incidents. Recorded incidents, unlike those inferred by unpublished ML models, necessitate actions and reporting in production.
Search and filter objects in the Models section
In the Models section of the asset tree, you can search for and filter the following objects:
- ML models
- ML model templates
- ML model elements
- Markups
- Assets
- Tags
The search is done by object name.
To find objects in the asset tree,
under Models, enter your search query into the Search field. The search is performed as you type characters in the search field.
Matching objects will be displayed in the tree, along with the asset tree sections where they were found.
To reset the search query, click ![]() in the search bar.
in the search bar.
You can filter objects within the asset tree. You can select object statuses and states for ML models and their elements.
Filtering is applied to objects that are found according to the search query. If no search query is defined, filtering is applied to all objects in the asset tree.
To filter objects within the asset tree:
- Under Models, click
 above the asset tree.
 The filter options will be displayed on the right.
- From the Section type drop-down list, select one or more asset tree section types.
You can select the following section types: Models, Model templates, Model elements, Markups, Assets, and Tags.
- If you have selected Models, do the following as needed:
- From the Model status drop-down list, select ML model statuses.
- From the Model state drop-down list, select the ML model states.
- If you have selected the Model elements section type, do the following as needed:
- From the Model element type drop-down list, select one or more ML model element types.
You can choose the following types of ML model elements: Predictive element, Rule, and Elliptic envelope.
- From the Model element status drop-down list, select ML model element statuses.
- In the Model state drop-down list, select the states of ML model elements.
- From the Model element type drop-down list, select one or more ML model element types.
- To reset the filter settings, do one of the following:
- To reset a specific filter setting, click
 next to the setting.
 - To reset all filter settings, click Clear filters in the upper right corner of the window.
- To reset a specific filter setting, click
- To hide the filter settings, click
 next to the Search field.
Object filtering is performed as you select the filter criteria. If any objects match your filter criteria, the tree view will display those items, along with the corresponding categories where they were found.
If any filters are applied to the asset tree,  will appear above.
Working with markups
This section provides information on working with markups.
The functionality is available after a license key is added.
In the Models section, you can create, modify, and delete markups. If required, you can view the graph to see the data time intervals that the ML model will use for training and/or inference.
Markups are used as training or inference indicators to point to data time intervals that the ML model can use for training or inference. When creating or changing the parameters of an ML model, you can generate an inference indicator by selecting one or several previously created markups. When configuring the training parameters for ML model elements, you can generate a learning indicator by selecting one or more previously created markups.
Creating markup
You can use markup to generate learning indicators or inference of the ML model.
The functionality is available after a license key is added.
To create markup:
- In the main menu, select the Models section.
- In the asset tree, next to the name of the asset for which you want to create a markup, open the vertical menu
 and select Create markup.
A list of options appears on the right.
- Specify the name of the markup in the Name field.
- Enter a description for the markup in the Description field.
- In the Grid step (sec) field, specify a UTG period for markup in seconds expressed as a decimal.
- In the Markup color field, select a color that will be used to highlight data intervals selected by the markup.
- If necessary, turn on the Treat inconclusive result as positive toggle switch.
If Kaspersky MLAD cannot unequivocally evaluate the fulfillment of criteria specified in the Time filter and Tag conditions settings blocks, for example, due to the absence of observations for tags, the application will consider specified criteria to be fulfilled when this option is enabled.
- In the Time filter settings block, do one the following:
- To add an interval, click Add interval and select one of the following time interval types from the Interval type drop-down list:
- Fixed. If you select this type of interval, specify the days of the week and the time interval during which the input data must be validated according to the specified criteria.
- Recurrent. If you select this type of interval, specify the years, dates, days of the week, and daily time interval for periodically validating input data according to the specified criteria.
- To delete an interval, click to the right of the interval.
You can add one or more time intervals.
- To add an interval, click Add interval and select one of the following time interval types from the Interval type drop-down list:
- To add tag behavior criteria, do the following:
- In the Tag conditions settings block, click the Condition button.
- In the Tag drop-down list, select the tag for which to add a tag behavior criterion.
If you need to check the behavior directly opposite of the selected behavior criterion from the condition block, click the NOT button on the left of the selected tag. The NOT caption in the button will be highlighted in bold.
For example, click the NOT button if you need to add a condition that contains no steps with the specified settings.
- In the Behavior drop-down list, select one of the following tag behaviors that must be tracked:
- Over: the tag value exceeds the specified threshold.
- Below: the tag value falls below the specified threshold.
- Rising: the trendline of tag values is increasing.
- Falling: the trendline of tag values is decreasing.
- Level: there are no pronounced changes in the trendline of tag values.
- Step change: the trendline of the selected tag is displaying abrupt upward or downward shifts.
- Flat: the selected tag is transmitting the same value.
- Spread: abrupt changes in the spread of values are being observed around the trendline of the selected tag.
- In the Window field, specify an interval for analyzing the behavior of tags in the UTG steps.
- Depending on the value selected for Behavior, do one of the following:
- If you selected Over or Below, specify a tag threshold value in the Threshold field and specify the minimum number of times the threshold value can be breached within a window in the Minimum violations field.
- If you selected Rising, Falling, or Level, use the Threshold slope field to specify the trend slope percentage value that must be exceeded for the trend to be considered as growing or falling, and specify the time interval between adjacent trend estimates in the Evaluation period field.
By default, the Threshold slope setting is not defined. If the setting is not defined, Kaspersky MLAD will determine the trend direction automatically.
By default, the Evaluation period setting has a value of
1. With this value, the trend is estimated at each UTG node. - If you selected Spread, use the Minimum change field to specify the minimum value by which the tag value spread around the trendline can change, and select one of the following spread change directions in the Direction drop-down list: Any, Flare, or Shrink.
By default, the Minimum change setting is not defined. If the setting is not defined, Kaspersky MLAD will determine it automatically.
The tag behavior criterion is met when the tag spread around the trendline increases and/or decreases.
- If you selected Step change, use the Minimum change field to specify the minimum shift value for the tag trendline, and select one of the following tag value change directions from the Direction drop-down list: Any, Up or Down.
By default, the Minimum change setting is not defined. If the setting is not defined, Kaspersky MLAD will determine it automatically.
- If you selected Flat, use the Value field to specify the value that the tag should transmit, and specify the maximum tag value spread in the Spread field.
The Spread parameter is set to zero by default. With this value, any repeating tag value triggers the criterion.
- To add a tag behavior criterion to a condition block, click the plus sign at the bottom of the condition block and repeat steps 9b through 9e.
- If the block contains more than one tag behavior criterion, select one of the following logical operators between the criterion rows by clicking logical operator button:
- AND if you require all of the block criteria to be fulfilled at the same time.
- OR if at least one of the block criteria must be fulfilled.
- To delete a tag behavior criterion from a condition block, click in the row that contains the criterion.
- If you need to check whether the fulfillment of a pre-condition triggered the fulfillment of a post-condition, do the following:
- Add one of the following temporal operators:
- Wait if you need to generate the result of the criteria check in the last node of the maximum waiting interval.
- If ahead if you need to generate the result of the criteria check at the time of a pre-condition check.
The Wait and If ahead buttons are available after adding at least one condition.
Markup with an If ahead temporal operator can be used in learning indicators only.
- In the Recess (steps) field, specify the following time intervals:
- from is the interval between the pre-condition check node and the UTG node where the post-condition check will start (minimum waiting interval).
- to is the interval between the pre-condition check node and the UTG node where the post-condition check will finish (maximum waiting interval).
The post-condition is checked in the UTG nodes between the minimum and maximum waiting intervals.
- In the Check drop-down list, select one of the following group operators:
- If you require fulfillment of tag behavior criteria from the post-conditions in all UTG nodes between the minimum and maximum waiting intervals, select the All steps group operator.
- To require fulfillment of tag behavior criteria from the post-conditions in at least one UTG node between the minimum and maximum waiting intervals, select the Any step group operator.
If the Wait temporal operator is added, the criteria check result is determined in the last node of the maximum waiting interval. If more than one condition check is performed using the Wait temporal operator, the result of the previous temporal condition check is the precondition for each subsequent check of the Wait temporal condition.
If the If ahead temporal operator is added, the criteria check result is generated at the time of the precondition check.
- Add one of the following temporal operators:
- Select one of the following logical operators between markup blocks by clicking the logical operator button:
- AND if you require the criteria of both condition blocks to be fulfilled.
- OR if the criterion of at least one of the condition blocks must be fulfilled.
- In the upper-right corner of the window, click the Save button.
The new markup will be displayed in the Markups group of the asset tree. The Markups group is created automatically and displayed as part of the selected section of the asset tree.
Page topViewing the markup chart
After creating markup, you can view data time intervals selected by the markup on the graph.
The functionality is available after a license key is added.
To view the markup chart:
- In the main menu, select the Models section.
- In the asset tree, select the markup whose chart you want to view.
A list of options appears on the right.
- Click the On graph button.
A pane with the markup chart appears on the right.
- Select the relevant preset from the Preset drop-down list.
- If necessary, in the Markups field, select the markups for displaying data intervals.
- If you need to select a date and time for displaying the data, do one of the following:
- In the Graph center field, select the date and time for which you want to display data in the chart.
The vertical black dotted line will indicate the selected date and time (in the center of the chart).
- Click
 to the left of the time axis, and select the point on the time axis.
The selected point will become the new center of the graph. The vertical black dashed line will indicate the new date and time.
- In the Graph center field, select the date and time for which you want to display data in the chart.
- If you need to select a time interval for displaying data on the chart, do one of the following:
- If you need to display data for a fixed time interval, select the relevant time interval from the Scale drop-down list. The following time intervals are available by default:
- 1, 5, 10, 15, and 30 minutes
- 1, 3, 6, and 12 hours
- 1, 2, 15, and 30 days
- 3 and 6 months
- 1, 2, and 3 years
If necessary, the system administrator can create, edit, or delete time intervals.
- To display data for a custom time interval, click the
 button icon to the left of the time axis, select the required interval on the time axis, and click the Apply button. If you need to change the scale again, repeat this step.
- If you need to display data for a fixed time interval, select the relevant time interval from the Scale drop-down list. The following time intervals are available by default:
The chart will show the data intervals in the colors specified for the selected markups.
Page topCopying a markup
You can create a markup by copying a previously created one. Copying will create a markup whose settings match those of the original at the time of copying.
The functionality is available after a license key is added.
To copy a markup:
- In the main menu, select the Models section.
- In the asset tree, next to the name of markup that you want to copy, open the vertical menu and select Copy markup.
The Copy markup pane appears on the right.
- Specify the name of the markup in the Name field.
By default, the markup is assigned a name in the following format:
<name of the original markup>_Cloned_<date and time of cloning>. - In the Asset drop-down list, select the asset to which you want to assign the markup.
- Click the Save button.
The new markup will be displayed in the Markups group of the asset tree. The Markups group is created automatically and displayed as part of the selected section of the asset tree.
Page topModifying the markup
You can edit the markup settings.
Markup settings cannot be edited for imported ML models and ML models that were created by cloning imported ML models or based on a template of imported ML models.
The functionality is available after a license key is added.
To edit markup:
- In the main menu, select the Models section.
- In the asset tree, select the markup that you want to edit.
A list of options appears on the right.
- Click the Edit button.
- Adjust the markup settings, if needed. For a description of the settings, see the instructions on creating markup.
- In the upper-right corner of the window, click the Save button.
Removing markup
You can delete markup if it is not used for training or inference of any ML model.
The functionality is available after a license key is added.
To delete markup:
- In the main menu, select the Models section.
- In the asset tree, select the markup that you want to delete.
A list of options appears on the right.
- In the upper-right corner of the window, click
 .
. - In the window that opens, confirm the deletion of the markup.
Working with imported ML models
This section provides information about working with imported ML models and their elements.
The functionality is available after a license key is added.
ML models can be provided by Kaspersky specialists or certified integrators within the Kaspersky MLAD Model-building and Deployment Service. Such ML model must be imported to Kaspersky MLAD and activated. You cannot create new elements for an imported ML model, or delete existing elements.
Upon importing into Kaspersky MLAD the ML model is already trained. You can train the predictive elements and elliptic envelope-based elements as part of the imported ML model before running inference and/or publishing it.
ML model importing
If the ML model was created by Kaspersky specialists or a certified integrator, you can import this ML model into Kaspersky MLAD.
Kaspersky MLAD may slow down its operation when importing an ML model whose size exceeds 1 GB.
System administrators and users who have the Upload models permission from the Manage ML models group of rights can import ML models. The functionality is available after a license key is added.
To import an ML model:
- In the main menu, select the Models section.
- In the asset tree, next to the name of the asset for which the ML model is to be imported, open the vertical menu and select Import model.
- In the opened window, select the ML model file.
An ML model file is provided as a TAR archive with a maximum size of 1.5 GB.
The ML model will be imported to Kaspersky MLAD. The new ML model displays in the Models group of the asset tree. The Models group is created automatically and displayed as part of the selected section of the asset tree. If the imported ML model contains predictive elements, elliptic envelope-based elements, and/or diagnostic rule-based elements, the Models group will display the Predictive elements, Elliptic envelopes, and/or Rules subgroups, respectively.
After being imported, the ML model is assigned the Not activated status. The ML model must be activated. If you import an ML model that was previously activated and then deleted, you do not need to reactivate the ML model.
Page topActivating an imported ML model
After an ML model prepared by Kaspersky specialists or a certified integrator has been imported into Kaspersky MLAD, it must be activated.
If the ML model activation code is lost, send a request to Kaspersky to receive a new code.
System administrators and users who have the Activate models permission from the Manage ML models group of rights can activate imported ML models. The functionality is available after a license key is added.
To activate an imported ML model:
- In the main menu, select the Models section.
- In the asset tree, select the imported ML model.
The details area appears on the right.
- In the Model activation code field, enter the code received from Kaspersky personnel, and click the Activate button in the upper right part of the window.
ML model is activated. It will be assigned the Trained status. If necessary, you can train the ML model again. For example, you can train it again on new data.
You can to start ML model inference to begin the analysis of telemetry data received from the monitored asset.
Page topChanging the parameters of an element of an imported ML model
You can change some parameters of an element of an imported ML model.
Parameters cannot be changed if the ML model is assigned the Ready for publication or Published status.
System administrators and users who have the Edit untrained models permission from the Manage ML models group of rights can edit the settings of elements of imported ML models. The functionality is available after a license key is added.
To change the parameters of an imported ML model element:
- In the main menu, select the Models section.
- In the asset tree, select the ML model element that you want to change.
A list of options appears on the right.
- In the upper-right corner of the window, click the Edit button.
- Adjust the following element settings, if needed:
- Name and description of the ML model element
- Reminder period
This parameter is unavailable for editing if the ML model is in the Historical inference in progress or Streaming inference in progress state.
Modifying this setting changes anomaly detection sensitivity.
- Period of recurring alert suppression
This parameter is unavailable for editing if the ML model is in the Historical inference in progress or Streaming inference in progress state.
Modifying this setting changes anomaly detection sensitivity.
- Anomaly observation period
This parameter is unavailable for editing if the ML model is in the Historical inference in progress or Streaming inference in progress state.
Modifying this setting changes anomaly detection sensitivity.
- Anomaly duration share in interval
This parameter is unavailable for editing if the ML model is in the Historical inference in progress or Streaming inference in progress state.
Modifying this setting changes anomaly detection sensitivity.
- Color of incident dot indicators
- Incident status and cause
- Detection threshold
This parameter is unavailable for editing if the ML model is in the Historical inference in progress or Streaming inference in progress state.
The detection threshold value was set after training an element of the imported ML model. Modifying this setting changes anomaly detection sensitivity.
- Expert opinion
- In the upper-right corner of the window, click the Save button.
Working with manually created ML models
This section provides information about working with manually created ML models and their elements.
The functionality is available after a license key is added.
When creating an ML model manually, you can add predictive ML model elements, elliptic envelope-based elements, and/or diagnostic rule-based elements, and edit or delete these.
The ML model needs to be trained before you can run inference on it. To do this, all predictive elements and elliptic envelope-based elements within the ML model must be pretrained. If necessary, you can view the training results of the elements. Elements based on diagnostic rules do not need to be trained, so they are considered to be pretrained.
Creating an ML model
System administrators and users who have the Create models permission from the Manage ML models group of rights can create ML models. The functionality is available after a license key is added.
To create an ML model:
- In the main menu, select the Models section.
- In the asset tree, next to the name of the asset for which you want to create an ML model, open the vertical menu and select Create model.
A list of options appears on the right.
- In the Name field, specify the ML model name.
The ML model name must not be longer than 100 characters.
- In the Description field, specify the ML model description.
- If you need to apply markups when selecting data for ML model inference, select the required markups under Inference indicator.
- To view the data that will be selected by the markups, click On graph.
Markups are displayed in the colors selected when they were created.
- In the upper-right corner of the window, click the Save button.
The new ML model displays in the Models group of the asset tree. The Models group is created automatically and displayed as part of the selected section of the asset tree.
Page topAdding a predictive element to an ML model
System administrators and users who have the Create models permission from the Manage ML models group of rights can add ML model elements. The functionality is available after a license key is added.
To add a predictive element to an ML model:
- In the main menu, select the Models section.
- To add a predictive element, do the following:
- In the asset tree, next to the name of the ML model to which you want to add a predictive element, open the vertical menu and select Create element.
- In the window that opens, select the element type Predictive element.
- Click the Create button.
A list of options appears on the right.
- In the asset tree, next to the name of the ML model to which you want to add a predictive element, open the vertical menu
- In the Name field, specify the name of the ML model element.
- Enter a description for the ML model element in the Description field.
- In the General element settings block, do the following:
- In the Reminder period (sec) field, specify the period in seconds, upon reaching which the ML model will generate a repeated incident if anomalous behavior is retained in each UTG node.
The default value of this setting is
0, which corresponds to no reminders. - In the Period of recurring alert suppression (sec) field, specify the period in seconds during which the ML model does not log repeated incidents for the same element.
The default value of this setting is
0(repeat incidents not suppressed). - In the Anomaly observation interval (sec) field, enter the period (in seconds) during which the anomalous behavior of the tag is monitored to make a decision regarding incident registration.
- In Anomaly duration share in interval, enter as a decimal fraction the proportion of the period in Anomaly observation interval (sec) that must elapse for the ML model element to register an incident.
You can specify a value in the range of
0to1. - In the Color of incident dot indicators field, select the color of the indicator points of the incidents logged by the ML model element on the graphs in the Monitoring and History sections. This color will also be used to display the graph of the artifact generated by this element.
- If necessary, in the Incident status drop-down list, select a status to be automatically assigned to incidents logged by the ML model element.
- If necessary, in the Incident cause drop-down list, select the cause to be automatically set for incidents logged by the ML model element if this cause is known in advance.
- In the Detection threshold field, specify a prediction error threshold value upon reaching which an incident is logged.
The value of this parameter will be automatically adjusted after training the ML model element. If necessary, you can change the value of this parameter.
- If required, in the Expert opinion field, specify the expert opinion that will be automatically generated for incidents registered by the ML model element if the contents of this opinion are known in advance.
- In the Reminder period (sec) field, specify the period in seconds, upon reaching which the ML model will generate a repeated incident if anomalous behavior is retained in each UTG node.
- Select one of the following ML model predictive element architectures: Dense, RNN, CNN, TCN, Transformer, or LR.
- If necessary, turn on the Advanced neural network settings toggle switch.
The toggle switch is only available for elements with a Dense, RNN, CNN, TCN, or Transformer architecture.
- In the Main settings block, do the following:
- In the Grid step (sec) field, specify the element's UTG period (in seconds) expressed as an integer or decimal.
- In the Input tags drop-down list, select one or more tags that serve as the source data for predicting the values of the output tags.
- In the Output tags drop-down list, select one or several tags whose behavior is predicted by the model element.
- In the Smoothing factor field, specify the cumulative prediction error smoothing factor in decimal format.
The higher the coefficient, the less smoothing is applied to the data.
- In the Prediction error power exponent field, specify the power to which the prediction error value is raised at each UTG node before calculating the cumulative error.
- In the Window settings block, do the following:
- In the Input window (steps) field, specify the size of the input value window, from which the ML model element predicts the output values.
The window size is indicated in the number of UTG steps.
- In the Output window offset field, specify the number of UTG steps by which the beginning of the output window will be shifted relative to the beginning of the input window.
- In the Output window (steps) field, specify an output tag prediction length calculated from the input tags on the input window.
- In the Input window (steps) field, specify the size of the input value window, from which the ML model element predicts the output values.
- If extended setup mode is enabled and you are adding an element with a Dense architecture, do the following:
- In the Multipliers for calculating number of neurons per layer field, provide the multipliers, separated by a comma without spaces, by which to multiply the number of input tags to calculate the number of neurons in the ML model element layers.
The default value of this parameter is
8,4,8. - In the Activation function per layer field, specify one of the following activation functions on each layer of an ML model element separated by a comma without spaces:
relu: A non-linear activation function that converts an input value to a value between0and positive infinity.selu: A monotonically increasing function that enables normalization based on the central limit theorem.linear: A linear function that is a straight line proportional to the input data.sigmoid: A non-linear function that converts input values to values between0and1.tanh: A hyperbolic tangent function that converts input values to values between-1and1.softmax: A function that converts a vector of values to a probability distribution that adds up to1.
The default value of this setting is
relu,relu,relu. - In the Regularization field, specify the regularization coefficient in decimal format to prevent overfitting of the ML model element.
The default value of this parameter is
0.
- In the Multipliers for calculating number of neurons per layer field, provide the multipliers, separated by a comma without spaces, by which to multiply the number of input tags to calculate the number of neurons in the ML model element layers.
- If extended setup mode is enabled and you are adding an element with an RNN architecture, do the following:
- In the GRU neurons per layer field, specify the number of GRU neurons on layers separated by a comma without spaces.
The default value of this parameter is
40,40. - In the Number of neurons in TimeDistributed layer field, specify the number of neurons distributed in time on the layers of the decoder separated by a comma without spaces.
The default value of this parameter is
40,20. - If you need to restore data received as input to the network, turn on Use autoencoder toggle switch.
- In the Regularization field, specify the regularization coefficient in decimal format to prevent overfitting of the ML model element.
The default value of this parameter is
0.
- In the GRU neurons per layer field, specify the number of GRU neurons on layers separated by a comma without spaces.
- If extended setup mode is enabled and you are adding an element with an CNN architecture, do the following:
- In the Filter size per layer field, specify the size of the filters for each layer of the element separated by a comma without spaces.
The default value of this parameter is
2,2,2. - In the Number of filters per layer field, specify the number of filters for each layer of the ML model element separated by a comma without spaces.
The default value of this parameter is
50,50,50. - In the Regularization field, specify the regularization coefficient in decimal format to prevent overfitting of the ML model element.
The default value of this parameter is
0. - In the MaxPooling window size per layer field, specify the maximum sampling window size on each layer separated by a comma without spaces.
The default value of this parameter is
2,2,2. - In the Number of neurons in decoder field, specify the number of neurons on the layers of the decoder.
- If you need to restore data received as input to the network, turn on Use autoencoder toggle switch.
- In the Filter size per layer field, specify the size of the filters for each layer of the element separated by a comma without spaces.
- If extended setup mode is enabled and you are adding an element with an TCN architecture, do the following:
- In the Regularization field, specify the regularization coefficient in decimal format to prevent overfitting of the ML model element.
The default value of this parameter is
0. - In the Size of filters field, specify the size of the filters for the ML model element.
The default value of this parameter is
3. - In the Number of layers in residual block field, specify the number of residual block layers.
The default value of this parameter is
1. - In the Number of filters per layer field, specify the number of filters for each ML model element layer.
The default value of this parameter is
64. - In the Dilation per layer field, specify the exponential expansion values of the output data on the layers as a comma-separated list.
The default value of this parameter is
1,2,4,8,16. - In the Decoder layer type field, select one of the following types of layer to precede the output layer:
- TimeDistributedDense (default): A fully connected architecture layer.
- GRU: A layer with a recurrent architecture.
- In the Activation function drop-down list, select one of the following activation functions:
- linear: A linear activation function whose result is proportional to the input value.
- relu: A non-linear activation function that converts an input value to a value between zero and positive infinity. If the input value is less than or equal to zero, the function returns a value of zero; otherwise, the function returns the input value.
The default value of this parameter is
linear.
- In the Regularization field, specify the regularization coefficient in decimal format to prevent overfitting of the ML model element.
- If extended setup mode is enabled and you are adding an element with a Transformer architecture, do the following:
- In the Encoder regularization field, specify the regularization coefficient in the encoder in decimal format.
The default value of this parameter is
0.01. - In the Number of attention heads field, specify the number of attention heads.
The default value of this parameter is
1. - In the Number of encoders field, specify the number of encoders.
The default value of this parameter is
1. - In the Multipliers for calculating number of neurons per layer field, provide the factors, separated by a comma without spaces, by which to multiply the number of input tags to calculate the number of neurons in the decoding layers.
The default value of this parameter is
10,5,10.
- In the Encoder regularization field, specify the regularization coefficient in the encoder in decimal format.
- In the upper-right corner of the window, click the Save button.
When the first item in the ML model is created, a Predictive elements group will be automatically created in the asset tree. The newly created element appears in this group.
The ML model element will be assigned the Not trained status, and the ML model to which the added element belongs will be assigned the Not trained status. To run inference on the ML model, all of its predictive elements and elliptic envelope-based elements must be trained.
Page topModifying an ML model predictive element
You can edit the settings of an ML model predictive element.
Parameters cannot be changed if the ML model is assigned the Ready for publication or Published status.
System administrators and users who have the Edit untrained models permission from the Manage ML models group of rights can edit elements of ML models. The functionality is available after a license key is added.
To edit an ML model predictive element:
- In the main menu, select the Models section.
- In the asset tree, select the predictive element that you want to edit.
A list of options appears on the right.
- In the upper-right corner of the window, click the Edit button.
- Adjust the settings of the predictive ML model element, if needed. For a description of the settings, see the instructions on adding a predictive ML model element.
Editing the Reminder period (sec), Period of recurring alert suppression (sec), Anomaly observation interval (sec), Anomaly duration share in interval, Detection threshold, and/or Smoothing factor settings changes anomaly detection sensitivity. These parameters are unavailable for editing if the ML model is in the Historical inference in progress or Streaming inference in progress state.
- In the upper-right corner of the window, click the Save button.
- If you have edited the neural network element architecture settings, and the options in Main settings and/or Window settings, confirm that you want to save the changes.
After changes are made to these parameters, the ML model element must be retrained.
The element will be assigned the Not trained status.
Page topAdding an ML model element based on a diagnostic rule
System administrators and users who have the Create models permission from the Manage ML models group of rights can add ML model elements. The functionality is available after a license key is added.
To add an ML model element based on a diagnostic rule:
- In the main menu, select the Models section.
- To add a diagnostic rule, do the following:
- In the asset tree, next to the name of the ML model to which you want to add a diagnostic rule, open the vertical menu and select Create element.
- In the window that opens, select the Rule element type.
- Click the Create button.
A list of options appears on the right.
- In the asset tree, next to the name of the ML model to which you want to add a diagnostic rule, open the vertical menu
- In the Name field, specify a name for the diagnostic rule.
- In the Description field, specify the diagnostic rule description.
- In the General element settings block, do the following:
- In the Reminder period (sec) field, specify the period in seconds, upon reaching which the ML model will generate a repeated incident if anomalous behavior is retained in each UTG node.
The default value of this setting is
0, which corresponds to no reminders. - In the Period of recurring alert suppression (sec) field, specify the period in seconds during which the ML model does not log repeated incidents for the same element.
The default value of this setting is
0(repeat incidents not suppressed). - In the Anomaly observation interval (sec) field, enter the period (in seconds) during which the anomalous behavior of the tag is monitored to make a decision regarding incident registration.
- In Anomaly duration share in interval, enter as a decimal fraction the proportion of the period in Anomaly observation interval (sec) that must elapse for the ML model element to register an incident.
You can specify a value in the range of
0to1. - In the Color of incident dot indicators field, select the color of the indicator points of the incidents logged by the ML model element on the graphs in the Monitoring and History sections. This color will also be used to display the graph of the artifact generated by this element.
- If necessary, in the Incident status drop-down list, select a status to be automatically assigned to incidents logged by the ML model element.
- If necessary, in the Incident cause drop-down list, select the cause to be automatically set for incidents logged by the ML model element if this cause is known in advance.
- If required, in the Expert opinion field, specify the expert opinion that will be automatically generated for incidents registered by the ML model element if the contents of this opinion are known in advance.
- In the Reminder period (sec) field, specify the period in seconds, upon reaching which the ML model will generate a repeated incident if anomalous behavior is retained in each UTG node.
- In the Rule settings block, do the following:
- In the Grid step (sec) field, specify the element's UTG period (in seconds) expressed as an integer or in decimal format.
- If necessary, turn on the Treat inconclusive result as positive toggle switch.
If Kaspersky MLAD cannot unequivocally evaluate the fulfillment of criteria specified in the Time filter and Tag conditions settings blocks, for example, due to the absence of observations for tags, the application will consider a rule to be triggered when this option is enabled.
- In the Time filter settings block, do the following:
- Click the Add interval button.
- In the Interval type drop-down list, select one of the following time interval types:
- Fixed. If you select this type of interval, specify the days of the week and the time interval during which the input data must be validated according to the specified criteria.
- Recurrent. If you select this type of interval, specify the years, dates, days of the week, and daily time interval for periodically validating input data according to the specified criteria.
- If you want to add one more interval, click the Add interval button and complete step 7b.
- To delete an interval, click to the right of the interval.
You can add one or more time intervals. If no time interval is specified, the diagnostic rule is applied in each UTG node.
- To add tag behavior criteria, do the following:
- In the Tag conditions settings block, click the Condition button.
- In the Tag drop-down list, select the tag for which to add a tag behavior criterion.
If you need to check the behavior directly opposite of the selected behavior criterion from the condition block, click the NOT button on the left of the selected tag. The NOT caption in the button will be highlighted in bold.
For example, click the NOT button if you need to add a condition that contains no steps with the specified settings.
- In the Behavior drop-down list, select one of the following tag behaviors that must be tracked:
- Over: the tag value exceeds the specified threshold.
- Below: the tag value falls below the specified threshold.
- Rising: the trendline of tag values is increasing.
- Falling: the trendline of tag values is decreasing.
- Level: there are no pronounced changes in the trendline of tag values.
- Step change: the trendline of the selected tag is displaying abrupt upward or downward shifts.
- Flat: the selected tag is transmitting the same value.
- Spread: abrupt changes in the spread of values are being observed around the trendline of the selected tag.
- In the Window field, specify the number of UTG steps.
- Depending on the value selected for Behavior, do one of the following:
- If you selected Over or Below, specify a tag threshold value in the Threshold field and specify the minimum number of times the threshold value can be breached within a window in the Minimum violations field.
- If you selected Rising, Falling, or Level, use the Threshold slope field to specify the trend slope percentage value that must be exceeded for the trend to be considered as growing or falling, and specify the time interval between adjacent trend estimates in the Evaluation period field.
By default, the Threshold slope setting is not defined. If the setting is not defined, Kaspersky MLAD will determine the trend direction automatically.
By default, the Evaluation period setting has a value of
1. With this value, the trend is estimated at each UTG node. - If you selected Spread, use the Minimum change field to specify the minimum value by which the tag value spread around the trendline can change, and select one of the following spread change directions in the Direction drop-down list: Any, Flare, or Shrink.
By default, the Minimum change setting is not defined. If the setting is not defined, Kaspersky MLAD will determine it automatically.
The tag behavior criterion is met when the tag spread around the trendline increases and/or decreases.
- If you selected Step change, use the Minimum change field to specify the minimum shift value for the tag trendline, and select one of the following tag value change directions from the Direction drop-down list: Any, Up or Down.
By default, the Minimum change setting is not defined. If the setting is not defined, Kaspersky MLAD will determine it automatically.
- If you selected Flat, use the Value field to specify the value that the tag should transmit, and specify the maximum tag value spread in the Spread field.
The Spread parameter is set to zero by default. With this value, any repeating tag value triggers the criterion.
- To add a tag behavior criterion to a condition block, click the plus sign at the bottom of the condition block and repeat steps 8b through 8e.
- If the block contains more than one tag behavior criterion, select one of the following logical operators between the criterion rows by clicking logical operator button:
- AND if you require all of the block criteria to be fulfilled at the same time.
- OR if at least one of the block criteria must be fulfilled.
- If you need to check whether the fulfillment of a pre-condition caused the fulfillment of a post-condition in a future UTG node, add a temporal operator:
- In the Tag conditions settings block, click the Wait button.
The Wait button is available after at least one condition has been added.
- In the Recess (steps) field, specify the following time intervals:
- from is the interval between the pre-condition check node and the UTG node where the post-condition check will start (minimum waiting interval).
- to is the interval between the pre-condition check node and the UTG node where the post-condition check will finish (maximum waiting interval).
The post-condition is checked in the UTG nodes between the minimum and maximum waiting intervals.
- In the Check drop-down list, select one of the following group operators:
- If you require fulfillment of tag behavior criteria from the post-conditions in all UTG nodes between the minimum and maximum waiting intervals, select the All steps group operator.
- To require fulfillment of tag behavior criteria from the post-conditions in at least one UTG node between the minimum and maximum waiting intervals, select the Any step group operator.
The criteria check result is determined in the last node of the maximum waiting interval.
If more than one condition check is performed using the temporal operator, then the result of the check of the previous temporal condition is a precondition for each subsequent check of the temporal condition.
- In the Tag conditions settings block, click the Wait button.
- Select one of the following logical operators between rule blocks by clicking the logical operator button:
- AND if you require the criteria of both condition blocks to be fulfilled.
- OR if the criterion of at least one of the condition blocks must be fulfilled.
- In the upper-right corner of the window, click the Save button.
When the first ML model element is created, a Rules group will be automatically created in the asset tree. The newly created element appears in this group.
If an ML model contains only elements based on diagnostic rules, the model is assigned the Trained status. You can start inference for such an ML model. If the ML model contains untrained predictive elements and/or elliptic envelope-based elements, these must be trained before starting the inference.
Page topChanging an ML model element based on a diagnostic rule
You can change the settings of an ML model element based on a diagnostic rule.
Parameters cannot be changed if the ML model is assigned the Ready for publication or Published status.
System administrators and users who have the Edit untrained models permission from the Manage ML models group of rights can edit elements of ML models. The functionality is available after a license key is added.
To change an element of an ML model based on a diagnostic rule:
- In the main menu, select the Models section.
- In the asset tree, select the element based on a diagnostic rule that you want to edit.
A list of options appears on the right.
- In the upper-right corner of the window, click the Edit button.
- Adjust the diagnostic rule settings, if needed. For a description of the settings, see the instructions on adding a diagnostic rule-based ML model element.
Editing the Reminder period (sec), Period of recurring alert suppression (sec), Anomaly observation interval (sec), and/or Anomaly duration share in interval settings changes anomaly detection sensitivity. These parameters are unavailable for editing if the ML model is in the Historical inference in progress or Streaming inference in progress state.
- In the upper-right corner of the window, click the Save button.
- If Grid step (sec) has been edited, confirm the changes.
Adding an elliptic envelope-based ML model element
System administrators and users who have the Create models permission from the Manage ML models group of rights can add ML model elements. The functionality is available after a license key is added.
To add an elliptic envelope-based ML model element:
- In the main menu, select the Models section.
- To add an elliptic envelope, do the following:
- In the asset tree, next to the name of the ML model you want to add an elliptic envelope to, open the vertical menu and select Create element.
- In the window that opens, select the Elliptic envelope item type.
- Click the Create button.
A list of options appears on the right.
- In the asset tree, next to the name of the ML model you want to add an elliptic envelope to, open the vertical menu
- In the Name field, specify the name of the ML model element.
- Enter a description for the ML model element in the Description field.
- In the General element settings block, do the following:
- In the Reminder period (sec) field, specify the period in seconds, upon reaching which the ML model will generate a repeated incident if anomalous behavior is retained in each UTG node.
The default value of this setting is
0, which corresponds to no reminders. - In the Period of recurring alert suppression (sec) field, specify the period in seconds during which the ML model does not log repeated incidents for the same element.
The default value of this setting is
0(repeat incidents not suppressed). - In the Anomaly observation interval (sec) field, enter the period (in seconds) during which the anomalous behavior of the tag is monitored to make a decision regarding incident registration.
- In Anomaly duration share in interval, enter as a decimal fraction the proportion of the period in Anomaly observation interval (sec) that must elapse for the ML model element to register an incident.
You can specify a value in the range of
0to1. - In the Color of incident dot indicators field, select the color of the indicator points of the incidents logged by the ML model element on the graphs in the Monitoring and History sections. This color will also be used to display the graph of the artifact generated by this element.
- If necessary, in the Incident status drop-down list, select a status to be automatically assigned to incidents logged by the ML model element.
- If necessary, in the Incident cause drop-down list, select the cause to be automatically set for incidents logged by the ML model element if this cause is known in advance.
- In the Detection threshold field, specify the threshold value upon reaching which an incident is registered.
The value of this parameter will be automatically adjusted after training the ML model element. If necessary, you can change the value of this parameter.
- If required, in the Expert opinion field, specify the expert opinion that will be automatically generated for incidents registered by the ML model element if the contents of this opinion are known in advance.
- In the Reminder period (sec) field, specify the period in seconds, upon reaching which the ML model will generate a repeated incident if anomalous behavior is retained in each UTG node.
- In the Grid step (sec) field, specify the element's UTG period (in seconds) expressed as an integer or decimal.
- In the Input tags drop-down list, select one or several tags to include in the ML model.
- In the upper-right corner of the window, click the Save button.
When creating the first ML model element, an Elliptic envelopes group will be automatically created in the asset tree. The newly created element appears in this group.
The ML model element will be assigned the Not trained status, and the ML model to which the added element belongs will be assigned the Not trained status. To run inference on the ML model, all of its predictive elements and elliptic envelope-based elements must be trained.
Page topEditing an elliptic envelope-based ML model element
You can edit the settings of an elliptic envelope-based ML model element.
Parameters cannot be changed if the ML model is assigned the Ready for publication or Published status.
System administrators and users who have the Edit untrained models permission from the Manage ML models group of rights can edit elements of ML models. The functionality is available after a license key is added.
To edit an elliptic envelope-based ML model element:
- In the main menu, select the Models section.
- In the asset tree, select the elliptic envelope-based element that you want to edit.
A list of options appears on the right.
- In the upper-right corner of the window, click the Edit button.
- Adjust the elliptic envelope settings, if needed. For a description of the settings, see the instructions on adding an elliptic envelope-based ML model element.
Editing the Reminder period (sec), Period of recurring alert suppression (sec), Anomaly observation interval (sec), Anomaly duration share in interval, and/or Detection threshold settings changes anomaly detection sensitivity. These parameters are unavailable for editing if the ML model is in the Historical inference in progress or Streaming inference in progress state.
- In the upper-right corner of the window, click the Save button.
- If you have edited Grid step (sec) and/or Input tags, confirm that you want to save the changes.
After changes are made to these parameters, the ML model element must be retrained.
The element will be assigned the Not trained status.
Page topCloning of the ML model element
You can create an ML model element by cloning an element of any ML model. Copying creates an ML model element whose status and state, architecture settings, and learning settings match those of the original at the time of copying. If the original element of the ML model is trained at the time of its copying, the new element of the ML model will display the learning results of the original element.
The functionality is available after a license key is added.
An element used in an imported ML model cannot be copied.
To copy an ML model element:
- In the main menu, select the Models section.
- In the asset tree, next to the name of the ML model element that you want to copy, open the vertical menu and select Copy element.
The Copy element pane appears on the right.
- Specify the name of the element in the Name field.
By default, an ML model element is assigned a name in the following format:
<name of the original ML model element>_Cloned_ <date and time of cloning>. - In the Model drop-down list, select the ML model to copy the selected item to.
- Click the Save button.
The new ML model element will be displayed within the corresponding group of elements of the selected ML model.
Page topRemoving an ML model element
When removing an ML model element, Kaspersky MLAD also deletes the inference results of the selected ML model element.
System administrators and users who have the Remove models permission from the Manage ML models group of rights can remove elements of ML models. The functionality becomes available after adding a license key.
You cannot delete an element used in an imported ML model.
To remove an ML model element:
- In the main menu, select the Models section.
- In the asset tree, select the ML model element that you want to delete.
A list of options appears on the right.
- In the upper-right corner of the window, click .
- In the window that opens, confirm the deletion of the ML model element.
Cloning an ML model
System administrators and users who have the Copy models permission from the Manage ML models group of rights can clone ML models.
The functionality is available after a license key is added.
You can create an ML model by cloning a previously added ML model. When cloning, a new ML model is created. The new ML model contains the same elements, statuses and settings of the ML model and its elements, as well as the training state of the elements as the ones of the ML model being cloned at the time of its cloning.
After cloning an ML model that was created manually or from a template based on a manually created ML model, you can add predictive elements, elliptic envelope-based elements, and/or diagnostic rule-based elements to the cloned ML model, and edit or delete them.
After cloning an ML model that was imported into the application or created using a template based on an imported ML model, you cannot change the set of elements of the cloned ML model.
Before running inference, you can change the training settings and retrain the elements of the copied ML model.
To clone an ML model:
- In the main menu, select the Models section.
- In the asset tree, select the ML model that you want to copy.
A list of options appears on the right.
- In the upper-right corner of the window, click
 .
.The Model copying pane appears on the right.
- In the Name field, specify the ML model name.
The ML model name must not be longer than 100 characters.
By default, an ML model is assigned a name in the following format:
<name of the original ML model>_Cloned_ <date and time of cloning>. - In the Asset drop-down list, select the asset to which you want to assign the new ML model.
- Click the Save button.
The new ML model displays in the Models group of the asset tree. The Models group is created automatically and displayed as part of the selected section of the asset tree. If the cloned ML model contains predictive elements, elliptic envelope-based elements, and/or diagnostic rule-based elements, the Models group will display the Predictive elements, Elliptic envelopes, and/or Rules subgroups, respectively.
Page topWorking with ML model templates
This section provides instructions on working with ML model templates.
The functionality is available after a license key is added.
You can create a template of an existing ML model to reuse its algorithm structure, set of elements, and training state at the time of the template creation. You can use a created template to add new ML models.
If the original ML model used as a template was created manually, you can add predictive elements, elliptic envelope-based elements, and/or elements based on diagnostic rules to the ML model created based on such template, as well as modify or delete them.
If the original ML model used to create a template was imported to Kaspersky MLAD, the set of elements of the ML model created based on such a template cannot be changed.
Before run inference on the ML model, train all of its predictive and elliptic envelope-based elements.
Creating a template based on an ML model
System administrators and users who have the Create model templates permission from the Manage ML models group of rights can create templates based on ML models. The functionality is available after a license key is added.
You can create an ML model template based on a previously added ML model. The created templates retain the algorithm structure, set of elements, tag composition, and the training state of the source ML model.
You can generate a template from an existing ML model if all predictive and elliptic envelope-based elements have been trained, and conditions have been set for all diagnostic rule-based elements.
To create a template based on an ML model:
- In the main menu, select the Models section.
- In the asset tree, next to the name of the ML model based on which you want to create a template, open the vertical menu and select Create template.
A list of options appears on the right.
- Specify the name of the template in the Name field.
You can enter up to 100 characters.
By default, a template is assigned a name in the format
Template_<ML model name>_<date and time of template creation>. - To change the names of the template tags, in the Template tag name column specify the new names for the relevant tags.
The template tags are automatically assigned the names of the tags employed in the ML model that was used to create the template. You can specify any other names for template tags. For example, you can use the functional descriptions of the tag roles. The names of the template tags do not have to match the names of the tags of the ML model that was used to create the template.
- Click the Save button.
The new ML model template appears in the Templates group of the asset tree. The Templates group is created automatically and displayed as part of the selected section of the asset tree.
Page topEditing an ML model template
You can edit the settings of a created ML model template.
System administrators and users who have the Edit model templates permission from the Manage ML models group of rights can edit ML model templates. The functionality is available after a license key is added.
To edit an ML model template:
- In the main menu, select the Models section.
- In the asset tree, select the template that you want to edit.
A list of options appears on the right.
- In the upper-right corner of the window, click the Edit button.
- Adjust the settings of the ML model template, if needed. For a description of the settings, see instructions on creating an ML model template.
- Click the Save button.
Creating an ML model based on a template
System administrators and users who have the Create models permission from the Manage ML models group of rights can create ML models based on templates. The functionality is available after a license key is added.
You can create a new ML model based on available templates. When creating an ML model, you can specify the IDs of tags that should be used in the new ML model.
To create an ML model based on a template:
- In the main menu, select the Models section.
- In the asset tree, next to the name of the template that you want to use to create an ML model, open the vertical menu and select Create model.
The Creating a model pane opens on the right.
- Enter a name for the new ML model in the Model name field.
The ML model name must not be longer than 100 characters.
- In the Model tag name column, for each template tag, in the asset tree select the tag that will be used by an ML model that is created from the template.
- Click the Save button.
The new ML model displays in the Models group of the asset tree. The Models group is created automatically and displayed as part of the selected section of the asset tree. If the ML model contains predictive elements, elliptic envelope-based elements, and/or diagnostic rule-based elements, the Models group will display the Predictive elements, Elliptic envelopes and/or Rules subgroups, respectively.
The state of the created ML model will match the training state of the source ML model when the template was created.
Page topRemoving an ML model template
System administrators and users who have the Delete model templates permission from the Manage ML models group of rights can remove ML model templates. The functionality is available after a license key is added.
You can remove an ML model template from Kaspersky MLAD. Deleting a template does not remove ML models based on this template.
To remove an ML model template:
- In the main menu, select the Models section.
- In the asset tree, select the ML model template that you want to delete.
A list of options appears on the right.
- In the upper-right corner of the window, click .
- Confirm deletion of the ML model template.
The selected ML model template will be removed from Kaspersky MLAD.
Page topChanging the parameters of an ML model
You can change the settings of an ML model that was created manually, imported into Kaspersky MLAD, created from a template, or copied.
Markup editing is not available for imported ML models and ML models that were created by cloning imported ML models or based on a template of imported ML models.
System administrators and users who have the Edit untrained models permission from the Manage ML models group of rights can edit the settings of ML model elements. The functionality is available after a license key is added.
To change the parameters of an ML model:
- In the main menu, select the Models section.
- In the asset tree, select the ML model whose settings you want to edit
A list of options appears on the right.
- In the upper-right corner of the window, click the Edit button.
- Adjust the ML model settings, if needed. For a description of the settings, see the instructions on creating an ML model.
- In the upper-right corner of the window, click the Save button.
Training an ML model predictive element
With Kaspersky MLAD, you can train a predictive element for an ML model that was created manually, imported into Kaspersky MLAD, created from a template, or copied.
System administrators and users who have the Train models permission from the Manage ML models group of rights can train elements of ML models. The functionality is available after a license key is added.
To train an ML model element:
- In the main menu, select the Models section.
- In the asset tree, select the predictive element that you want to train.
A list of options appears on the right.
- Open the Training tab and click the Edit button in the upper-right corner of the window.
- In the Data selection interval field, specify the data time interval on which you want to train the ML model.
- To apply markups when selecting data for training the ML model within a selected interval, select one or several markups in the Markups field.
The selected markups will form a learning indicator.
- To view the data that will be selected by the markups, click On graph.
Markups are displayed in the colors that were specified when they were created.
You can select a preset when viewing the data on the graph.
- If you need to configure extended training settings, turn on Advanced training settings toggle switch.
- In Maximum training duration (sec), specify a maximum time in seconds the Kaspersky MLAD server can spend training an ML model.
- In the Validation split field, use a decimal value to specify the share of the validation sample as a percentage of the entire dataset used to train the ML model.
You can specify a value in the range of
0to1.The default value of this parameter is
0.2. - In the Maximum epoch count field, specify the maximum number of epochs for training the ML model.
The default value of this parameter is
500. - In the Patience field, specify the number of epochs with no improvement in training quality to wait before stopping the ML model training process early.
Stopping the ML model training early avoids overfitting of the model. Training in this case is considered to be completed successfully.
The default value of this parameter is
15. - In the Resolution of training results graphs field, use a decimal value to specify the graph resolution for displaying training results on the Training results tab.
You can specify a value in the range of
0to1. - In the Batch size field, specify the number of selection items that must be sent for training within the iteration.
The default value of this parameter is
16.This parameter is not available for an element with TCN architecture.
- In Block count, specify the number of blocks to split the ML model training dataset into.
The default value of this parameter is
4. - In the Inference mode drop-down list, select one of the following values:
- If you want to load all datasets for training into RAM, select Fast inference.
This inference mode allows you to perform inference faster.
- If you want to load datasets into RAM one at a time, select Memory saving mode.
This inference mode allows inference to be performed with minimal expenditure of RAM, but it will take place slower than in Fast inference mode.
- If you want to load all datasets for training into RAM, select Fast inference.
- In the Training mode drop-down list, select one of the following values:
- To load the entire training dataset into RAM, select Load all data to RAM.
- If you want to load one data block at a time into RAM and generate validation blocks from the end of the dataset, select Validate at the end of the dataset.
- If you want to load one data block at a time into RAM without generating validation blocks, select Run validation in each training data block.
Validation data is generated from each training data block.
- In the Memory allocation mode drop-down list, select one of the following settings:
- Reserve minimum amount of free RAM. If this setting is selected, the Trainer service will make sure that the minimum amount of memory specified in the Amount of RAM, MB field remains free when training the ML model.
- Reserve maximum available amount of RAM for model training. If this setting is selected, the Trainer service will use the maximum amount of RAM specified in the Amount of RAM, MB field when training the ML model.
- To consider previous training results while training an ML model on new data, enable the option to Initialize model weights with values from previous training results.
- If you want to shuffle the data to improve the quality of ML model training, enable the Shuffle data option.
- In Initialization of pseudorandom number generator, set a value for generating a pseudorandom number sequence.
- In Learning rate coefficient, set the coefficient to be used for adjusting ML model element weights in each training iteration.
The default value of this parameter is
0.0001. - In the Training optimization algorithm drop-down list, select one of the following algorithms:
- Adadelta is an adaptive learning rate-based algorithm for each dimension.
- Adagrad is the algorithm in which the learning rate depends on the update rate of settings during learning.
- Adam is the algorithm based on adaptive computing of the first-order and second-order momentum of setting distribution.
- RMSprop is the algorithm that uses a moving average of the squared gradient to adaptively normalize the learning rate at each step.
- SGD is the Stochastic Gradient Descent algorithm.
- In the Loss function drop-down list, select one of the following functions:
- MSE: for calculating the root mean square error.
- MSLE: for calculating the logarithmic mean error.
- MAE: for calculating the mean absolute error.
- MAPE: for calculating the mean absolute percentage error.
- In the upper-right corner of the window, click the Save button.
If you change the learning parameters for a previously trained element, you have to confirm the changes.
- In the information block located above the training settings, click the Train element button.
The information block will show the number of the current training epoch of the element.
After the training is complete, you can view the training results of an ML model element in the Training results tab.
After all predictive elements and elliptic envelope-based elements that are part of the ML model have been successfully trained, the model will be assigned a status of Trained. If required, you can retrain the ML model element by clicking Restart training.
Page topTraining an elliptic envelope-based ML model element
With Kaspersky MLAD, you can train an elliptic envelope-based element for an ML model that was created manually, imported into Kaspersky MLAD, created from a template, or copied.
System administrators and users who have the Train models permission from the Manage ML models group of rights can train elements of ML models. The functionality is available after a license key is added.
To train an ML model element:
- In the main menu, select the Models section.
- In the asset tree, select the elliptic envelope-based element that you want to train.
A list of options appears on the right.
- Open the Training tab and click the Edit button in the upper-right corner of the window.
- In the Data selection interval field, specify the data time interval on which you want to train the ML model.
- To apply markups when selecting data for training the ML model within a selected interval, select one or several markups in the Markups field.
The selected markups will form a learning indicator.
- To view the data that will be selected by the markups, click On graph.
Markups are displayed in the colors that were specified when they were created.
You can select a preset when viewing the data on the graph.
- If you need to configure extended training settings, turn on Advanced training settings toggle switch.
- In Sample fraction for estimating the mean and covariance, enter as a decimal fraction the proportion of the training sample the covariance and mean are being calculated on.
You can specify a value in the range of
0to0.5inclusive. - In Outliers in sample, enter as a decimal fraction the proportion of outliers (anomalies) in the training sample.
You can specify a value in the range of
0to1. This setting automatically overrides the Detection threshold as set when the element was created. As the percentage of outliers in the training data increases, the threshold for registering an incident decreases. After training the element, you can adjust the incident registration threshold manually. - In Initialization of pseudorandom number generator, set a value for generating a pseudorandom number sequence.
- In the Resolution of training results graphs field, use a decimal value to specify the graph resolution for displaying training results on the Training results tab.
You can specify a value in the range of
0to1. The higher the value, the better the quality of the graphs. - If you assume that the tag values are centered and their mean is equal to zero, turn on Data is centered toggle switch.
- In the upper-right corner of the window, click the Save button.
If you change the learning parameters for a previously trained element, you have to confirm the changes.
- In the information block located above the training settings, click the Train element button.
After the training is complete, you can view the training results of an ML model element in the Training results tab.
After all predictive elements and elliptic envelope-based elements that are part of the ML model have been successfully trained, the model will be assigned a status of Trained. If required, you can retrain the ML model element by clicking Restart training.
Page topViewing the training results of an ML model element
You can view the results of training predictive elements and elliptic envelope-based elements.
System administrators and users who have the Train models permission from the Manage ML models group of rights can view the results of training ML model elements. The functionality is available after a license key is added.
To view the training results of an ML model element:
- In the main menu, select the Models section.
- In the asset tree, select the ML model element whose training result you want to view.
A panel with the settings of the selected element will appear on the right.
- Select the Training results tab.
If the ML model element has been successfully trained, the following information about the training results is displayed in the Training results tab:
- Message about successful completion of training of an ML model element.
If you want to view the training settings for an element that were specified during its creation, click the Training settings button.
- User: The name of the user who started training the ML model element.
- Start of training: The date and time when the Trainer service began training the ML model element.
- End of training: The date and time that training of the ML model element finished. ML model element weights have been updated by the Trainer service.
- Training interval: The time spent by the Kaspersky MLAD server for training the ML model element.
- Total training duration: The duration of data time intervals considering the markups in the training dataset.
- Number of UTG nodes: The number of UTG nodes included in the training set.
- Graphs with learning results for ML model predictive elements:
- Training and validation errors: A graph showing the training and validation errors for each training epoch.
- Model prediction: Graphs showing model predictions for the output tags and the overall prediction error.
- Graphs with learning results for ML model elliptic envelopes:
- Tag deviation—a graph showing the distance of a point, representing the state of a monitored asset at every moment in time within the phase space, from the center of the elliptical region of normal states. The orange horizontal line marks the threshold. It indicates the farthest point at which a condition can still be considered normal.
- Tag values: graphs showing the values of each tag during training.
- Tag value distribution: histograms that show the distribution of values for each tag during training.
- Tag correlation: matrix that shows relationships between tags used when training an ML model element.
Starting and stopping ML model inference
You can start or stop the inference of an ML model in a status of Trained or Published on historical or incoming telemetry data.
The functionality is available after a license key is added.
To start the ML model inference:
- In the main menu, select the Models section.
- In the asset tree, select the ML model whose inference you want to run.
A list of options appears on the right.
- Select the Inference tab.
- In the Inference type drop-down list, select one of the following values:
- Historical to run ML model inference on historical telemetry data. If you select this value, specify the data time interval for running the ML model.
- Real-time to run ML model inference on telemetry data that is being received in real time.
- Click the Start button.
When starting a historical inference on previously inferenced data, previous inference results will be deleted.
If historical inference was started, Kaspersky MLAD will add the ML model to the inference queue.
To stop the ML model inference:
- In the main menu, select the Models section.
- In the asset tree, select the ML model whose inference you want to stop.
A list of options appears on the right.
- Select the Inference tab.
- Click the Stop button.
Kaspersky MLAD will stop inference for the selected ML model.
Page topViewing the data flow graph of an ML model
You can view the data flow graph in ML models.
The functionality is available after a license key is added.
To view the data flow graph in an ML model:
- In the main menu, select the Models section.
- In the asset tree, select an ML model, for which you want to view the data flow graph.
A list of options appears on the right.
- Select the Data flow graph tab.
The ML model data flow graph is displayed on the right.
- If you need to view the settings of a graph element, move the mouse cursor over it.
A window listing the values of settings of the selected element will be displayed.
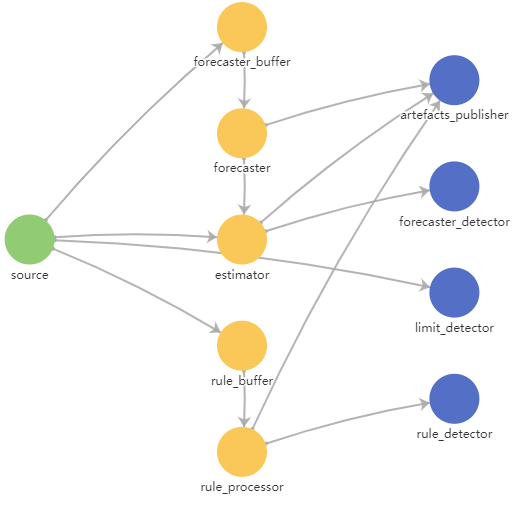
ML model data flow graph
Preparing an ML model for publication
You can prepare the model for publication after training it and checking the inference results. An ML model ready for publishing cannot be modified.
System administrators and users who have the Edit untrained models permission from the Manage ML models group of rights can prepare an ML model for publication. The functionality is available after a license key is added.
To prepare an ML model for publication:
- In the main menu, select the Models section.
- In the asset tree, select the ML model you want to prepare for publication.
A list of options appears on the right.
- Click the Prepare to publish button.
The ML model is assigned the Ready for publication status. Notify the officer responsible for publishing the ML model that it is ready, or, if you have the required permissions, publish the ML model.
To make changes to the ML model before publishing, click the Back to edit mode button. The ML model will revert to a status of Trained.
Page topPublishing an ML model
You can publish an ML model. The ML model will register incidents detected in real-time data from the monitored asset once inference begins. Recorded incidents, unlike those inferred by unpublished ML models, necessitate actions and reporting in production.
System administrators and users who have the Edit untrained models permission from the Manage ML models group of rights can publish ML models. The functionality is available after a license key is added.
To publish an ML model:
- In the main menu, select the Models section.
- In the asset tree, select the ML model that you want to publish.
A list of options appears on the right.
- Click Publish.
The ML model is assigned the Published status.
Page topRemoving an ML model
You can delete previously created and/or imported ML models from Kaspersky MLAD. You can reload a previously imported and subsequently deleted ML model, if needed.
After the ML model is removed, its artifacts, such as predictions, individual errors, prediction errors, or rule progress indicators, as well as incidents registered by the ML model, will be deleted.
System administrators and users who have the Remove models permission from the Manage ML models group of rights can remove ML models. The functionality is available after a license key is added.
To remove an ML model:
- In the main menu, select the Models section.
- In the asset tree, select the ML model to be deleted.
A list of options appears on the right.
- In the upper-right corner of the window, click .
- Confirm deletion of the ML model.
The selected ML model will be removed from Kaspersky MLAD.
Page top