Contents
- About Kaspersky Security 9.0 for SharePoint Server
- What's new
- Application architecture
- Upgrading from a previous version of the application
- Installing and removing the application
- Preparing to install
- Access rights for managing Kaspersky Security
- How to grant rights to website collections and modify the SharePoint configuration
- Creating an SQL database manually
- Features of the application installation on a SharePoint farm
- Starting the application installation
- Step 1. Viewing the License Agreement
- Step 2. Selecting the type of installation
- Step 3. Selecting components and configuring component installation
- Step 4. Creating a database on an SQL server
- Step 5. Configuring a user account for running Kaspersky Security services
- Step 6. Starting the application installation
- Changes in the system after installing the application
- Getting started
- Restoring the application
- Removing the application
- Administration
- Working with personal data of users
- Role-based access restriction in Kaspersky Security for SharePoint Server
- Modifying the additional settings of the SQL server connection string
- Application licensing
- Starting Management Console
- Adding protected servers to Management Console
- Default protection
- Participating in Kaspersky Security Network
- On-access scan
- Kaspersky Security operation depending upon the SharePoint server settings
- Enabling and disabling on-access anti-virus scanning
- Configuring basic scan settings
- Configuring object processing rules for on-access scanning
- Enabling and disabling on-access content filtering
- Enabling and disabling SharePoint web object scanning
- Creating on-access Anti-Virus scan exclusions
- Configuring additional settings for on-access content filtering
- On-access scan
- General
- Exclusions from anti-virus scan
- File mask
- Content filtering rules
- Phishing scan
- On-demand scan
- Adding an on-demand scan task
- Starting and stopping on-demand scan tasks
- Viewing a report on the results of an on-demand scan
- Saving a report on the results of an on-demand scan
- Deleting an on-demand scan task
- Selecting and excluding from on-demand scanning areas of the SharePoint structure
- Creating on-demand Anti-Virus scan exclusions
- Configuring content filtering
- Task settings – General
- On-demand scan
- Connecting the Management Console to a SharePoint farm when upgrading Kaspersky Security
- Task settings – Scan scope
- Web address
- Task settings – Schedule
- Task settings – Exclusions from anti-virus scan
- Task settings – Content filtering rules
- File mask
- Content filtering
- About the white list
- Creating the white list
- Creating, renaming, and deleting user categories of unwanted words and phrases
- Importing a list of unwanted words and phrases into a user category from a text file
- Adding, changing, and deleting unwanted words and phrases in user categories
- Creating, renaming, and deleting a set of masks for unwanted file names
- File name mask creation rules
- Changing a set of unwanted file name masks
- Content filtering
- Category name
- Keyword settings
- Set name
- File mask
- Preparing the DLP Module
- Backup
- Viewing the list of files in Backup
- Quick file search in Backup
- Extended file search in Backup
- Restoring files from Backup
- Rules for restoring files when version control is enabled in SharePoint
- Saving files from Backup to disk
- Removing files from Backup
- Purging Backup manually
- Configuring automatic Backup purging
- Backup
- Database update
- Configuring automatic database updates
- Configuring the local database update settings on SharePoint servers of the farm
- Viewing the information about updates to the anti-virus database
- Updating databases manually
- Propagating global database update settings to SharePoint farm servers
- Updates
- Updates – General
- Updates – Database update settings
- SharePoint server database update settings
- Notification delivery
- Preparing application reports
- Auditing the application operation
- Kaspersky Security events in Windows Event Log
- About the log of content filtering
- Enabling the extended event logging into the Content Filtering log
- Configuring the path to the logs folder
- Configuring the log storage term
- Configuring the detail level of event logs
- Failsafe support for SQL databases
- Settings
- Diagnostics settings window
- Managing the application using the Kaspersky Security Center
- Installing the Kaspersky Security administration plug-in
- About application activation via Kaspersky Security Center
- Updating application databases via Kaspersky Security Center
- Kaspersky Security events in Kaspersky Security Center
- Viewing SharePoint server protection status details
- Application operation statistics in Kaspersky Security Center
- Monitor the application's operation via System Center - Operations Manager
- To security officer
- About Data Leak Prevention
- Security Officer's Guide
- Assessing the status of data protection
- Using categories. Assigning data to categories
- File formats to scan
- Keywords. Making expressions using operators
- Adding a category of keywords
- Table data. Setting up the match level
- Adding a category of table data
- Quotations from documents
- Adding a category with quotations from documents
- Document templates
- Adding a category for searching for documents using templates
- About Kaspersky Lab data categories
- Changing the contents of a Kaspersky Lab category
- Editing category settings
- About exclusions from a Kaspersky Lab category
- Regular expressions
- Configuring exclusions from a Kaspersky Lab category
- Deleting a category
- Monitoring and preventing data leaks
- New Policy Wizard
- Searching for policies by users
- Adding a file to exclusions by web address
- Deleting a policy
- Categories and policies
- Settings of a category of table data
- Settings of a category of keywords
- Settings of a category with quotations from documents
- Settings of a category with document templates
- Results of adding or modifying categories of quotations from documents and document templates
- Category: <Category name>
- New Policy Wizard. Step 1
- New Policy Wizard. Step 2
- New Policy Wizard. Step 3
- New Policy Wizard. Step 4
- Policy settings – Policy
- Control scope
- Policy settings – Users
- Web address
- Policy settings – Actions
- Exclusions from a Kaspersky Lab category tab
- Searching SharePoint websites for data
- Features of incremental scan
- Enabling the incremental scanning
- Adding a search task
- Starting and stopping a data search
- Editing the search task settings
- Viewing the search results
- Saving search results
- Deleting a task
- Deleting the search results
- Search
- Task settings – General
- Task settings – Categories
- Task settings – Search scope
- Web address
- Task settings – Run mode
- Managing incidents
- Updating the list of incidents
- Changing incident details displayed in the table
- Searching for incidents using a filter
- Searching for similar incidents
- Changing the status of an incident
- Viewing incident details
- Copying incident details to the clipboard
- Archiving incidents
- Restoring incidents from the archive
- Deleting archived incidents
- Incidents
- Change status
- Incident details – Review
- Incident details – History
- Incident Archiving Wizard
- Incident Recovery Wizard
- Generating application reports
- Generating a quick report
- Adding a report generation task
- Saving reports
- Starting a report creation task
- Editing report generation task settings
- Configuring settings of the report on policy-related incidents
- Configuring the report on users
- Configuring system KPI report settings
- Configuring settings of the incident status report
- Viewing the report on policy-related incidents
- Viewing the system KPI report
- Viewing the report on users
- Viewing the incident status report
- Deleting a report
- Reports
- Main settings of the detailed report
- Main settings of the report on users
- Additional report settings
- System report settings
- Main settings of the statistical report
- Additional settings of the statistical report
- Main settings of the detailed report
- Main settings of the report on users
- System report settings
- Main settings of the report on policies
- Additional task settings
- Run mode
- Contacting the Technical Support Service
- Sources of information about the application
- Glossary
- Activating the application
- Active key
- Active policy
- Additional key
- Anti-virus databases
- Archived incident
- Archiving
- Backup
- Black list of key files
- Closed incident
- Confidential data
- Control scope
- Corporate security
- Data category
- Data leak
- Data leak prevention
- Data search
- Data subcategory
- Disinfection
- DLP Module (Data Leak Prevention)
- DLP Module status
- Document templates
- False positive incident
- File blocking
- Full scan
- Hash sum
- Incident
- Incident status
- Incremental scanning
- Infected object
- Kaspersky CompanyAccount
- Kaspersky Lab categories
- Kaspersky Lab update servers
- Kaspersky Security Network (KSN).
- Key file
- Keywords
- License certificate
- License term
- Managed device
- Management Console
- Match level
- Object removal
- On-access scan
- Opened incident
- Personal data
- Phishing
- Policy
- Policy violation
- Probably infected object
- Quotations from documents
- Search scope
- Search task
- Security Officer
- SharePoint server structure
- Skipping of an object
- System KPI (Key Performance Indicators)
- Table data
- Unwanted content
- Update
- User category
- Violation context
- Virus
- Working scenario
- Kaspersky Lab AO
- Information about third-party code
- Trademark notice
About Kaspersky Security 9.0 for SharePoint Server
Kaspersky Security 9.0 for SharePoint Server Maintenance Release 3 (hereinafter referred to as "Kaspersky Security", "the application") is designed to protect the SharePoint platform against viruses and other malware. The application lets you scan the content of websites and wiki blogs for unwanted content, protect personal data of users, and confidential corporate data on SharePoint websites against data leaks.
Kaspersky Security features:
- Scan files for malware and unwanted content in real time
- Block files containing malicious objects or unwanted content when they are accessed by users (for example, when copying the file from a SharePoint server to a computer)
- Monitor the content of blogs and wiki pages on SharePoint
- Form custom criteria of unwanted content
- Scan web addresses against lists of malicious or phishing links
- Receive anti-virus database updates from Kaspersky Lab servers during the license validity period
- Use file and link reputation data from Kaspersky Security Network services
- Run an on-demand scan of files on SharePoint
- select areas of the SharePoint structure to scan on demand, and exclude certain areas from the scan to reduce the load on the server;
- Configure the schedule and run mode of SharePoint file scan tasks
- Scan modified files only
- Move copies of infected objects to Backup before disinfecting or deleting them
- Automatically or manually generate application reports and send them to email addresses
- Define the settings for maintaining the application event logs
- Automatically send infected file notifications to email addresses
- Use the role-based access control system for accessing various application functions
- Create data categories to protect information that is valuable to the company;
- Scan file content for data of specific categories at the time when users upload files to SharePoint sites.
Distribution kit
Kaspersky Security 9.0 for SharePoint Server is supplied as part of Kaspersky Security for Collaboration Servers and Kaspersky Total Security.
You can buy the application through partner companies or Kaspersky Lab eStore.
If the application is purchased through an online store, it is downloaded from the online store's website. Information needed to activate the application, including the key file, will be emailed to you after you purchase a license.
Carefully review the End User License Agreement before installing and using the application.
Page topHardware and software requirements
Kaspersky Security has the following hardware and software requirements:
Hardware requirements
If installing Management Console and Security Server:
- For SharePoint Server 2010:
- 64-bit quad-core processor
- 4 GB RAM
- 229 MB of available disk space
- For SharePoint Server 2013:
- 64-bit quad-core processor
- 8 GB RAM
- 229 MB of available disk space
- For SharePoint Server 2016:
- 64-bit quad-core processor
- 8 GB RAM
- 229 MB of available disk space
If installing only Management Console:
- Minimum 400 MHz processor (1 GHz recommended)
- 256 MB RAM
- 176 MB of available disk space
Depending upon the application settings and its mode of operation, more disk space may be required for Backup and other service folders. DLP Module additionally requires at least 4 GB free disk space. While DLP Module is running, files and memory dumps are generated, which may require a volume of memory that would significantly exceed 4 GB.
Software requirements
Kaspersky Security supports SharePoint servers of the following versions:
- Microsoft SharePoint Server 2010;
- Microsoft SharePoint Server 2013;
- Microsoft SharePoint Server 2016.
Kaspersky Security supports the following operating systems:
If installing Management Console and Security Server:
- For SharePoint Server 2010:
- Windows Server 2008 R2 Service Pack 1;
- Windows Server 2012 R2
- For SharePoint Server 2013:
- Windows Server 2008 R2 x64 Service Pack 2
- Windows Server 2012 x64;
- Windows Server 2012 R2
- For SharePoint Server 2016:
- Windows Server 2012 R2;
- Windows Server 2016.
If installing only Management Console:
- Windows Server 2008 R2;
- Windows Server 2012 x64;
- Windows Server 2012 R2;
- Windows Server 2016;
- Windows 7 Professional Service Pack 1;
- Windows 7 Professional x64 Service Pack 1
- Windows 7 Enterprise Service Pack 1
- Windows 7 Enterprise x64 Service Pack 1
- Windows 7 Ultimate Service Pack 1
- Windows 7 Ultimate x 64 Service Pack 1
- Windows 8
- Windows 8 x64
- Windows 8.1;
- Windows 10.
The following components are required for installation of Kaspersky Security:
- Supported version of Microsoft SharePoint Server
Standalone installation of Management Console does not require Microsoft SharePoint Server
- Microsoft .NET Framework 4.5;
- Microsoft Management Console 3.0
A locally or remotely installed SQL server is required for operation of the application. The following versions of Microsoft SQL Server are supported:
- Microsoft SQL Server 2016 Express, Standard, or Enterprise;
- Microsoft SQL Server 2014 Express, Standard, or Enterprise;
- Microsoft SQL Server 2012 Express, Standard, or Enterprise.
To install the administration plug-in, you must have Kaspersky Security Center 10 Service Pack 2 Maintenance Release 1.
Page topWhat's new
Kaspersky Security now provides the following features:
- Interaction with Kaspersky Security Center:
- View information on the protection status of SharePoint servers (monitoring of the operation of the Anti-Virus, Anti-Phishing, and Content Filtering Modules, connection to the SQL database, and other aspects of the application's operation).
- View statistics on the application's operation on SharePoint servers.
- Distribute update packages for the Anti-Virus and DLP Module databases to protected SharePoint servers whose network settings block connections to external network resources.
- Monitor the versions of the Anti-Virus and DLP Module databases to make sure they are up-to-date
- Log information about the application's operation to the Kaspersky Security Center Administration Server Event Log.
To install the administration plug-in, you must have Kaspersky Security Center 10 Service Pack 2 Maintenance Release 1.
- Select servers for simultaneous on-demand scan for the purpose of distributing the load and reducing the task completion time.
- Run an on-demand scan in incremental mode, i.e. scan modified files only.
- Remove only the scanned infected versions of a file during an on-demand scan.
- Log the following events to the Windows Event Log:
- On-demand scan tasks are started or stopped.
- The application configuration is modified.
- The status of application modules is changed.
- Anti-Virus databases become outdated and there are errors when attempting to update them.
- Other application events.
- Assign a user the KSH AV Operators or KSH AV Security Officers role for the purpose of restricting application access permissions.
- Track data leaks based on the following new categories: Personal identification (Russia),U.S. Federal Law FCRA,and U.S. Federal Law GLBA.
- Track data leaks based on the Document templates and Document quotations categories that can be configured by the user.
- Add exclusions from scanning when tracking data leaks.
- Monitor the application's operation via System Center Operations Manager.
The application uses the latest versions of the Anti-Virus, Anti-Phishing, and DLP Module kernels.
Page topApplication architecture
Kaspersky Security 9.0 for SharePoint Server includes the following components:
- Management Console. This is a snap-in for Microsoft Management Console (hereinafter referred to as MMC). This component is designed for interaction with the application through an interface.
You can install Management Console separately from other application components. If you need to manage other components of the application, you can add computers with installed components to Management Console. If several administrators work concurrently, Management Console can be installed on each administrator's computer.
- Security Server. This component is designed for anti-virus protection of a SharePoint server (or server farm) and for scanning files, blogs, and wiki pages for unwanted content. Security Server is responsible for real-time protection, updating the application databases, background scanning of SharePoint servers, relaying data to Kaspersky Security Network services, and activating the application.
- DLP Module. This component is designed to protect SharePoint data against leaks. The DLP Module is part of Security Server and can be installed on a SharePoint server only together with Security Server. A separate key is required to use the DLP Module.
Some Kaspersky Security settings are stored in the memory of third-party software (Active Directory and Microsoft SQL Server). Kaspersky Security is unable to guarantee security of such data. To prevent unauthorized changes to these settings, you have to ensure their security on your own.
The figure below shows an example of application deployment within the Microsoft SharePoint Server structure.
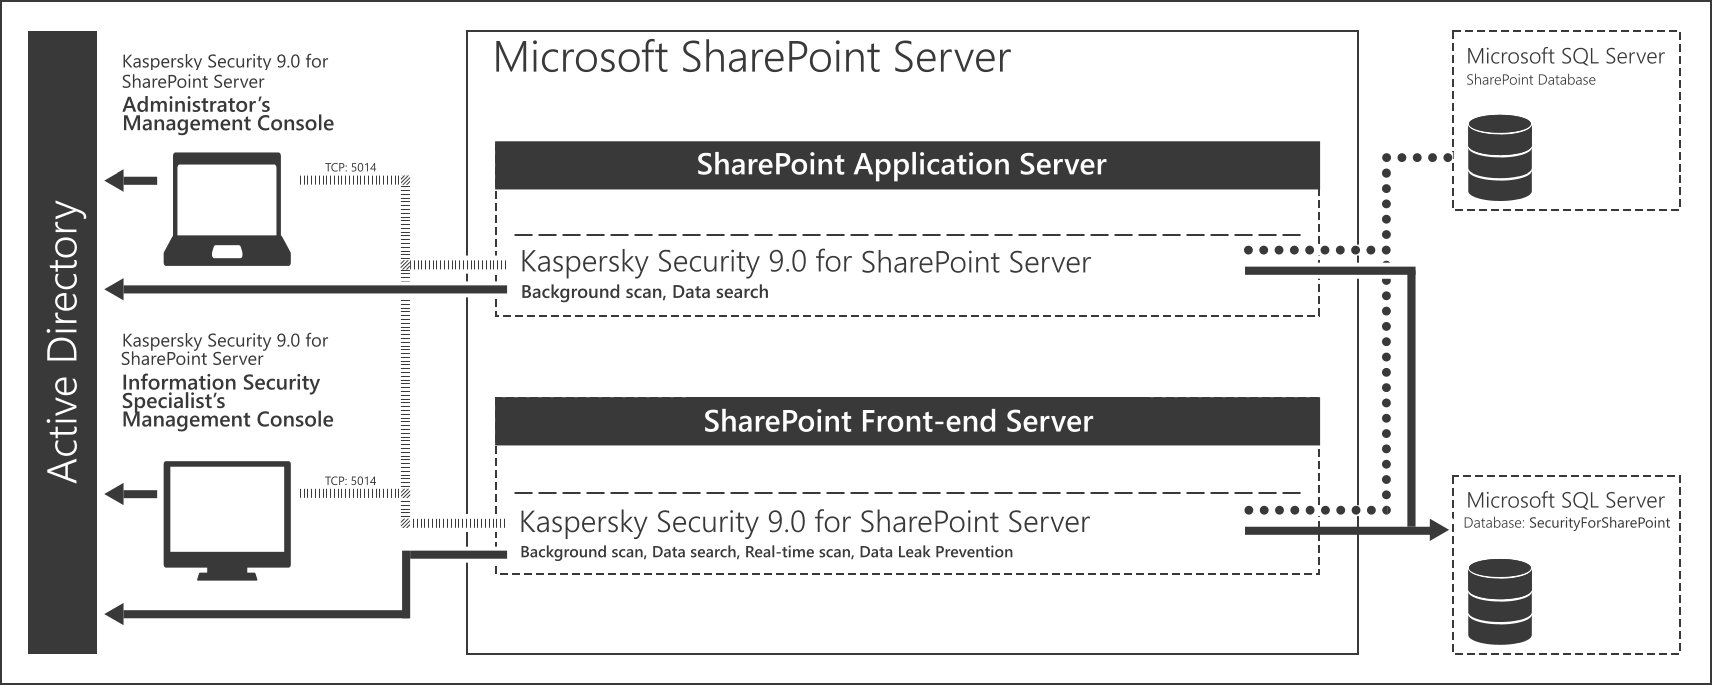
Kaspersky Security 9.0 for SharePoint Server deployment example
About information stored in the SQL database
The application saves the following information to the SQL database:
- Details of Security Server's operation:
- The component's configuration
- The component's operation statistics
- Ready reports
- Backup copies of documents.
- Details of DLP Module's operation:
- The component's configuration
- Information about user categories
- The component's operation statistics
- Ready reports
- Information about incidents (including files associated with incidents)
- Information about the progress of scan tasks.
Files associated with incidents and backup copies of documents are not encrypted. For security reasons (for example, to prevent unauthorized access or possible data leaks), you are advised to protect files in the SQL database on your own.
Information about incidents may increase the size of the database significantly. An information security specialist can archive incidents. This procedure allows minimizing the volume of data stored in the SQL database.
Page topUpgrading from a previous version of the application
This section describes the procedure for upgrading from the previous version of the application. This section includes upgrade instructions and describes the specifics of upgrading Kaspersky Security on a standalone SharePoint server and on a SharePoint server farm.
About Kaspersky Security upgrades
Kaspersky Security 9.0 Maintenance Release 2 (build 9.2.57185) can be upgraded to version 9.0 Maintenance Release 3. Upgrades of earlier application versions are not supported.
The following upgrade configurations of Kaspersky Security are available:
- Security Server and Management Console installed on a standalone SharePoint server
- Security Server and Management Console installed on a SharePoint server in a SharePoint farm environment.
- Management Console only
During the upgrade of a separately installed Management Console, tasks running on Security Server are not suspended. SharePoint server protection remains enabled.
Before upgrading Security Server for Kaspersky Security, you are recommended to complete all on-demand scan, report and database update tasks running on the server. Otherwise, these tasks are forcibly stopped prior to completion.
To run the application upgrade, the account under which Kaspersky Security is to be upgraded must have rights to handle SQL databases.
While the application is being upgraded, you may continue using the SQL database that was created in Kaspersky Security 9.0 Maintenance Release 2. If you install Kaspersky Security 9.0 Maintenance Release 3 after removing version 9.0 Maintenance Release 2, you must create a new SQL database. After removing Kaspersky Security 9.0 Maintenance Release 2, you will not be able to use the database in a new version of the application.
During the application upgrade process, Anti-Virus databases are rolled back automatically. For the safety of your computer, you are advised to start the database update after completing the application upgrade.
When the application upgrade is started, the I have read the KSN Statement and accept all of the conditions therein check box is automatically cleared in the Kaspersky Security settings. When the upgrade is complete, you can accept the KSN Statement and define the settings of KSN usage Other Kaspersky Security settings are transferred to the new version unchanged.
When upgrading Kaspersky Security 9.0 Maintenance Release 2 to version 9.0 Maintenance Release 3, failures may occur in the operation of the SharePoint Timer service. Errors in the Windows Event Log will indicate an operation failure. Text of error messages will start with the name of the SharePoint.Integration.Vsapi.Com.dll module. In this case, you will have to restart the SharePoint Timer service. The SharePoint Timer service must be restarted on all the servers on which Kaspersky Security is installed.
Page topTips for upgrading Kaspersky Security on a SharePoint farm
When upgrading Kaspersky Security on a SharePoint server farm, it is recommended that you complete the upgrade in the shortest possible time frame.
When upgrading Kaspersky Security on a SharePoint server farm, it is not recommended to perform any operations with the application until the upgrade has been completed on all SharePoint farm servers.
If you need to resume using the application before an upgrade is completed on a SharePoint server farm, the version number of Security Server should comply when being added to Management Console. You can add Security Server of the previous version to Management Console that has not yet been upgraded, or you can add Security Server of the new version to the upgraded instance of Management Console.
However, Security Server that has not yet been upgraded cannot be added to the upgraded instance of Management Console.
Page topUpgrading Kaspersky Security on a standalone SharePoint server or the first server in a SharePoint farm
When upgrading Security Server and Management Console on the first server in a SharePoint server farm, or on a standalone SharePoint server, the following items are transferred to the new version:
- Active key and additional key that have been added before the application upgrade. The respective validity periods of the keys remain unchanged.
- Settings of Kaspersky Security that have been defined before the application upgrade.
- Objects moved to Backup before the application upgrade.
- Reports created before the application upgrade.
The application uses the application log to save the operation data of the Security Server version that has not yet been upgraded.
Operation statistics of Security Server that have been collected before the application upgrade, will not be saved nor displayed in the Control Center node. Reports that have been created after the application upgrade, will not contain any information about the application's activity before the upgrade.
If you modify any settings of the upgraded Security Server on the first server in a SharePoint server farm, the settings that have been modified will be applied to other SharePoint servers. Security Servers that have not yet been upgraded continue running under the settings defined before the upgrade start.
Page topStarting the application upgrade
The user account under which the application upgrade will be run must be granted the rights to access the SQL database.
Before starting the upgrade of Kaspersky Security, Management Console must be closed on the computer from which the upgrade will be started.
To upgrade Kaspersky Security:
- Run the setup.exe file from the application's distribution package on the computer on which you want to upgrade Kaspersky Security.
This opens the welcome window of the install package.
- Click the Kaspersky Security 9.0 for SharePoint Server link in welcome window to launch the Setup Wizard.
- Click the Install button in the welcome screen of the Setup Wizard.
The automatic upgrade of the application now starts. When the upgrade completes, the final screen of the Setup Wizard opens.
- To complete the upgrade and close the Setup Wizard, click the Finish button.
The upgrade completes. When the upgrade of Kaspersky Security 9.0 Maintenance Release 2 to version 9.0 Maintenance Release 3 is complete, you need to restart SharePoint Timer.
SharePoint server protection is disabled during the upgrade because all services under the application are stopped until the upgrade of Security Server for Kaspersky Security completes.
During Kaspersky Security installation, the Setup Wizard adds the account of the computer running the installation to the KSH Administrators group in Active Directory. You will have to add the computer account to the KSH Administrators group if you need to manage Kaspersky Security through Kaspersky Security Center.
Page topRestarting the SharePoint Timer service
SharePoint Timer needs to be restarted after Kaspersky Security 9.0 Maintenance Release 2 is upgraded to version 9.0 Maintenance Release 3. The SharePoint Timer service must be restarted on all the servers on which Kaspersky Security is installed.
To restart the SharePoint Timer service:
- Run Windows PowerShell on behalf of the administrator.
- In the PowerShell environment, run the
Add-PSSnapin Microsoft.SharePoint.PowerShellcommand.The Windows PowerShell snap-in will be added.
- Run the
Get-SPTimerJob job-timer-recycle | Start-SPTimerJobcommand.
SharePoint Timer will be restarted.
Page topInstalling and removing the application
This section provides instructions on how to install and remove the application, as well as information about system changes after installation of the application.
Preparing to install
Before preparing your computer for Kaspersky Security installation, make sure that the hardware and software on your computer meet the requirements for the Security Server and Management Console.
To prepare your computer for Kaspersky Security installation:
- Install all of the components required for the Kaspersky Security operation (if they are still missing):
- Microsoft .NET Framework 4.5;
- Microsoft Management Console 3.0
The computer must be restarted after Microsoft .NET Framework 4.5 installation. Continuing the application installation without restart may cause failures in the Kaspersky Security operation.
If Microsoft SharePoint Server is not installed on the computer, the application prompts you to install Management Console alone. In this case, the Security Server and the DLP Module cannot be installed on this computer.
- Create an account to run Kaspersky Security services and grant it all the relevant rights.
- Create an account under which Kaspersky Security installation will be run, and grant it all the relevant rights.
If no access rights for the SharePoint_Config and SharePoint_AdminContent_<GUID> databases are provided, the anti-virus settings of the SharePoint server cannot be defined. At the final stage of the installation, when the files are being copied and the components registered, an error message appears. When the error message appears, click the Ignore button in the dialog box and, when the installation finishes, reboot the ISS server using the command iisreset / restart.
- If necessary, create a database manually to store Backup configuration files and data.
If the user account intended to handle the SQL database has been assigned the sysadmin role on the SQL server on which the database is to be created, you can skip this step. If these rights have been granted, the database will be created by the Application Installation Wizard automatically.
Kaspersky Security does not provide channel encryption during data transmission between the server and the SQL database. To secure your data, manually encrypt data to be transmitted over communication channels.
- Create an account for SQL database preparation and grant it all the relevant rights.
- In Active Directory, create groups for role-based access to Kaspersky Security features. These groups can be created in any of the organization's domains. The group type is "Universal". Group names:
- Ksh Administrators;
- Ksh AV Security Officers;
- Ksh AV Operators;
- Ksh Security Officers.
If the account under which Kaspersky Security is to be installed, has the rights to create groups in Active Directory, you can skip this step. The groups will be created automatically during the application installation.
- Create an account for managing Kaspersky Security and grant it all the relevant rights.
Kaspersky Security cannot be managed without those rights.
Management Console connects to the Security Server over TCP using port 5014. The port must remain open to allow management of the Security Server.
Upon finishing your installation preparations, you can proceed to Kaspersky Security installation.
Access rights for managing Kaspersky Security
Kaspersky Security installation and management are based on the access rights granted to the account under which all actions on the application are performed. The rights required for various actions with Kaspersky Security are listed below.
Rights for Kaspersky Security
The account under which Kaspersky Security services will be run, must have the following set of rights:
- Local administrator rights on the SharePoint servers on which Kaspersky Security is to be installed
- Rights to modify the SharePoint configuration
- Rights to website collections that require protection using Kaspersky Security
You can grant rights to modify the SharePoint configuration and rights to website collections that require protection using one of two methods: manually or with a script.
Rights for installing Kaspersky Security
The account under which you run the application installation, must have the following set of rights:
- Local administrator rights on the computer on which Kaspersky Security is to be installed
- Rights for creating groups in Active Directory
Without the rights for creating groups in Active Directory, the application cannot create role-based control groups automatically. If these rights have not been granted to the account, you have to create role-based control groups manually.
- using rights for SQL database preparation.
Rights for SQL database preparation
Kaspersky Security uses the SQL database to store Backup configuration files and data. You can provide the account selected for SQL database preparation with access to the database using one of the following methods:
- Assign the account the sysadmin role on the SQL server (on which a database for Kaspersky Security management already exists or is to be created).
Users with the sysadmin role can perform any actions on the SQL server. If the user account has been assigned the sysadmin role, the database is automatically created under this user account when installing the application.
- Assign the account the db_owner role for a database that was created manually.
If the database was created manually before the application installation, you will need to specify this database in the SQL server connection settings during the application installation. Users with the db_owner role can perform any actions on the database.
The account intended for SQL database creation and preparation will be used only when the Application Installation Wizard is running. It will not be used after installation of Kaspersky Security is complete.
Rights for managing Kaspersky Security
The user account under which Kaspersky Security will be managed must have read-write permissions to <application installation folder>\Configurations. By default, the account that has been granted the local administrator rights on the computer, has the read/write access in this folder.
In addition, the user account under which the Management Console is run must be added to the Active Directory group that defines the application user role.
Kaspersky Security cannot be managed without these rights.
Page topHow to grant rights to website collections and modify the SharePoint configuration
To ensure the proper functioning of Kaspersky Security, the user account under which Kaspersky Security will be run must be granted rights to modify the SharePoint configuration, as well as rights to website collections that need to be protected. Listed below are the methods of granting those rights to a user account.
Granting rights manually
You can grant rights manually through Microsoft SQL Server Management Studio or Microsoft SQL Server Management Studio Express.
The user account must be assigned the following:
- db_owner role for the SQL database, which contains the SharePoint configuration (by default, SharePoint_Config database).
- db_owner role for the SQL database, which contains the SharePoint configuration contents (by default, SharePoint_AdminContent database).
- SiteCollection Administrator rights to each of the website collections that need to be protected.
These rights can be granted, for example, through the SharePoint admin center or the SharePoint command console.
- db_owner role for each SQL database with a website collection that needs to be protected.
Granting rights using a script
Use of scripts lets you automate the process of granting a user account the rights to website collections.
You can run the following scripts using Windows PowerShell:
- script for granting rights to modify the SharePoint configuration:
Add-SPShellAdmin -UserName <domain\KSH_User> - script for granting rights to each website collection that needs to be protected:
$wa = Get-SPWebApplication <http://WebApp.domain.com>$wa.GrantAccessToProcessIdentity(<domain\KSH_User>)$wa.Update()Where:
http://WebApp.domain.comis the web address or GUID of the web application on the SharePoint portal.domain\KSH_Useris the user account name created for managing Kaspersky Security.You must run this script for each web application on which SharePoint website collections are located.
Creating an SQL database manually
To create an SQL database manually, run the following SQL script:
CREATE DATABASE [<database name>]
ON PRIMARY
(
NAME = [<name of database>_
<logical name of the primary data file> ],
FILENAME = '<full path to the primary data file>'
),
FILEGROUP [<name of database>_BACKUP_DATA_FILE_GROUP]
(
NAME = [<name of database>_BACKUP_DATA_FILE_GROUP],
FILENAME = 'full path to the secondary data file'
)
To manage the database that has been created manually, you must grant the relevant access rights to the account intended for database preparation.
Page topFeatures of the application installation on a SharePoint farm
When Kaspersky Security is installed on a SharePoint farm, the application needs to be successively installed on all the SharePoint farm servers. When the installation completes on the first SharePoint farm server, you can use the Configuration Wizard to perform the initial setup of the application. The installation of Kaspersky Security on the other SharePoint farm servers uses the initial settings configured during installation of the application on the first SharePoint farm server.
The process of Kaspersky Security installation is accompanied by the Setup Wizard. The Setup Wizard will prompt you to configure the installation settings. Follow the Wizard's instructions.
Page topStarting the application installation
Kaspersky Security installation on a computer is performed by the Setup Wizard. The Wizard interface contains a sequence of windows (steps). You can switch between windows in the Setup Wizard by clicking the Back and Next buttons.
To close the Setup Wizard, click the Finish button. To stop the Setup Wizard at any step, click the Cancel button.
To install Kaspersky Security:
- Run the setup.exe file included in the Kaspersky Security distribution package.
The Setup Wizard will run.
- Follow the Setup Wizard instructions.
When the Setup Wizard is complete, Kaspersky Security will be installed.
During Kaspersky Security installation, the Setup Wizard adds the account of the computer running the installation to the KSH Administrators group in Active Directory. You will have to add the computer account to the KSH Administrators group if you need to manage Kaspersky Security through Kaspersky Security Center.
Step 1. Viewing the License Agreement
The End User License Agreement is an agreement between the application user and AO Kaspersky Lab. By selecting the I accept the terms of the License Agreement check box, you are confirming that you read the End User License Agreement and accepted its terms and conditions. You can print the text of the License Agreement by clicking the Print button.
After you accept the License Agreement, you can proceed to the next step of the Setup Wizard by clicking the Next button.
Page topStep 2. Selecting the type of installation
You can select one of the following application installation types:
- Typical. By default, the application installs two Kaspersky Security components: Security Server and Management Console. The DLP Module will not be installed. The application files will be copied to the default application installation folder and the default data storage folder. If you select this installation type, the Wizard proceeds to Creating the database.
- Custom. You can manually select the application components that will be installed on your computer, as well as specify the application installation folder and the data storage folder. If you select this installation type, the Wizard proceeds to Select components.
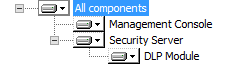
Step 3. Selecting components and configuring component installation
At this step, you can select the application components that you need to install. Click ![]() to add or exclude an application component to be installed on your computer. The following options are available for component installation:
to add or exclude an application component to be installed on your computer. The following options are available for component installation:
- Management Console, Security Server, and DLP Module (see the figure below)
Component tree appearance with all the application components installed
- Management Console and Security Server (see the figure below)
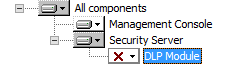
Component tree appearance with the DLP Module excluded from installation
- Management Console (see the figure below)
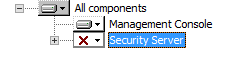
Component tree appearance with Security Server excluded from installation
The Management Console can be installed on a different computer for remote management of a Security Server of Kaspersky Security.
To configure component installation:
- In the Destination folder field, specify the path to the application installation folder. You can specify a path manually, or select one by clicking the Browse button.
By default, the application will be installed to C:\Program Files (x86)\Kaspersky Lab\Kaspersky Security for SharePoint Server\.
- In the Data storage folder field, specify the path to the folder, which will store application logs and databases. You can specify a path manually, or select one by clicking the Browse button.
By default, the application will save data to C:\Program Files (x86)\Kaspersky Lab\Kaspersky Security for SharePoint Server\data\.
If you need to discard the settings you defined and return to the default settings, click the Reset button.
- Click the Disk Usage button if you want to view information about free space available on local drives required to install the selected components.
The window that opens displays information about local drives.
To continue to the next step of the Setup Wizard, click the Next button.
Page topStep 4. Creating a database on an SQL server
To create a database on an SQL server:
- In the Name of SQL server field, specify the name (or IP address) of the computer with SQL server installed, and the name of the SQL server, for example, MYCOMPUTER\SQLEXPRESS.
Click the Browse button located next to the Name of SQL server field to select SQL servers that are available in the network.
If the connection is to a remote SQL server, make sure that the SQL server is enabled to support TCP/IP as a client protocol.
- In the Database name field, specify the name of the database where the application will store Backup data, statistics, and application configuration details.
The user account that starts the Setup Wizard must have the rights to prepare the SQL database.
You can use any of the following databases for handling the application:
- Database created in advance by the SQL server administrator;
- Database created automatically by the Setup Wizard
When installing Kaspersky Security on a SharePoint server farm, you have to ensure integration of all servers on which the application is installed with the same SQL database. To this end, identical values must be specified in the Name of SQL server and Database name fields when you install the application on all farm servers.
- In the Additional connection parameters field, specify the additional settings for connecting the Backup and statistics database to the SQL server.
Optional field. For a description of the SQL server connection string settings, you can refer to the Microsoft website via the following link: connection string settings. After installation, you can also edit the connection string settings in the configuration file.
Example:
Connection Timeout=30;Integrated Security=SSPI; MultiSubnetFailover=true
In the Additional connection parameters field, it is not recommended to specify the
Data SourceandDatabasesettings because they are defined in the Name of SQL server and Database name fields. - To finish the database configuration and proceed to the next step of the Setup Wizard, click the Next button.
Kaspersky Security does not provide channel encryption during data transmission between the server and the SQL database. To secure your data, manually encrypt data to be transmitted over communication channels.
Page topStep 5. Configuring a user account for running Kaspersky Security services
For a proper functioning of the application, the user account under which Kaspersky Security services will be run must have required rights.
To configure a user account for running Kaspersky Security services,
specify the name and password of a user account in the Account and Password fields in the Setup Wizard window, or select a user account by clicking the Browse button.
To proceed to the final step of the Setup Wizard, click the Next button.
Page topStep 6. Starting the application installation
To start installation of the application,
click the Install button.
It will initiate copying of the application files to the computer and registration of the components in the system. Once the files are copied and the components are registered, the Setup Wizard will display a notification informing about completion of the application installation.
To finish the application installation,
click the Next button.
The application installation is finished, and the Setup Wizard window closes.
If the application is installed on a standalone SharePoint server or the first server in a SharePoint farm, the Configuration Wizard starts automatically. The Configuration Wizard allows you to specify the initial application settings: activate the application, enable SharePoint server protection, and configure application database updates.
Page topChanges in the system after installing the application
When Kaspersky Security is installed on the computer, the following changes are made:
- Kaspersky Security folders are created.
- Kaspersky Security are registered.
- Kaspersky Security keys are registered in the system registry.
In special cases, the application behavior can be modified by means of configuration files that need to be saved in the application folder. Contact Technical Support for more details.
Kaspersky Security folders
Kaspersky Security folders created on the computer
Default folder |
Kaspersky Security files |
|---|---|
In the Microsoft Windows 32-bit version: %ProgramFiles%\Kaspersky Lab\Kaspersky Security for SharePoint Server\
|
Executable files, configuration, and logs in Kaspersky Security. |
|
Updatable data of Kaspersky Security |
C:\ProgramData\Microsoft\Windows\Start Menu\Programs\Kaspersky Security for SharePoint Server\ |
Shortcuts of Management Console, Administrator's Guide, Kaspersky Security Uninstaller, and IFilter utility. |
C:\Windows\assembly\GAC_MSIL\SharePoint.Integration.Vsapi.Com |
File to integrate Kaspersky Security with SharePoint servers. |
Kaspersky Security services
Kaspersky Security services
Service |
Purpose |
|---|---|
KSHSecurityService |
The main service of Kaspersky Security; it manages tasks and working processes of Kaspersky Security. |
KSHAdministrationService |
Service to ensure Kaspersky Security management. |
System registry keys
System registry keys
Key |
Purpose |
|---|---|
[HKEY_LOCAL_MACHINE\SOFTWARE\Microsoft\Shared Tools\Web Server Extensions\AVScanner] |
Registration of the Anti-Virus with SharePoint |
[HKEY_LOCAL_MACHINE\SOFTWARE\Classes\CLSID\{2D4428D8-63EB-41f4-97C9-B8E240B6ED58}] |
Configuration of the Anti-Virus for SharePoint |
|
Kaspersky Security configuration settings |
|
Microsoft Management Console snap-in for Management Console |
HKEY_LOCAL_MACHINE\SYSTEM\CurrentControlSet\services\eventlog\Application\KSHSecurityService HKEY_LOCAL_MACHINE\SYSTEM\CurrentControlSet\services\eventlog\Application\KSHAdministrationService |
Sources of event records in Windows Event Log |
[HKEY_LOCAL_MACHINE\SYSTEM\CurrentControlSet\services\KSHAdministrationService] [HKEY_LOCAL_MACHINE\SYSTEM\CurrentControlSet\services\KSHSecurityService] |
Kaspersky Security services |
Getting started
If the application was installed on a standalone SharePoint server or the first server in a SharePoint farm, the Application Configuration Wizard starts automatically after the Setup Wizard has finished.
The Configuration Wizard allows you to specify the initial application settings: activate the application, enable SharePoint server protection, and configure application database updates.
If you are installing the application on the remaining servers of a SharePoint farm, the Application Configuration Wizard will not be started. Kaspersky Security on these SharePoint farm servers uses the settings defined in the Application Configuration Wizard during setup on the first server of the SharePoint farm.
You can close the Application Configuration Wizard by clicking the Cancel button in the welcome window of the Application Configuration Wizard, and perform the necessary configuration after starting Kaspersky Security.
Step 1. Activating the application
To activate the application:
- Click the Add button in the Application Configuration Wizard.
- In the window that opens, specify the path to the key file (a file with the .key extension) and click the Open button.
The key corresponding to the license that entitles the owner to use the entire functionality of Kaspersky Security for the specified time period will be added in the product then.
The key added during installation on the first SharePoint farm server is automatically used to install the application on subsequent SharePoint farm servers.
To remove the key,
click the Delete button in the Application Configuration Wizard.
Page topStep 2. Enable Anti-Virus protection
To configure the anti-virus protection settings for a SharePoint server or servers:
- Select the Enable anti-virus protection check box to enable anti-virus scanning of files as they are uploaded to the server or downloaded from the server to the user's computer.
If, when configuring the application on the first server of a SharePoint farm, you enable protection of this SharePoint server, protection of the remaining servers in the same SharePoint farm will automatically be enabled immediately after Kaspersky Security installation is complete on those servers.
- Select the Enable automatic database updating check box if you want the application to update the anti-virus databases automatically as scheduled, or clear the check box if you want to run updates of the databases manually.
Step 3. Participating in Kaspersky Security Network
In the Use of Kaspersky Security Network window, you can view the Statement on the use of Kaspersky Security Network services for protection of your computer.
Kaspersky Security Network (KSN) is an infrastructure of cloud services providing access to Kaspersky Lab's online knowledge base with information about the reputation of files, web resources, and software. The use of data from Kaspersky Security Network ensures faster responses by Kaspersky Lab applications to threats, improves the effectiveness of some protection components, and reduces the risk of false positives.
To participate in Kaspersky Security Network,
select the I accept the Kaspersky Security Network Statement and want to use KSN services for protection check box if you have read the KSN Statement and accepted all of its conditions.
Page topStep 4. Configuring the proxy server settings
In the Configuring proxy server to retrieve updates and connect to Kaspersky Security Network window of the Application Configuration Wizard, you can define the proxy server settings for Kaspersky Security.
To configure the proxy server settings, perform the following steps:
- Select the Use proxy server check box if you want the application to connect to Kaspersky Lab update servers via a proxy server.
- Specify the proxy server address in the Proxy server address field.
- Specify the proxy server port number in the Port field.
The default port number is 8080.
- If a password is required to access the proxy server, specify the proxy user authentication settings. To do this, select the Use authentication check box and fill in the Account and Password fields.
The application uses the specified proxy server to retrieve updates and connect to Kaspersky Security Network
To finish configuration of the application and proceed to the final step in the Configuration Wizard, click the Next button.
Page topStep 5. Completing application configuration
To stop the application configuring:
- If you want Kaspersky Security Management Console to run automatically after closing the Configuration Wizard, leave the Start Management Console after the Application Configuration Wizard finishes check box selected.
- To finish the configuration of the application and exit the Configuration Wizard, click the Finish button.
The Configuration Wizard closes. If the Start Management Console after the Application Configuration Wizard finishes check box has been selected, Management Console starts as soon as the Configuration Wizard closes.
Restoring the application
If the application malfunctions (due to a damaged executable file of the application or the application databases, or a fault in the operation of VS API interceptor), you can restore the application using the Setup Wizard.
During restoration, the installer replaces the executable files and libraries used by Kaspersky Security with the files contained in the Distribution, application databases – databases in the Distribution, and replaces the registration of VS API interceptor.
The application's configuration and event logs are saved during the restoration process.
To restore Kaspersky Security:
- Launch the setup.exe file from the application distribution package.
This opens the welcome window of the install package.
- Click the Kaspersky Security 9.0 for SharePoint Server link in welcome window to launch the Setup Wizard.
- Click the Next button in the welcome screen of the Setup Wizard.
This opens the Modify, recover, or remove application window.
- In the Change, Repair or Remove the application window, click the Restore button.
This opens the Restore window.
- In the Restore window, click the Repair button.
The process to replace the executable files, libraries, and databases of the application and register VS API interceptor begins.
Restoration of the application will not be possible if its configuration files are damaged. Removing and reinstalling the application is recommended in that case.
Page topRemoving the application
You can delete Kaspersky Security from the computer using:
- Standard Microsoft Windows tools to install/uninstall applications.
- Using the Setup Wizard.
To uninstall Kaspersky Security from the SharePoint farm, the application must be deleted from each SharePoint farm server.
To uninstall Kaspersky Security using the Setup Wizard:
- Launch the setup.exe file from the application distribution package.
This opens the welcome window of the install package.
- Click the Kaspersky Security 9.0 for SharePoint Server link in welcome window of the install package to launch the Setup Wizard.
This opens the start window of the Setup Wizard.
- In the start window of the Setup Wizard, click the Next button.
- In the Modify, recover, or remove application window click the Remove button.
- In the Remove window, confirm your choice by clicking the Remove button.
The process of removing application files from the computer and unregistering application components begins.
- If you are removing the application from a standalone SharePoint server or from the last server of a SharePoint farm, once the files have been removed a window appears prompting you to delete the application database. Select one of the following operations in this window:
- If you want to delete the database containing the application configuration, Backup and statistical data, click Yes.
To delete the database, the account under which the removal process is running must possess the db_owner role for this database. If the account does not possess this role, in the window that appears clickNo. When Kaspersky Security is uninstalled, you need to delete the database manually.
- If you choose not to delete the database so that you can use the database for a future re-installation of the application, click the No button.
- If you want to delete the database containing the application configuration, Backup and statistical data, click Yes.
Administration
This Help section is intended for specialists who perform Kaspersky Security installation and administration, as well as for those who provide technical support to organizations that use Kaspersky Security.
Information in this section is arranged in accordance with the interface of Kaspersky Security Management Console.
Working with personal data of users
Kaspersky Security processes the following personal data of users to perform its basic functions:
- Active Directory accounts.
The application checks Active Directory accounts to implement the role-based user access control for the application features and services.
- Contents of files downloaded from / uploaded to SharePoint servers, and contents of blogs and wiki pages on SharePoint.
The application checks the listed objects to provide anti-virus protection, anti-phishing protection, content filtering, and data leak prevention in accordance with the defined settings.
The original objects that have triggered one of the protection components are saved in the application database. This enables to restore deleted objects via Backup.
Texts contained in processed objects may be saved on the Security Server if the administrator has enabled detailed logging of events to application logs. This information can be used to provide technical support.
- Metadata of Backup objects.
The metadata of objects that have triggered one of the protection components is saved in the application database. This enables to restore deleted objects via Backup.
Metadata of objects may be transmitted to Kaspersky Security Center as part of information on application events if your organization uses this software solution.
Metadata of objects is also saved in the application log, which is required for provision of technical support.
Metadata of Backup objects may contain the following personal data of users:
- Account name and user name of the user who performed the operation that resulted in the file being placed in Backup.
- Account name and email address of the file creator.
- Account name and email address of the user who made the latest modifications to the file.
- File name
- File path.
The listed data is also saved in the file named backup.csv when the list of Backup objects is exported.
- Email addresses of the recipients of notifications and reports.
The email addresses of the recipients of notifications and reports about application operation are saved in the application database along with other values of protection settings.
- Details of incidents associated with the violation of data leak prevention (DLP) policies.
Details of incidents are stored in the application database and logs.
Depending on the defined settings, incidents may contain personal data of any type. By default, the "Statistics by users" report indicates the names of user accounts that have violated DLP policies.
- Personal data contained in application settings.
Application settings are saved in the application database, in application logs, and in the Windows Event Log. Depending on the modifications that were made, this information may contain the following personal data of users:
- Account names of users who modified application settings.
- Account names, email addresses, and user names of users who performed actions with files or web objects of SharePoint.
- Account names of users for whom DLP policies have been set, and of users who have been excluded from a policy scope.
- Any other personal data specified by the security officer in the settings of DLP categories and policies.
- Organization representative information.
Information on the contact person of the organization that signed the End User License Agreement is used to validate the license. Depending on the application configuration, such information is stored either in Active Directory or locally on the Security Server.
The table below presents the specifics of storing the listed data.
Specifics of storing personal data of users in Kaspersky Security
Component that uses personal data |
Data storage location |
Data storage period |
Data security |
|---|---|---|---|
Configuration files |
<Application setup folder>\Configuration |
Indefinite. |
When working with the Kaspersky Security Management Console, data is secured through role-based restrictions of user access to functions and services of the application. The Kaspersky Security administrator and security officer must personally ensure the security of this data. |
SQL database specified during application installation. |
Indefinite, unless otherwise restricted by the SQL server administrator. |
||
Backup |
SQL database specified during application installation. |
Indefinite, unless otherwise restricted by the Kaspersky Security administrator or SQL server administrator. |
|
Application reports and statistics |
SQL database specified during application installation. |
Indefinite, unless otherwise restricted by the SQL server administrator. |
|
Reports in viewing mode |
%Temp% |
Until the application is restarted. |
|
Audit and event log |
<Application setup folder>\logs |
365 days, unless a different value is set by the Kaspersky Security administrator. |
|
DLP Module (settings of categories and policies, incidents) |
SQL database specified during application installation. |
Indefinite, unless otherwise restricted by the SQL server administrator. |
|
Temporary files |
%Temp% <Application setup folder>\data\temp |
Until the application is restarted or until termination of the operation that is using temporary files. |
You can restrict handling of personal data of users by the application as follows:
- Change the storage term for application logs.
- Configure automatic purging of Backup or manually purge it when necessary.
- Remove objects from Backup.
- Monitor the list of recipients of notifications and reports about application operation.
- Monitor the operation of the DLP Module.
- If you need to change the contact person of your organization, please contact the license provider.
Role-based access restriction in Kaspersky Security for SharePoint Server
Kaspersky Security for SharePoint Server allows you to apply role-based access to manage users. A unique group of access rights corresponds to each of the roles in Kaspersky Security. Roles allow you to grant users rights to use Kaspersky Security depending on their respective tasks.
A role is assigned to a user by adding the user account to an Active Directory group. A user can combine multiple roles. In this case, the account must be added to the Active Directory groups, which correspond to those roles. The user will be granted access rights in accordance with the roles assigned.
The table below shows the names and descriptions of roles, names of Active Directory groups corresponding to those roles, and a list of nodes, which are displayed in the Management Console for each role.
Description of roles in Kaspersky Security
Role |
Description |
Active Directory group |
Nodes in Management Console |
Administrator |
Members of this group have top-priority rights to use Kaspersky Security for SharePoint Server. Members of this group monitor the operation of Kaspersky Security components, application database updates, and the protection status on SharePoint servers. Members of this group can grant other users restricted rights to use Kaspersky Security. |
Ksh Administrators |
|
Anti-Virus Security Officer |
Members of this group have rights to view the protection status on SharePoint servers and generate application reports. Members of this group also have restricted rights to handle objects that have been moved to Backup. Member of this group can view the application configuration, but they have no rights to edit or save the settings. |
Ksh AV Security Officers |
|
Security Officer |
Members of this group have rights to manage data leakage protection through Kaspersky Security. Rights of this group do not intersect rights of other groups. |
Ksh Security Officers |
|
Anti-Virus Security Operator |
Members of this group have minimum rights to use Kaspersky Security. Members of this group can view the protection status on SharePoint servers and generate application reports. |
Ksh AV Operators |
|
You can create Active Directory groups manually before installing Kaspersky Security. If the account under which Kaspersky Security is being installed, has the rights to create groups in Active Directory, groups will be created automatically when installing the application. In this case, the user account under which the application is installed will be automatically added to the Ksh Administrators and Ksh Security Officers groups. If groups are automatically created in Active Directory, the Ksh Administrators group has rights to edit Ksh AV Security Officers and Ksh AV Operators.
Role assignment in Kaspersky Security through Active Directory groups applies to all servers of the SharePoint farm.
Page topModifying the additional settings of the SQL server connection string
You can change the additional settings of the SQL server connection string. When the application is installed, data in the SQL server connection string is saved in the following configuration file in XML format:
<application setup folder>\Configuration\BackendDatabaseConfiguration2.config
To change the additional settings of the SQL server connection string:
- Open the SQL server configuration file in a text editor.
- Find the tag named
AdditionalConnectionParameters.When the application is installed, the value of this setting is automatically defined by the application based on the information provided by the administrator.
- Use the text editor to make the necessary changes to the SQL server connection settings.
For a description of the SQL server connection string settings, you can refer to the Microsoft website via the following link: connection string settings.
In the Additional connection parameters field, it is not recommended to define the SqlServerName and DatabaseName settings because they are already defined in the Name of SQL server and Database name fields.
- Save the file.
Changes made to the configuration file become effective within one minute.
Page topApplication licensing
This section provides information about general concepts related to the application licensing.
About the End User License Agreement
The End User License Agreement is a binding agreement between you and Kaspersky Lab AO, stipulating the terms on which you may use the application.
Carefully review the terms of the License Agreement before using the application.
You can view the terms of the License Agreement in the following ways:
- During installation of Kaspersky Security.
- By reading the license.txt file. This file is included in the application's distribution kit.
By confirming that you agree with the End User License Agreement when installing the application, you signify your acceptance of the terms of the End User License Agreement. If you do not accept the terms of the End User License Agreement, you must abort application installation and must not use the application.
Page topAbout the license
A license is a time-limited right to use the application, granted under the End User License Agreement.
A license entitles you to the following kinds of services:
- Use of the application in accordance with the terms of the End User License Agreement
- Technical support
The scope of services and application usage term depend on the type of license under which the application is activated.
The following license types are provided:
- Trial – a free license intended for trying out the application.
A trial license is of limited duration. When the trial license expires, all Kaspersky Security features become disabled. To continue using the application, you need to purchase a commercial license.
You can activate the application under a trial license only once.
- Commercial – a pay-for license that is provided when you buy the application.
When the commercial license expires, the application continues running with limited functionality (for example, Kaspersky Security database updates are not available). To continue using Kaspersky Security in fully functional mode, you must renew your commercial license.
We recommend renewing the license before its expiration to ensure maximum protection of your computer against security threats.
Page topAbout the license certificate
License Certificate is a document provided together with a key file or activation code.
The License Certificate contains the following license information:
- Order ID;
- Details of the license holder
- Information about the application that can be activated using the license
- Limitation on the number of licensing units (devices on which the application can be used under the license)
- License start date
- License expiration date or license validity period
- License type.
About the key
A key is a sequence of bits with which you can activate and subsequently use the application in accordance with the terms of the End User License Agreement. A key is generated by Kaspersky Lab.
You can add a key to the application by using a key file. After you add a key to the application, the key is displayed in the application interface as a unique alphanumeric sequence.
Kaspersky Lab can black-list a key over violations of the End User License Agreement. If the key has been black-listed, you have to add a different key to continue using the application.
A key may be an "active key" or an "additional key".
An active key is the key that is currently used by the application. A trial or commercial license key can be added as the active key. The application cannot have more than one active key.
An additional key is a key that entitles the user to use the application, but is not currently in use. An additional key automatically becomes active when the license associated with the current active key expires. An additional key may be added only if the active key is available.
A key for a trial license can be added only as the active key. A trial license key cannot be installed as the additional key.
Page topAbout the key file
A key file is a file with the .key extension that you receive from Kaspersky Lab. Key files are designed to activate the application by adding a key.
You receive a key file at the email address that you provided when you bought Kaspersky Security or ordered the trial version of Kaspersky Security.
You do not need to connect to Kaspersky Lab activation servers in order to activate the application with a key file.
You can recover a key file if it is accidentally deleted. You may need a key file to register with Kaspersky CompanyAccount.
To recover a key file, do one of the following:
- Contact the license seller.
- Obtain a key file on the Kaspersky Lab website based on your existing activation code.
About data provision
To increase the protection level, by accepting the terms of the License Agreement, you agree to provide the following information to Kaspersky Lab in automatic mode:
- Details of the currently used license;
- Data on the Kaspersky Security version currently in use.
When you participate in Kaspersky Security Network, information obtained as a result of the Kaspersky Security operation is automatically sent from the computer to Kaspersky Lab. The list of data sent is given in the Kaspersky Security Network Statement. You can read the terms of the Kaspersky Security Network Statement in the following ways:
- By clicking the KSN Participation Agreement link in the Settings node.
- By reading the ksn_agreement.rtf document located in the application installation folder.
Participation in Kaspersky Security Network is voluntary. You can opt out of participating in Kaspersky Security Network at any time. No personal data of the user is collected, processed, or stored.
Kaspersky Lab protects any received information pursuant to the legal requirements and effective Kaspersky Lab rules.
Kaspersky Lab uses any collected information in depersonalized format and as general statistics only. General statistics are automatically generated using collected original information and do not contain any private data or other confidential information. Originally collected information is cleared as it is accumulated (once per year). General statistics are stored indefinitely.
Page topActivating Security Server
Security Server activation lets you use the full functionality of Anti-Virus protection and Content filtering and update application databases. Security Server is activated by adding a key for Security Server.
To activate Security Server:
- Open Management Console.
- In the Management Console tree of nodes, select the Licensing node of the relevant server.
- In the Active key section, click the Add button.
- In the window that opens, specify the path to the key file (a file with the .key extension) and click the Open button.
The application adds the Security Server key corresponding to the license. The appearance of the Active key section changes. The section displays the following information:
- Key status. Details of the active Security Server key.
- Key. A unique alphanumeric sequence required to receive technical support from Kaspersky Lab.
- License type. Trial or commercial.
- Representative. Name of the representative of the company that executed the agreement to purchase the application.
- Users. The maximum number of employees with access to the SharePoint server protected by the application.
- Expiration date. The date when the Security Server license expires.
If Kaspersky Security is installed on a standalone SharePoint server, the key status details are displayed in the Licensing section in the workspace of the Control Center (<Server name>) node.
Activating the DLP Module
DLP Module activation enables the security officer to use the full functionality of the DLP Module and manage Data Leak Prevention. The DLP Module is activated by adding a key for the DLP Module.
The DLP Module can be activated after activating Security Server. The DLP Module key validity period may not exceed the Security Server key validity period.
To activate the DLP Module:
- Open Management Console.
- In the Management Console tree of nodes, select the Licensing node of the relevant server.
- In the Active key of DLP Module section, click the Add button.
- In the window that opens, specify the path to the key file (a file with the .key extension) and click the Open button.
The application adds the DLP Module key corresponding to the license.
The appearance of the Active key of DLP Module section changes. The section displays the following information:
- Key status. Details of the active DLP Module key.
- Key. A unique alphanumeric sequence required to receive technical support from Kaspersky Lab.
- License type. Trial or commercial.
- Representative. Name of the representative of the company that executed the agreement to purchase the application.
- Users. The maximum number of company employees with access to management of Data Leak Prevention.
- Expiration date. DLP Module license expiration date.
Information on the DLP Module license is displayed in the Control Center node on all servers.
Application functionality is limited when the DLP Module license expires. The application stops scanning files in real time as they are uploaded to SharePoint, creating new incidents, and searching for data belonging to specific categories. The security officer can view information about previously created incidents, create categories, policies and reports. After the Security Server license has expired, the application stops updating DLP Module databases.
Replacing a key
You can replace an active key or additional key with a key that has a longer validity period or a key that allows a greater number of users of Kaspersky Security (if any).
Replacing an active key does not interfere with on-access scans, on-demand scan tasks, or database updates.
To replace the active key for Kaspersky Security:
- Select and open in the Management Console tree the node corresponding to the necessary SharePoint server. Then select the Licensing node.
- In the workspace, click the Replace button.
- In the displayed File name dialog specify path to the key file (file with the .key extension) and click Open.
To replace an additional key:
- Select and open in the Management Console tree the node corresponding to the necessary SharePoint server. Then select the Licensing node.
- In the workspace, in the Additional key section, click the Replace button.
- In the displayed File name dialog specify path to the key file (file with the .key extension) and click Open.
Removing a key
To remove a key for Kaspersky Security:
- Select and open in the Management Console tree the node corresponding to the necessary SharePoint server. Then select the Licensing node.
- In the workspace of the Active key or Additional key section, click the Delete button.
If Kaspersky Security is installed on a SharePoint farm and a key is removed from one SharePoint server within the farm, the key is also removed from all servers of the SharePoint farm.
Page topLicensing node
The Licensing node displays information about the license of Kaspersky Security. In this node, you can activate the application and renew your license.
The Active key section displays information about the current license. If you did not complete activation when preparing the application for use, you can select a key file to activate the application by clicking the Add button.
This section shows information about the key status, license type, expiration date, the company's representative who executed the agreement to purchase the application, and the maximum number of users of the application. In this section, you can also replace or delete the active key.
The Additional key section allows adding a key that entitles you to use the application but is not currently in use.
The Active key of DLP Module section is displayed if the DLP Module component is installed. This section lets you add a key for activation of the DLP Module. If a key has already been added, the section shows information about the key status, license type, expiration date, the company's representative who executed the agreement to purchase the application, and the maximum number of users of the application.
Starting Management Console
The services of Kaspersky Security start automatically during the operating system start-up. Management Console is started manually.
To start Management Console, perform the following steps:
- In the Start menu select Programs.
- Select the Kaspersky Security 9.0 for SharePoint Server folder in the list of programs.
- Select Kaspersky Security 9.0 for SharePoint Server in the menu.
When the Management Console starts, the Kaspersky Security snap-in connects to the Microsoft Management Console. The Management Console tree then displays an icon for the application and a node named Kaspersky Security 9.0 for SharePoint Server.
When Management Console is running, you can add servers on which the Security Server component has been installed (hereinafter referred to as "Protected servers") to Management Console.
The application records information about the starting or closing of Management Console to the Windows Event Log.
Page topKaspersky Security 9.0 for SharePoint Server node
The Kaspersky Security 9.0 for SharePoint Server node displays information about the current version of the application and its purpose. In this node, you can view the list of SharePoint servers that have been added to the Management Console, as well as add new servers and proceed to servers in the Console tree.
In the Protected servers section, you can add to Management Console the SharePoint server on which Security Server has been installed (hereinafter referred to as protected SharePoint server or simply protected server). After adding a protected server, you can add other ones or proceed to that server's protection settings.
The Added servers list displays the names of protected SharePoint servers that have been added to Management Console. Clicking the <Server name> button takes you to the Control Center node of the selected Server in Management Console.
Adding protected servers to Management Console
To add protected servers to Management Console:
- Start Management Console.
- Select in Management Console tree the node of Kaspersky Security 9.0 for SharePoint Server.
- In the workspace, click the Add server button.
- Select the appropriate option in the displayed dialog Add server:
- Local. The application adds to Management Console the SharePoint server on which Management Console and Security Server are installed. This is the default option.
- Remote. The application adds to Management Console the SharePoint server on which Security Server is installed. If you select this option, use one of the following methods to specify the server name:
- Click Browse and select the computer from the list in the window that opens.
- Enter the server name manually as an IP address (in IPv4 or IPv6 notation) or DNS name.
- Click the OK button.
The server will be added to Management Console and shown in the nodes tree.
If Kaspersky Security is installed on a farm of SharePoint servers, you can add any server of the farm to Management Console.
Page topAdd server window
In the Add server window, you can select the protected SharePoint server that will be added to Management Console.
Default protection
The protection status of the SharePoint server depends on the settings defined in the Application Configuration Wizard during installation. A detailed description of the Application Configuration Wizard is provided in the Installation Guide for Kaspersky Security 9.0 for SharePoint Server.
If the Enable Anti-Virus protection check box was selected in the Application Configuration Wizard during setup on the first SharePoint server, the application components are launched in the following mode at application startup:
- On-access scan:
- Anti-Virus scan is enabled;
- Action on infected and probably infected files: Disinfect;
- Action on corrupted files and password-protected files: Skip;
- Content filtering is enabled.
- Anti-Virus scan is enabled;
- On-demand scan:
- On-demand scan tasks are not created. On-demand scan is not performed.
If the Enable Anti-Virus protection check box was cleared during application installation, the Anti-Virus scan and Content filtering components are disabled at application startup, and on-demand scanning is not performed.
If an application that collects information and sends it to be processed is installed on your computer, Kaspersky Security may classify this application as malware. To avoid this, you can exclude the application from scanning by configuring Kaspersky Security as described in this document.
Viewing SharePoint server protection status details
The Information about server protection section shows the application version and the status of anti-virus scanning and Content Filtering. Available values:
- Enabled. Anti-Virus protection / Content filtering is enabled in the On-access scan node of Management Console and is working correctly on all SharePoint farm servers.
- Disabled. Anti-Virus protection / Content filtering is disabled
on all SharePoint farm servers. - Protection errors. Errors detected in the operation of Anti-Virus protection / Content filtering on at least one of the SharePoint farm servers.
- Unknown. The status of anti-virus protection / Content filtering on at least one of the SharePoint farm servers is unknown.
The section contains a description of any errors that occur.
Page topInformation about server protection
The Protection of farm servers section shows the current version of the application and the status of its components. The following component statuses are possible:
- Enabled. The component is enabled and runs correctly on all SharePoint farm servers.
- Disabled. The component is disabled on all the servers in the SharePoint farm.
- Protection errors. Errors have been detected in the operation the component on at least one of the SharePoint farm servers. The section contains a description of any errors that occur.
- Unknown. The status of Anti-Virus protection / Content filtering on at least one of the SharePoint farm servers is unknown.
Anti-virus settings of SharePoint
The Anti-Virus settings of SharePoint section displays information about the scan settings configured on the SharePoint server. If anti-virus protection is disabled on the SharePoint server, Kaspersky Security does not perform Anti-Virus scanning and Content filtering in real time.
Page topApplication licenses
Depending on the application components installed on the SharePoint server, the workspace may display the following sections with licensing information:
- Security Server license;
- DLP Module license.
The Key status field displays the details of the active key. Available field values:
- Current license. A key has been added, and the license has not expired.
- Errors on some farm servers. Licensing errors or violations have been detected on at least one of the SharePoint farm servers (for example, a key is missing or blacklisted). The error description is displayed in red, and the section itself is highlighted in orange.
- No key has been added. Licensing subsystem type: ##licensingSubsystemType##. No key has been added, and Management Console is deployed on a standalone SharePoint server.
The Expiration date field displays the expiration date of the license.
If the number of days remaining on the license is less than the number of days specified in the Notifications node, the expiration date in the field is displayed in red. You are advised to add an additional key in the Licensing node before the current license expires.
The Additional key field contains information about the availability of an additional key. Available values:
- Added. An additional key has been added, and the validity period of the active key has not expired yet.
- Not added. One of two possibilities:
- an additional key is not added;
- an additional key is installed, but the active key has expired.
The Number of users field contains information about the maximum number of company employees with access to a SharePoint server protected by the application.
The Functionality field contains information on available application features. Available field values:
- Full functionality. No limitations are imposed on the operation of Kaspersky Security.
- The license expired. Database updates and technical support are not available. The application does not update Anti-Virus protection, Content filtering, and DLP Module databases. You have to replace the key to be able to download the current databases.
- Management only. No key is installed, or the trial license has expired. Only management of Kaspersky Security is available. Anti-Virus protection and Content filtering are not performed, and updates are not available.
- Update only. The key is in the black list. Only database updates are available. Anti-virus scanning and content filtering are not performed.
Protection of SharePoint farm servers
The Protection of farm servers section displays information about the current protection status of servers in the SharePoint farm.
SharePoint farm servers that have not accessed the database within the past 60 seconds are considered inactive by the application. The number and list of such servers are shown in this section. Detailed information about why the database was not accessed is displayed in a table on the List of farm servers tab.
If Kaspersky Security is installed on a standalone SharePoint server, the Protection of farm servers section is not displayed in the workspace of the Control Center (<Server name>) node.
Page topDatabase update
The Database update section shows information about the current state of the anti-virus databases, the date of the last update, and the number of records in the databases.
The Status field displays information about the status of databases currently in use by Kaspersky Security.
If Kaspersky Security is installed on a SharePoint farm, the Status field can take the following values:
- Databases are up to date on all farm servers. Databases used on all SharePoint farm servers were updated in the past 24 hours and are not corrupted.
- Databases outdated on some farm servers. Databases were not updated in the past 24 hours.
- Databases corrupted on some farm servers. Databases are missing or corrupted, and cannot be read by the application on at least one SharePoint farm server.
If Kaspersky Security is installed on a standalone SharePoint server, the Status field can take the following values:
- Databases are up to date. Databases were updated in the past 24 hours and are not corrupted.
- Update required. Databases were not updated in the past 24 hours.
- Databases corrupted. Databases are missing or corrupted and cannot be read by the application.
The Last update status field displays the date and result of the most recent update of the databases. If an error occurred during the last database update, the field contains a description of the error. In this case, the Database update section is highlighted in orange, and the description of the error is displayed in red.
If Kaspersky Security is installed on a standalone SharePoint server, the section displays the Last update field, which contains the date and time of the most recent attempt to update the databases.
The Release date and time field shows the release date of the earliest database on all SharePoint farm servers. If the databases are out of date, the date is displayed in red. In this case, it is recommended that you go to the Updates node and update the application databases.
The Number of records field contains information about the total number of records in the databases on the server since the time of the first update.
Page topStatistics
The Statistics section contains statistics on the application's operation for the last week. The graph presents the following information about the number of positives returned by application components, the number of threats detected, files blocked, and clean files:
- ANTI-VIRUS PROTECTION:
- Total files. The total number of files that are infected, probably infected, corrupted, password-protected, or clean, and files that returned an error during Anti-Virus scanning.
- Threats. The number of malicious objects detected in scanned files.
- Excluded. The number of files excluded from the scan scope.
- Non-infected. The number of files scanned by the application and recognized as not infected.
- Other. Files that do not match any other categories. The group includes, for example, files not scanned because of key errors or files that have caused errors while being processed.
- CONTENT FILTERING:
- Total. The total number of files and SharePoint web objects that caused content filtering incidents (by content, by file type and format, and masks of unwanted file names, files with Non-infected status, and files that returned content filtering errors).
- Files with unwanted content. The number of files found by Content filtering to contain unwanted words or phrases included in Kaspersky Lab categories and custom categories. You can configure custom categories in Content filtering settings.
- Web objects with unwanted content. The number of SharePoint web objects that have been found by Content Filtering to contain unwanted words or phrases included in Kaspersky Lab categories and custom categories, and the number of web objects found to contain malicious or phishing URLs.
- Files in unwanted formats. Number of files in unwanted formats.
- Found clean. The number of files that are free from unwanted content (with the names and formats not matching the specified masks of unwanted file names and formats), malicious or phishing URLs.
- Other. Files that do not match any other category including files unprocessed because of errors.
Control Center node
In the Control Center node, you can view the details of the protection status of a server or a farm of SharePoint servers.
The workspace of this node displays the Events and statistics and List of farm servers tabs, depending on the schemes for deployment of Kaspersky Security on the organization's network. The List of farm servers tab is displayed if Kaspersky Security is installed on a farm of SharePoint servers that handle a single database for configuration of the application and Backup.
Events and statistics tab
The Events and statistics tab displays summary information about the protection status of a server or a farm of SharePoint servers, about the application components, as well as the application operation statistics for the last week.
The Protection of farm servers section displays the current version of the application, the statuses of the application subsystems (i.e., anti-virus protection and content filtering) and the DLP Module component.
- Enabled. This component / subsystem is enabled and operates properly on a server or a farm of SharePoint servers.
- Disabled. This component / subsystem is disabled on a server or a farm of SharePoint servers.
- Protection errors. Errors have been detected in the operation of this component / subsystem on at least one of the SharePoint servers. The section contains a description of any errors that occur.
- Unknown. The status of the subsystems on one of the SharePoint servers is unknown.
The Anti-Virus settings of SharePoint section displays information about the anti-virus settings of SharePoint. The operation of Kaspersky Security in on-access scan mode depends on the anti-virus settings defined on SharePoint.
For example, if the scanning of files downloaded from SharePoint websites to a computer is disabled in the anti-virus settings of SharePoint, Kaspersky Security will not be able to scan those files.
Define anti-virus settings of SharePoint
The workspace displays the Security Server license section (always) and DLP Module license section (if components such as Security Server and DLP Module have been installed on the SharePoint server). The Security Server license and DLP Module license sections provide information about the status of the key for corresponding components, the license expiration date, as well as the number of users and availability of an additional key (added or not added).
If any key-related errors occur, the sections display information about those errors
The Database update section shows information about the current status of the anti-virus databases, their latest update, the number of records in the databases, as well as information about update-related errors.
The Protection of farm servers section contains information about the current protection status on the farm of SharePoint servers. If Kaspersky Security is installed on a stand-alone SharePoint server, the Protection of farm servers section is not displayed.
The Statistics section contains statistics on the application's operation for the last week. The charts present information about the number of positives returned by the application components, the number of threats detected, files blocked, and non-infected files.
Page topList of farm servers tab
The List of farm servers tab displays a table with a list of protected SharePoint servers included in the farm, as well as information about the protection status and the update status of Kaspersky Security databases on all of the servers.
Page topParticipating in Kaspersky Security Network
To protect SharePoint servers more effectively, Kaspersky Security uses data that is collected from users around the globe. Kaspersky Security Network is designed to process such data.
Kaspersky Security Network (KSN) is an infrastructure of cloud services providing access to Kaspersky Lab's online knowledge base with information about the reputation of files, web resources, and software. The use of data from Kaspersky Security Network ensures faster responses by Kaspersky Lab applications to threats, improves the effectiveness of some protection components, and reduces the risk of false positives.
Your participation in Kaspersky Security Network helps Kaspersky Lab to gather real-time information about the types and sources of new threats, develop methods of neutralizing them, and reduce the number of false alarms. Participation in Kaspersky Security Network also lets you access reputation statistics for applications and websites.
When you participate in Kaspersky Security Network, certain statistics are collected while Kaspersky Security is running and are automatically sent to Kaspersky Lab. This information makes it possible to keep track of threats in real time. Also, additional checking at Kaspersky Lab may require sending files (or parts of files) that are imposed to an increased risk of being exploited by intruders to do harm to the user's computer or data.
Participation in Kaspersky Security Network is voluntary. To start using Kaspersky Security Network, you have to accept the terms of a special agreement – the Kaspersky Security Network Statement. You can also opt out of participating in Kaspersky Security Network at any time. No personal data of the user is collected, processed, or stored by the Kaspersky Security Network services. The types of data that Kaspersky Security sends to Kaspersky Security Network are also described in the Kaspersky Security Network Statement. You can use Kaspersky Security Network services if the application license has not yet expired and the key has not been blacklisted.
KSN Protection Settings
To configure the KSN protection settings:
- Select and open in the Management Console tree the node corresponding to the necessary SharePoint server. Then select the Settings node.
- In the Use of Kaspersky Security Network section, select the I have read the KSN Statement and accept all of the conditions therein check box if you accept all of the conditions of the Kaspersky Security Network Statement. You can view its text by clicking the KSN Participation Agreement button.
- To use KSN cloud services for protection of SharePoint web objects, select the Use Kaspersky Security Network check box.
Information received from Kaspersky Security Network services is used during anti-virus scans and scans of web objects for phishing threats.
- Set the Maximum waiting time when requesting KSN. The default wait time for a response from the cloud is 10 seconds.
- Select the Use proxy server to access KSN check box if you want to exchange information with KSN services using a proxy server.
The way to configure the proxy server settings is described in the automatic database update configuration instructions.
- Click the Save button.
On-access scan
On-access scan is an operation mode of Kaspersky Security in which Kaspersky Security subsystems scan objects on SharePoint servers in real time. The subsystems scan an object in the moment the SharePoint user handles it (for example, when copying it from a SharePoint server to a computer).
Each of the application subsystems performs a scan of a single type. The table lists scan types that the application performs in on-access scan mode, as well as objects to which the respective scans apply.
Processing objects in on-access scan mode
Objects to scan |
Scan types |
||
Anti-virus scan |
Content filtering |
Phishing scan |
|
Files uploaded by the user to the SharePoint server |
+ |
+ |
– |
Files copied from the SharePoint server to the computer |
+ |
+ |
– |
SharePoint web parts (such as wiki pages and forums hosted on the SharePoint server) that are created or modified |
– |
+ |
+ |
If the subsystems that scan an object detect no threats, malicious links, and unwanted content, the application allows the user to handle this object. If a subsystem detects a threat, malicious link, or unwanted content, the application performs the action that has been configured for each scan type.
Objects are scanned by subsystems one by one. If an object was blocked by the application during a scan by a subsystem, the remaining subsystems do not scan this object. If a file was blocked during an anti-virus scan, the application does not apply content filtering to this file.
If failures occur in the operation of the application subsystems, some file may remain unscanned. By default, unscanned files are skipped without being scanned. You can configure the application so that it will block all files that cannot be scanned. Contact Technical Support for additional details.
Status labels assigned to files following on-access scan
Based on the results of on-access scanning, the application assigns one of the following status labels to the file:
- Not infected. No threats detected in the file.
- Infected. A file a segment of whose code fully matches a code segment of a known threat.
- Probably infected. A file whose code contains a modified segment of code of a known threat, or a file resembling a threat in the way it behaves.
- Password-protected. A password-protected archive.
- Corrupted. The file cannot be read by Kaspersky Security.
Based on the results of content filtering, the application assigns one of the following status labels to the file:
- Allowed. There is no unwanted content in the file.
- Forbidden format. The file has an unwanted format.
- Forbidden mask. The file name contains an unwanted mask.
- Forbidden content. The file has been found to contain unwanted words and phrases.
Based on the results of content filtering and phishing scanning, the application assigns one of the following status labels to the SharePoint web part:
- Allowed. The SharePoint web object does not contain unwanted content, malicious or phishing URLs.
- Forbidden content. The SharePoint web object has been found to contain malicious / phishing URLs or unwanted content.
About the restricted scan mode
If one of the scanning subsystems is freezing during an on-access scan, the application switches to the restricted scan mode by default. In this case, some objects may remain unscanned. When the application switches to the restricted scan mode, the following information is recorded to Windows Event Log:
- Date and time the restricted scan mode was enabled
- Name of the subsystem for which the mode was enabled
- Event level: Error
- Event category: Infrastructure
- Event ID: 6200
If the application switches to the restricted scan mode, the Control Center node displays a warning. For example, if a phishing scan is freezing, the following warning is displayed: Restricted scan mode enabled. Some objects can be skipped without being scanned for phishing. Information about files that have not been scanned by the application due to the restricted scan mode will be logged to the report with the Scan errors status.
The restricted scan mode does not affect on-demand scanning or data leak prevention.
The restricted scan mode can be disabled. For additional information about how to disable the restricted scan mode please contact Technical Support.
Kaspersky Security operation depending upon the SharePoint server settings
The operation of Kaspersky Security in on-access scan mode depends on the values of the anti-virus settings of SharePoint.
Anti-virus settings of SharePoint
SharePoint setting |
Value |
Impact on the operation of Kaspersky Security |
Scan files being uploaded to SharePoint
|
Check box selected |
Kaspersky Security can scan files that are uploaded to SharePoint websites. The application performs on files actions that have been defined in the anti-virus protection settings. |
Check box cleared |
Anti-virus protection of files uploaded to SharePoint websites is not available. |
|
Scan files being downloaded from SharePoint
|
Check box selected |
Kaspersky Security can scan files downloaded from SharePoint websites. The application performs on files actions that have been defined in the anti-virus protection settings. |
Check box cleared |
Anti-virus protection of files downloaded from SharePoint websites is not available. |
|
Allow users to download infected files
|
Check box selected |
Kaspersky Security cannot block and disinfect files that users access. The application skips infected files. |
Check box cleared |
The Attempt to disinfect infected files setting impacts the operation of Kaspersky Security. |
|
Attempt to disinfect infected files
|
Check box selected |
Kaspersky Security can disinfect infected files when they are accessed by users. If the application cannot disinfect a file, it blocks the file. |
Check box cleared |
Kaspersky Security can block infected files when they are accessed by users. |
The anti-virus protection settings of Kaspersky Security may conflict those of SharePoint. For example, if the Allow users to download infected files check box is selected in the anti-virus protection settings of SharePoint while the Block action is selected in the anti-virus protection settings of Kaspersky Security, the user will be able to download an infected file. Before downloading, the web browser window shows a warning message informing that Kaspersky Security recommends you to avoid downloading that file.
When a conflict arises between the anti-virus protection settings of Kaspersky Security and the anti-virus settings of SharePoint, the latter ones will have the higher priority.
Page topEnabling and disabling on-access anti-virus scanning
To enable or disable anti-virus scanning:
- Select and open in the Management Console tree the node corresponding to the necessary SharePoint server. Then select the On-access scan node.
- On the General tab, perform one of the following actions:
- Select the Enable Anti-Virus scan check box if you want the application to perform on-access anti-virus scanning of the file.
- Clear the Enable Anti-Virus scan check box if you do not want the application to perform on-access anti-virus scanning of the file.
- Click the Save button.
Configuring basic scan settings
To define the general settings of real-time protection:
- In the Management Console tree, select the Server for which the real-time protection should be configured.
- Select the On-access scan node.
- In the workspace, select the General tab.
- Select the Move files to backup check box if you want Kaspersky Security to add to Backup copies of files that have been blocked by Anti-Virus scanning and Content Filtering.
- To limit the size of files to be scanned, select the Exclude from scanning any files larger than check box and specify the maximum size of files to be scanned (in MB). The default value is 10 MB.
- Click the Save button.
Configuring object processing rules for on-access scanning
Kaspersky Security will handle infected, potentially infected, corrupted and password-protected files depending on the Anti-Virus scan settings of the SharePoint server.
To create object processing rules for anti-virus scanning:
- Select and open in the Management Console tree the node corresponding to the necessary SharePoint server. Then select the On-access scan node and click the General tab in the workspace.
- In the Anti-Virus scan section, open the Actions with infected and probably infected files dropdown list and select one of the following actions:
- Disinfect. Kaspersky Security attempts to disinfect the file. If the file cannot be disinfected, Kaspersky Security blocks it (the file is not uploaded to the SharePoint server or downloaded from the server to the user's computer).
- Block. Kaspersky Security blocks the file.
- Allow. Kaspersky Security does not perform any action on the file. The file can be uploaded to the SharePoint server or downloaded from the server to the user computer.
- In the Anti-Virus scan section, open the Actions with password-protected files dropdown list and select one of the following actions:
- Disinfect. Kaspersky Security blocks the file. The file cannot be uploaded to the SharePoint server or downloaded from the server to the user computer.
- Allow. Kaspersky Security does not perform any action on the file. The file can be uploaded to the SharePoint server or downloaded from the server to the user computer.
- In the Anti-Virus scan section, open the Actions with corrupted files dropdown list and select one of the following actions:
- Block. Kaspersky Security blocks the file. The file cannot be uploaded to the SharePoint server or downloaded from the server to the user computer.
- Allow. Kaspersky Security does not perform any action on the file. The file can be uploaded to the SharePoint server or downloaded from the server to the user computer.
If the Allow option is selected, Kaspersky Security does not take any action on the file, but assigns one of the status values to the file based on the scan results. Information about the file will be added to reports and statistics.
- To save the changes, click the Save button.
To create object processing rules for content filtering:
- Select and open in the Management Console tree the node corresponding to the necessary SharePoint server. Then select the On-access scan node and click the General tab in the workspace.
- In the Content filtering section, open the Actions with files that contain unwanted content dropdown list and select one of the following actions:
- Block. Kaspersky Security blocks the file. The file cannot be uploaded to the SharePoint server or downloaded from the server to the user computer.
- Allow. Kaspersky Security does not perform any action on the file. The file can be uploaded to the SharePoint server or downloaded from the server to the user computer.
- To save the changes, click the Save button.
If the Allow option is selected, Kaspersky Security does not take any action on the file, but assigns one of the status values to the file based on the scan results. Information about the file will be added to reports and statistics.
Page topEnabling and disabling on-access content filtering
To enable or disable Content Filtering:
- Select and open in the Management Console tree the node corresponding to the necessary SharePoint server. Then select the On-access scan node.
- On the General tab, perform one of the following actions:
- Select the Enable Content filtering check box if you want the application to perform content filtering of the file during on-access scanning.
- Clear the Enable Content filtering check box if you do not want the application to perform content filtering of the file during on-access scanning.
- Click the Save button.
For Content filtering to work properly, the Kaspersky Security account must have site collection administrator privileges (for all site collections) and administrator privileges for the SQL database containing the site collection.
Page topEnabling and disabling SharePoint web object scanning
To enable or disable the scanning SharePoint web objects:
- Select and open in the Management Console tree the node corresponding to the necessary SharePoint server. Then select the On-access scan node.
- On the General tab, perform one of the following actions:
- Select the Scan SharePoint web content check box if you want the application to scan SharePoint web objects when they are created or modified.
- Clear the Scan SharePoint web content check box if you do not want the application to scan SharePoint web objects when they are created or modified.
Kaspersky Security scans SharePoint web objects if Content Filtering is enabled (the Enable Content filtering check box is selected).
If the Scan SharePoint web content check box is selected, the application scans SharePoint web objects that are created or modified for unwanted words or phrases included in Kaspersky Lab categories and custom categories within the search scope configured in the Content filtering settings.
On detecting unwanted content in a SharePoint web object, the application makes a corresponding record in the application log and the Windows event log. Kaspersky Security does not save the SharePoint web objects or move them to Backup. The application shows a message that such SharePoint web object cannot be saved or modified.
If Kaspersky Security blocks a SharePoint web object under Microsoft SharePoint Server 2010, the application may fail to save the changes made to this SharePoint web object or the newly created SharePoint web object.
- Click the Save button.
Creating on-access Anti-Virus scan exclusions
To reduce the load on the SharePoint server caused by on-access Anti-Virus scanning, you can specify file formats or file name masks to be excluded from scanning and set the maximum size of files to scan.
To exclude unwanted file formats from on-access anti-virus scanning:
- Select and open in the Management Console tree the node corresponding to the necessary SharePoint server. Then select the On-access scan node.
- In the workspace, select the Exclusions from Anti-Virus scan tab.
- In the File formats list, select the check boxes next to the items in the file formats tree that correspond to the relevant formats.
Make a convenient use of the tree with the Expand all and Minimize all buttons.
- To save the changes, click the Save button.
To exclude files that match specific masks from Anti-Virus scanning:
- Select and open in the Management Console tree the node corresponding to the necessary SharePoint server. Then select the On-access scan node.
- In the workspace, select the Exclusions from Anti-Virus scan tab.
- In the File masks list, select the check boxes next to file name masks to be excluded from the scan scope.
- To add a mask to the list, open the Adding a file mask window by clicking the Add button, and specify the mask in the entry field. To save the mask and close the window, click OK. The mask will be displayed in the File masks field.
If you want to define several masks, use a semicolon as a delimiter.
- To save the changes, click the Save button.
Configuring additional settings for on-access content filtering
You can configure additional settings for on-access Content filtering: specify prohibited file formats, masks of unwanted file names, unwanted words or phrases.
To specify prohibited file formats:
- Select and open in the Management Console tree the node corresponding to the necessary SharePoint server. Then select the On-access scan node.
- In the workspace, select the Content Filtering rules tab.
- In the Unwanted file formats list, select the check boxes next to unwanted file formats.
Make a convenient use of the tree with the Expand all and Minimize all buttons.
- To save the changes, click the Save button.
To specify the masks for unwanted file names:
- Select and open in the Management Console tree the node corresponding to the necessary SharePoint server. Then select the On-access scan node.
- In the workspace, select the Content Filtering rules tab.
- In the Unwanted file names list, select the check boxes next to unwanted file name masks.
In the Content filtering node you can add and edit the sets of unwanted file name masks using the Filter by masks tab.
- To save the changes, click the Save button.
To define unwanted words and phrases:
- Select and open in the Management Console tree the node corresponding to the necessary SharePoint server. Then select the On-access scan node.
- In the workspace, select the Content Filtering rules tab.
- In the List of categories list, select the check boxes next to categories of unwanted words and phrases.
You can add and edit custom categories of unwanted words and expressions in the Content filtering node using the tab Filter by keywords.
- To save the changes, click the Save button.
On-access scan
The application scans files and web objects when they are accessed by users, i.e., when uploading files to SharePoint websites, when downloading files from SharePoint websites to the computer of a user, and when modifying web objects.
In the On-access scan node, you can enable and configure anti-virus protection and content filtering of files and web objects.
General
On the General tab, you can configure the anti-virus protection and content filtering to perform on-access scanning. While on this tab, you can go to the website of SharePoint administration center in order to define the SharePoint anti-virus settings. The values of the anti-virus settings of SharePoint affect the application's operation.
Exclude from scanning any files larger than
The Anti-Virus scan section allows enabling the anti-virus protection and configure the application's actions on files that users access.
Actions with infected and probably infected files
Actions with password-protected files
The Content filtering section allows enabling content filtering, as well as configuring the application's actions on files with unwanted content.
Actions with files that contain unwanted content
Scan content of SharePoint web objects for phishing
The Anti-Virus settings of SharePoint section displays information about the anti-virus settings of SharePoint. The operation of Kaspersky Security in on-access scan mode depends on the anti-virus settings defined on SharePoint.
For example, if the scanning of files downloaded from SharePoint websites to a computer is disabled in the anti-virus settings of SharePoint, Kaspersky Security will not be able to scan those files.
Define anti-virus settings of SharePoint
Exclusions from anti-virus scan
On the Exclusions from Anti-Virus scan tab, you can define the settings for exclusion of files from anti-virus scanning.
The File formats section displays a list of file formats grouped by type (executable files, data, multimedia, images, archives). Clicking the ![]() button next to the name of a group opens a list of file formats (or subgroups) included in that group.
button next to the name of a group opens a list of file formats (or subgroups) included in that group.
You can configure exclusions from anti-virus scanning by selecting the check boxes next to relevant groups, subgroups, and specific file formats. The real-time protection settings will not be applied to files of selected formats. The application allows uploading files of specified formats to SharePoint websites, as well as downloading them from SharePoint websites to the computer.
All boxes are cleared by default.
In the File masks section, you can create a list of file masks, as well as select file masks that will be used to exclude files from scanning.
If the check box is selected next to a mask, the application allows uploading to SharePoint websites files that correspond to that mask, as well as downloading such files from SharePoint websites to the computer.
File mask
In the entry field, you can specify / change a file mask. Use a semicolon to separate multiple masks.
Page topContent filtering rules
On the Content Filtering rules tab, you can create content filtering rules (such as prohibition of some words and expressions, prohibition of some file names, and blocking of specific file formats on SharePoint websites). In accordance with those rules, the application tracks unsolicited data in SharePoint files and web objects.
The List of categories section displays a list of categories of unwanted words and phrases. The list of categories is divided into the following groups:
- Kaspersky Lab categories. Preset categories of unwanted words and phrases compiled by Kaspersky Lab experts.
- Custom categories. Categories of unwanted words and phrases created by the user manually in the Content filtering node.
Clicking the ![]() button next to a group of categories expands the list of categories included in that group. You can select the check boxes for categories that will be included in a rule for prohibition of some words and expressions. In accordance with the rule, the application scans SharePoint files and web objects for unwanted words and phrases belonging to the selected categories. When handling files that contain unwanted words and phrases, the application applies the action defined on the General tab.
button next to a group of categories expands the list of categories included in that group. You can select the check boxes for categories that will be included in a rule for prohibition of some words and expressions. In accordance with the rule, the application scans SharePoint files and web objects for unwanted words and phrases belonging to the selected categories. When handling files that contain unwanted words and phrases, the application applies the action defined on the General tab.
All boxes are cleared by default.
The Unwanted file names section displays a list of file mask sets. You can create sets of file masks in the Content filtering node. You can select the check boxes for sets that will be included in a rule for prohibition of some file names on SharePoint. In accordance with the rule, the application checks if the names of files match the masks. When handling files that match the mask(s), the application applies the action defined on the General tab.
All boxes are cleared by default.
The Unwanted file formats section displays a list of file formats grouped by their type. Clicking the ![]() button next to the name of a group opens a list of file formats (or subgroups) included in that group.
button next to the name of a group opens a list of file formats (or subgroups) included in that group.
You can select the check boxes for file formats that will be included in a rule for prohibition of specific file formats on SharePoint websites. When handling such files, the application performs the action that has been defined on the General tab.
All boxes are cleared by default.
Phishing scan
Phishing scan is a feature of Kaspersky Security designed to protect the user's personal data.
While scanning the content of SharePoint web objects, the application checks links against lists of malicious and phishing URLs.
Checking links against the list of malicious URLs allows the application to detect URLs redirecting to infected websites. Malicious URLs can be contained in the text of messages disguised as ads. The ad text prompts you to find out more about a product or service by clicking a link. The link takes you to a website with viruses, and the computer gets infected. The computer is infiltrated by viruses and malware that can access your private data and relay it to criminals.
By checking links against the list of phishing web addresses, the application is able to detect links redirecting to fraudulent websites. A phishing attack can be disguised, for example, as an email message from your bank with a link to its official website. The link takes you to an exact copy of the bank's website where you can even see the bank site's address in the browser despite actually being on a spoofed website. From this point forward, all of your actions on the site are tracked and can be used to steal your private data.
A phishing scan of SharePoint web objects detects malicious and phishing URLs embedded in the text of web objects. Malicious and phishing URLs are designed to steal your personal data or information entered in a web form. The application performs a phishing scan when a SharePoint web object is created or modified. If the phishing scan detects at least one web address appearing on lists of malicious and phishing ones, the application assigns the Phishing status to the web object.
On detecting a phishing or malicious URL in a SharePoint web object, the application performs the action configured in theContent filtering section. If the action is set to Block, the application shows a dialog saying that web content cannot be created or modified.
To protect SharePoint servers against phishing, the application uses a list of URLs of web resources that have been labeled as malicious or phishing URLs by Kaspersky Lab. The database is regularly updated and is part of the Kaspersky Security delivery kit.
For additional protection of SharePoint servers against phishing, you can use Kaspersky Security Network services that let you receive up-to-date information about threats before they are included in the anti-phishing databases of Kaspersky Lab.
Enabling and disabling Anti-Phishing scanning of web content
To enable or disable Anti-Phishing scanning of web content:
- Select and open in the Management Console tree the node corresponding to the necessary SharePoint server. Then select the On-access scan node.
- On the General tab in the Content filtering section, perform one of the following actions:
- Select the Scan content of SharePoint web objects for phishing check box if you want the application to scan the content of a created or modified SharePoint web object for links appearing on the lists of malicious or phishing URLs.
- Clear the Scan content of SharePoint web objects for phishing check box if you do not want the application to scan the content of a created or modified SharePoint web object for links appearing on the lists of malicious or phishing URLs.
Kaspersky Security scans web content for malicious and phishing links if Content Filtering is enabled (the Enable Content filtering check box is selected) and scanning of SharePoint web objects is enabled (the Scan SharePoint web content check box is selected).
If the Scan content of SharePoint web objects for phishing check box is selected, the application checks URLs against the Kaspersky Lab database of malicious and phishing URLs when web content is created or modified. If Kaspersky Security Network is used to protect a server or servers, information about the malicious / phishing URL can be relayed to KSN services.
On detecting a phishing threat in a SharePoint web object, the application logs information about it in Reports.
- Click the Save button.
On-demand scan
On-demand scanning is files scanning on SharePoint servers that is performed manually or according to a schedule created in advance.
Kaspersky Security scans the following objects on-demand:
- SharePoint files;
- all SharePoint web objects (such as wiki pages and forums hosted on the SharePoint server);
- SharePoint service files.
You can perform on-demand scans simultaneously on several SharePoint servers. This will reduce scanning time considerably.
The application scans only the last versions of files and SharePoint web objects hosted on the SharePoint server.
During on-demand scanning, Kaspersky Security performs:
- Performs anti-virus file scanning in accordance with the scan exclusions settings.
- Searches for unwanted file formats and unwanted file names.
- Scans files and SharePoint web objects for unwanted content.
Status labels assigned to files based on scan results
Based on the results of Anti-Virus scanning, Kaspersky Security assigns one of the following status labels to the file:
- Not infected. No threats detected in the file.
- Infected. A file a segment of whose code fully matches a code segment of a known threat.
- Probably infected. A file whose code contains a modified segment of code of a known threat, or a file resembling a threat in the way it behaves.
- Password-protected. A password-protected archive.
- Corrupted. The file cannot be read by Kaspersky Security.
Based on the results of content filtering, Kaspersky Anti-Virus assigns one of the following status labels to the file:
- Allowed. There is no unwanted content in the file.
- Forbidden format. The file has an unwanted format.
- Forbidden mask. The file name contains an unwanted mask.
- Forbidden content. The file has been found to contain unwanted words and phrases.
Based on the results of content filtering, the application assigns one of the following status labels to the SharePoint web part:
- Allowed. The SharePoint web object does not contain unwanted content.
- Forbidden content. The SharePoint web object has been found to contain unwanted content.
On-demand scan tasks
To run on-demand scan tasks, you have to configure an on-demand scan task or tasks in Kaspersky Security. You can configure anti-virus scanning and content filtering settings for each on-demand scan task, and define a schedule.
On-demand scan tasks can be run manually or scheduled to run automatically. The application generates a report with the results of each scan task.
The list of on-demand scan tasks is displayed in a table in the workspace of the On-demand scan node. The on-demand scan tasks that were not run or could not be run at the scheduled time are highlighted in red. Color highlighting is not used for other tasks.
The reasons for not running the tasks are displayed in the Status column:
- Task servers are missing. Kaspersky Security Server has been deleted from all SharePoint servers specified in the on-demand scan task settings. You can specify other servers on which the Security Server has been installed in the task settings.
- Task not executed. All SharePoint servers specified in the on-demand scan task settings were unavailable at the time scheduled for the start of the task. SharePoint server availability must be checked. You can run the task manually.
Adding an on-demand scan task
To add an on-demand scan task:
- Select and open in the Management Console tree the node corresponding to the necessary SharePoint server. Then select the On-demand scan node.
- Click the Create button in the workspace.
This opens the Task settings window on the General tab.
- In the Task name field, specify the name of the task. It can contain no more than 100 symbols and not use % ? ? \ | / : * < >.
- Specify the application's actions when running this task.
- If necessary, select the Scan modified files only check box. During repeated runs of the task, the application will scan only those files that have been modified since the previous scan.
- If necessary, select the Move files to backup check box. When running the task, Kaspersky Security will place copies of the scanned files in Backup.
- If necessary, select the Scan service files check box. When running the task, Kaspersky Security will scan service files of SharePoint.
- Select the scan type for objects and configure the actions to be performed by the application during the selected type of scan:
- Anti-Virus scan.
To select this type of scan, select the Enable Anti-Virus scan check box and specify the action the application should perform when running the task for the following file types:
- infected and probably infected files
- password-protected files
- corrupted files.
- Enable Content filtering.
To select this type of scan, select the Enable Content filtering check box and configure the actions to take on files containing unwanted content by selecting them from the Actions with files that contain unwanted content drop-down list. If you want the application to scan SharePoint web objects (such as wiki pages and forums hosted on a SharePoint server) with Content Filtering, select the Scan SharePoint web content check box.
- Anti-Virus scan.
- Configure limits for running the task:
- If you want to limit the duration of task execution, select the Use task execution timeout (h : m) check box and specify a value in the field on the right (in hours and minutes). When performing a task the application automatically stops the task after the specified time has passed. In the scroll box on the right, you can specify the maximum allowed task duration in hh:mm format. On-demand task duration limits:
- If the task is not completed when the specified time interval expires, the application stops the task.
- The maximum task run time is 30 minutes.
- The default task run time is 3 hours.
- If this check box is cleared, the task run time is unlimited.
- The check box is cleared by default.
- If you want to limit the duration for a scan of each individual file, select the Use object scan timeout (s) check box and enter a value (in seconds) in the field on the right. If this check box is selected, the application limits the object scan time (e.g., when scanning a file). In the spin box on the right, you can specify the maximum allowed scan time (in seconds). When the specified time expires, the application stops the object scan and proceeds to another object. Object scanning duration limits:
- If an object scan has been stopped due to the expiration of the specified time interval, the application assigns the Not infected status to the object.
- Possible values in this field span from 30 to 60,000 seconds.
- The default scan timeout is 30 seconds.
- If the check box is cleared, the object scan time is unlimited.
- The check box is cleared by default.
- If you want to limit the duration of task execution, select the Use task execution timeout (h : m) check box and specify a value in the field on the right (in hours and minutes). When performing a task the application automatically stops the task after the specified time has passed. In the scroll box on the right, you can specify the maximum allowed task duration in hh:mm format. On-demand task duration limits:
- In the workspace, select the Schedule tab.
- In the Schedule section, set up a schedule for the on-demand scan task:
- If you want to run the on-demand scan task manually at your convenience, select manually.
- If you want the on-demand scan task to run once at the specified time, select Once and specify the date and time for task start.
- If you want the on-demand scan task to run automatically every week, select Weekly and specify the days and time for task start.
If the Once or Weekly option is selected, the application uses the time set on the SharePoint server where the task will be run.
- In the Start on-demand scan tasks on the following servers section, select the check boxes next to those servers the application needs to scan on-demand.
Default check box selections:
- If you are using one SharePoint server, the box next to the only SharePoint server is selected by default.
- If you are using several SharePoint servers, all boxes will be unselected by default.
- In the Schedule section, set up a schedule for the on-demand scan task:
- Click the OK button.
The new task will be added to the list of tasks in the workspace of the On-demand scan node.
Starting and stopping on-demand scan tasks
To start an on-demand scan task:
- Select and open in the Management Console tree the node corresponding to the necessary SharePoint server. Then select the On-demand scan node.
- Select an on-demand scan task from the list in the workspace.
- Click the Start button to run the on-demand scan task, or click the Stop button to stop the task.
Viewing a report on the results of an on-demand scan
To view a report on the results of an on-demand scan:
- Select and open in the Management Console tree the node corresponding to the necessary SharePoint server. Then select the On-demand scan node.
- In the workspace of the node in the Scan results section, you will see a list of prepared reports.
- Select the report you need in the list and click the View button.
The report will be displayed in a new window of your browser.
Details of scan results
If you are viewing a report generated by Kaspersky Security 9.0 for SharePoint Server Maintenance Release 2, the fields in the report will be different from those described in this reference material.
All reports contain the following details of scan results:
- The report header includes the following data:
- Report generation date.
- Task name. A unique task name assigned by the user in the task settings.
- Scan type. Scan type: or .
- Start method. Whether the task is run manually or automatically, according to a schedule
- Information about application components that performed the scan (for example, Content filtering, Anti-Virus scan, Scanning SharePoint web objects).
- Status. A task completion result summary generated based on the task status for each SharePoint server:
- Completed successfully;
- Error;
- Error caused by license restrictions;
- Stopped by the user;
- Task timed out.
- Task servers. A table containing statuses used to perform on-demand scans on each of the SharePoint servers.
- Server name.
- Task execution status on server. Possible values:
- Completed successfully;
- Error;
- Error caused by license restrictions;
- Stopped by the user;
- Task timed out.
- Table of locations to scan. A table of paths to areas in the SharePoint structure entered by the user in the task settings.
- Path. A list of paths to scanned areas in the SharePoint structure.
- Excluded. A list of paths to areas of the SharePoint structure excluded manually by the user in the task settings (for example, you can exclude a large area that does not require scanning).
- Included. A list of paths to areas in the SharePoint structure added manually by the user in the task settings (for example, you can add a small area requiring scanning that is a part of a larger area excluded from and does not require scanning).
- Subheader of the report for the SharePoint server.
- Server name. SharePoint server on which the task was performed
- Status. The task completion result may have the following values:
- Completed successfully;
- Error;
- Error caused by license restrictions;
- Stopped by the user;
- Task timed out.
- Scan results. General information about the results of task implementation.
- Start. Local scan start time on the SharePoint server specified in the subheader.
- Finish. Local scan end time on the SharePoint server specified in the subheader.
- Processing errors. The number of files skipped by the application because of processing errors.
- Scanned items. Total number of scanned files.
- Virus threats found. The number of malicious objects detected (the number Anti-Virus component incidents).
- Content filtering component positives. The number of Content Filtration incidents logged whenever the application discovers unwanted content, type and format of such files, the detection of masks of unwanted file names, as well as Content Filtration incidents logged whenever the application discovers unwanted content in web-based objects.
- Table of positives. A table with information about all files found to contain malicious objects or violations of Content filtering rules. If the scan has not detected any virus threats or violations of content filtering rules, the File scan detected no incidents message is displayed instead of the table of positives.
- File name. The name and path to the file where malicious objects or violations of content filtering rules have been found.
- Version. File version on the SharePoint server.
- Action. Operation performed on the file based on the scan results in accordance with the defined settings.
- Anti-Virus scan. Status assigned to the file by the anti-virus scanning component. This column displays the Corrupted or Password-protected status label for corrupted or password-protected files. For infected or probably infected files, the column displays the name of the malicious object detected in the file.
- Content filtering. Status assigned to the file by the content filtering. Policies whose violation triggered the content filtering component.
- Backup. Information about creation of a backup copy for the file in Backup.
- Restored version. The version to be assigned to the restored file (if it can be disinfected).
- Incident ID. The universal ID of the positive. The incident ID simplifies the search for information about the incident in the report, Backup, and file log. It is also displayed in the properties of a backup copy of the file in Backup and in notifications about violations of security policies during on-demand scanning.
- SharePoint web objects scan alarms. A table with the details of SharePoint web objects found to contain unwanted words or phrases. If no unwanted words or phrases have been detected during a scan of SharePoint web objects, the SharePoint web objects scan detected no incidents message is displayed instead of this table.
- Name and version. Name and version of a SharePoint web object found to contain unwanted words or phrases included in Kaspersky Lab sections and user categories within the search scope configured in the Content filtering settings. The name consists of:
<Site name> / <List name> / <Object ID>. The field containsn/aif the version information of the scanned SharePoint web object is unavailable. - Categorized as. List of SharePoint web object fields found to contain unwanted words or phrases, and categories to which the detected words and phrases belong.
- Incident ID. The universal ID of the positive. You can use the incident ID to search for information about the incident in the report and log files.
- Name and version. Name and version of a SharePoint web object found to contain unwanted words or phrases included in Kaspersky Lab sections and user categories within the search scope configured in the Content filtering settings. The name consists of:
Saving a report on the results of an on-demand scan
To save a report on the results of an on-demand scan task:
- Select and open in the Management Console tree the node corresponding to the necessary SharePoint server. Then select the On-demand scan node.
- In the workspace of the node, in the Scan results section, select the on-demand scan task of which you need to save the results.
- Click Save and, in the window that opens, select the folder to which the application will save the report.
The application saves the report in HTML format to the specified folder.
Page topDeleting an on-demand scan task
To delete an on-demand scan task:
- Select and open in the Management Console tree the node corresponding to the necessary SharePoint server. Then select the On-demand scan node.
- In the workspace, select the task that you want to remove and click the Delete button.
Selecting and excluding from on-demand scanning areas of the SharePoint structure
You can specify areas of the SharePoint structure to be scanned during an on-demand scan task. You can also exclude individual areas of the SharePoint structure from scanning.
To define the scan scope in a SharePoint structure:
- Select and open in the Management Console tree the node corresponding to the necessary SharePoint server. Then select the On-demand scan node.
- In the list of tasks displayed in the workspace, select the on-demand scan task that you want to modify. Click the Change button to open the Task settings window on the Scan scope tab.
- Specify the scan scope in the SharePoint structure in one of the following ways:
- In the SharePoint server structure tree, select check boxes corresponding to the SharePoint structure areas that you want to include in the scan scope. All check boxes are selected by default (all available SharePoint structure areas are scanned during the on-demand scan task).
The tree only displays the SharePoint structure areas, for which administrator access is allowed to the account used to start the application services.
- Add SharePoint structure areas manually. To do this, in the Additional web addresses section, perform the following actions:
- Click the Add button. In the window that opens, enter the path to the area that you want to add and click OK.
The following types of paths are supported:
http://<SharePoint portal name>.local/content/;https://<SharePoint portal name>.local:8080/content/file.txt;http://<SharePoint portal name>/.
To remove an area, select one in the list and click the Delete button.
- Select the check box opposite the path to a SharePoint structure area, and select Include in the drop-down list.
- Clear the check box opposite the path to a SharePoint structure area, and select Exclude in the drop-down list.
- Click the Add button. In the window that opens, enter the path to the area that you want to add and click OK.
- In the SharePoint server structure tree, select check boxes corresponding to the SharePoint structure areas that you want to include in the scan scope. All check boxes are selected by default (all available SharePoint structure areas are scanned during the on-demand scan task).
- Click OK to save the changes and close the window.
To exclude SharePoint structure areas from an on-demand scan:
- Select and open in the Management Console tree the node corresponding to the necessary SharePoint server. Then select the On-demand scan node.
- In the list of tasks displayed in the workspace, select the on-demand scan task that you want to modify. Click the Change button to open the Task settings window on the Scan scope tab.
- Exclude a SharePoint structure area from scanning in one of the following ways:
- In the SharePoint server structure tree, clear the check boxes corresponding to the areas which you want to exclude from the scan scope.
- In the Additional web addresses section, select the Exclude action in the dropdown lists for the areas that you want to exclude from scanning.
- Click OK to save the changes and close the window.
Creating on-demand Anti-Virus scan exclusions
To ease the load on the SharePoint server, you can exclude files from the scope of on-demand Anti-Virus scanning specific formats or file name masks, restrict scanning duration for individual files, as well as disable scanning of archives.
To exclude specific file formats from on-demand anti-virus scanning:
- Select and open in the Management Console tree the node corresponding to the necessary SharePoint server. Then select the On-demand scan node.
- In the list of tasks displayed in the workspace, select the on-demand scan task that you want to modify. Click the Change button to open the Task settings window, then select the Exclusions from Anti-Virus scan tab.
- In the File formats list, select the check boxes next to the file formats that you want to exclude from scanning.
Make a convenient use of the tree with the Expand all and Minimize all buttons.
- To save the changes and close the window, click OK.
To exclude files that match specific masks from on-demand Anti-Virus scanning:
- Select and open in the Management Console tree the node corresponding to the necessary SharePoint server. Then select the On-demand scan node.
- In the list of tasks displayed in the workspace, select the on-demand scan task that you want to modify. Click the Change button to open the Task settings window and select the File formats tab.
- In the File masks list, select the check boxes next to file name masks to be excluded from the scan scope.
- To add a mask to the list, open the Adding a file mask window by clicking the Add button, and specify the mask in the entry field.
If you want to define several masks at once, use a semicolon as a separator.
- To save the changes and close the window, click OK.
Configuring content filtering
For on-demand scan tasks, you can configure the application to look for specific file formats, file name masks, and the categories of unwanted words and phrases.
To configure Content Filtering rules for an on-demand scan:
- Select and open in the Management Console tree the node corresponding to the necessary SharePoint server. Then select the On-demand scan node.
- In the list of tasks displayed in the workspace, select the on-demand scan task that you want to modify. Click the Change button to open the Task settings window and select the Content filtering rules tab.
- Configure the following Content filtering settings:
- In the List of categories, select the check boxes next to the categories of Kaspersky Lab and user categories, which the application should seek while running the on-demand scan task.
- In the Formats list, select check boxes next to the file formats that should be scanned. To expand / collapse the entire list of formats and extensions, use the Expand all and Minimize all button.
- In the Mask sets list, select check boxes next to the sets of file name masks to be scanned during on-demand scanning.
- To save the changes and close the window, click OK.
You can specify the file formats and file name masks and the set of categories of unwanted words and phrases in the Content filtering node.
Page topTask settings – General
Under the General tab, you can select the general settings of the task, as well as set up anti-virus scanning and real-time content filtering modes. You can set up different modes of anti-virus scanning and content filtering for various tasks.
In the Actions section, you can configure the application's actions during the task run.
In the Restrictions section, you can set up the waiting time for task runs and object scans.
Use task execution timeout (h : m)
In the Anti-Virus scan section, you can enable the anti-virus scanning and set up rules for processing objects with an anti-virus scan.
Actions with infected and probably infected files
Actions with password-protected files
The Content filtering section allows enabling content filtering, as well as configuring the application's actions on files with unwanted content.
Actions with files that contain unwanted content
On-demand scan
In the On-demand scan tasks section, you can add new tasks and manage their execution progress.
In the Scan results section, you can view and save reports with scan results.
Connecting the Management Console to a SharePoint farm when upgrading Kaspersky Security
If Kaspersky Security is installed on a SharePoint server farm, you can connect the Management Console to any of the servers in the SharePoint farm.
When upgrading Kaspersky Security on a SharePoint server farm, you are advised to avoid performing any operations with the application until the upgrade is complete on all the servers of the SharePoint farm.
If you need to use the application before the upgrade is complete on all the servers of the SharePoint farm, you must make sure that the Management Console version and the SharePoint server version are matching. The previous version of the Management Console must be connected to servers with the application version that has not yet been upgraded, while the new version of the Management Console must be connected to servers with Kaspersky Security that has already been upgraded.
During the application upgrade process, Anti-Virus databases are rolled back automatically. For the safety of your computer, you are advised to start the database update after completing the application upgrade.
Page topTask settings – Scan scope
On the Scan scope tab, you can select SharePoint websites that the application will scan when running the task.
The Select areas of the SharePoint structure to scan section shows a list of websites hosted on the protected SharePoint server. You can create a scan scope by selecting the check boxes for certain websites or their websites.
In the Additional web addresses section, you can add SharePoint web addresses to the scan scope manually, as well as configure exclusions from the scan scope. In the dropdown list on the right of the web address that has been added, you can specify the action that the application will take on that address:
- Exclude. The address will be excluded from the scan scope.
- Include. The address will be added to the scan scope.
Web address
In this entry field, you can specify the SharePoint web address for which you want to set up specific scanning conditions. The application supports the following syntax of web addresses:
https://<SharePoint portal name>.local:8080/content/file.txthttp://<SharePoint portal name>.local/content/;http://<SharePoint portal name>/.
Task settings – Schedule
Under the Schedule tab, you can configure the task launch mode and select those SharePoint servers that require on-demand scanning.
In the Schedule section, you can select the task run mode (manual or automatic) and set up the schedule of automatic scan run.
The Start on-demand scan tasks on the following servers section will display SharePoint servers on which Security Server has been installed. You can change the list of selected servers by selecting check boxes next to the servers the application needs to scan on-demand.
Default check box selections:
- If you are using one SharePoint server, the box next to the only SharePoint server is selected by default.
- If you are using several SharePoint servers, all boxes will be unselected by default.
Task settings – Exclusions from anti-virus scan
On the Exclusions from Anti-Virus scan tab, you can define the settings for exclusion of files from anti-virus scanning.
The File formats section displays a list of file formats grouped by type (executable files, data, multimedia, images, archives). Clicking the ![]() button next to the name of a group opens a list of file formats (or subgroups) included in that group.
button next to the name of a group opens a list of file formats (or subgroups) included in that group.
You can configure exclusions from anti-virus scanning by selecting the check boxes next to relevant groups, subgroups, and specific file formats. The anti-virus scan settings will not be applied to files of selected formats. When running the task, the application will not scan files of specified formats.
All boxes are cleared by default.
In the File masks section, you can create a list of file masks, as well as select file masks that will be used to exclude files from scanning.
If the check box is selected next to a mask, the application will not scan files matching that mask when running the task.
Task settings – Content filtering rules
On the Content Filtering rules tab, you can create content filtering rules (such as prohibition of some words and expressions, prohibition of some file names, and blocking of specific file formats on SharePoint websites). In accordance with those rules, the application scans SharePoint files and web objects for unwanted information.
The List of categories section displays a list of categories of unwanted words and phrases. The list of categories is divided into the following groups:
- Kaspersky Lab categories. Preset categories of unwanted words and phrases compiled by Kaspersky Lab experts.
- Custom categories. Categories of unwanted words and phrases created by the user manually in the Content filtering node.
Clicking the ![]() button next to a group of categories expands the list of categories included in that group. You can select the check boxes for categories that will be included in a rule for prohibition of some words and expressions. In accordance with the rule, the application scans SharePoint files and web objects for unwanted words and phrases belonging to the selected categories. When handling files that contain unwanted words and phrases, the application applies the action defined on the General tab.
button next to a group of categories expands the list of categories included in that group. You can select the check boxes for categories that will be included in a rule for prohibition of some words and expressions. In accordance with the rule, the application scans SharePoint files and web objects for unwanted words and phrases belonging to the selected categories. When handling files that contain unwanted words and phrases, the application applies the action defined on the General tab.
All boxes are cleared by default.
The Unwanted file names section displays a list of file mask sets. You can create sets of file masks in the Content filtering node. You can select the check boxes for sets that will be included in a rule for prohibition of some file names on SharePoint. In accordance with the rule, the application checks if the names of files match the masks. When handling files that match the mask(s), the application applies the action defined on the General tab.
All boxes are cleared by default.
The Unwanted file formats section displays a list of file formats grouped by their type. Clicking the ![]() button next to the name of a group opens a list of file formats (or subgroups) included in that group.
button next to the name of a group opens a list of file formats (or subgroups) included in that group.
You can select the check boxes for file formats that will be included in a rule for prohibition of specific file formats on SharePoint websites. When handling such files, the application performs the action that has been defined on the General tab.
All boxes are cleared by default.
File mask
In this entry field, you can add or edit one or several file masks. If you enter multiple file masks in the field, use semicolons to separate them (e.g., test; win*; img).
Content filtering
Kaspersky Security performs content filtering of files placed on the SharePoint server during on-access scanning and on-demand scanning.
Content is filtered by:
- file format
- file name mask You can specify masks for unwanted file names and formats.
- By the text content and names of the files. Kaspersky Security includes a preset collection of categories of unwanted words and phrases created by the experts at Kaspersky Lab. The preset collection of unwanted words and phrases cannot be modified nor updated. The window for adding new user categories of words and phrases.
File content is scanned using the libraries of filters that support the management interface used by IFilter. To enable or disable filters available on a server, you can use IFilter utility, which is installed along with Kaspersky Security.
More details about IFilter can be found at http://msdn.microsoft.com/en-us/library/ms691105%28v=vs.85%29.aspx.
When the application is installed, filters included in following standard filter packs are enabled by default:
- Windows Server (installed with the operating system).
- SharePoint (installed with the SharePoint server).
- Office 2007 Filter Pack
- Office 2010 Filter Pack
If other filters are installed on the SharePoint server, they are disabled by default and content filtering by format is not performed for files scanned using these filters. Use Kaspersky IFilter Utility to enable such filters.
You can enable / disable the installed filters and also install necessary additional filters using utility.
You can start the utility from the menu Start → Programs → Kaspersky Security 9.0 for SharePoint Server → Kaspersky IFilter Utility.
For more details on the Kaspersky IFilter Utility, please refer to the online Help file.
About the white list
The while list is a list of words and / or phrases that should be skipped by Content filtering.
The white list contains words and / or phrases that, although included in prohibited categories of Kaspersky Lab, should be ignored by Content Filtering. By using the white list, it is possible to avoid false positives of the application component on detecting words and / or phrases that are permissible in and specific to the field of the company's business.
The white list is local. It is created separately for each farm server. When a word and / or phrase is included in the white list, all of its word forms should be specified for the application component to work properly.
Example: <string>sea</string> <string>seas</string> <string>seaside</string> <string>seasick</string> |
Changes made to the list are applied with a delay of no more than 5 seconds.
Page topCreating the white list
To create a white list of permissible words and / or phrases:
- Open the folder with SharePoint server configuration files by performing the following:
- If the application is installed on a farm of SharePoint servers, open the application setup folder and go to the folder of the corresponding farm server. Then open the Configuration folder.
- If the application is installed on a standalone SharePoint server, open the application setup folder and go to the Configuration folder.
- Create an XML file with the name ContentFilteringWhitelist.
The ContentFilteringWhitelist.config file must have the following structure:
<?xml version="1.0" encoding="utf-16"?><configuration version="1.0"><ContentFilteringWhitelistSubset xmlns:xsi="http://www.w3.org/2001/XMLSchema-instance" xmlns:xsd="http://www.w3.org/2001/XMLSchema"><Items><string></string></Items></ContentFilteringWhitelistSubset></configuration> - Type the word or phrase to be skipped by Content filtering between the <string> and </string> tags.
Type each new word or phrase and their word forms in a new line between the <string> and </string> tags.
- Save changes to the file in Unicode format.
If you save the file in a different format, words and / or phrases with language-specific characters may be displayed incorrectly.
Page topCreating, renaming, and deleting user categories of unwanted words and phrases
To create a new user category of unwanted words and phrases:
- Select and open in the Management Console tree the node corresponding to the necessary SharePoint server. Then select the Content filtering node.
- In the workspace, select the Filter by keywords tab and click the Create button in the List of categories section.
- In the Category name window that opens, enter a name for the new category.
- Click the OK button.
To rename a user category of unwanted words and phrases:
- Select and open in the Management Console tree the node corresponding to the necessary SharePoint server. Then select the Content filtering node.
- In the workspace, click the Filter by keywords tab, select the category that you want to rename, and click the Rename button.
- In the Category name window that opens, enter the name of the category and click OK.
To delete a category for unwanted words and phrases:
- Select and open in the Management Console tree the node corresponding to the necessary SharePoint server. Then select the Content filtering node.
- In the workspace, click the Filter by keywords tab, in the List of categories section, select the category that you want to delete, and click the Delete button. Selected category will be removed from the list.
Only user categories can be created, renamed or deleted. You cannot change the preset collection of Kaspersky Lab categories included in the application.
Importing a list of unwanted words and phrases into a user category from a text file
You can import from a text file a list of unwanted words and phrases into a user category.
The words and phrases in such file must comply with the following conditions:
- Each line must contain just one term with its word forms.
- The term should be separated from its word forms with the "|" character.
- Term length may not exceed 127 characters.
If a term contains special symbols or multibyte characters, for example, UTF-8 (encoded using three or more bytes), the term length must not exceed 64 characters.
To import a list of unwanted words and phrases into a user category:
- Select and open in the Management Console tree the node corresponding to the necessary SharePoint server. Then select the Content filtering node.
- In the workspace, select the Filter by keywords tab, and in the List of categories field, select the category to which you want to import the list.
- In the List of categories field, click the Import from file button. In the displayed window specify the path to the necessary file.
The Import from file button is only available for custom categories of unwanted words and phrases.
- To save the changes, click the Save button.
Adding, changing, and deleting unwanted words and phrases in user categories
To add an unwanted word or phrase to a user category:
- Select and open in the Management Console tree the node corresponding to the necessary SharePoint server. Then select the Content filtering node.
- In the workspace, click the Filter by keywords tab, and in the List of categories field, select the custom category to which you want to add a word or phrase.
- In the Category structure field, click the Add button. Type the word or phrase in the field within the displayed dialog.
- If you want the application to consider case while searching for a word or phrase, select the Case-sensitive check box.
- Click the OK button.
You can specify several words or phrases. Use the "|" character as a delimiter.
To edit a word or phrase within a selected user category:
- Select and open in the Management Console tree the node corresponding to the necessary SharePoint server. Then select the Content filtering node.
- In the workspace, click the Filter by keywords tab, and in the List of categories field, select the custom category containing the word or phrase that you want to edit.
- In the Category structure field, select the word or phrase that you want to edit, and click the Change button.
- Edit the word or phrase in the displayed window. If necessary, select the Case-sensitive to enable case sensitivity.
- Click the OK button.
To delete a word or phrase from a selected user category:
- Select and open in the Management Console tree the node corresponding to the necessary SharePoint server. Then select the Content filtering node.
- In the workspace, select the Filter by keywords tab, and in the List of categories field, select the custom category containing the word or phrase that you want to delete.
You can select several words of phrases in the list while holding the SHIFT key pressed.
- In the Category structure field, select the word or phrase that you want to delete, and click the Delete button.
Only user categories can be created, edited or deleted. You cannot change the preset collection of Kaspersky Lab categories included in the application.
Creating, renaming, and deleting a set of masks for unwanted file names
To create a new set of forbidden file name masks:
- Select and open in the Management Console tree the node corresponding to the necessary SharePoint server. Then select the Content filtering node.
- In the workspace, on the Filter by masks tab, click the Add button. This opens the Set name window.
- Enter in the displayed dialog the name for the new set of masks.
- Click the OK button.
To rename a set of masks for unwanted file names:
- Select and open in the Management Console tree the node corresponding to the necessary SharePoint server. Then select the Content filtering node.
- In the workspace, on the Filter by masks tab, select the set of masks that you want to rename, and click the Rename button.
- Enter the new name for the set of masks in the window that opens, and click OK.
To delete a set of unwanted file name masks:
- Select and open in the Management Console tree the node corresponding to the necessary SharePoint server. Then select the Content filtering node.
- In the workspace, on the Filter by masks tab, select the set of masks that you want to delete, and click the Delete button.
File name mask creation rules
Please follow these guidelines on creating masks:
- The following wildcards are supported:
- * – an arbitrary string of characters. For example, the "abc*" mask stands for any file with the name beginning with the "abc" string: abc.exe, abc1.com, abc2.rar.
- ? – any single character. For example, the "abc?.exe" mask stands for any file with the name beginning with the "abc" string followed with an arbitrary single character, like abc1.exe. However, the file abc12345.exe will not match the mask.
- Observe the following restrictions:
- Masks cannot contain the following characters: >, <, \, /, |, ", ;.
- It is not recommended to use masks that match the file extensions of SharePoint service files (for example, *.aspx, *.html, *.mht) in the content filtering settings. Deleting SharePoint service files could disrupt the operation of SharePoint.
Changing a set of unwanted file name masks
To add an unwanted file name mask to a set:
- Select and open in the Management Console tree the node corresponding to the necessary SharePoint server. Then select the Content filtering node.
- In the workspace, select the Filter by masks tab, and in the Mask sets field, select the set to which you want to add a mask.
- In the Masks in set field, click the Add button. In the window that opens, specify the mask of the unwanted file name in the field.
You can specify several masks. Use a semicolon as a delimiter.
To edit the unwanted file name masks in a set:
- Select and open in the Management Console tree the node corresponding to the necessary SharePoint server. Then select the Content filtering node.
- In the workspace, click the Filter by masks tab, and in the Mask sets field, select the set in which you want to edit masks.
- In the Masks in set field, select the mask that you want to edit, and click the Edit button.
- In the window that opens, edit the mask and click OK.
To delete an unwanted file name mask from a set:
- Select and open in the Management Console tree the node corresponding to the necessary SharePoint server. Then select the Content filtering node.
- In the workspace, click the Filter by masks tab, and in the Mask sets field, select the set from which you want to delete masks.
You can select several masks in the set while holding the SHIFT key pressed.
- In the Masks in set field, select the mask that you want to delete, and click the Delete button.
If multiple masks have been selected within a set, you can only delete the selected masks. No other operations with them will be available.
Content filtering
In the Filter by keywords section, you can prepare data categories that the application will use during content filtering. The left part of the section displays the List of categories. This list contains two types of categories:
- User categories (marked with
 )
) - Kaspersky Lab categories (marked with
 )
)
In the right part of the section, you can create and view the set of custom categories.
In the Filter by masks section, you can prepare sets of masks that the application will use during content filtering. The left part of the section displays the Mask sets list.
In the left part of the section, you can create and view the contents of sets.
Keyword settings
In the entry field, you can specify a word and / or word combination. Use the semicolon to separate words or word combinations. Term length may not exceed 512 characters.
File mask
In the entry field, you can specify / change a file mask. When specifying file name masks, you must follow the file name mask creation rules. Use a semicolon to separate multiple masks.
Preparing the DLP Module
The DLP (Data Leak Prevention) Module is a Kaspersky Security component designed to protect data against leaks. The component monitors file uploads by users to SharePoint in real time, checking the file contents for any confidential data. Settings of the DLP Module are configured by the Security Officer.
The Data Leak Prevention section is displayed in the Settings node if the DLP Module component has been installed on the SharePoint server. Data Leak Prevention is enabled by default.
Disabling the DLP Module can affect the workflow of the Security Officer.
To enable or disable DLP functionality:
- Select and open in the Management Console tree the node corresponding to the necessary SharePoint server. Then select the Settings node.
- In the Data Leak Prevention section, perform one of the following actions:
- Select the Enable DLP Module check box if you want the application to monitor data leaks in real-time mode.
- Clear the Enable DLP Module check box if you do not want the application to monitor data leaks in real-time mode.
- If necessary, in the Allow running search tasks on the following servers list, select the check boxes next to servers on which the security officer will be able to run scan tasks to search SharePoint servers for confidential data.
During a search task, the load on SharePoint servers increases.
- To keep the changes, click the Save button in the upper part of the window.
Information about changes in the component operation is displayed in the Control Center node and in the root node of the Security Officer.
Backup
Kaspersky Security saves in Backup copies of files that require action based on the results of Anti-Virus scanning and / or Content filtering (such as blocking or deletion). The application places in Backup copies of all harmful files, whether they can be disinfected or not.
Kaspersky Security places files to the Backup storage in encrypted form, which prevents the infection risk (files in Backup storage are not accessible without decryption).
Backup size
The data volume that can be stored in the Backup may be restricted by one of the two following parameters:
- Total number of files in Backup cannot exceed 50000. You cannot remove or change this restriction.
- The default size of Backup is 3686 MB. You can change the size of Backup.
Removing files from Backup
The application periodically (every time a new file is placed in Backup) checks compliance with the set restrictions on the size of Backup.
If the restrictions are exceeded, the application:
- Stops placing files in Backup, if the number of files in storage is exceeded.
- Frees up the necessary disk space by deleting the oldest files, if the restriction on storage size is exceeded by the addition of another file. The files stored for the longest amount of time are deleted first.
You can also delete files from Backup manually. For example, you may need to delete files that have been successfully restored after disinfection, or delete all files to purge Backup.
Viewing the list of files in Backup
You can view the list of files in Backup; it is displayed as a table with corresponding column headers.
To view the list of files in Backup:
- Select and open in the Management Console tree the node corresponding to the necessary SharePoint server. Then select the Backup node.
The workspace displays information about Backup and a list of files moved to Backup.
The top right corner of the workspace displays the number of files moved to Backup and the total size of these files.
The bottom right corner of the workspace displays the following information:
- The range of lines in the table listing files.
- The number of lines in the table listing files.
- The page number of the files list.
In the files list you can view the information about files stored in Backup. The appearance of the files list may differ depending on the columns selected for display.
By default, the list contains the following file information:
- File name. File name.
- Path to file. The path to the original location of the file on the server.
- Account. Account of the user who had performed the operation that resulted in file addition to Backup.
- Restored. Date and time of file restoration on server.
- Detected. Date and time of object detection in file.
- Component. The module, that scanned the file - anti-virus scan or content filtering.
- Reason why moved to Backup. Name of the object detected in the file.
- Scan type. The type of scan which detected the object – on-demand or on-access scan.
- Configure the appearance of the files list (if necessary) by selecting the columns to be displayed in the table:
- Click the Select columns button.
This opens the Select columns to display window.
The columns in the table of files will appear and disappear as you select or clear their corresponding check boxes.
The File name column is always displayed. It cannot be hidden.
- Click outside the Select columns window to close it.
- Click the Select columns button.
- You can sort the files list in the table by any of the columns in ascending or descending order, as required. To do this, click the header of the column that you want to sort files by, for example, File name, Path to file, or Component. If you want to reverse the sorting order, click the header once again.
The list of files will be sorted by the selected column. The sorting symbol will appear in the header of the selected column:
 – sorted in ascending order
 – sorted in descending order
To view the details of a specific file, select it in the file list using the buttons to navigate to the next / previous, first / last pages of the file list![]() . To find files in the list, you can also use the quick search and extended filter functions.
. To find files in the list, you can also use the quick search and extended filter functions.
Quick file search in Backup
To quick-search files in Backup:
- Select and open in the Management Console tree the node corresponding to the necessary SharePoint server. Then select the Backup node.
The workspace displays a list of files moved to Backup.
- Enter the pattern string for file search in the Quick search field. The pattern string supports masks.
Quick search begins acting immediately as soon as you enter the template string.
The table lists only files that match the search condition. A file will match the search condition if the entered pattern string can be found in at least one of the following file properties:
- File name
- Path to file
- Account
- File originator
- File originator email
- Last edit by
- Last editor email
- Incident ID.
If you want to cancel quick search, click the ![]() icon next to the Quick search field.
icon next to the Quick search field.
Extended file search in Backup
To find files in Backup using the extended filter:
- Select and open in the Management Console tree the node corresponding to the necessary SharePoint server. Then select the Backup node.
The results window will display the list of files stored in Backup.
- Click the
 icon to maximize the extended filter section.
The extended filter section will be displayed. The section contains the list of filter conditions. By default, the list contains three lines where you can specify the conditions that will be used to filter document copies. Each filter condition consists of three parts: the file property to check, the pattern string and the comparison rule applied while matching the property and the pattern string.
- To define a filtration condition:
- Select the property to check from the drop-down list in the left part of the line.
You can pick any of the following values as the property to check:
- File name
- Path to file
- User name
- Account
- Incident ID
- File originator
- File originator email
- Last edit by
- Last editor email
- Scan type.
- Select the comparison rule from the drop-down list in the middle of the line.
The set of values in the list will correspond to the selected value of the property to check. For example, when checking the File name property, the list contains the following values: Contains, Does not contain, Empty field.
If you have selected Empty field, the entry field in the right part of the line will become inactive.
- Enter the template string in the entry field in the right part of the line. The pattern string supports masks.
Specified filter condition will be applied to the list of files in Backup immediately as soon as you specify all its three parts. The files list only displays files matching all specified filtering conditions.
- Select the property to check from the drop-down list in the left part of the line.
- If you need to define more than three filter conditions, you can append additional lines to the list of conditions. To do this, click the Add a condition button.
A new line will appear in the lower part of the filter conditions section.
- If you want to delete an additional filter condition, click the
 icon in the filtering condition line.
The selected line will be deleted from the list of filter conditions. The list of files will be refreshed to match the remaining filter conditions.
For convenience, you can minimize the extended filter section by clicking the ![]() icon. Minimized extended filter will continue to function. If you want to cancel extended filtering, click the Reset filter link.
icon. Minimized extended filter will continue to function. If you want to cancel extended filtering, click the Reset filter link.
Restoring files from Backup
To restore files from Backup:
- Select and open in the Management Console tree the node corresponding to the necessary SharePoint server. Then select the Backup node.
The workspace displays a list of files moved to Backup.
- Select the files that you want to restore in the table.
Restoring files containing viruses and malicious objects can cause the computer to be infected.
- Click the Restore button.
Selected files will be decrypted and restored to the original locations in SharePoint structure. The files will be restored in the same format and under the same names they had when they were added to Backup.
While restoring objects, the application updates in SharePoint the following relevant information:
- Account. The application records to the field the account name of its administrator.
- Comment. The application records in this field the application name, date when an object was placed in Backup and file version.
- Version. The application updates the file version.
After file restoration its copy and relevant information remains in Backup.
Rules for restoring files when version control is enabled in SharePoint
When files are being restored from Backup, it is possible that the path specified in SharePoint points to a file of the same name. Restoration of files of the same name depends on version control settings configured on the SharePoint server.
The following version control options exist:
- Major. File versions are available to all users of the SharePoint server.
- Minor. File versions are available to a limited group of users.
Restoring a file of the same name with version control enabled
If there is no file of the same name in SharePoint, the application restores the object from Backup as a file with the first minor or major version, depending on the version of the file when a copy of it was placed in Backup. If major version control is enabled in SharePoint, the file will be restored as a file with the corresponding major version.
If there is a file of the same name in SharePoint, Kaspersky Security restores the file according to the following rules:
- Kaspersky Security restores the new minor version if minor/major version control is enabled in SharePoint and the file in Backup has a minor version.
- Kaspersky Security restores the new major version in all other cases.
If the file being restored has no version, the application restores the file as a file with a new minor version (if minor/major version control is enabled in SharePoint), or as a file with a new major version (if major version control is enabled).
Restoring a file of the same name with version control disabled
In this instance, Kaspersky Security prompts you to replace the file of the same name with the file being restored.
You can select one of the following actions in the window with the prompt to replace the file:
- Yes. The file in SharePoint is replaced with the file being restored.
- No. The file in SharePoint is not replaced with the file being restored. In this case, the file being restored remains in Backup.
When several files are being restored from Backup and there is a file of the same name of at least one of them in SharePoint, Kaspersky Security prompts you to replace the file / files of the same name with the file / files being restored.
You can select one of the following actions in the window with the prompt to replace the file / files:
- Yes, restore the file. The file in SharePoint will be replaced with the restored file.
- No, do not restore the file. The file in SharePoint will not be replaced with the restored file.
Saving files from Backup to disk
To save files in Backup to disk:
- Select and open in the Management Console tree the node corresponding to the necessary SharePoint server. Then select the Backup node.
The results window will display the list of files stored in Backup.
- If you want to save a single file to disk:
- Select in the files list the file, which you want to save to disk. You may use quick search or extended filter to find the file.
- Click the Save button.
The standard file saving dialog will appear.
- Select the destination folder for the file.
- If you want to save the file under a different name, enter one in the File name field.
- Click the Save button.
Selected file will be saved in the destination folder.
- If you want to several files to disk:
- Select in the list the files, which you want to save to disk. You may use quick search or extended filter to find the files.
- Click the Save button.
The standard destination selection dialog will appear.
- Select the destination folder where you want to save the files and click Save.
Selected files will be saved in the destination folder.
Removing files from Backup
To delete files from Backup:
- Select and open in the Management Console tree the node corresponding to the necessary SharePoint server. Then select the Backup node.
The results window will display the list of files stored in Backup.
- Select in the list the files, which you want to delete. You may use quick search or extended filter to find the files.
Kaspersky Security permanently removes files from Backup.
- Click the Delete button.
A warning dialog will appear.
- Click the Yes button.
Selected files will be deleted from Backup.
Purging Backup manually
You can purge Backup by deleting all the objects inside it.
To purge the Backup:
- Select and open in the Management Console tree the node corresponding to the necessary SharePoint server. Then select the Backup node.
- In the workspace, click the Purge Backup button below the list of files moved to Backup.
The application permanently deletes all files in Backup.
Configuring automatic Backup purging
To configure automatic Backup purging:
- Select and open in the Management Console tree the node corresponding to the necessary SharePoint server. Then select the Settings node.
- Select the Clear Backup automatically if its size exceeds check box.
- Enter in the entry field maximum Backup size (MB).
Supported parameter values are 1 –1048576 MB. If there is a storage size restriction and the addition of a new file exceeds this restriction, the application frees up the necessary space by deleting the oldest files. The default size of Backup is 3686 MB.
- To save the changes, click the Save button in the upper part of the application window.
Backup
The Backup node lets you view information about malicious objects detected by the application.
Configure automatic Backup cleansing
The upper part of the workspace displays the Quick search entry field. Here you can specify the name of an object (or a mask) that must be found in Backup. Clicking the button on the right of the entry field opens the block of advanced search settings. The drop-down lists on the left let you select an object filtering criterion. Details of the object or users related to it are used as filtering criteria. In the next dropdown list, you can specify the rate of the match between the criterion and the value. In the entry field on the right, you can specify a value for the selected criterion.
By default, the block contains three filtering conditions. You can add several conditions to configure object filtering flexibly. The application performs filtering according to all conditions added to the advanced search settings.
The drop-down list lets you select a filtering criterion. An additional filtering condition will be displayed for this criterion in the advanced search settings. Conditions that have been added are highlighted with dark green. You can delete an additional condition by clicking the ![]() button.
button.
A table with information about Backup objects follows. For your convenience, you can set up the appearance of the table and sort objects by any of the columns that are displayed at the time of sorting.
Clicking this button expands the Select columns to display section. This section lets you select the object details to be displayed in the Backup table by means of check boxes. Object details next to which the icon ![]() appears are always displayed in the table.
appears are always displayed in the table.
In the bottom part of the workspace, you can view the object's details. Clicking the ![]() button opens a section with the details of the object that has been selected in the table.
button opens a section with the details of the object that has been selected in the table.
Database update
Kaspersky Security database updates keep SharePoint servers protected against new viruses and other threats. Databases contain the latest information about threats and ways to neutralize them.
Databases contain descriptions of all malicious programs known to date and ways of disinfecting objects that have been corrupted by malware, as well as descriptions of programs that may be used by criminals to do harm to the user's computer or data.
While updating the databases, the application does not update the set of Kaspersky Lab categories.
It is important to keep all databases up to date. You are advised to update the databases as soon as you install the application because the databases included in the distribution kit will already be out of date. The databases on Kaspersky Lab's update servers are updated every hour.
Databases can be updated from the following sources:
- Kaspersky Lab's update servers on the Internet
- Local updates source, such as a local or a network folder
- Another HTTP or FTP server, such as your Intranet server
The updating is performed either manually or automatically, according to a schedule. After the files are copied from the specified update source, the application automatically connects to the new databases.
For added protection of SharePoint files, you can use Kaspersky Security Network services in addition to database updates. These services provide up-to-date information about threats and malware before it appears in Anti-Virus and Anti-Phishing databases.
During setup on several SharePoint farm servers, you can define local update settings for each individual server or propagate the global update settings to all servers.
The application's functionality may change after an update of the application databases.
Configuring automatic database updates
To configure automatic database updates:
- Select and open in the Management Console tree the Control Center (<Server name>) node corresponding to the relevant SharePoint server. Then select the Updates node.
- In the workspace, click the General tab, and in the Updates on servers section, select an update source for the databases:
- Kaspersky Lab's servers to download updates from Kaspersky Lab servers.
- HTTP server, FTP server, local or network folder to download updates from some of the listed update sources.
If you select this option, specify in the corresponding text box the server address, local or network folder.
If Kaspersky Security is installed on a standalone SharePoint server, the update source is selected in the Updates on servers section of the workspace, which appears on selecting the Updates node in the Management Console tree.
- The Run mode dropdown list allows you to set up a schedule for updates of the databases:
- Manually. The update starts when you click the Run database update on all servers button.
- Periodically. The update starts at the specified intervals.
- Daily. The update starts at the specified time (the local time of the SharePoint server is used).
- On selected day. The update starts on the specified days of the week.
If Kaspersky Security is installed on a standalone SharePoint server, the run mode for automatic updates of databases is configured in the Database update settings section of the workspace, not on the tab.
- In the Connection settings section, specify the required connection settings:
- If you connect to the Internet using a proxy server, select the Use proxy server check box and specify the proxy server address and number of the port used for connection. The default proxy server port number is 8080.
- If the proxy server requires authentication, specify the name and password of the user account. To do this, select the Use authentication check box and fill in the Account and Password fields.
- Specify the timeout duration in the Connection timeout entry field. By default, the timeout is set to 60 seconds.
This proxy server is used to exchange information with KSN cloud services if KSN protection is enabled.
If Kaspersky Security is installed on a standalone SharePoint server, connection settings should be defined in the Connection settings section of the workspace displayed when you select the Updates node in the console tree.
- Click the Save button.
Configuring the local database update settings on SharePoint servers of the farm
To configure the local database update settings on a SharePoint server within a farm:
- Select and open in the Management Console tree the Control Center (<Server name>) node corresponding to the relevant SharePoint server. Then select the Updates node.
- In the workspace, click the Updates on servers tab, select the required server in the table, and click the Modify local settings button.
- In the Server settings window that opens, in the General settings section, select a source of updates:
- Kaspersky Lab's servers to download updates from Kaspersky Lab servers.
- HTTP server, FTP server, local or network folder to download updates from some of the listed update sources.
If you select this option, enter the server address, local or network folder in the entry field.
- In the Database update settings section, in the Run mode dropdown list, set up a schedule for updates of the databases:
- Manually. The update starts when you click the Run update button.
- Periodically. The update starts at the specified intervals.
- Daily. The update starts at the specified time (the local time of the SharePoint server is used).
- On selected day. The update starts on the specified days of the week.
- In the Connection settings section, define the connection settings:
- If you connect to the Internet via a proxy server, select the Use proxy server check box and specify the proxy server address and number of the port used for connection. The default proxy server port number is 8080.
- If the proxy server requires authentication, specify the name and password of the user account. To do this, select the Use authentication check box and fill in the Account and Password fields.
- Specify the timeout duration in the Maximum connection timeout entry field. By default, the timeout is set to 60 seconds.
- Click the Save button.
Viewing the information about updates to the anti-virus database
To view the information about database updates:
- Select and open in the Management Console tree the Control Center (<Server name>) node corresponding to the relevant SharePoint server. Then select the Updates node.
- In the workspace, open the Updates on servers tab.
You will see a table with information about database updates on each SharePoint farm server. The table contains the following columns:
- Server name. Server within a SharePoint farm, on which Kaspersky Security is installed.
- Status of the last database update. The result of the last database update.
- Database release date (UTC). The time when databases currently used by the application were published on Kaspersky Lab servers.
- Time of last database update. The time of the latest database update on the server.
- Settings. Update settings used on the server (local or global).
If Kaspersky Security is installed on a standalone SharePoint server, update-related information is displayed in the workspace of the Update settings section, not on the Updates on servers tab.
Page topUpdating databases manually
You can start the database update procedure on all servers of the farm or on a few selected ones.
To update the database on all servers manually:
- Select and open in the Management Console tree the node corresponding to the necessary SharePoint server. Then select the Updates node.
- In the workspace, go to the General tab, and, in the General settings configuration section, click the Run database update on all servers button.
To update the database on several selected servers manually:
- Select and open in the Management Console tree the node corresponding to the necessary SharePoint server. Then select the Updates node.
- In the workspace, open the Updates on servers tab.
- Select the servers in the table and click the Run update@ button.
Propagating global database update settings to SharePoint farm servers
To apply the global database update settings on all SharePoint servers of the farm:
- Select and open in the Management Console tree the node corresponding to the necessary SharePoint server. Then select the Updates node.
- In the workspace, click the Updates on servers tab, select the required server in the table, and click the Propagate global settings button.
Updates
In the Updates node, you can configure the updating of databases.
In this node, the General and Updates on servers tabs can be displayed, depending on the schemes for deployment of Kaspersky Security on the organization's network. The Updates on servers tab is displayed if Kaspersky Security is installed on a farm of SharePoint servers that handle a single database of application configuration and Backup.
Updates – General
The Database update section displays information about the number of records in the databases, as well as their respective release dates. If the databases are outdated, this section displays a notification stating that the databases need to be updated. This section is displayed in the local settings of the Server if Kaspersky Security is installed on a farm of SharePoint servers that handle a single database for configuration of the application and Backup.
In the General settings section, you can specify the source from which the application will download updates, as well as set up the update run mode and schedule.
HTTP server, FTP server, local or network folder
In the Connection settings section, you can define the proxy server settings for updates downloading.
Updates – Database update settings
The Updates on servers tab displays a table, which lists Servers included in the farm. You can define the local settings for updates of the databases on each of those Servers, or use shared settings for all of them.
Run database update on all servers
SharePoint server database update settings
The Database update section displays information about the number of records in the databases, as well as their respective release dates. If the databases are outdated, this section displays a notification stating that the databases need to be updated. This section is displayed in the local settings of the Server if Kaspersky Security is installed on a farm of SharePoint servers that handle a single database for configuration of the application and Backup.
In the General settings section, you can specify the source from which the application will download updates, as well as set up the update run mode and schedule.
HTTP server, FTP server, local or network folder
The Connection settings section allows specifying the address of the proxy server through which an Internet connection will be established and configure the connection via the proxy server.
Notification delivery
Notification is an email message that contains information about an event, which occurred on a protected SharePoint Server.
Kaspersky Security supports the delivery of notifications on the following events in the application:
- Detection of infected, password-protected, and corrupted objects, or unwanted content during an on-access scan
- Detection of infected, password-protected, and corrupted objects, or unwanted content during an on-demand scan
- Change of database status and condition
- Execution of an on-demand scan task and its results
- Detection of inactive SharePoint servers
- License-related events
Kaspersky Security sends event notifications by email. The application uses a SMTP server to send notifications. You can select an SMTP server used on SharePoint or specify a different SMTP server.
You can specify notification recipients for each event. By default, no notification recipients are specified.
You can edit the text in the automatic notification of events that are logged by anti-virus scanning and content filtering. When making templates for notifications about events related to on-access and on-demand scans, you can use the following variables:
Variables in notification templates
Variable name |
Variable value |
%ACTION% |
The application's action on the object. |
%AUTHOR% |
Name of the user who is the file author. If the user cannot be recognized (e.g., during an on-demand scan), the variable takes on the value |
%BACKUP_RESULT% |
Object backup result. |
%FARM_NAME% |
Name of the server farm associated with the event. |
%FILE_NAME% |
Name of the object scanned by the application. |
%FILE_URL% |
Path to the object on SharePoint. |
%FILE_VERSION% |
Version of the file scanned by the application. This variable can only be used in notifications about events of an on-demand scan. |
%INCIDENT_ID% |
Unique ID of the incident. The ID allows finding information about the event in the application event log and Backup. |
%LAST_MODIFIER% |
Name of the user who has been the last to make any changes to the file. If the user cannot be recognized (e.g., during an on-demand scan), the variable takes on the value |
%ODS_TASK_NAME% |
Name of an on-demand scan task. This variable can only be used in notifications about events of an on-demand scan. |
%OPERATION_TYPE% |
The user's action on the object (e.g., downloading the file from a SharePoint website to the user's computer). This variable can only be used in notifications about events of an on-access scan. |
%SERVER_LOCAL_DATETIME% |
Date and time the malicious object or unwanted content was detected on the server. The variable takes on the value of the local time of the server. |
%SERVER_NAME% |
Name of the server associated with the event. |
%THREAT_DESCRITION% |
Name of the virus or category of unwanted words and phrases. |
%USER% |
Name of the user associated with the event. This variable can only be used in notifications about events of an on-access scan. |
%UTC_OFFSET% |
Time shift regarding UTC (Coordinated Universal Time). |
For other events (such as changes in the database status and condition, or license-related events), the notification text remains unchanged.
Notifications about license-related events
Kaspersky Security checks licenses of Security Server and the DLP Module after each database update. The application sends notifications about license-related events in the following cases:
- If the license expires soon
The application sends the notification once per day (at 12:00 A.M. UTC) if both the active key and the additional key expire. By default, the application starts sending notifications 15 days before this event. You can change the term for sending the license expiration notification.
- If the license already expired
The application sends the notification once per day (at 12:00 A.M. UTC) if the active key expired and no additional key is available.
- If the active key has been added to the black list of keys
When updating anti-virus databases, the application checks the black list of keys for active keys. The application sends a notification if at least one active key has been found in the black list of keys.
Kaspersky Security sends special notifications about events related to Security Server and DLP Module licenses.
SMTP server configuration for delivery of notifications
To define the SMTP server settings for sending notifications:
- In the Management Console tree, select the protected SharePoint server on which you want to configure the SMTP server.
- In the node tree of this server, select the Notifications node.
The workspace of this node displays the notification settings.
- Configure the following settings in the SMTP server settings section:
- Email addresses of SharePoint administrators.
The application sends any notifications of application operation events to those addresses. You can configure notifications in the Event notifications node.
Use a semicolon to separate email addresses in the entry field.
No addresses are specified by default.
- Email address from which the application will send notifications of events in the application operation.
By default, the application sends email messages from the email address, which is specified in the SMTP server settings on SharePoint.
- Email addresses of SharePoint administrators.
- Select the method of SMTP server configuration from the following options:
- Use SMTP server settings on SharePoint.
The application uses the settings of the SMTP server defined on SharePoint. If the settings of the SMTP server have not been defined on SharePoint, the application will not be able to send email messages.
This is the default option.
- Use custom SMTP server settings.
The application uses the settings of the SMTP server that have been specified manually.
If you select this option, the SMTP server address, Account, and Password fields become available. In this fields, you can specify the settings of the SMTP server that you intend to use for sending email messages.
- Use SMTP server settings on SharePoint.
- If you need to test the operation of the SMTP server that has been configured manually, click the button.
- Click the Save button in the upper part of the window.

The application saves the SMTP server settings for sending notifications.
Page topConfiguring notifications of events in the application operation
To configure automatic notifications of events in the application operation:
- In the list of protected servers that have been added to Management Console, select the SharePoint server on which you need to configure notifications of events in the application operation.
- In the node tree of this server, select the Notifications node.
The workspace of this node displays the notification settings.
- In the Event notifications section, configure notifications as follows:
- In the left part of the section, in the Notification subjects list, select an event of which the application will notify you by email.
The right part of the section displays a list of recipients that can be sent notifications.
- Select the check box next to the recipients that will be automatically notified of this event by the application. You can specify the following recipients:
- Administrator. Email address(es) of the administrators specified in the Event notifications section.
- Author. Email address of the document author (user who uploaded the first version of this document to SharePoint). The author's email address is contained in the settings of the SharePoint server on which the document is stored.
- User. Email address of a user associated with the event. The user's email address is contained in the settings of the SharePoint server on which the document is stored.
- Additional addresses. Email address(es) specified in the entry field. Use a semicolon to separate email addresses in the entry field.
- If necessary, edit the notification text by clicking the Template button.
- In the left part of the section, in the Notification subjects list, select an event of which the application will notify you by email.
- Click the Save button in the upper part of the window.
The settings of notifications about events in the application operation will be saved.
Page topChanging the term of sending license expiration notifications
To change the term of sending license expiration notifications:
- In the list of protected servers that have been added to Management Console, select the SharePoint server on which you need to configure license expiration notifications.
- In the node tree of this server, select the Notifications node.
The workspace of this node displays the notification settings.
- In the left part of the Event notifications section, in the Notification subjects list, select License-related events.
The right part of the section then displays the settings of license-related event notifications.
- In the Notify about license expiration in advance (days before) spin box, specify how many days before the license expiration the application must start sending notifications.
By default, the application sends the first notification 15 days before the license expires.
Notifications are sent once per day (at 12:00 A.M. UTC).
- Click the Save button in the upper part of the window.
The notification settings are saved. The application starts sending license expiration notifications on the specified day.
Page topNotifications node
In the Notifications node, you can configure the sending of automatic notifications of the application operation by email.
The SMTP server settings section allows you to configure the SMTP server for sending email messages on behalf of the application.
Use SMTP server settings on SharePoint
Use custom SMTP server settings
In the Event notifications section, you can configure the delivery of notifications about events in the operation of the application.
The left part of the section displays the Notification subjects list. In this list, you can select events of which the application will notify recipients from the right part of the section, by email.
In the right part of the section, you can select recipients for each notification, edit the text of notifications, or define the advanced settings for notifications about events. The set of notification recipients may vary depending on the event selected in the Event notifications list in the left part of the section. Additional notification settings will also be available for defining.
In the Recipients of notifications list, you can select one or several recipients to whom the application will send a notification about the selected event. Use a semicolon to separate email addresses in the entry field.
You can edit the text in this automatic notification by clicking the Template button on the right of each recipient. This feature is available for events that were logged by anti-virus scanning or content filtering.
On-access scan. Malicious objects
On-access scan. Unwanted content
On-demand scan. Malicious objects
On-demand scan. Unwanted content
Change databases status and condition
Reports on on-demand scan tasks
Inactive Kaspersky Security on SharePoint server
Notification template
In the Notification template window, you can edit the contents of the notification that the application will send to a specified recipient.
Preparing application reports
Kaspersky Security allows you to generate anti-virus protection, content filtering and operational reports. Reports allow you to analyze information about the protection status of a SharePoint server. Reports provide information on the number of clean and infected files and the number of files disinfected and removed.
Ready reports are displayed in the workspace of the Reports node, on the Generate and view reportstab. You can view a report in the web browser window.
You can generate reports using one of the two following methods:
- Generate reports manually
The application generates a report upon your request.
- Generate reports through a report task
The application generates reports automatically according to the defined task settings. You can set up a report generation schedule or delivery of notifications about created reports by email. If necessary, you can run report generation tasks manually.
The list of report generation tasks is displayed in the workspace of the Reports node on the Report generation tasks tab. Report generation tasks that were or could not be run at the scheduled time are highlighted red.
If a report generation task has not been executed, information about this event is displayed in the list of tasks, in the Status column:
- Deleted: <Server name>. Security Server of Kaspersky Security has been deleted from the SharePoint server specified in the report generation task settings. You can specify a different SharePoint server in the task settings.
- Task not executed. The SharePoint server specified in the report generation task settings was not available at the time scheduled for the start of the task. The availability of the server needs to be checked.
Configuring automatic report generation
Kaspersky Security allows you to automate your activities when generating application reports. You can assign the application report generation tasks that it will run according to the specified schedule. The application will generate reports in accordance with the requirements specified in the task settings.
Current report generation tasks are displayed in the workspace of the Reports node, in the Report generation tasks section. Report generation tasks that have not yet been executed or cannot be run at the scheduled time are highlighted with red. The details of reasons that interfere with execution of a task are displayed in the task table as follows:
Reasons that interfere with the task execution
Column |
Status |
Description |
|---|---|---|
Last start |
Task not executed |
The protected server specified in the task settings was unavailable at the moment of the automatic task run. The availability of the server needs to be checked. |
Server name |
Deleted |
The Security Server component has been removed from the protected server specified in the task settings. You can perform the following actions:
|
If necessary, you can run report generation tasks manually.
To configure automatic report generation:
- In the Management Console tree, select and expand the protected SharePoint server on which you need to configure automatic report generation. Then select the Reports node.
The workspace of this node displays the report settings.
- In the Report generation tasks section, click the Create button.
The Task settings dialog will appear.
- In the Task name field, specify the task name. The task name must be unique.
- Select the Run on schedule check box for the application to run the task at the specified time. The check box is selected by default.
- In the Report generation server dropdown list, select the protected SharePoint server on which you need to generate reports automatically.
- In the Schedule section, select the time interval for automatic task run and define its settings:
- Every N days. The report will be created at the interval with the specified number of days, at the specified time. The report contains data for the last N days (by default, collected from 12:00 AM of the first day of the interval to 12:00 AM of the report generation day). You can change the report generation time in the Start time entry field.
- Weekly. The report will be created at the defined time on the specified day of the week. The report contains data for the last 7 days (by default, from 12:00 AM of the first specified day of the week to 12:00 AM of the report generation day, for example, from Monday to Monday). You can change the report generation time in the Start time entry field.
- Monthly. The report will be created at the defined time on the specified day of the month. The report contains data for the last month (by default, collected from 12:00 AM of the specified date of the previous month to 12:00 AM of the specified date of the report generation month). You can change the report generation time in the Start time entry field.
If you clear the Run on schedule check box, the settings in the Schedule section will not be available.
- Select the Send to administrator check box for the application to send newly generated reports to the administrator email address.
If the administrator email address has been specified, it is displayed on the right from the check box. If no address has been specified, you can define this setting in the Notifications node.
- Select the Send to recipients check box and enter email addresses for the application to send reports to them. If several addresses are defined, use a semicolon as a delimiter.
- To save the settings and close the window, click OK.
The newly created task is displayed in the Report generation tasks section. The application will automatically run the task in accordance with the schedule that you have set up.
Page topStarting a report generation task
To run a report generation task manually:
- In the Management Console tree, open and expand the protected server on which you need to run the report generation task. Then select the Reports node.
The workspace of this node displays the report settings.
- In the Report generation tasks section, select the report generation task that you need to run at the moment.
The task control buttons become available.
- Click the Report generation server button.
The application generates the report according to the configured task settings. The application automatically opens the recently generated report in the default web browser window.
Page topGenerating reports manually
To generate a report manually:
- In the Management Console tree, open and expand the protected server on which you need to generate a report. Then select the Reports node.
The workspace of this node displays the report settings.
- In the Reports section, click the New report button.
This opens the Report settings window.
- In the Create report list, specify the time interval over which you need to generate a report:
- For 24 hours.
If you select this option, use the section on the right to select the day for which the report will be generated.
- Over period.
If you select this option, use the section on the right to specify the start date and end date of the reporting period for which the report will be generated.
- For 24 hours.
- Click the OK button.
The application generates a report for the selected time interval. The application automatically opens the newly generated report in the default web browser window.
You can also generate a report manually by means of report generation tasks.
Page topViewing reports
To view a report:
- In the Management Console tree, open and expand the protected server about which you would like to view a report. Then select the Reports node.
The workspace of this node displays the report settings.
- In the Reports section, select the report that you would like to view and click the View button.
The report opens in the default browser.
The generation date and time are displayed for each report, as well as the name of the protected server for which it has been generated, and the reporting period that it covers. The report displays blocks with statistical information about objects that have been scanned by the application.
Report on operations with files section
This section displays the number of files that were scanned by the application over the reporting period, as well as statistics on statuses that were assigned to files during the scan.
General statistics on files scanned by the application
Status |
Description |
|---|---|
Recognized as clean |
Number of files recognized as clean after being scanned by application components to which they were referred for scanning. |
Disinfected |
Number of files that have been successfully disinfected by the application. |
Deleted |
Number of files that have been deleted after scanning. |
Blocked |
Number of files that have been blocked during on-access scanning. |
Skipped |
Number of files that have been skipped by the application after anti-virus scanning and content filtering according to the configured settings of on-demand and on-access scanning. |
Not processed |
Number of files that have not been scanned by at least one Kaspersky Security component. |
Section Report on status of server protection
This section displays the number of files that have undergone anti-virus scanning, as well as statistics on statuses that were assigned to files during the virus scan.
Statistics on files scanned by Anti-Virus
Group of objects |
Status |
Description |
|---|---|---|
Scanned |
Non-infected |
Number of files that have been found to be free from threats during virus scanning. |
|
Infected |
The number of files with a code segment fully matching a code segment of a known application posing a threat. |
|
Probably infected |
The number of files whose code contains a modified segment of code of a known application posing a threat, or files resembling such application in the way it they behave. |
|
Password protected |
Number of password-protected archives. |
|
Corrupted |
Number of files that cannot be read by Kaspersky Security |
Not scanned |
Excluded from scanning by the administrator |
Number of files that have been skipped according to the virus scan exclusion settings. |
|
Licensing issues |
The number of files that have not be scanned due to license errors (such as a missing key). |
|
Processing errors |
Number of files that have been skipped due to errors during virus scanning. |
File processing results |
Disinfected |
Number of files disinfected after virus scanning. |
|
Deleted |
Number of files deleted after virus scanning. |
|
Blocked |
Number of files blocked after virus scanning. |
|
Skipped |
The number of files that, although found to contain a threat during an anti-virus scan, have been skipped because the Allow action had been specified in the scan settings. |
Content filtering report section
This section displays the number of files that have undergone content filtering, as well as statistics on statuses that were assigned to files during filtering. During content filtering, the application can assign multiple statuses to a single file. Statistics reflect all statuses that have been assigned to files.
Statistics on content filtering of files
Group of objects |
Status |
Description |
|---|---|---|
Scanned |
Allowed |
Number of files that have been found to be free from violations of content filtering policies. |
|
Forbidden format |
Number of times that the content filtering component detected prohibited file formats specified in the content filtering settings. |
|
Forbidden mask |
Number of times that the content filtering component detected file names that match masks specified in the content filtering settings. |
|
Forbidden content |
Number of times that the Content filtering component detected words or phrases included in Kaspersky Lab sections and user categories within the search scope configured in the Content filtering settings |
Not scanned |
Excluded from scanning by the administrator |
Number of files that have been skipped according to the content filtering exclusion settings. |
|
Text extraction errors |
Number of files whose contents have not been scanned by the application due to text extraction errors. Such errors may be caused by errors in the corresponding filter of IFilter Utility or a stopped Kaspersky Text Extracting Service. |
|
Licensing issues |
The number of files whose content has not been scanned by the applications to due license violations, such as a missing or blacklisted key. |
|
Text filter is not available |
Number of files whose contents have not been scanned by the application because the corresponding filter of IFilter Utility is disabled or not installed. |
|
Processing errors |
Number of files that have been skipped due to other errors occurring during content filtering. |
Object processing results |
Deleted |
Number of files for which the action is set to Delete in content filtering settings. |
|
Blocked |
Number of files for which the action is set to Block in content filtering settings |
|
Skipped |
Number of files for which the action is set to Skip in content filtering settings. |
SharePoint web objects scan report section
This section displays the number of web objects that have undergone content scanning, as well as statistics on statuses that were assigned to web objects detected during the scan.
Statistics on web objects scanned
Group of objects |
Status |
Description |
|---|---|---|
Scanned |
Recognized as clean |
Number of SharePoint web parts that have been found to be free from violations of content filtering policies. |
|
Blocked |
Number of SharePoint web parts that have been blocked based on the results of content filtering. |
|
Skipped |
The number of SharePoint web objects that, although found to contain unwanted content, have not been blocked because the Skip action has been specified for them in the scan settings. |
Not scanned |
Licensing issues |
The number of SharePoint web objects that have not be scanned due to license errors (such as a missing key) |
|
Processing errors |
The number of SharePoint web objects that have been skipped due to errors occurring during content filtering. |
Saving reports to a file
To save a report to a file:
- In the Management Console tree, select and expand a protected server. Then select the Reports node.
The workspace of this node displays the report settings.
- In the Generate and view reports section, select the report that you need to save, and click the Save button.
The standard Save as window of Microsoft Windows opens.
- Select a folder to save the report in and change the report file name, if necessary. By default, the application assigns the following name to the report file: <report name> <report creation date>.
The application saves the report in an HTML file to the folder that you have specified.
Page topReports
The Report generation tasks section displays a table with a list of report generation tasks. Clicking column headers allows you to sort the list of tasks shown in the table. If a task is selected in the table, buttons for managing this task become available.
The Generate and view reports section displays a table with a list of reports. Clicking column headers allows you to sort the list of reports displayed in the table. If a report is selected in the table, buttons for managing this report become available.
Task settings
In the Task settings window, you can define the settings of the report generation task.
The Schedule section allows setting up a schedule according to which the application will run the task.
In the lower part of the window, you can select the recipients whom the application will send the ready report by email to.
Page topReport parameters
In the Create report list, you can select the time period for which the application will create a report.
Auditing the application operation
Details of the application operation are recorded into Kaspersky Security logs (hereinafter referred to as "logs") and into Microsoft Windows Event Log.
About Windows Event Log
Windows Event Log contains the details of the Kaspersky Security operation that the Kaspersky Security administrator or the security officer can use to monitor the application operation.
Events related to the Kaspersky Security operation are recorded to Windows Event Log by KSHSecurityService (Kaspersky Security service). Each basic events related to the application operation has a respective fixed event code. You can use an event code to find and filter events in a log.
About event logs in Kaspersky Security
Details of the application operation in Kaspersky Security logs are recorded by the application's components and software modules. The application records information to the end of the most recent log. Records of new events are grouped at the top of the list. When the log reaches100 MB in size, the application archives it and creates a new one.
Event logs are created in TXT format and saved to the default folder <Application installation folder>/Logs.
You can define the following settings of Kaspersky Security logs:
- Log storage time;
- Log detail level;
- Location of the folder in which Kaspersky Security stores logs.
You can also enable the logging of event details for the Content Filtering log
Data saved in a log may contain confidential information. For security reasons (for example, to prevent unauthorized access or possible data leaks), you are advised to personally protect files of the application log.
Kaspersky Security events in Windows Event Log
This section contains information about basic events in the application operation that are recorded to Windows Event Log. Events related to the Kaspersky Security operation are recorded to Windows Event Log by KSHSecurityService (Kaspersky Security service). Each of those events has a respective fixed event code. Events in this table are sorted by event code in ascending order.
Main events in the application operation
Event code |
Task category |
Event importance level |
Description |
1011 |
AntivirusScanner; Dlp; TextCategorizer. |
Error |
Such an event is logged if the application registers any errors in the operation of a component. The event record specifies the component name and the error description. |
Warning |
Such an event is logged if the application registers the disabling of a component. The event record specifies the component name. |
||
Info |
Such an event is logged if the application registers the enabling of a component. The event record specifies the component name. |
||
1015 |
OAS |
Warning |
Such an event is logged if the application detects an infected file during an on-access scan. |
1019 |
OAS |
Warning |
Such an event is logged if the application detects unwanted content during an on-access scan. |
1020 |
OAS |
Warning |
Such an event is logged if the application detects a phishing link during an on-access scan. |
1021 |
ODS |
Info |
Such an event is logged if the on-demand scan task has been run manually or automatically (by schedule). The event record specifies the task name and the run type. |
1022 |
ODS |
Info |
Such an event is logged if the on-demand scan task was stopped. The event record specifies the task name and the task stop reason. |
1023 |
ODS |
Info |
Such an event is logged if the user requested the on-demand scan task to run. The event record specifies the user account. |
1024 |
ODS |
Info |
Such an event is logged if the user requested the on-demand scan task to stop. The event record specifies the user account. |
1041 |
Updates |
Error |
Such an event is logged if an update of the application databases fails. The event record specifies the error description. |
1042 |
Updates |
Info |
Such an event is logged if an application database update error is fixed and the databases are successfully updated. The event record specifies the database release date. |
1091 |
Updates |
Error |
Such an event is logged if the application detects that the databases became outdated more than 24 hours ago. The event record specifies the database release date. |
1092 |
Updates |
Info |
Such an event is logged if the application databases have been updated to the latest version. The event record specifies the database release date. |
6200 |
Infrastructure |
Error |
Such an event is logged if an application component switched to restricted scan mode. The event record specifies the component name and the time it switched to restricted scan mode |
7114 |
Backup |
Info |
Such an event is logged if the user deleted a file from Backup. The event record specifies the user account and the file details. |
7115 |
Backup |
Info |
Such an event is logged if the user saves a file from Backup to disk. The event record specifies the user account and the file details. |
7116 |
Backup |
Info |
Such an event is logged if the user restores a file from Backup. The event record specifies the user account and the file details. |
10200 |
Licensing |
Warning |
Such an event is logged if no active key is detected. |
10201 |
Licensing |
Error |
Such an event is logged if the license expired. The event record specifies the key and the license expiration date. |
10202 |
Licensing |
Warning |
Such an event is logged if the Notify about license expiration in advance (days before) setting has been defined. The event record specifies the key, the license expiration date, and the number of days left until this date. |
11010 |
Infrastructure |
Info |
Such an event is logged if the Management Console has been run. The event record specifies the account of the user who has run the Management Console. |
11011 |
Infrastructure |
Info |
Such an event is logged if the Management Console was closed. The event record specifies the account of the user who closed the Management Console. |
16000 |
Dlp |
Warning |
Such an event is logged if the Log events to Windows Event Log and Kaspersky Security Center Event Log setting is defined in the policy or in the Search task and the application detected a file that violates the security policy. |
16012 |
Dlp |
Warning |
Such an event is logged if the security officer requested an incident-attached object to be saved to disk. |
16013 |
Dlp |
Warning |
Such an event is logged if the security officer archived some incidents. |
16100 |
Dlp |
|
Such an event is logged if the Notify when adding Kaspersky Lab categories setting is defined and Kaspersky Lab categories were updated during the application database update. The event record specifies the names of categories that have been updated, as well as their brief descriptions. |
30000 |
Configuration |
Info |
Such an event is logged if some of the application settings have been modified. The event record specifies the account of the user who modified the settings, the modification scope (for example, Content Filtering), and the new values of the settings. |
31000 |
Licensing |
Info |
Such an event is logged if the key status, license expiration date, number of users, or license type have changed. The event record specifies the key, the license type, the license expiration date, and the number of license users. |
31022 |
Licensing |
Info |
Such an event is logged if the user performed an action on the Security Server key or the DLP Module key. The event record specifies the user account. |
About the log of content filtering
The log of Content Filtering allows you to check if Content Filtering is configured properly.
The log of Content Filtering is located in the folder <Application installation folder>\logs\content_filtering\content_filtering_incidents_log_YYYYDDMM.csv, where YYYYDDMM stands for the log creation date.
The log of Content Filtering is created on a daily basis and contains the details of content filtering incidents for the relevant day. Logs for the previous days are stored in the folder <Application setup folder>\logs\content_filtering in archives with the corresponding names.
When a Content Filtering incident is triggered by the name or the content of a file, the following details are recorded in the log of Content Filtering:
- Incident ID
- Path to the file
- File name
- The word or phrase that caused the Content filtering incident
- The Kaspersky Lab section or user category to which the specific word belongs
The log of Content Filtering will additionally record a sequence of characters from the text that has been extracted from the file or the field of a SharePoint web object by the corresponding filter of Kaspersky IFilter Utility.
When a content filtering incident is caused by the content of a SharePoint web part, the following details are recorded in the log of content filtering incidents:
- Incident ID
- Path to the SharePoint web object
- Name of the field of the SharePoint web object in which unwanted content has been detected
- The word that caused the content filtering incident
- The Kaspersky Lab section or user category to which the specific word belongs
For a more detailed check of the operation of Content Filtering, you can enable the detailed logging of events to the log of Content Filtering. The log records a sequence of 10 words located in the text before the word that caused the Content filtering incident, the word itself, and 10 words located in the text after the word that caused the incident. If these 10 words contain more than 100 characters, the sequence is limited to 100 characters before and after the word that caused the Content filtering incident.
Data in the Content filtering log is not encrypted. For security reasons (for example, to prevent unauthorized access or possible data leaks), you are advised to personally protect files of the application log.
Page topEnabling the extended event logging into the Content Filtering log
To enable the extended event logging into the Content Filtering log:
- Select and open in the Management Console tree the node corresponding to the necessary SharePoint server. Then select the Settings node.
- In the Diagnostics block of settings, select the Record details of events to Content filtering log check box.
The log of Content Filtering will additionally record a sequence of characters from the text that has been extracted from the file or the field of a SharePoint web object by the corresponding filter of Kaspersky IFilter Utility.
- To save the changes, click the Save button in the upper part of the window.
Configuring the path to the logs folder
To configure the path to the logs folder:
- In the Management Console tree, select and open the node that corresponds to the relevant SharePoint server, then select the Settings node.
- In the Diagnostics section, in the Logs folder entry field, specify the path to the logs folder.
Do not use variables and masks when specifying the path to the folder. Do not specify an FTP server or a network folder as a location where the application logs are stored.
The application will save logs using the specified path. If you configure the path to the folder on a server within a farm, the configuration will cover the entire server farm.
- If necessary, click the Default link to restore the default path to the logs folder.
- Click the Save button in the upper part of the window.
If the application does not save logs using the specified path, check the rights of access to that folder.
Configuring the log storage term
To configure the storage term for log files:
- Select and open in the Management Console tree the node corresponding to the necessary SharePoint server. Then select the Settings node.
- In the Diagnostics section, in the Log storage period field, specify a value for the log storage term (in days).
The application will store logs during the specified number of days since the last record is added to the log. If no new records have been added to a log over the specified time period, the application deletes the log.
- Click the Save button in the upper part of the window.
Configuring the detail level of event logs
To configure the detail level of event logs:
- In the Management Console tree, select and open the node that corresponds to the relevant SharePoint server, then select the Settings node.
- Click the Settings button in the Log details section.
This opens the Diagnostics settings window.
- Select events that must be recorded in detail.
- Click OK to save the changes and close the window.
If you have selected multiple events in the window, the detail level changes to Custom. The application will record main events in the application operation, as well as detailed information for the events that you have specified.
If you have selected all of the events in the window, the detail level changes to Maximum. The application will record detailed information about all events to logs.
When maintaining a log with the advanced detail level, this log contains web addresses that have been scanned for phishing.
- If you want to reset the current detail level of a log, click the Reset button.
The application changes the detail level to Minimum. Logs will only contain basic events from the application operation, such as scan results, updates of databases, and keys added.
- If necessary, select the Record details of events to Content filtering log check box.
The application will record to the Content Filtering log a text fragment that is related to a content filtering event.
- Click the Save button in the upper part of the window.
Failsafe support for SQL databases
Kaspersky Security supports the following failsafe technologies for SQL databases:
- Failover Clustering. Supported automatically.
- Database Mirroring. Supported automatically.
- Log Shipping. When the database used by the application (primary database) fails, the server hosting the restored database needs to be specified manually in order to switch to this database.
Using Database Mirroring technology
If your SQL server is configured to use the Database Mirroring failover support technology, the application automatically switches from the primary database that has failed to a mirror database, and then back to the primary database after it has been restored.
If the SQL server is running in High Performance Mode or High Safety Mode Without Automatic Failover for Database Mirroring, manual switchover to Database Mirroring is required by means of the SQL server if the main database used by Kaspersky Security fails.
Using Log Shipping technology
If your SQL server is configured to use the Log Shipping failover support technology, you can switch to using a restored database when the primary database fails. This switch is performed manually.
To switch to the restored database when using Log Shipping technology:
- In the folder <Application installation folder>\Configuration, open the file BackendDatabaseConfiguration.config in a text editor.
- Specify the name of the SQL server (indicating the SQL server instance) that hosts the failover partner in the line
<SqlServerName>SQL server name\instance</SqlServerName>. - Save the file.
The changes will take effect within one minute.
If Kaspersky Security is installed on a SharePoint farm, the corresponding changes to the file BackendDatabaseConfiguration.config need to be made on all SharePoint farm servers.
Page topSettings
In the Settings node, you can define the general settings of the application.
The Use of Kaspersky Security Network section allows you to view the KSN Statement, enable the usage of KSN services, and define the protection settings of the SharePoint server.
I have read the KSN Statement and accept all of the conditions therein
Use Kaspersky Security Network
Maximum waiting time when requesting KSN
Use proxy server to access KSN
The Data Leak Prevention section lets you configure the DLP Module settings that are used by the security officer.
The Allow running search tasks on the following servers list contains the names of servers on which the DLP Module is installed. Servers selected in the list become available to the information security officer for starting scan tasks.
The Diagnostics section lets you configure the parameters of Kaspersky Security application event logs.
In the Log details section, you can configure the detail level of logs. The following detail levels are available:
- Minimum. Kaspersky Security only logs main events, such as the start of an objects scan, start of an update, expiration of the license, as well as errors in the operation of the application components and errors occurred when updating the databases.
- Custom. Kaspersky Security logs main events, as well as detailed information about the events that have been selected in the Diagnostics settings window.
- Maximum. Kaspersky Security logs detailed information about all events in the application operation.
The current detail level set for logs is displayed in the Detail level field. The detail level depends on the number of events that have been selected in the Diagnostics settings window.
Record details of events to Content filtering log
The Configure automatic Backup cleansing section allows you to define the Backup size and enable automatic purging of Backup.
Clear Backup automatically if its size exceeds
Diagnostics settings window
The Diagnostics settings window displays a list of events. In the Enable detailed logging of events list, you can select events in the application operation that the application will record to a log.
All boxes are cleared by default.
Managing the application using the Kaspersky Security Center
Kaspersky Security Center is an application intended for centralized management of Kaspersky Lab applications on a corporate network. For more detailed information about installing and using Kaspersky Security Center, please refer to the Kaspersky Security Center Administrator's Guide.
You can use Kaspersky Security Center to perform the following tasks when working with Kaspersky Security for SharePoint Server:
- Distribute keys to protected SharePoint servers.
- View information about the protection status of SharePoint servers.
- View statistics on the operation of the application on SharePoint servers.
- Save information about the application's operation in the Kaspersky Security Center Administration Server Event Log.
- Distribute update packages for the Anti-Virus, Anti-Spam, and DLP Module databases to protected SharePoint servers whose network settings block connections to external network resources.
About the administration plug-in
The Kaspersky Security for SharePoint Server administration plug-in provides the interface designed for managing Kaspersky Security for SharePoint Server through Kaspersky Security Center. The plug-in is included in the Kaspersky Security for SharePoint Server distribution kit. The plug-in must be installed on the computer, which has the Kaspersky Security Center Administration Console installed.
To install the administration plug-in, you must have Kaspersky Security Center 10 Service Pack 2 Maintenance Release 1.
Administration rights
The user accounts of all computers on which Kaspersky Security for SharePoint Server is installed must be added to the KSH Administrators group so that you can manage Kaspersky Security for SharePoint Server through the Kaspersky Security Center Administration Console.
Installing the Kaspersky Security administration plug-in
To install the administration plug-in, you must have Kaspersky Security Center 10 Service Pack 2 Maintenance Release 1.
To install the Kaspersky Security administration plug-in:
- Copy the file klcfginst.msi from the Kaspersky Security distribution kit to the computer where the Kaspersky Security Center Administration Console is installed and run the file.
- Complete the steps of the Setup Wizard.
The administration plug-in will be installed on the computer.
Kaspersky Security Center will begin to use the Kaspersky Security administration plug-in to connect to the corporate SharePoint servers that have the Kaspersky Security application installed. For more detailed information, please refer to the Kaspersky Security Center Administrator's Guide.
Page topAbout application activation via Kaspersky Security Center
If you manage Kaspersky Security for SharePoint Server via Kaspersky Security Center, you can use a key to activate the application. Kaspersky Security Center lets you automatically distribute keys to . You can use a key file or activation code to add a Security Server key for Kaspersky Security for SharePoint Server to the storage of the relevant Administration Server. You can use the functionality that automatically distributes the key to managed devices in the key properties, both when you add the key to the Administration Server storage and at any other time.
For more details on the specifics of managing Kaspersky Lab application keys via Kaspersky Security Center, see the Kaspersky Security Center Administrator's Guide.
The automatically distributed key is added as the active key on servers with Kaspersky Security for SharePoint Server connected to the current Administration Server, which do not have an active key or whose licenses have expired.
If the license is about to expire and an additional key is missing, the key is added as an additional key. The application automatically switches to using this key when the active key expires. You cannot distribute a key that was added as an additional key using an activation code.
When new servers with Kaspersky Security for SharePoint Server are connected to the Administration Server, the key is applied to them automatically.
If the automatically distributed key is added to at least one SharePoint farm server, Kaspersky Security will use this key as an active key for all SharePoint farm servers.
When the automatically distributed key is removed from the Administration Server storage, the Security Server to which the key was automatically distributed continues to use the key. In this case, the key can be managed and its details viewed only via the interface of Kaspersky Security for SharePoint Server.
Automatic distribution is available for Security Server keys only. The DLP Module key has to be added via the interface of Kaspersky Security for SharePoint Server.
The scenario of key distribution to servers with Kaspersky Security for SharePoint Server using the key distribution task is not supported.
Page topUpdating application databases via Kaspersky Security Center
You can use Kaspersky Security Center to centrally download updates for the Anti-Virus and DLP Module databases. If this is the case, update packages will be saved in a network folder and will be relayed to the application over the internal corporate network. This method lets you reduce external network traffic and optimize application database updates on protected servers whose network settings block access to external network resources.
To configure this method for updating application databases:
- In the Kaspersky Security Center Administration Console, create a download updates to the repository task and specify the network folder in which to save updates. For more detailed information, please refer to the Kaspersky Security Center Administrator's Guide.
Make sure that the network settings allow data transfer between the selected network folder and the protected SharePoint servers.
- In the Management Console of Kaspersky Security for SharePoint Server, go to the Updates node. In the General settings section, select HTTP server, FTP server, local or network folder and specify the network folder that is defined as the update source in Kaspersky Security Center.
Kaspersky Security events in Kaspersky Security Center
This section contains accumulated information on application events that are written to the event log of the Kaspersky Security Center Administration Server.
Kaspersky Security Center also lets you export Kaspersky Security events to SIEM systems via the Syslog protocol.
For more detailed information about working with application events and policies using the Kaspersky Security Center Administration Server, please refer to the Kaspersky Security Center Administrator's Guide.
Kaspersky Security events in Kaspersky Security Center
Event |
Event importance level |
Description |
Default time period for storing event information in the Kaspersky Security Center log. |
Active key is not detected |
Critical |
An active key is missing. |
30 days |
On-access scan is enabled |
Informational message |
The application detected the activation of the Anti-Virus component. The event record contains the component name. |
30 days |
On-access scan is disabled |
Warning |
The application detected the deactivation of the Anti-Virus component. The event record contains the component name. |
30 days |
Anti-Virus databases are up to date |
Informational message |
Application databases have been updated to the latest version. The event record contains the database release date. |
30 days |
Anti-Virus databases are out of date |
Critical |
Anti-virus databases of the application are outdated by more than one day. The event record contains the database release date. |
30 days |
Limited scan mode enabled |
Critical |
An application component has switched to restricted scan mode. The event record contains the component name and the time it switched to restricted scan mode. |
30 days |
An incident occurred while performing web object content filtering during on-access scan |
Warning |
Unwanted content has been detected in a web object when a web object was being created, edited, or saved on a server. |
30 days |
An incident occurred while performing file content filtering during on-access scan |
Warning |
Content filtering has caused the application to register an incident when a file was accessed. |
30 days |
A web object containing a phishing link was detected during on-access scan |
Warning |
Content filtering has caused the application to detect a phishing link when a web object was being created, edited, or saved on a server. |
30 days |
On-demand scan task has been started |
Informational message |
The on-demand scan task has been run manually or automatically (by schedule). The event record contains the task name and the launch type. |
30 days |
On-demand scan task has been stopped |
Informational message |
The on-demand scan task has been stopped. The event record contains the task name and the task stop reason. |
30 days |
Content filtering is enabled |
Informational message |
The application detected the activation of the content filtering component. |
30 days |
Content filtering is disabled |
Warning |
The application detected the deactivation of the content filtering component. |
30 days |
DLP Module is enabled |
Informational message |
The application has detected the activation of the DLP Module. |
30 days |
DLP Module is disabled |
Warning |
The application has detected the deactivation of the DLP Module. |
30 days |
Kaspersky Lab categories updated |
Informational message |
Kaspersky Lab categories have been updated during the application database update. The event record contains the names of categories that have been updated, as well as their brief descriptions. |
Do not store |
Application component error |
Critical |
The application has detected errors in the operation of a component. The event record contains the component name and the error description. |
30 days |
Anti-Virus databases update error is fixed. Anti-Virus databases have been updated successfully |
Informational message |
An Anti-Virus database update error has been fixed and the databases have been successfully updated. The event record contains the database release date. |
30 days |
Database update error |
Critical |
An update of application databases has failed. The event record contains the error description. |
30 days |
Error connecting to the SQL Server. Switched to inactive mode |
Critical |
The application has switched to inactive mode. File scanning is stopped if there is no connection with the SQL server for more than two hours. The event record contains the database name, the SQL server name, and the error description. |
30 days |
Error connecting to the SQL Server. Switched to cached mode |
Critical |
The application has switched to active mode with the settings received before loss of connection with the SQL server. The event record contains the database name, the SQL server name, and the error description. |
30 days |
An action was performed on the Security Server key |
Informational message |
The key status, license expiration date, number of users, or license type have changed. The event record contains the key, the license type, the license expiration date, and the number of license users. |
30 days |
User restored an object from Backup |
Informational message |
The user has restored an object from Backup. The event record contains detailed information about the object and the user account. |
Do not store |
User has changed application settings |
Informational message |
The user has changed the application settings. The event record contains the account of the user that changed the settings as well as detailed information about the application settings that have been changed. |
30 days |
User has performed an action on the Security Server key |
Informational message |
The user has performed an operation with a Security Server key. The event record contains the user account. |
30 days |
User has attempted to run on-demand scan |
Informational message |
The user has attempted to run the on-demand scan task. The event record contains the user account. |
30 days |
User has attempted to stop on-demand scan |
Informational message |
The user has attempted to stop the on-demand scan task. The event record contains the task name and the task stop reason. |
30 days |
User attempted to archive incidents |
Warning |
The security officer has attempted to archive incidents registered by the DLP Module. |
Do not store |
User has attempted to save a Backup object to disk |
Informational message |
The user has saved an object from Backup to disk. The event record contains detailed information about the object and the user account. |
Do not store |
User attempted to save an object attached to the incident to disk |
Warning |
The security officer has attempted to save an incident registered by the DLP Module to disk. |
Do not store |
User has removed an object from Backup |
Informational message |
The user has removed an object from Backup. The event record contains detailed information about the object and the user account. |
Do not store |
An incident has occurred during on-access Anti-Virus scan |
Warning |
The application has registered an incident during scanning when a file was being saved. |
30 days |
An infected file was detected and disinfected during on-access virus scan |
Informational message |
The application has disinfected an infected file during scanning when the file was being saved. |
30 days |
Connection to the SQL Server is restored |
Informational message |
Access to the SQL server containing the application database has been restored. |
30 days |
New incident created during DLP Module operation |
Warning |
A file that violates the security policy has been detected. Such an event is written to the Kaspersky Security Center log if the Log events to Windows Event Log and Kaspersky Security Center Event Log check box is selected in the policy or in the Search task. |
Do not store |
License expired |
Critical |
The license has expired. The event record contains the key and the license expiration date. |
30 days |
License is about to expire |
Warning |
The license is about to expire. The event record contains the key, the license expiration date, and the number of days left until this date. |
30 days |
Viewing SharePoint server protection status details
To view information about the protection status of a SharePoint server:
- Start the Kaspersky Security Center Administration Console and connect to the Kaspersky Security Center Administration Server. For more detailed information about connections, please refer to the Kaspersky Security Center Administrator's Guide.
- In the console tree, select the Managed devices node, select the group of managed devices to which the SharePoint server belongs, and then select the Devices tab in the workspace.
A table containing a list of corporate client devices appears in the workspace of the node. This list may contain SharePoint servers as well as other corporate computers that have Kaspersky Lab applications installed. For more detailed information about the information displayed in the table, please refer to the Kaspersky Security Center Administrator's Guide. Information specific to SharePoint servers is provided below.
The Status column displays the current protection status of SharePoint servers: (OK, Critical, Warning). The current protection status is also designated by color: OK – green, Warning – yellow, Critical – red.
The Status description column displays the reasons for the status of the SharePoint server being changed to Critical or Warning. Possible reasons for status change:
- For Warning status:
- KSH: On-access scan disabled;
- KSH: DLP Module disabled;
- KSH: DLP Module running with errors;
- KSH: Security Server license is about to expire;
- KSH: DLP Module license is about to expire;
- KSH: DLP Module license expired;
- KSH: DLP Module licensing issue;
- KSH: SQL server is unavailable.
- For Critical status:
- KSH: Application stopped or inaccessible;
- KSH: Access to the application is denied;
- KSH: Anti-Virus running with errors;
- KSH: Security Server license expired;
- KSH: Security Server licensing issue;
- KSH: Anti-Virus and DLP Module databases outdated;
- KSH: Error updating Anti-Virus and DLP Module databases;
- KSH: SQL Server has been unavailable for a long time.
The listed statuses are displayed if the properties of the corresponding group of managed devices include the following: in the Set computer status to Critical if and Set computer status to Warning if lists, the Determined by the application check box is selected (<Group of managed devices> → Properties → Device status). For more detailed information, please refer to the Kaspersky Security Center Administrator's Guide.
The table also displays information about the statuses of Kaspersky Security components:
- Protection Status of Collaboration Servers is the status of anti-virus protection of a SharePoint server.
- Data Leak Prevention Status is the DLP Module status.
The status may have the following values:
- Unknown – status information is not available or the component is not installed.
- Stopped – the component is disabled.
- Running – the component is enabled.
- Error – the component is running with errors.
- For Warning status:
Application operation statistics in Kaspersky Security Center
You can view statistics of the virus scan, file content filtering, and SharePoint web objects content filtering components. Each application component has a separate information pane with a chart showing statistics. You can manage the information panes on the Statistics tab of the Kaspersky Security Center Administration Server. The chart shows statistics on the operation of a component on servers with Kaspersky Security for SharePoint Server connected to the current Administration Server. If at least one server in the SharePoint server farm is connected to the Administration Server, the statistics section displays consolidated data for all servers of the SharePoint farm. You can view statistics of different servers connected to Kaspersky Security Center Administration Console.
You can add the following information panes on pages of the Statistics tab of the Kaspersky Security Center Administration Server:
Anti-Virus scan statistics. The diagram provides the following information:
- Clean. The number of files scanned by the application and recognized as not infected.
- Infected. The number of malicious objects detected in scanned files.
- Password protected. Number of password protected files.
- Corrupted. Number of corrupted files.
- Excluded from scanning by the administrator. Number of files that have been skipped according to the virus scan exclusion settings.
- Processing errors. Number of files that were skipped because of application errors or licensing issues.
File content filtering statistics. The diagram provides the following information:
- Clean. Number of files that have been found to be free from violations of content filtering policies.
- Forbidden mask. Number of incidents registered by the application during content filtering of file names that match masks specified in the content filtering settings.
- Forbidden format. Number of incidents registered by the application during content filtering of file formats configured in the content filtering settings.
- Forbidden content. Number of incidents registered by the application during content filtering of files.
- Excluded from scanning by the administrator Number of files that have been skipped according to the content filtering exclusion settings.
- Processing errors. Number of files that were skipped because of application errors or licensing issues.
Web object content filtering statistics. The diagram provides the following information:
- Clean. Number of SharePoint web parts that have been found to be free from violations of content filtering policies.
- Phishing or forbidden content. Number of incidents registered by the application during content filtering of web objects and scanning for phishing links.
- Processing errors. Number of SharePoint web objects that were skipped because of application errors or licensing issues.
Monitor the application's operation via System Center - Operations Manager
To monitor the application status using System Center Operations Manager, you can use Kaspersky Security for SharePoint Server Monitoring Management Pack. The Management Pack is available only in English, but you can use it with any language version of the application.
Minimum software requirements
Supported operating systems of Security Server:
- Windows Server 2012;
- Windows Server 2012 R2;
- Windows Server 2008 R2
Supported versions of System Center Operations Manager:
- System Center 2012 Operations Manager;
- System Center 2012 R2 Operations Manager.
Windows PowerShell 3.0 or a later version must be installed on servers that are being monitored.
Importing the management pack
The management pack is imported using the standard procedure prescribed by the version of System Center Operations Manager being used (please refer to the accompanying documentation for System Center Operations Manager).
The account of the server being monitored must be added to the KSH Administrators group in Active Directory.
Functionality of the Kaspersky Security for SharePoint Server Monitoring Management Pack
For the purposes of receiving information about application operation, the management pack provides the following monitors:
- KSH Services Monitor - monitors the status of Kaspersky Security for SharePoint Server services.
- KSH Administration Service Monitor - monitors the status of the Kaspersky Security for SharePoint Server Administration Service.
- KSH Security Service Monitor - monitors the status of the Kaspersky Security for SharePoint Server Security Service.
- KSH Anti-Virus Monitor - monitors the operating status of Anti-Virus.
- KSH Anti-Virus Databases Monitor - monitors the status of Anti-Virus databases.
- KSH Content Filtering Monitor - monitors the operating status of Content Filtering.
- KSH SQL Database Monitor - monitors the status of the connection between the application and the SQL database.
- KSH Licensing Monitor - monitors the status of the license.
If an error occurs in any application component, an alert is displayed on the corresponding monitor. Depending on the severity of the error, the alert receives a status of Warning and/or Critical.
Types of alerts and their causes
Monitor name |
Warning |
Critical |
|---|---|---|
KSH Services Monitor |
Not available |
At least one of the services of Kaspersky Security for SharePoint Server is not running. |
KSH Administration Service Monitor |
Not available |
Kaspersky Security for SharePoint Server Administration Service is not running. |
KSH Security Service Monitor |
Not available |
Kaspersky Security for SharePoint Server Security Service is not running. |
KSH Anti-Virus Monitor |
Brief loss of connection between the application and the SQL database. |
|
KSH Anti-Virus Databases Monitor |
Brief loss of connection between the application and the SQL database. |
Anti-Virus databases are out of date. |
KSH Content Filtering Monitor |
|
Not available |
KSH SQL Database Monitor |
Brief loss of connection between the application and the SQL database. |
The connection between the application and the SQL database is down for more than 2.5 hours. |
KSH Licensing Monitor |
|
|
In the event of a brief loss of connection between the application and the SQL database, protection is provided based on the last configuration received from the SQL database.
In the event of a loss of connection between the application and the SQL database for more than 2.5 hours, application components and modules switch to inactive mode. Server is not being protected.
All monitors except KSH Services Monitor, KSH Administration Service Monitor and KSH Security Service Monitor are assigned the Warning status if the following system requirements are not fulfilled:
- The account of the server being monitored has not been added to the KSH Administrators group in Active Directory.
- Windows PowerShell 2.0 or an earlier version is installed on the servers being monitored.
To security officer
This Help section is intended for professionals tasked with ensuring the security of confidential data, providing data leak prevention or preventing unauthorized access to data, and constantly monitoring the information security system and supporting its security hardware.
Information in this Help is arranged in accordance with the standard tasks that a data security officer performs using Kaspersky Security.
Page topAbout Data Leak Prevention
Kaspersky Security comprises the DLP (Data Leak Prevention) Module designed to protect data against leaks. The component monitors file uploads by users to SharePoint websites in real time and detects data leaks according to the following parameters:
- Type of data in the file and data contents;
- Name of the user transferring the file;
- SharePoint website to which the file is transferred.
You can configure these settings using application categories and policies.
If a user attempts to transfer a file containing confidential data (such as salary information of fellow employees) to a SharePoint website through which a leak may occur (such as a publicly accessible portal), the application registers this event as a data leak.
If national law requires notifying individuals that their network activity is being monitored, you must warn users about the operation of the DLP Module in advance.
You can configure the operations of Kaspersky Security as it registers data leaks. The application can perform the following operations automatically:
- Generate incidents (records documenting instances of corporate security violations)
- Assign priorities to incidents according to corporate security requirements
- Block file uploads to SharePoint
- Notify users and other officers about corporate security violations.
Information contained in incidents can be used to investigate corporate security violations.
Page topSecurity Officer's Guide
The Security Officer role is intended for ensuring confidential data security on SharePoint websites. The Security Officer has access rights for managing protection of data against leaks.
Kaspersky Security enables a security officer to perform the following:
- Monitor information security on SharePoint websites.
- Find and protect confidential data on SharePoint websites.
- Receive email notifications about incidents.
- View details of data leaks
- Archive old data leak entries and recover them from the archive
- Configure the settings of the search for files with confidential data on SharePoint websites;
- Generate data leak reports for different periods and configure the delivery of reports to email addresses
- View data leak reports
Security Officer makes part of the role system, being intended for managing user access to Kaspersky Security for SharePoint Server features.
The Security Officer requires the Administrator to predefine the application settings in advance. The administrator's scope of duties includes the activation and enabling the DLP Module in Kaspersky Security, as well as providing rights to run scan tasks on SharePoint servers.
Page topAssessing the status of data protection
The status of data protection has to be assessed constantly in order to maintain the proper level of data security on SharePoint websites. Information about data protection is refreshed in real time in the Data Leak Prevention node.
The status of data protection can be assessed using the following criteria:
- Status of the DLP Module, errors in the operation of the Module;
If the DLP Module operates with errors, this decreases the level of protection. If the DLP Module is disabled, the application does not scan files that are uploaded by users to SharePoint.
- Statistics on opened incidents;
This information helps to evaluate the volume of incidents processed so far and plan further incident processing.
- Statistics on closed incidents;
This information helps to analyze the reasons why incidents have been closed. Analysis results help to detect weak spots in computer protection and modify policy settings accordingly.
- Statistics on files uploaded to SharePoint.
This information helps to monitor and evaluate application performance.
You can configure automatic delivery of notifications about changes in the protection status to email addresses.
Viewing protection status details
Information about the status of data protection is displayed in the workspace of the Data Leak Prevention node of Management Console.
The DLP Module status section displays information about the current status of the Module and any notifications about Module errors:
- Enabled. The administrator of Kaspersky Security has enabled the DLP Module, and the application runs correctly on all servers.
- Enabled, running with errors. The administrator of Kaspersky Security has enabled the DLP Module, but the application has encountered errors during its operation. The application shows error information in the lower part of the section. For each type of error, the application shows the names of servers where errors of this type were detected. The following types of errors are possible:
- Scan errors. The application is unable to scan files due to time-out, infrastructure errors, or interceptor errors.
- DLP Module license error. The application is unable to scan files because a DLP Module license is missing, the license has expired, or the key has been black-listed.
- Server unavailable. The application is unable to scan files because there is no access to the SharePoint server (the server may have been disabled by the administrator).
- Disabled. Administrator disabled the DLP Module. The application does not scan files uploaded by users to SharePoint.
The Opened incidents section displays the following information about users and currently opened incidents:
- The number of unique users with whom opened incidents are associated
- The rating of users with the highest number of policy violations
- The number of incidents with the New status
- The number of incidents with the In progress status
Data on the ratio of incidents with New status to incidents with In progress status is presented in the form of a chart. The chart shows statistics on incidents associated with the selected categories of data. You can modify the list of categories for which statistics are displayed.
The Statistics section allows you to view information about files scanned and incidents closed over periods of 7 days or 30 days. Depending on the period selected, the following indicators change:
- The number of files uploaded by users to SharePoint
- The number of files scanned by the application
- The number of incidents generated
- The number of files that have not been scanned due to time-out
- The number of files that have not been scanned due to errors
Information on the reasons why incidents have been closed is presented in the form of a chart. The chart shows statistics on incidents associated with the selected categories of data. You can modify the list of categories for which statistics are displayed.
Page topConfiguring automatic notifications
To define the notification sending settings:
- Open Management Console.
- In the Management Console nodes tree, select the Data Leak Prevention node.
- Click the Configure notifications button in the DLP Module status section.
This opens the Notification settings window.
- In the entry field, specify the email addresses to which notifications should be sent. Use a semicolon to separate email addresses in the entry field.
The application uses the specified addresses to send notifications of new incidents and the status of the DLP Module, as well as ready reports.
- If necessary, select the Notify when adding Kaspersky Lab categories check box.
The application sends automatic notifications of Kaspersky Lab categories that have been added or modified.
- Click OK to save the changes and close the window.
Selecting categories for generating incident statistics
To select categories to be included in the statistics chart:
- Open Management Console.
- In the Management Console nodes tree, select the Data Leak Prevention node.
- Perform one of the following steps:
- To generate a chart of opened incidents, click the Select categories button in the Opened incidents section.
- To generate a chart of closed incidents, click the Select categories button in the Statistics section.
The List of categories dialog will appear.
- In the List of categories window, select data categories to be included in the statistics.
The application generates incident statistics based on the categories selected.
If the All categories check box is selected, information about incidents related to newly added categories will be automatically added to the statistics chart.
- Click OK to save the changes and close the window.
Data on incidents created according to the selected categories is reflected in the chart.
Data Leak Prevention
This node lets you view information about the status of data protection on SharePoint sites and incident statistics.
Kaspersky Security uses the DLP Module status section to notify the user about the following events in the operation of the DLP Module:
- About changes in the status of the DLP Module (Enabled, Disabled, or Enabled, running with errors)
- About DLP Module licensing problems
- About application errors (such as no connection to the SQL database or a SharePoint server that is unavailable)
This section lets you specify the email addresses of Security Officers. The application automatically sends event notifications to these addresses.
The Opened incidents section lets you view current data leak statistics.
The following information about open incidents is displayed in the upper part of the section:
- Violators. The number of unique users that violated policies.
- New incidents. The number of incidents with New status.
- Incidents under processing. The number of incidents with In progress status.
- Opened high-priority incidents. The number of opened incidents (in percentage points) to which a high priority of data leak danger has been assigned.
- Top 3 violators. The rating of users with the highest number of policy violations.
A chart of statistics on opened incidents as associated categories is displayed in the lower part of the section. You can modify the list of categories for which statistics are displayed.
The Statistics section displays the following information about the operation of the DLP Module:
- Files transferred. The number of files that users have uploaded to SharePoint.
- Files scanned. The number of files that caused policy violations while being uploaded to SharePoint.
- Incidents created. The number of incidents generated as a result of policy violations.
- Files not scanned due to timeouts. The number of files that could not be scanned due to a SharePoint server connection time-out.
- Files not scanned due to errors. The number of files that could not be scanned due to application errors.
You can change the reporting period for which statistics are displayed by clicking the 30 days and 7 days links.
The Closed incidents section displays a chart with statistics on closed incidents. This chart makes it possible to analyze the reasons why incidents belonging to different categories have been closed. You can modify the list of categories for which statistics are displayed.
Notification settings
Addresses of information security specialists
Notify when adding Kaspersky Lab categories
Categories
The window displays the current list of categories. You can select categories for which statistics are displayed by selecting check boxes opposite the category names.
If the All categories check box is selected, when new categories are added the information about incidents related to such categories is automatically refreshed in the statistics chart.
By default, all categories are selected.
Using categories. Assigning data to categories
The application uses categories to monitor data leaks and search for information on SharePoint sites. Data categories contain criteria against which the application recognizes data matching the corporate information security restrictions on SharePoint sites
In this application usage scenario, you will learn how to categorize data and use categories in the operation of Kaspersky Security. You can begin using the application by analyzing the data that needs to be protected against leaks and assigning such data to different categories.
Data categories are required to classify information that you need to protect against leakage.
Data category. A set of data united with a common feature or subject and corresponding to specific criteria (e.g., a combination of words used in text in a certain order). The application uses data categories for recognizing information in files being uploaded and stored on SharePoint. The application allows using preset Kaspersky Lab data categories and creating custom data categories.
Kaspersky Lab categories. Predefined data categories developed by Kaspersky Lab specialists. Categories can be updated during application database updates. A security officer cannot modify or delete those predefined categories.
You can create data categories manually upon the following criteria:
- Quotations from documents. Text fragments from documents that must be protected against leakage.
- Document templates. Files with text data used as patterns for creation of new documents. The application protects against leakage all documents that have been created on the basis of those templates.
- Keywords. Word, phrase, or sequence of characters that the application uses for recognizing data in files being uploaded and stored on SharePoint that need to be protected against leakage. Keywords can be added to data categories.
- Table data. Information organized in a table format that must be protected against leakage. Table data is processed in Kaspersky Security using CSV (Comma Separated Values) files.
Scenario of data distribution by categories
- Prepare the documents that you need to protect against leakage and distribute them by groups in accordance with general criteria (for example, accounting records, personal data, or information about new technologies).
- In accordance with those general criteria, distribute data by categories:
- To recognize text fragments precisely, use categories with quotations from documents. You manually add to a category documents from which quotations need to be tracked. The application recognizes quotation from documents by comparing data in the category against data uploaded to and stored on SharePoint.
- To recognize full text from documents, use categories with document templates. You manually add to a category files with text data that need to be tracked.
- To recognize text information (such as details of the organization's technologies and workflows), use keyword categories. You add keywords to the category manually. The application recognizes the data by keywords or expressions, selecting them from multiple keywords that have been specified in the category settings.
- To recognize information stored in tables (such as personal records of employees or information about their wages), use table data categories. You add table data to the category manually. The application recognizes the data by the number of matches with table cells that has been specified in the category settings.
- Use preset Kaspersky Lab categories to recognize data belonging to the most common categories (such as medical records, personal data, and bank details).
You can use categories to monitor and prevent data leaks and to search SharePoint websites for data.
File formats to scan
To protect data against leakage, Kaspersky Security scans files uploaded to SharePoint for data of specific categories. The application determines the format of each file being scanned by analyzing its structure, which defines the way the file is stored or displayed on the screen. The extension of a file may not match its format. The application unpacks archived files down to the 64-th nesting level and scans all embedded objects. The file formats that the application handles are listed below.
File formats to scan
File type |
Formats |
Archives |
7Z; ARJ; BZ2; CAB; CPIO; DMG; EXE; GZ; ISO; JAR; OBD; RAR; RPM; TAR; TBZ2; ZIP |
Databases |
DB; DB3; DBF |
Documents |
AMI; DCA; DOC; DOCX; DOX; .DW5; FFT; FW3; JTD; JBW; JTT; HWP; IWP; JBW; JTD; JTT; KEY; M11; MAN; MANU; MNU; NUMBERS; ODT; PAGES; PDF; PUB; PW; PW1; PW2; QA; QA3; RFT; SAM; SDW; SXW; WPD; WRI; WS; WSD; WS2; WSx; XY |
E-mail messages. |
EML; EMLX; MBOX; MBX; MHT; MSG; PST; OST; OFT |
Presentations |
ODP; ODS; PPT; PPTX; SXI; SDI; SDP |
Tables |
CSV; FW3; ODS; SX, SXC; SXS; WK; WK3; WK4; WKS; WPS; XLS; XLSB; XLSX |
Text |
CHM; DCA; EMF; HTM; HTML; ONETOC; RTF; SGML; TXT; XML; WMF |
The application does not monitor uploads of other file formats to SharePoint by users. If other file formats also contain any confidential information, advanced tools and techniques of data leakage control are advised to use along with the application.
Page topKeywords. Making expressions using operators
A keyword is a word, phrase, or sequence of characters that the application needs in order to recognize confidential data in text.
Words and phrases that have been specified as keywords and put into quotes can be separated with whitespaces and other symbols (for example, "#", "%", "+", "@", "&", and punctuation symbols). Keywords can be combined into expressions by using such operators as AND, OR, NEAR(n), and ONEAR(n) (see table below).
Using operators in expressions
Operator |
Description of use |
Result |
|
! |
The "!" character is used at the beginning of a keyword to make it case-sensitive. If the keyword consists of several words, the case operator applies to each word included in the keyword. For example, "!Kaspersky Lab". |
The application detects files whose text includes the "Kaspersky Lab" keyword beginning with upper-case letters. Files containing this keyword in lower-case (such as "kaspersky lab") are skipped. |
|
AND |
Use the AND operator to detect two or more keywords included in the text at the same time. For example, "anti-virus" AND "security". The order in which the keywords are enumerated does not affect the search.
|
The application detects files whose text includes the words "anti-virus" and "security" at the same time. Files containing only one of these words are skipped. |
|
OR |
Use the OR operator to detect one of the keywords or several keywords in the text. For example, "security" OR "computer protection". The OR operator is applied automatically to keywords typed in the entry field beginning with a new line. |
The application detects files in which the text includes the word "security" or the word combination "computer security", or both. |
|
NEAR(n) |
The NEAR operator is used to detect several keywords separated by several other words in text. Specify the number of words separating the keywords in brackets. For example, "security" NEAR(6) "system". The order in which keywords have been entered is disregarded during the search. |
The application detects files in whose text the word "security" appears before or after the word "system" with six or fewer words between them. |
Use several operators to create complex expressions from keywords. Use round brackets to specify the order in which the operators should be applied.
Example: The category contains the following expression consisting of keywords: "security" AND ("!Kaspersky Lab" NEAR(5) "program code") The application detects files whose content matches the following criteria:
For example: "...protect the program code of the application against hacking. At the conference, Kaspersky Lab will showcase an improved version of the product that makes networking more secure". |
The search for expressions “term1” NEAR(n) (“term2” AND “term3”) and “term1” NEAR(n) (“term2” NEAR(m) “term3”) is not supported. When the application searches for data using these type of expressions, uncertainty arises when the brackets are removed.
Page topAdding a category of keywords
A keyword is a word, phrase, or set of characters using which the application identifies data on SharePoint sites. To search SharePoint sites for data using keywords, you have to add keywords to a category. A category can contain a single keyword or an expression consisting of several keywords.
To add a category of keywords:
- Open Management Console.
- In the tree of nodes of Management Console, select the Categories and policies node.
- In the workspace of the node, click the New category button and select Keywords in the list of category types that opens.
The Category settings dialog will appear. This window lets you add keywords to a category and specify the category name.
- In the entry field, type the keywords to be included in the category.
A keyword is a word or word combination enclosed in quotation marks. Use the "!" character at the beginning of the keyword to make it case-sensitive. Keywords can be combined into expressions by using such operators as AND, OR, NEAR(n), and ONEAR(n). Use round brackets to specify the order in which the operators should be applied.
The OR operator is applied automatically to keywords typed in the entry field beginning with a new line. The application detects files whose text includes keywords consisting of one or more lines of the category.
Example:
The category contains the following expression consisting of keywords:
"security" AND ("!Kaspersky Lab" NEAR(5) "program code")
The application detects files whose content matches the following criteria:
- They include words and word combinations "security", "Kaspersky Lab", and "program code".
- The words "Kaspersky Lab" begin with upper-case letters.
- The word combination "program code" is used before or after the word combination "Kaspersky Lab" with five or fewer words between them.
For example: "...protect the program code of the application against hacking. At the conference, Kaspersky Lab will showcase an improved version of the product that makes networking more secure".
For more details on how to add categories of keywords click the Help on adding keywords link in the Category settings window.
- Specify the category name in the Name field.
- In the Comments field, specify additional information pertaining to data included in the category.
- Click the OK button.
The new category is added to the list of categories in the Categories and policies node.
You can use a category to search SharePoint sites for data and monitor data leaks.
Table data. Setting up the match level
The match level is the number of table data cells against which the application is searching SharePoint for matches. The number of cells involved in the search is defined as the number of unique intersections between columns and lines in the table. The match level has two parameters:
- Threshold value for lines. The minimum number of rows containing data for which the application searches SharePoint for matches.
- Threshold value for columns. The minimum number of columns containing data for which the application searches SharePoint for matches.
By finding a match to table data, the application detects a file containing data from the specified number of columns in the specified number of rows. There is no requirement for the same columns to match in different rows.
Example: A table of CSV format containing the following table data has been added to the category:
The following match level for table data is configured: the threshold value of rows is 2, the threshold value of columns is 3. The application detects files whose data match six cells of table data. The matching data must be located in at least two rows at once, and at least three cells must produce a match in each row. For example:
Given this match level, the application will also detect a file containing the following table data:
Files with a lesser number of matches are ignored by the application. For example:
In the example above, table data in three cells match a CSV table only in one row. The file does not match the specified threshold value of rows (2) and is therefore ignored by the application. |
Adding a category of table data
Table data describes information that is arranged in the form of tables. A common method of storing table data is a CSV (Comma Separated Values) file. Lines in CSV files correspond to table rows. Table rows in CSV files are separated using a special character known as the column separator. For example, a semicolon can be used to separate columns in a CSV files.
The application uses categories of table data to search for table data on SharePoint sites. The category contains the path to a CSV file with table data that needs to be monitored to prevent potential leaks, and also data search criteria.
A CSV file can be opened in such applications as Notepad, WordPad, or Microsoft Excel.
To add a category of table data:
- Open Management Console.
- In the tree of nodes of Management Console, select the Categories and policies node.
- In the workspace of the node, click the New category button and select Keywords in the list of category types that opens.
The Category settings dialog will appear. This window lets you add table data, configure data search settings, and specify the category name.
- In the Path to file field, enter the full path to the location of the CSV file with table data to be added to the category.
For the category of table data to work properly, the CSV file must be saved using UTF-8 encoding.
- In the Column separator dropdown list, select the symbol to be used as the column separator in the CSV file that you are uploading.
By default, the comma is used to separate columns.
- Configure the match level for table data.
The match level is the minimum number of cells with table data whose content matches data in SharePoint files. The number of cells is created based on unique crossings between columns and rows of the table.
- In the Threshold value for lines spin box, specify the number of table rows.
By default, the application detects files with data present in any two table rows.
- In the Threshold value for columns spin box, specify the number of table columns.
By default, the application detects files with data present in any two table columns.
For more details on how to add table data categories click the Additional information about category link in the Category settings window.
- In the Threshold value for lines spin box, specify the number of table rows.
- Specify the category name in the Name field.
- In the Comments field, specify additional information pertaining to data included in the category.
- Click the OK button.
This opens a window showing the progress of table data being loaded into a category.
When table data is added to a category, the first row in the CSV file is ignored (it is presumed that the first row contains table header data).
If an error is encountered while table data is being added to a category, the application shows a notification with the number of the table row that caused the error.
The new category is added to the list of categories in the Categories and policies node.
You can use a category to search SharePoint sites for data and monitor data leaks.
Quotations from documents
Kaspersky Security allows you to check text in files that are uploaded to or stored on SharePoint for the presence of quotations from confidential documents. The Quotations from documents category allows you to specify a list of documents from which quotations must be detected by the application.
To detect quotations, Kaspersky Security uses Digital Fingerprints technology, which allows the application to convert text data into digital fragments.
When monitoring for leaks, the application compares fragments in files being scanned against fragments stored in the category. To detect quotations, the application must recognize Minimum number of matching fragments.
The application stores no original documents (nor any parts of them) in the category. No original documents (nor any of their parts) that have been added to a category can be restored or read on the basis of fragments.
Category settings
The Minimum number of matching fragments setting determines the number of text fragments from documents that have been added to a category, which is sufficient to register a data leak by this category.
The default value of this setting (4 fragments) ensures an optimal functioning of the category when handling most documents.
We recommend that you alter the default value of this setting in the following cases:
- If scanned documents cause false positives (the application creates incidents when scanning documents that you do not view as containing any quotations from documents that have been added to the category). We recommend that you increase this value when configuring the category.
False positives may occur if the original document and the one being scanned both contain large portions of unchanged text, which repeats in various documents (for example, common text in headers and footers). In this case, the specified number of matching fragments may be found in such repeated text, which results in a false positive.
- If no quotations are found in documents being scanned (the application creates no incidents when scanning documents that you view as containing some quotations from documents that have been added to the category). We recommend that you decrease this value when configuring the category.
We recommend that you upload documents of an approximately equal size to a single category. We recommend that you create separate categories for documents if their size differs more than 2-3 times. Otherwise, search for quotations across documents in a category may be far from optimal.
If you cannot find an optimal value of the Minimum number of matching fragments setting, we recommend that you distribute the documents from this category by a few subcategories so that each of them contains documents with an approximately equal number of fragments.
Scenarios of document quoting check
- Add a category with quotations from documents and configure it.
- Use the category to check quotations using one of the following methods:
- If you need to check documents that are uploaded to SharePoint websites, add a policy for this category.
- If you need to check documents that are stored on SharePoint websites, add a search task with this category.
Adding a category with quotations from documents
To add a category with quotations from documents:
- Open Management Console.
- In the tree of nodes of Management Console, select the Categories and policies node.
- In the workspace of the node, click the New category button and select Quotations from documents in the list of category types that opens.
The Category settings dialog will appear.
- Specify the category name in the Name field.
- Click the Add button and select file(s) that need to be protected against data leakage.
The application supports files from which text data can be extracted, (such as DOC, DOCX, ODT, ODP, PDF, PPT, PPTX, RTF and TXT). You are advised to not add more than 2 GB total volume of documents in a single category.
- If necessary, in the Minimum number of matching fragments spin box, change the number of document fragments that the application must detect in files uploaded to and stored on SharePoint.
- In the Comments field, specify additional information pertaining to data in the category, for example, a link to the document that regulates the information security rules in the organization.
- Click the OK button.
The application converts text data from files into fragments. If processing some files has failed when creating the category, the application displays a list of those files together with the details of processing errors.
The application stores no original documents (nor any parts of them) in the category. No original documents (nor any of their parts) that have been added to a category can be restored or read on the basis of fragments.
The new category for searching for quotations from documents will be displayed in the list of categories and policies.
Page topDocument templates
Kaspersky Security allows you to detect documents that were created on the basis of templates and layouts and might contain confidential data. The Document templates category allows you to specify a list of document templates against which the application will monitor for matches.
To detect matches with templates, Kaspersky Security uses Digital Fingerprints technology, which allows the application to convert text data into digital fragments.
When monitoring for leaks, the application compares fragments in files being scanned against fragments stored in the category. You can also configure Document match threshold to perform the following tasks:
- Detect completed templates of documents;
- Detect documents that partially or fully match templates.
The application stores no original documents (nor any parts of them) in the category. No original documents (nor any of their parts) that have been added to a category can be restored or read on the basis of fragments.
Category settings
Document match threshold determines the level of match between the document being scanned and a template added to the category; when this value is reached, the application registers a data leak by this category. This level is conditioned by two settings: minimum and maximum percentage of fragment match.
The minimum percentage of fragment match determines the minimum allowed similarity between scanned text and a template. If the scanned text matches the template at a lower rate than the value of this setting, the application registers no data leak by this category.
The maximum percentage of fragment match determines the maximum similarity between scanned text and a template. If the scanned text matches the template at a higher rate than the value of this setting, the application registers no data leak by this category.
The respective default values of these settings (30% and 99% similarity, respectively) ensure an optimal functioning of the category when handling most documents. In some cases, you may have to redefine these settings.
We recommend that you alter the minimum percentage of fragment match in the following cases:
- If scanned documents cause false positives (the application creates incidents when scanning documents that you do not view as matching any of the templates from the category). We recommend that you increase this value when configuring the category.
- If no match is found between scanned documents and any templates (the application cannot find the documents that you view as matching some of the templates from this category). We recommend that you decrease this value when configuring the category.
We recommend that you alter the maximum length of a matching sequence of fragments in the following cases:
- If you need to find documents, which completely match templates that have been added to the category (for example, the templates themselves). We recommend that you raise this value up to 100% when configuring the category in this case.
- If you need to exclude from the scan some documents, which are alternate versions of templates (for example, templates with slightly changed margins). We recommend that you decrease this value when configuring the category.
We recommend that you upload documents of an approximately equal size to a single category. We recommend that you create separate categories for documents if their size differs more than 2-3 times. Otherwise, detection of matches with templates added to the category may be far from optimal.
If you cannot find optimal values for the minimum and maximum percentage of fragment match, we recommend that you distribute the templates from this category by a few subcategories so that each of them contains templates with an approximately identical structure and file size.
Scenario of a check for matches with documents
- Add a category with quotations from documents and configure it.
- Use a category with document patterns using one of the following methods:
- If you need to find matches in documents that are uploaded to SharePoint websites, add a policy for this category.
- If you need to find matches in documents that are stored on SharePoint websites, add a search task with this category.
Adding a category for searching for documents using templates
To add a category with document templates:
- Open Management Console.
- In the tree of nodes of Management Console, select the Categories and policies node.
- In the workspace of the node, click the New category button and select Document templates in the list of category types that opens.
The Category settings dialog will appear.
- Specify the category name in the Name field.
- Click the Add button and select file(s) that need to be protected against data leakage.
The application supports files from which text data can be extracted (such as DOC, DOCX, ODS, ODT, PDF, RTF, TXT, XLS and XLSX). You are advised to not add more than 2 GB total volume of documents in a single category.
- If necessary, in the Document match threshold block of settings, change the percentage of match as compared with document templates that have been added to the category.
- In the Comments field, specify additional information pertaining to data in the category, for example, a link to the document that regulates the information security rules in the organization.
- Click the OK button.
The application converts text data from files into fragments. If processing some files has failed when creating the category, the application displays a list of those files together with the details of processing errors.
The application stores no original documents (nor any parts of them) in the category. No original documents (nor any of their parts) that have been added to a category can be restored or read on the basis of fragments.
The new category for searching for documents using templates appears in the list of categories and policies.
Page topAbout Kaspersky Lab data categories
Kaspersky Lab categories are preset categories that have been developed by Kaspersky Lab specialists. Each category includes data subcategories (that is, more specific categories).
Subcategory is a nested, embedded data category included in a larger-scale category. Each subcategory describes a set of category data combined with a specific feature. For example, the "Magnetic stripe data" subcategory makes part of the "Banking cards" category.
You can change the contents of a category by excluding or including subcategories. When a Kaspersky Lab data category is used, the application considers the data subcategories selected as part of this category. Subcategories that have been excluded from the category are ignored. For example, you can exclude subcategories upon which the application generates false positive incidents.
Kaspersky Lab categories are provided as part of the Kaspersky Security distribution kit. Categories can be updated during application database updates. The application records information about new Kaspersky Lab categories received during the update in the Windows Event Log. To receive information about preset Kaspersky Lab categories that have been added or modified, you can enable automatic notifications. Notifications contain information about the number of new and modified categories with their descriptions.
Kaspersky Lab categories
Category name |
Category description |
Administrative documents |
This category allows you to detect words and expressions that are used in standard forms of administrative and regulating documents. These include orders, notices, job descriptions, and applications from employees. Sets of data on administrative documents depend on the country they are used in. |
Alcohol, tobacco and narcotic substances |
This category allows you to detect words and expressions that, directly or indirectly, are associated with alcoholic products, tobacco goods, and narcotic and / or psychoactive substances. These include advertising descriptions, instructions on the use or preparation of such substances. |
Payment cards |
This category allows you to scan files for data that are protected by the PCI DSS (Payment Card Industry Data Security Standard). The requirements of this standard apply to companies that work with international payment systems. These requirements protect personal data of payment card owners when such data are processed, transmitted, and stored. This category allows you to detect the data of a payment card and its magnetic strip. |
Discrimination |
This category allows you to detect words and expressions that may infringe upon the rights and legitimate interests of various groups of people. Any meaningful distinction of a person may become a pretext for discrimination; this may be his or her sex, race, religious beliefs, sexual orientation, nationality, or occupation. |
Confidential documents |
This category allows you to detect words and expressions that are used in confidential documents. These include documents with tags indicating their confidential character: "For internal use only", "Confidential", or "Not for external distribution". |
Medical data (UK) Medical data (Germany) Medical data (Russia) Medical data (USA) Medical data (France) |
These categories allow you to check files for the numbers of medical insurance policies, medical case histories, diagnoses, and medical advice. Sets of data on drugs, treatments, and social insurance data depend on the country in which a person receives medical assistance. (Registered trademarks and service marks are the property of their respective owners.) |
Violence and weapons |
This category lets you detect words and expressions that are associated with cruelty or that indicate a planned, provoked, or occurred use of force intended to harm the life or health of an individual or group of people (including to cause harm to one's own health or to commit suicide). This category also lets you detect information associated with the manufacture, acquisition, or use of weapons or explosives. |
Discontent |
This category allows you to detect words and expressions that may indicate employees' depressed state or discontent. For example, employees may give unfavorable opinions on the managerial staff, colleagues, and customers, express discontent of their job or salary. Such opinions may indicate a negative emotional state of employees and lead to degradation of working performance. |
Explicit language |
This category allows you to detect rude and abusive words and expressions, as well as explicit language. |
Personal data (UK) Personal data (Germany) Personal data (Russia) Personal data (USA) Personal data (France) |
These categories allow you to check files for personal data that can be used to ascertain a citizen's identity or location (for example, date of birth, address of residence, data from the passport or driver's license, social security number and social insurance number, banking card data and numbers of banking accounts). The set of data classified as personal depends on the laws of the country whose citizenship the person holds. |
Personal identification (Russia) |
This category lets you detect copies of official documents that confirm the identity of a citizen of the Russian Federation, and that confirm the right of a citizen of the Russian Federation to operate a vehicle. |
U.S. Federal Law FCRA |
The category allows you to detect any information that is protected by the FCRA in the USA. The FCRA (Fair Credit Reporting Act) is a legislative act of the USA that regulates the data reporting for the purpose of assessment of citizens' financial condition, for example, when concluding a credit or insurance agreement. |
U.S. Federal Law GLBA |
The category allows you to detect any personal data and financial information protected by the GLBA in the USA. The GLBA (Gramm — Leach — Bliley Financial Services Modernization Act) is a legislative act of the USA that regulates the activities of financial institutions concerning citizens' personal and financial information. |
U.S. Federal Law HIPAA |
This category allows you to detect personal healthcare data listed in the HIPPA Federal Act of the USA. HIPAA (Health Insurance Portability and Accountability Act) is a legislative act of the USA that regulates the activities of medical, insurance, and financial organizations as they handle medical records of individuals. |
Russian Federal Law No. 152 |
This category allows you to check files for data protected by the Russian Federal Law No. 152. This law is aimed at protection of personal data when they are processed, stored, and used. The requirements of this law cover personal data operators (public authority, local authority, juridical or physical person who manages or performs personal data processing, as well as defines the goals and content of personal data processing). These requirements regulate activities that concern collection, processing, storage, and transmission of citizens' personal data. |
Financial documents |
This category allows you to detect words and expressions that are used in standard forms of financial documents. These include contracts, accounts and invoices, payrolls, and orders. The sets of data on financial documents depend on the country they are used in. |
Erotica and pornography |
This category allows you to detect words and expressions that are associated with the sexual side of human relationship. These include descriptions of human genitals, coitus, sexual perversions, or masturbation. |
Changing the contents of a Kaspersky Lab category
To change the contents of a Kaspersky Lab category:
- Open Management Console.
- In the tree of nodes of Management Console, select the Categories and policies node.
- In the list of Kaspersky Lab categories, select the one you need to edit and click the Settings button.
A window with two tabs opens:
- Settings.
- Exclusions.
- On the Settings tab in the Subcategories section, select the check boxes next to the data subcategories that you want to remain in this category.
- Click OK to save the changes.
Editing category settings
If necessary, you can edit categories that you have added manually. The following table lists the possible changes of a category depending on its type.
Changeable category settings
Possible changes |
Category |
|---|---|
Changing the list of keywords. |
Keywords |
Replacing the table data file in the category. |
Table data |
Adding document(s) to the category. Deleting document(s) from the category. |
Quotations from documents Document templates |
Changing the level of match with a document(s) in the category. |
Table data Quotations from documents Document templates |
Changing the category name. |
All categories |
Changing the category comment. |
All categories |
To edit the category settings:
- Open Management Console.
- In the tree of nodes of Management Console, select the Categories and policies node.
- In the list of categories, select the category of which you want to edit the settings and click the Settings button.
The category settings window opens.
- On the Settings tab, make changes to the category depending on the type of category selected.
- Click OK to save the changes.
About exclusions from a Kaspersky Lab category
To reduce the number of false positive incidents, you can configure exclusions from a Kaspersky Lab data category. Exclusions are regular expressions that control the way the DLP Module generates incidents.
Conditions of incident generation by the application:
- If the object being scanned has been found to contain only data described in exclusions, the application does not generate an incident.
- If the object being scanned has been found to contain only data described in exclusions as well as data not described in exclusions, the application does generates an incident. In this case the application considers only those data that do not match the list of exclusions.
Data categories available for the DLP Module are used to scan objects for leaks of scanned documents, such as the Personal identification (Russia) category. The DLP Module does not take into account the existing exclusions when scanning objects that contain document images, but does take into account the exclusions when scanning objects that contain textual information.
Regular expressions
The application supports the regular expression format that you can view at the Microsoft website via the following link: regular expressions.
Examples:
|
The application does not consider the case of symbols used in the regular expression.
Configuring exclusions from a Kaspersky Lab category
To configure exclusions from a Kaspersky Lab category:
- Open Management Console.
- In the tree of nodes of Management Console, select the Categories and policies node.
- In the list of Kaspersky Lab categories, select the category for which you want to configure exclusions and click the Settings button.
A window with two tabs opens:
- Settings.
- Exclusions.
- Select the Exclusions tab.
- Perform one of the following steps:
- To add an exclusion of a sequence of symbols to a Kaspersky Lab category, click the
 button and add the text of the regular expression.
 - To remove an exclusion of a sequence of symbols, select the regular expression that you want to delete and click the
 button.
- To add an exclusion of a sequence of symbols to a Kaspersky Lab category, click the
- Click OK to save the changes.
New exclusions are applied 5 minutes after you have saved the changes.
Deleting a category
To delete a category:
- Open Management Console.
- In the tree of nodes of Management Console, select the Categories and policies node.
- In the list of categories, select one to be deleted and click the Delete button.
After you confirm deletion, the application deletes the category permanently.
If polices were assigned to this category, they are deleted together with the category.
If the deleted category was used in search tasks, the task settings are modified after the category has been deleted.
Page topMonitoring and preventing data leaks
Kaspersky Security allows you to track and prevent data leakage on SharePoint websites by means of policies.
A policy is a collection of application settings that provide protection against data leaks. The policy defines the conditions on which users can handle confidential data, as well as actions that must be taken by the application when possible data leakage is detected.
According to the policy, the application scans files uploaded to SharePoint, using the following settings:
- By the name of the user account under which the file is uploaded
- By the address of the SharePoint website to which the file is uploaded
- By the match between data in the uploaded file and data in the category
If the conditions set for file upload to SharePoint meet the settings defined in the policy, the application registers a policy violation.
A policy violation means user actions leading to a violation of the conditions applied to the handling of confidential data on SharePoint servers. The application views an event as a policy violation if the user specified in the policy uploads to a SharePoint website some data from a category prohibited by the policy.
You can set up actions that the application will take in case of a policy violation, in accordance with one of the following scenarios:
- If you want to prevent leakage of data protected by the policy, we recommend that you configure the policy so that Kaspersky Security blocks files from being uploaded by users to SharePoint websites. This option is recommended if leakage of protected data poses a threat for data security in the organization.
You can additionally set up notification delivery to email addresses in order to receive up-to-date information about policy violations
- If you want to track possible leakage of data protected by the policy, we recommend that you configure the policy so that Kaspersky Security does not block files from being uploaded to SharePoint websites. The application will not affect user activities on SharePoint servers. This option is recommended if information about policy violations is analyzed during incident management.
Policy adding scenario
Before adding a policy, we recommend that you create relevant data categories or select relevant data categories in the list of preset categories.
- In the list of categories and policies, select the category, which contains data that you need to protect.
- Create a new policy for the selected data category.
Multiple policies can be added for a single category.
The application will track and / or prevent data leakage if the policy is active.
New Policy Wizard
A policy is a way to specify data leak detection criteria for the application and configure its actions on leak detection. A policy contains a set of application settings for monitoring SharePoint sites for leaks of data belonging to a certain category. Initial configuration of policy settings is performed with the help of the Policy Wizard.
To launch the Policy Wizard:
- Open Management Console.
- In the tree of nodes of Management Console, select the Categories and policies node.
- Select the data category for which you want to configure a policy.
- Click the New policy button.
The application starts the Policy Wizard.
The interface of the Policy Wizard consists of a sequence of windows (steps). Use the Back and Next buttons to navigate the windows of the Wizard. To close the Wizard after it finishes, click the Finish button. To exit the Wizard at any step, click the Cancel button.
Step 1. Policy rationale and status
At this step, you can change the policy status and specify the rationale for creating it.
To change the policy status,
select the Activate policy check box.
When the wizard finishes, the application starts monitoring file uploads to SharePoint sites according to the settings configured in the policy.
To specify a rationale for a policy,
in the Link to guidance document field, specify the paragraph of the regulatory document that governs data confidentiality practices at the company.
A policy rationale is required to coordinate the efforts of several security officers working at the same company.
In the Policy name entry field, specify the name of the policy to be created. If the entry field has a red outline, this means that a policy with this name already exists.
Page topStep 2. Configuring permissions to transfer files
At this step, you can configure permissions for file transfer to SharePoint sites by users.
To configure permissions for file transfers by users:
- In the Policy applies to list, select one of the following methods to apply the policy:
- All Active Directory users
- Selected Active Directory users.
The application uses Active Directory accounts to monitor user activity. Creating and managing Active Directory groups is the job of the company's system administrator. The
 and
and  buttons are designed to add and remove user accounts to which a policy applies.
- To specify users to be excluded from the scope of the policy, add their accounts to the Exclude the following users from policy list.
Exclusions always have priority over permissions for file transfers by users. After a user account has been added to the exclusions list, the application stops monitoring this user's attempts to transfer files to SharePoint.
Step 3. Selecting protected SharePoint sites
At this step, you can configure the control scope of the policy by specifying SharePoint websites for which the application will monitor file transfers.
To configure the control scope:
- Select the check boxes next to SharePoint websites or use the Select child items and Deselect child items buttons to select the check boxes automatically.
The application will control the uploading of files to the selected websites.
- Configure exclusions from the control scope:
- Click the Add exclusion button.
This opens the Web address window.
- In the window that opens, specify a web address and click OK.
- Click the Add exclusion button.
The web address appears on the list of exclusions. The application will not control the uploading of files by users to that web address.
Page topStep 4. Actions on policy violation
A policy violation means user's actions leading to a violation of the conditions applied to the storage of confidential information on SharePoint websites. The user violates a policy by uploading policy-protected category data to SharePoint.
To configure application operations upon a policy violation:
- Select the Block file upload to SharePoint check box if you need to prevent leaks of data from this category.
If the application detects data belonging to several categories while scanning a file, the file is blocked if at least one policy is configured to block data.
If this check box is cleared, the application does not block file transfers to SharePoint but creates incidents when the policy is violated.
- In the Create incidents with priority dropdown list, select the priority that the application will assign to incidents upon a policy violation.
- If necessary, select the Attach file to incident details check box to view the file while handling the incident.
- If necessary, select the Log events to Windows Event Log and Kaspersky Security Center Event Log check box to save information about policy violations in centralized mode and use it when resolving errors in the future.
When a policy violation event is saved in Windows Event Viewer, it is assigned code 16000. Each record contains the incident number and incident information.
- In the Send notification by email list, select the check boxes next to the names of employees to be notified about policy violations. Select the Additionally check box to enter email addresses separated with a comma in the entry field.
In the event of a policy violation, the application sends notifications to these addresses.
- Click Finish to close the New Policy Wizard.
A policy is assigned for a category of data. You can view the list of policies assigned for a category by clicking the button. You can minimize the list of policies by clicking the button. Policy lists are minimized automatically when you switch to another node of Management Console.
Page topSearching for policies by users
To search for policies created for specific users:
- Open Management Console.
- In the tree of nodes of Management Console, select the Categories and policies node.
- In the Policies search section, select one of the following search options:
- On users without Active Directory accounts to find policies configured for anonymous users and users without Active Directory accounts
- On selected users to find all policies configured for specific users who have Active Directory accounts.
Click the Select button to specify a user account for running a policy search. You cannot select multiple user accounts.
- Click the Find button to start the policy search.
The application displays the list of policies located. For each policy, the application displays the corresponding data category and the action taken by the application when this policy is violated. If the policy that has been found is inactive, the relevant information is displayed in the Action column.
Page topAdding a file to exclusions by web address
To add an incident-related file to exclusions by its web address:
- Open Management Console.
- In the Management Console tree of nodes, select the Incidents node.
- In the list of incidents, select one for which the related file should be added to exclusions.
- Click the View button.
This opens the Incident details window.
- In the File row, click the Actions button and select Add to exclusions in the dropdown list.
The application adds the web address of the incident-related file to exclusions as follows:
- If the incident was created due to a policy violation, the web address will be added to the policy's exclusions. The application will not control the uploading of files by users to that web address.
- If the incident was created when running the search task, the web address will be added to the search task's exclusions. The application will not scan files located on that web address.
If adding the web address to exclusions has failed (e.g., due to the policy or search task that had been removed), the application displays an error message.
- Click OK to save the changes.
Deleting a policy
To delete a policy:
- Open Management Console.
- In the tree of nodes of Management Console, select the Categories and policies node.
- Select the category of confidential data for which you want to delete the policy and click the button..
This opens a list of policies assigned for the category.
- In this list, select the policy to be deleted and click the Delete button.
- Confirm deletion of the policy in the dialog box.
The application deletes the policy permanently.
Page topCategories and policies
In this node, you can configure protection of data against leakage.
The node's workspace displays a list of categories and policies configured to protect data against leakage.
Kaspersky Lab categories are marked with the ![]() symbol. User-added categories are marked with this icon
symbol. User-added categories are marked with this icon ![]() .
.
Clicking the button located on the left from the name of a category opens a list of policies set for that category. Policies are marked with icons that reflect their status:
 – the policy is active; when the policy is violated, the application blocks file transmission to SharePoint.
 – the policy is active; when the policy is violated, the application does not block file transmission to SharePoint.
 – the policy is inactive.
Clicking the name of a category or a policy in the right part of the section displays detailed information about the category or policy that has been selected.
The Policies search section allows searching for policies associated with specific users.
On users without Active Directory accounts
Settings of a category of table data
In the Category settings window, you can configure the conditions for data search across SharePoint using table data.
The Match level block of settings allows you to configure data search across SharePoint by the contents of table data cells added from the CSV file. The number of cells involved in the search is defined as the number of unique intersections between columns and lines in the table. By using the threshold value of rows and columns, you can set up the minimum number of table data cells involved in the search. The application searches for matches with data in cells across files stored on SharePoint.
Additional information about category
Settings of a category of keywords
In the Category settings window, you can configure the conditions of data search across SharePoint sites using keywords.
In this entry field, you can specify keywords and expressions that the application should use to find matches on SharePoint sites. Keywords should be put into quotes. The application ignores words or phrases that have not been put into quotes.
Words and phrases that have been specified as keywords and put into quotes can be separated with whitespaces and other symbols (for example, "#", "%", "+", "@", "&", and punctuation symbols). Keywords can be combined into expressions by using such operators as AND, OR, NEAR(n), and ONEAR(n).
Settings of a category with quotations from documents
This window allows you to generate a list of documents containing the quotations that must be detected by the application in files uploaded to and stored on SharePoint.
Minimum number of matching fragments
The table displays the list of documents added to the category. The Number of fragments column specifies the number of fragments created by the application upon processing documents that had been added. For documents that have just been added, the Number of fragments column shows the File has not been converted value. To convert added documents to fragments, you must save the changes made to the category by clicking the OK button. If you need to view the number of fragments in newly added documents, open the Category settings window again.
Settings of a category with document templates
This window allows you to generate a list of documents whose originals and versions must be detected by the application in files uploaded to and stored on SharePoint.
Results of adding or modifying categories of quotations from documents and document templates
This window provides information about the results of adding some documents to the category. If any errors occur when adding files to the category, the window shows the following information:
- Number of files that have been successfully added;
- Number of files that have failed to be added;
- List of files, which resulted in errors while being added.
If adding files to the category returned no errors, this window does not appear.
Possible errors that may occur when adding documents to a category
Error |
Description |
|---|---|
Insufficient text data volume (less than ##symbolsCount## symbols) |
The file size is calculated excluding spaces, punctuation marks, and special symbols. A file that you are adding must exceed:
|
Password-protected files |
A password-protected file cannot be added to a category. We recommend that you temporarily rest the passwords from such files. After the document is added to the category, you can set a password again. |
Maximum size (1 GB) exceeded |
A file that is larger than 1 GB cannot be added to a category. You can split the document into a few portions and add each of them to the category. |
Processing time exceeded |
The document processing time expired, for example, due to a high load on the CPU or disk. |
Access errors |
We recommend that you check the file location. Access to the folder, which stores the document, may have been restricted. |
Other errors |
For a detailed description of errors that may occur when adding a file, please see the application log. |
Category: <Category name>
In the window with the settings of the selected Kaspersky Lab category, you can view the category details or change the composition of this category.
The Subcategories section displays a list of subcategories included in the selected category. You can change the category contents by selecting the check boxes next to the data subcategories by which the application must recognize information. Subcategories that have been excluded from the category are ignored. For example, you can exclude subcategories upon which the application generates false positive incidents.
All check boxes are selected by default.
New Policy Wizard. Step 1
The New Policy Wizard lets you create a new data leak prevention policy and configure the policy settings. The Wizard consists of a sequence of windows. You can switch between Wizard windows by clicking the Next and Back buttons. You can quit the Wizard at any time by clicking the Cancel button.
New Policy Wizard. Step 2
At this step of the Wizard, you can configure permissions for file transfer to SharePoint by company employees.
The application supports the following file formats: DOC, DOCX, PPT, PPTX, XLS, XLSX, XLSB, ONE, RTF, VSD, PDF, HTML, XML, ODP, ODS, ODT, TXT. The application does not control users' access to files of other formats. Please find your own solution for protection of files of other formats.
The Policy applies to block of settings allows you to select users to be covered by the policy. The application controls file transfers to SharePoint performed by these users.
Select users to be covered by policy
Selected Active Directory users
The application controls file transfers to SharePoint performed by users whose accounts are specified on the list. The following buttons are designed for creating a list:
- – add an account to the list;
- – remove the selected account from the list.
The list is empty by default.
The Exclude the following users from policy section allows selecting Active Directory users who are out of scope of the policy. The application does not control file transfers to SharePoint performed by these users. The following buttons are designed for creating a list of users:
- – add an account to the list;
- – remove the selected account from the list.
The list is empty by default.
Monitor users missing in Active Directory
New Policy Wizard. Step 3
At this step of the Wizard, you can configure the control area. The application will control the uploading of files to the selected SharePoint websites. When users specified at the previous step of the Wizard upload files to the selected SharePoint websites, the application registers a policy violation.
The section in the bottom part of the window allows you to configure exclusions from the control area. You can create a list of web addresses to which files will be uploaded by users without being controlled by the application.
New Policy Wizard. Step 4
At this step of the Wizard, you can configure automatic actions to be performed by the application when the policy is violated.
Block file upload to SharePoint
Create incidents with priority
Attach file to incident details
Log events to Windows Event Log and Kaspersky Security Center Event Log
Policy settings – Policy
On the Policy tab, you can activate a policy, change its name, or specify some additional information about the policy's purpose.
Control scope
On the Monitoring scope tab, you can configure the control area. The application will control the uploading of files to the selected SharePoint websites.
The section in the bottom part of the window allows you to configure exclusions from the control area. You can create a list of web addresses to which files will be uploaded by users without being controlled by the application.
Policy settings – Users
On the Users tab, you can set up permissions to transfer files to SharePoint for the organization's employees.
The Policy applies to block of settings allows you to select users to be covered by the policy. The application controls file transfers to SharePoint performed by these users.
Select users to be covered by policy
Selected Active Directory users
The application controls file transfers to SharePoint performed by users whose accounts are specified on the list. The following buttons are designed for creating a list:
- – add an account to the list;
- – remove the selected account from the list.
The list is empty by default.
The Exclude the following users from policy section allows selecting Active Directory users who are out of scope of the policy. The application does not control file transfers to SharePoint performed by these users. The following buttons are designed for creating a list of users:
- – add an account to the list;
- – remove the selected account from the list.
The list is empty by default.
Monitor users missing in Active Directory
Web address
In the entry field, you can specify the web address of a file or a library. The application will not control the uploading of files to the specified web addresses by users.
If the specified web address has already been added to the list of exclusions for the policy, the application displays an error message. Non-existent web addresses cannot be added to exclusions.
Page topPolicy settings – Actions
On the Actions tab, you can configure automatic actions to be performed by the application when the policy is violated.
Block file upload to SharePoint
Create incidents with priority
Attach file to incident details
Log events to Windows Event Log and Kaspersky Security Center Event Log
Exclusions from a Kaspersky Lab category tab
You can create a list of regular expressions to exclude a sequence of symbols from a Kaspersky Lab category.
The following buttons are intended for generating a list of regular expressions:
- – add a regular expression to the list of exclusions.
Examples:
color– this regular expression excludes from category-based scanning the sequence of symbols color.111\d-\d{4}-\d{4}-\d{4}, where\dstands for any number from 0 to 9. This regular expression excludes from category-based scanning the sequences of symbols 1113-3333-3333-3333.colou?r,whereu?stands for the letter u that does not appear in the sequence of symbols or appears in it only once. This regular expression excludes from category-based scanning the sequence of symbols color and colour.
The application does not consider the case of symbols used in the regular expression.
- – delete the selected regular expression from the list of exclusions.
New exclusions are applied 5 minutes after you have saved the changes.
Searching SharePoint websites for data
Data search functionality lets you scan files on SharePoint sites for data belonging to specific categories.
You can use data search to perform the following operations:
- Detect all SharePoint sites that currently store files containing data that belongs to specific categories.
- Scan selected SharePoint sites for files containing data that belongs to specific categories. For example, you can receive information on files with employees' financial or personal data that are stored in improper locations.
- Use data categories to search SharePoint sites for specific files. For example, you can detect a file if its name and format are unknown but you know what type of data it may contain and on which SharePoint website it may be stored.
During data search, the load on SharePoint servers increases. To maintain a balanced load, the administrator can limit the list of SharePoint servers on which data search is available. If the Status column next to a running task displays the No servers available message, contact the administrator for a permission to run the task. The administrator modifies the DLP Module settings.
Managing search tasks
The SharePoint site data search function is implemented in the form of search tasks.
You can configure the following settings for each task:
- Scan type (full or incremental)
- Data categories according to which the search is performed
- SharePoint sites on which the search is performed
- Task run mode and schedule
- Application actions on detecting files that match the search conditions
On detecting files, the application can create incidents and log event information in Windows Event Viewer.
You can add several search tasks to scan various SharePoint servers for files containing data that belongs to various categories. You can edit search task settings, if necessary.
If data categories selected for running the search are modified while the search task is in progress (for example, certain keywords are removed or new table data is added), the application continues to search for files according to the modified data categories. The application does not re-scan the files that have been found.
The application searches for data in background mode. Regardless of the task run schedule, you can manually start or stop a search task at any time.
The application does not scan system files during a search task.
The progress of the search task is displayed in the form of a progress bar. The progress bar shows the percentage ratio of files that have been scanned against the total number of files on the selected SharePoint servers.
Data search optimization
During repeated runs of a task, the application can perform an incremental scan, i.e. scan only files that have been modified since the previous task run. Incremental scanning allows minimizing the task runtime and reducing the workload on the SharePoint server. You can enable incremental scanning in the task settings. If incremental scanning is disabled, the application scans all files that meet the search criteria.
Processing search results
The application generates a report on search results after the task is completed.
Each report contains a table with a list of files matching the search parameters. The report name is created automatically and matches the name of the task based on which it has been generated.
If necessary, you can save the report to view search results without opening Management Console.
Search results make it possible to analyze the current status of data protection on SharePoint and edit policy settings, if necessary.
Features of incremental scan
Incremental (partial) scan is a type of file scan during which the application only scans files that have been modified since the previous scan. By default, incremental scanning is enabled. The application performs a full scan at the first task run; all further runs enable incremental scans. The application does not scan files that have not been modified. Modifying the scan task may cause the search scope to include files that have not yet been scanned. The application performs a full scan of those files.
Dependency of the incremental scan on changes made to the scan task settings
Scan setting |
Setting modification |
Scan type |
Files scanned by the application |
Data categories
|
No. No data categories have been modified in the task. |
Incremental |
Modified files only. |
Yes. A new data category (or multiple ones) has been added to the scan task. |
Full and incremental |
All files are scanned for presence of the specified new categories. Modified files for presence of specified categories that have been used during the previous task run. |
|
Yes. The contents of a data category (or multiple ones) have been modified. |
Incremental |
Only modified files by updated categories. |
|
Scanned websites
|
No. |
Incremental |
Modified files only. |
Yes. A new SharePoint website (or multiple websites) has been selected. |
Full and incremental |
All files located on new SharePoint websites. Modified files on websites that have been scanned during the previous task run. |
Enabling the incremental scanning
To enable the incremental scanning:
- Open Management Console.
- In the Management Console nodes tree, select the Search node.
- In the list of tasks in the Search tasks section, select the task of which you want to edit the settings, and click the Change button.
This opens the Task settings window.
- On the General tab, select the Scan modified files only check box.
During repeated runs of the task, the application will scan files that have been modified since the previous task run.
- Click OK to save the changes.
Changes to scan task settings affect the performance of the incremental scan.
Page topAdding a search task
To add a search task:
- Open Management Console.
- In the Management Console nodes tree, select the Search node.
- In the Search tasks section, click the Create button.
This opens the Task settings window.
- On the General tab, in the Task name field, specify the task name.
- If necessary, select the Scan modified files only check box.
During repeated runs of the task, the application will scan files that have been modified since the previous task run.
- If necessary, select the Create incidents and Log events to Windows Event Log and Kaspersky Security Center Event Log check boxes.
On detecting files that contain data of the specified categories, the application creates an incident for each file and logs file detection information in Windows Event Viewer.
- On the Categories tab, select the check boxes next to data categories for which the application should find matches on SharePoint websites.
- On the Schedule tab, select the task run mode and set up the task run schedule.
- On the Search scope tab, select the check boxes next to SharePoint websites on which the application will search for files.
- If necessary, click the Add exclusion button to configure exclusions for websites.
The application will not scan files located on the web addresses that you have specified.
- Click OK to finish creating the task.
The newly added task is displayed in the table of tasks in the Search tasks section. You can start a task manually after creating it. If you have configured a task run schedule, the application runs a search for data at the specified time on the specified day.
Starting and stopping a data search
To start or stop a search task manually:
- Open Management Console.
- In the Management Console nodes tree, select the Search node.
- In the list of tasks, select the search task that you want to start or stop.
- Perform one of the following steps:
- To run the search task, click the Start button.
The application starts the data search on SharePoint websites.
- To stop the search task, click the Stop button.
The application stops running the task. After stopping the task, the application generates a report with information on files found before the task was stopped. The report will be displayed in the Search results section.
- To run the search task, click the Start button.
If the Status column next to a running task displays the No servers available message, contact the administrator to redefine the Allow running search tasks on the following servers setting.
Page topEditing the search task settings
To edit search task settings:
- Open Management Console.
- In the Management Console nodes tree, select the Search node.
- In the list of tasks in the Search tasks section, select the task of which you want to edit the settings, and click the Change button.
This opens the Task settings window.
- Make changes to the task settings in the window that opens.
- Click OK to save the changes.
Changes to scan task settings affect the performance of the incremental scan.
Viewing the search results
To view the search results:
- Open Management Console.
- In the Management Console nodes tree, select the Search node.
- In the list of reports in the Search results section, select one and click the View button.
The report opens in the default text editor.
The report contains the following information about the search results:
- Task settings:
- SharePoint sites on which the search was performed;
If the SharePoint sites specified in the search settings cannot be accessed, the report shows only their addresses and access error information.
- Categories according to which the search was performed.
- Reasons why the task ended (for example, the task was stopped manually).
- SharePoint sites on which the search was performed;
- Search start and end times.
- Number of files scanned.
- List of files matching the search settings. The following information is displayed for each file:
- File name and format;
- Full path to the file on the SharePoint site;
- File version;
- Name of the user that uploaded the file to the SharePoint site (first version of the file);
- Name of the user that made the last changes to the file (last file version);
- Date and time when file scanning started;
- Name of the category of data detected in the file.
If data belonging to several categories has been detected in the file, information about each category detected is displayed in a separate table column.
If the file has been found to contain data of the table data category, the report shows the number of rows from the CSV file loaded into the category.
- Possible error information:
- Access to the file is blocked
- The file could not be opened
- The file could not be scanned
Saving search results
To save search results:
- Open Management Console.
- In the Management Console nodes tree, select the Search node.
- In the list of reports in the Search results section, select one and click the Save button.
The application saves the report in CSV format to the specified folder.
Page topDeleting a task
To delete a search task:
- Open Management Console.
- In the Management Console nodes tree, select the Search node.
- In the list of tasks in the Search tasks section, select one to be deleted and click the Delete button.
After you confirm deletion, the application deletes the task permanently.
Page topDeleting the search results
To delete search results:
- Open Management Console.
- In the Management Console nodes tree, select the Search node.
- In the list of reports in the Search results section, select reports to be deleted and click the Delete button.
After you confirm deletion, the application deletes the selected reports on search results permanently.
Page topSearch
In this node, you can configure search of data across SharePoint by various categories, as well as view search results.
The Search tasks section contains a list SharePoint file search tasks. In this section, you can manage search tasks by adding new ones, modifying or removing existing tasks, as well as starting and stopping tasks run.
The Search resultss section contains a list of reports on the results of search tasks. In this section, you can view and delete reports, as well as save reports to disk.
Task settings – General
Log events to Windows Event Log and Kaspersky Security Center Event Log
Task settings – Categories
The Categories tab displays a list of categories that you can use in the task. The list contains Kaspersky Lab categories and user-created categories. The application searches for data across SharePoint by categories selected in the list.
Task settings – Search scope
On the Search scope tab, you can select SharePoint websites on which the application will perform data search according to the selected categories.
The section in the bottom part of the window allows you to configure exclusions from the search scope. You can create a list of web addresses on which the application will not scan files during the data search.
Web address
In the entry field, you can specify the web address of a file or a library. During the search, the application will not scan files located on the specified web address.
If the specified web address has already been added to the list of exclusions for the search task, the application displays an error message. Non-existent web addresses cannot be added to exclusions.
Page topTask settings – Run mode
On the Schedule tab, you can select the task run mode and set up a schedule that the application will use to run the search task.
Managing incidents
An incident is a record about an application event associated with a possible data leak. Kaspersky Security generates incidents in the following cases:
- When a policy is violated
- While searching SharePoint for data
Each incident contains detailed information about incident-related files and users and the reason why the incident has been generated. This information is needed to analyze and investigate possible data leaks.
The incident workflow process is regulated by job descriptions of security officers and may vary depending on the incident workflow regulations adopted within an organization.
Managing the incident workflow process
The incident workflow process can be managed as follows:
- Using incident statuses
The incident status is information about the current incident status. The incident status can be changed at any time. Information about the incident status change and the author of changes is saved in the incident history.
The application lets you change the status of several incidents at once.
- Using comments
Comments may contain information about the reasons for incident status changes and about an investigation of the circumstances under which the incident occurred.
Incident comments can be added while changing the incident status or viewing the incident history.
Selecting incidents to manage
The application adds all incidents that have been generated to the list of incidents in the Incidents node. You can change the appearance of the incident list by changing the incident information displayed in the table.
The application automatically assigns the New status to an incident when it is generated. New incidents available for processing can be displayed by refreshing the incident list.
You can use the incident filter to search for incidents according to specific criteria (such as incidents related to a specific user). You can use the search for similar incidents to handle similar incidents, i.e., those who share identical data.
Viewing incident details and processing incidents
You can start managing new incidents by viewing the incident details.
Incidents assigned for processing must have their status changed to In progress. If the company has several security officers, this will help them to coordinate their workflows.
To make a decision on an incident, you have to look at the context of the policy violation. The violation context is displayed in the incident details window. The violation context contains all text fragments that contain data indicating the violation. Keywords or table data in each fragment are highlighted in red. If the context of the violation is insufficient to make a decision on an incident, you can open the incident-related file on SharePoint.
When you point the mouse pointer on a text fragment that indicates a violation, a tooltip with the name of the data subcategory appears next to the pointer (see the figure below). A subcategory is a nested, embedded data category included in a larger category. The subcategory name helps to define more accurately the area of the category to which data belongs.
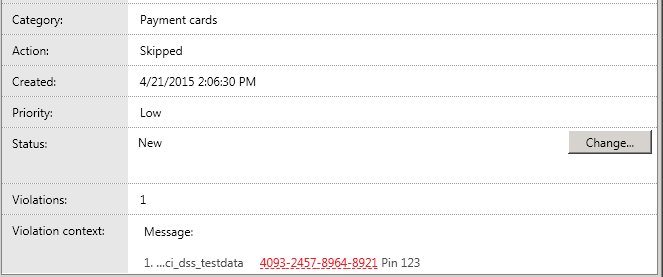
The subcategory name is displayed in a pop-up hint
You can add the web address of the file associated with the incident to exclusions. This helps you to reduce the number of false positive incidents generated when scanning template-based documents (such as uniform contracts or statements). The application adds the web address of a file to exclusions as follows:
- If the incident has been created due to a policy violation, the web address will be added to the policy's exclusions. The application will not control the uploading of files by users to that web address.
- If the incident has been created when running the search task, the web address will be added to the search task's exclusions. The application will not scan files located on that web address.
If the incident was generated while running a search task of Kaspersky Security 9.0 , you cannot add the file's web address to exclusions for the search task.
If you need to export incident information to prepare an official memo, you can copy the incident details to clipboard.
Finishing incident management
Following analysis of incident information, an incident can be assigned one of the following statuses:
- Closed (processed), if incident processing has been completed.
- Closed (false positive), if the policy violation was a false positive (e.g., a mistake was made while configuring the policy).
- Closed (not an incident), if the policy violation was admissible as an exclusion.
- Closed (other) in any other cases.
After finishing incident processing, you can remove them from the list of incidents by archiving them.
You are advised to perform archiving of incidents once the number of incidents exceeds 100,000. Kaspersky Security can be unstable when the number of incidents increases to 300,000.
Restoring incidents
You can consult archived incidents, if necessary, by restoring incidents. The application automatically assigns Archival status to all restored incidents.
After you finish processing these incidents, you can remove them from the list.
Updating the list of incidents
The list of incidents is not refreshed automatically. To manage new incidents, the list of incidents has to be refreshed manually.
To refresh the list of incidents:
- Open Management Console.
- In the Management Console tree of nodes, select the Incidents node.
- Click the Refresh button in the workspace of the node.
New incidents created since the time when the list was last refreshed are added to the list.
Page topChanging incident details displayed in the table
To change incident details displayed in the table:
- Open Management Console.
- In the Management Console tree of nodes, select the Incidents node.
- In the List of incidents section, click the Select columns button.
This opens the Select columns to display section.
- In the section, select check boxes opposite those incident details that you want displayed in the table.
Table changes are applied as soon as you select or clear a check box. Incident details next to which the icon ![]() appears are always displayed in the table.
appears are always displayed in the table.
Searching for incidents using a filter
By default, the list of incidents displays all incidents irrespective of their generation time and current status. You can filter the list of incidents to display only incidents with a particular status or incidents generated during a certain period.
To find an incident using a filter:
- Open Management Console.
- In the Management Console tree of nodes, select the Incidents node.
- In the Incidents filter section, set the incident filtering condition.
Each filtering condition has two parameters: a criterion and a value. The drop-down list on the left lets you select an incident filtering criterion. Incident details are used as filtering criteria. In the drop-down list next to it you can specify the value of the selected criterion according to which filtering is performed. The appearance of the drop-down list depends on the filtering criterion selected.
- If necessary, specify additional filtering conditions by clicking the Add a condition button.
The application performs filtering according to all conditions added to the incident filter.
- Click the Search button to search for incidents.
The List of incidents section displays incidents that meet the search conditions.
Page topSearching for similar incidents
To find similar incidents:
- Open Management Console.
- In the Management Console tree of nodes, select the Incidents node.
- In the list of incidents, select an incident whose details you want to view.
- Right-click to open the context menu of the incident and select Search for similar incidents.
This opens a list of criteria according to which you can search for incidents similar to the selected incident.
- Select a criterion according to which you want to search for similar incidents:
- Same category.
- Same policy.
- Same file.
- Same user.
The application automatically configures the incident filtration conditions according to the selected criterion. The List of incidents section displays incidents that meet the search conditions.
Page topChanging the status of an incident
Incident status is information about the current incident status. You can change the incident status based on the results of incident processing. Incident statuses are used when generating application reports. The incident status can be changed either in the list of incidents or in the incident details window.
To change the incident status:
- Open Management Console.
- In the Management Console tree of nodes, select the Incidents node.
- In the list of incidents, select an incident whose status you want to change.
You can select one or several incidents in the list.
- Click the Change status button and select Selected incidents in the dropdown list.
You can change the status of all incidents in the list. To do this, in the Change status dropdown list, select All incidents.
- In the Changing status window that opens, in the Status list, select the status that you want to assign to the incident.
- If you need to specify the reason for the status change or other information pertaining to incident processing, add it in the Comment field.
- Click OK to save the changes.
The new status of the incident is displayed in the Status column of the incidents list in the Incidents node. Information about the status change and the author of changes is saved in the incident history.
You can change the status of an incident in the Incident details window by clicking the Change button.
Viewing incident details
To view incident details:
- Open Management Console.
- In the Management Console tree of nodes, select the Incidents node.
- In the list of incidents, select an incident whose details you want to view.
- Click the View button.
This opens the Incident details window. In this window, you can view detailed information about the incident, change its status, and select an action for the incident-related file. You can switch between incidents on the list by clicking the Previous and Next buttons.
The Browse tab shows the details of incidents and the reasons why they were generated.
The History tab shows information about the history of incident processing (such as changes of the incident status or incident archiving).
- Click the Cancel button to finish viewing the incident details.
If you have changed the incident status while viewing the incident details, click OK to save the changes.
Copying incident details to the clipboard
To copy the incident details to the clipboard:
- Open Management Console.
- In the Management Console tree of nodes, select the Incidents node.
- In the list of incidents, select the one of which you need to copy the details.
- Click the View button.
This opens the Incident details window.
- In the File field, click the Actions button and select Copy data to clipboard in the dropdown list.
The application copies the incident details and processing history to the clipboard. The order and set of details being copied are the same as those displayed in the application window.
To continue handling the incident, you can paste the clipboard's contents to a text editor (such as Notepad or Microsoft Word).
Page topArchiving incidents
Incident archiving is a process of moving closed incidents to an archive in secure format.
Incident archiving reduces the size of the SQL database and the list of incidents displayed in Management Console.
To launch the Incident Archiving Wizard:
- Open Management Console.
- In the Management Console tree of nodes, select the Incidents node.
- Select closed incidents to be moved to the archive.
- Click the Archive button in the workspace of the node.
The application launches the Incident Archiving Wizard.
The interface of the Incident Archiving Wizard consists of a sequence of windows (steps). Use the Back and Next buttons to navigate the windows of the Wizard. To close the Wizard after it finishes, click the Finish button. To exit the Wizard at any step, click the Cancel button.
Starting the Wizard. Selecting incidents to archive
The first window of the Wizard shows information about incidents to be archived. You can archive incidents with the Closed status only.
In the Path to file field, specify the full path to the archive in which the application will save incidents. If you do not specify the name of an archive, the Incident Archiving Wizard creates a new incident archive. The archive name is assigned automatically and contains the date of creation of the earliest incident in the archive and the date of creation of the most recent incident in the archive. The application uses the dates when incidents were created on the server.
You cannot archive incidents with the New or In progress status, as well as incidents previously recovered from an archive.
Creating an archive with incidents
At this step the Wizard performs incident archiving. The incident archiving process is accompanied by a progress bar. Once incident archiving has been completed, the Wizard automatically proceeds to the next step.
Exiting the Wizard
At this step the Wizard announces that the incident archiving process has been completed and shows information on the number of incidents archived. If errors were encountered during the incident archiving process, the Wizard displays information about the incidents that could not be archived.
The following archiving process information is stored in the incident history:
- Archive name
- Date and time of the archiving process
- Name of the user that performed archiving
Incidents added to the archive are removed from the SQL database and from the list of incidents in the Incidents node.
Restoring incidents from the archive
Incident recovery is a process of copying incidents from the archive to the SQL database.
You can recover incidents when you need to view the details of incidents that had been processed a long time ago.
To launch the Incident Recovery Wizard:
- Open Management Console.
- In the Management Console tree of nodes, select the Incidents node.
- Click the Restore button in the workspace of the node.
The application starts the Incident Recovery Wizard.
The interface of the Incident Recovery Wizard consists of a sequence of windows (steps). Use the Back and Next buttons to navigate the windows of the Wizard. To close the Wizard after it finishes, click the Finish button. To exit the Wizard at any step, click the Cancel button.
Starting the Wizard. Selecting incidents to recover
In the first window of the Wizard, select the incidents that you want to recover.
In the Over period field, specify the period during which the relevant incidents were generated. In the Path to file field, specify the full path to the incidents archive file from which the application will recover the incidents.
Recovering incidents
At this step the Wizard performs incident recovery. The process of incident recovery from the archive is displayed in the Wizard window using a progress bar. Once incident recovery has been completed, the Wizard automatically proceeds to the next step.
Exiting the Wizard
At this step the Wizard announces that the incident recovery process has been completed and shows information on the number of incidents recovered. If errors were encountered during the incident recovery process, the Wizard displays information about the incidents that could not be recovered.
Recovered incidents cannot be archived or recovered again. It is impossible to change the status of recovered incidents.
All recovered incidents are displayed on the common list of incidents in the Incidents node. Archived status is added to the status of recovered incidents.
Deleting archived incidents
To delete archived incidents:
- Open Management Console.
- In the Management Console tree of nodes, select the Incidents node.
- Click the Delete archived button under the list of incidents.
After deletion is confirmed, the application removes incidents with Archived status from the incident list.
Page topIncidents
This node lets you view and process incidents.
The Incidents filter section lets you find incidents that need processing.
The section displays the incident filtering conditions. Each condition has two parameters: a criterion and a value. The drop-down list on the left lets you select an incident filtering criterion. Incident details are used as filtering criteria. In the drop-down list next to it you can specify the value of the selected criterion according to which filtering is performed. The appearance of the drop-down list depends on the filtering criterion selected.
By default, the incident filter contains one filtering condition. You can add several conditions to configure incident filtering flexibly. The application performs filtering according to all conditions added to the incident filter.
You can remove an incident filtering condition by clicking the ![]() button located on the right of the condition parameters.
button located on the right of the condition parameters.
The List of incidents section contains a table with a list of incidents. This list lets you view the details of each incident, change incident status, perform incident archiving and recover incidents from the archive.
The list of incidents appears one page at a time. The first page of the incident list displays 24 of the latest incidents. Use the buttons in the  bottom right corner of the table to navigate the pages. The number of the page you are viewing is displayed in the field between buttons.
Clicking this button expands the Select columns to display section. This section lets you select the incident details to be displayed in the incident table by means of check boxes. Incident details next to which the icon ![]() appears are always displayed in the table.
appears are always displayed in the table.
You can right-click to open the context menu of the incident. The context menu allows you to change the incident's status, view the incident details, and find similar incidents (e.g., those associated with the same user or file).
Change status
In this window, you can assign a new status to incidents and add comments on the reasons of the status change.
Incident details – Review
On the Browse tab, you can view detailed information about an incident, change the incident status, and send users notifications of violations of the corporate security requirements.
The Status field shows the current incident status. You can change the incident status by clicking the Change button.
The Manager field displays the account of the employee's manager that is present in Active Directory.
The Address field displays the web address of the file that has caused the policy violation while being transferred to SharePoint.
The Category field displays the name of the data category detected by the application in the file being transferred.
The Priority field displays the incident severity rate specified in the policy settings.
The Action field displays the action that has been applied by the application to the file.
The Created field displays the date and time of the incident creation. The internal SharePoint server time is used.
The Policy field displays the name of the violated policy.
The Violations field displays the number of text fragments that contain data matching the category.
The Violation context field displays all text fragments that contain data matching the category. Keywords or table data in each fragment are highlighted in red.
Incident details – History
The History tab displays information on events relating to incident processing (such as incident status changes or incident recovery from the archive). Entries about events relating to incident processing are highlighted in blue. Each entry includes the date, time, and author of changes.
Incident Archiving Wizard
The Incident Archiving Wizard lets you perform incident archiving by following a sequence of steps.
Information on incidents that can be archived is displayed in the Wizard window that opens. This window lets you configure the settings of incident archiving.
Once archiving has been completed, the following archiving results are displayed in the Wizard window:
- Number of successfully archived incidents
- Number of errors encountered during the archiving process
Incident Recovery Wizard
The Incident Recovery Wizard lets you recover incidents from an archive.
You can configure the incident recovery settings in the Wizard window that opens.
Once incident recovery has been completed, the following recovery results are displayed in the Wizard window:
- Number of successfully recovered incidents
- Number of incidents previously recovered from the archive
- Number of errors encountered during the recovery process
Generating application reports
Information on the operation of the application and the status of Data Leak Prevention can be saved in reports. Reports are generated on the basis of information stored in the database. You can generate a report manually or automatically (according to schedule).
You can use quick reports to generate reports manually.
You can use report generation tasks to generate reports automatically. Report generation tasks are started according to the schedule configured in task settings. If necessary, you can generate a report at any time without waiting for a scheduled task to start.
Selecting the report type
You can select the report type depending on the type of information you need to gather:
- To gather full information on the results of application operation and the status of Data Leak Prevention during a specific period, generate a report on policy-related incidents. The report contains information about incidents related to the selected categories and policies.
- To gather information about policy violations by specific users, generate a “user statistics” report. The report contains information about incidents related to the selected users.
You can use the report to analyze the frequency of policy violations by users. For example, if a user has repeatedly violated the same policy, you have to notify the user's manager.
- To check if the application is running properly, generate a system KPI (Key Performance Indicators) report. The report contains information on the key performance indicators of the application.
You can track changes in the operation of the application based on this report. For example, if the application has not scanned a large number of files, this may indicate a need to modify policy settings.
- To check if policies are configured correctly, generate an “incident status report”. The report contains information about incidents related to the selected data categories.
This report lets you analyze relationships between policy violations and reasons for closing incidents. For example, if policy-related incidents are closed as false positives, this may indicate a need to change the policy settings.
When generating a “report on policy-related incidents” or a “user statistics report”, the application factors in the incidents restored from the archive.
Managing reports
The application adds all reports that have been generated to the list of reports in the View and create reports section in the Reports node. The following information is displayed for each report:
- Name.
- Creation date and time.
- The reporting period.
- Report type.
This information helps you to find reports that you want to view. If you generate a quick report, the application automatically opens the generated report in the window of the default browser.
If necessary, you can save the generated reports to manage them without opening Management Console.
Generating a quick report
To create a quick report, perform the following steps:
- Open Management Console.
- In the Management Console nodes tree, select the Reports node.
- In the Generate and view reports section, click the New report button.
- Select the type of report you are creating in the drop-down list.
- In the window that opens, configure the report generation settings.
- Click OK to start generating the report.
The final report is displayed in the list of reports in the Generate and view reports section and automatically opens in the browser window.
Adding a report generation task
To add a report generation task:
- Open Management Console.
- In the Management Console nodes tree, select the Reports node.
- In the Report generation tasks section, click the New task button.
- In the drop-down list that opens, select the type of report to be generated.
This opens the Task settings window.
- In the window that opens, configure the settings of the report generation task.
- Click OK to add the task.
The new task is displayed on the list of tasks in the Report generation tasks section. The application starts the report generation task automatically according to the schedule configured in the task settings.
Saving reports
To save a report:
- Open Management Console.
- In the Management Console nodes tree, select the Reports node.
- In the list of reports in the Generate and view reports section, select one to be saved and click the Save button.
- In the window that opens, specify the folder to save the report to and click the Save button.
The application saves the report in an HTML file to the specified folder. By default, the name of the file being saved matches the report name.
Page topStarting a report creation task
To start a report generation task:
- Open Management Console.
- In the Management Console nodes tree, select the Reports node.
- In the Report generation tasks section, select the task to be run.
- Click the Start button.
The application generates the report according to the configured task settings. The report will be displayed on the list of reports in the Generate and view reports section.
Page topEditing report generation task settings
To edit the settings of a report generation task:
- Open Management Console.
- In the Management Console nodes tree, select the Reports node.
- In the Report generation tasks section, select a task and click the Change button.
The Task settings dialog will appear.
- Make changes to the task settings.
- Click OK to save the changes.
Configuring settings of the report on policy-related incidents
To configure the settings of the report on policy-related incidents:
- Open Management Console.
- In the Management Console nodes tree, select the Reports node.
- Configure a detailed report generation task or a quick detailed report:
- To configure an existing task for detailed report creation, select one in the Report generation tasks section and click the Change button.
- To configure the quick detailed report, in the Generate and view reports section, click the New report button and select Incidents by policies.
The report settings window opens.
- Make changes to the report settings.
- Click the OK button.
You can configure the settings of a detailed report as follows:
- Select incidents for the report on policies and categories.
When you select a category, all policies configured for the category are selected automatically.
- Select incidents associated with specific users for the report.
You can select individual users or groups of Active Directory users, anonymous users, or users without Active Directory accounts.
- Select incidents with specific statuses for the report.
- Configure the order for displaying incidents in the report.
The application can group report incidents with the same information in the order that you specify.
- Specify the reporting period.
If you create a quick report, you can specify any reporting period. If you configure a report task, the reporting period depends on the task schedule. For example, if you configured the task to run weekly, the report is generated for the past week.
- Configure the task launch schedule.
The application generates reports automatically according to this schedule. If necessary, you can disable automatic launch of tasks.
- Configure automatic delivery of the report via email.
If necessary, you can specify additional email addresses in the entry field, separating them with a semicolon. The application automatically sends the generated report to these addresses.
Configuring the report on users
To configure the settings of the report on users:
- Open Management Console.
- In the Management Console nodes tree, select the Reports node.
- Configure a task to generate a report on policies and incidents or a quick report on policies and incidents:
- To configure an existing task for creating a report on policies and incidents, select a task in the Report generation tasks section and click the Change button.
- To configure the quick report on policies and incidents, in the Generate and view reports section, click the New report button and select Statistics on statuses of incidents.
The report settings window opens.
- Make changes to the report settings.
- Click the OK button.
You can configure the settings of a report on users as follows:
- Select users to be included in the report.
You can select individual users or groups of Active Directory users, anonymous users, or users without Active Directory accounts. For users whose Active Directory accounts could not be determined, the SharePoint account may be displayed (for example:
SharePoint\Kaspersky). - Select incidents for the report on categories.
The application displays the number of violations related to the selected data categories for each user.
- Select incidents for the report on statuses.
- Configure the order for displaying user information in the report.
The application can group information about users who committed the same violations in the order that you specify.
- Specify the reporting period.
If you create a quick report, you can specify any reporting period. If you configure a report task, the reporting period depends on the task schedule. For example, if you configured the task to run weekly, the report is generated for the past week.
- Configure the task launch schedule.
The application generates reports automatically according to this schedule. If necessary, you can disable automatic launch of tasks.
- Configure automatic delivery of the report via email.
If necessary, you can specify additional email addresses in the entry field, separating them with a semicolon. The application sends the generated report to these addresses.
Configuring system KPI report settings
To configure the settings of the system KPI report:
- Open Management Console.
- In the Management Console nodes tree, select the Reports node.
- Configure a system KPI report task or a quick system KPI report:
- To configure an existing system KPI report task, select one in the Report generation tasks section and click the Change button.
- To configure the quick report on system KPI, in the Generate and view reports section, click the New report button and select System KPI.
The report settings window opens.
- Make changes to the report settings.
- Click the OK button.
You can configure the system KPI report settings as follows:
- Specify the reporting period.
If you create the report manually, you can specify any reporting period. If the report is created automatically, the reporting period depends on the task run schedule. For example, if you configured the task to run weekly, the report is generated for the past week.
- Configure the task launch schedule.
The application generates reports automatically according to this schedule. If necessary, you can disable automatic launch of tasks.
- Configure automatic delivery of the report via email.
If necessary, you can specify additional email addresses in the entry field, separating them with a semicolon.
Configuring settings of the incident status report
To configure the settings of the incident status report:
- Open Management Console.
- In the Management Console nodes tree, select the Reports node.
- Configure a task to generate a report on policies and incidents or a quick report on policies and incidents:
- To configure an existing task for creating a report on policies and incidents, select a task in the Report generation tasks section and click the Change button.
- To configure the quick report on policies and incidents, in the View and generate reports section, click the New report button and select Statistics on statuses of incidents.
The report settings window opens.
- Make changes to the report settings.
- Click the OK button.
You can configure the settings of a report on policies and incidents as follows:
- Select incidents for the report on categories.
The application selects incidents with Closed status for the report. Incidents with other statuses will not be included in the report. For each incident related to the selected category, the policy and the reason of incident closing will be specified in the report.
- Specify the reporting period.
If you create a quick report, you can specify any reporting period. If you configure a report task, the reporting period depends on the task schedule. For example, if you configured the task to run weekly, the report is generated for the past week.
- Configure the task launch schedule.
The application generates reports automatically according to this schedule. If necessary, you can disable automatic launch of tasks.
- Configure automatic delivery of the report via email.
If necessary, you can specify additional email addresses in the entry field, separating them with a semicolon. The application sends the generated report to these addresses.
Viewing the report on policy-related incidents
To view the report on policy-related incidents:
- Open Management Console.
- In the Management Console nodes tree, select the Reports node.
- In the list of reports in the Generate and view reports section, select one for which the Report type column will show Incidents by policies.
- Click the View button.
The report opens in the default browser.
The report contains the following information:
- Report parameters:
- Report type.
- Date and time of report generation.
- Number of incidents selected for the report.
- The reporting period.
- The statuses based on which the application has selected incidents for the report.
- The users for which the application has selected incidents for the report.
- The categories and policies based on which the application has selected incidents for the report.
- List of incidents selected for the report.
The list of incidents contains a table with detailed information on each incident included in the report. Incidents in the table are arranged in the order of the incident details selected in the report settings.
Viewing the system KPI report
To view the system KPI report:
- Open Management Console.
- In the Management Console nodes tree, select the Reports node.
- In the list of reports in the Generate and view reports section, select one for which the Report type column shows System KPI.
- Click the View button.
The report opens in the default browser.
The report contains the following information:
- Report parameters:
- Report type.
- Date and time of report generation.
- The reporting period.
- KPI data:
- In scope of policies. Number of files whose data has been scanned by the application.
- Clean. Number of files that have not been found to contain any data matching the categories.
- Violations. Number of files that have been found to contain data matching the categories.
- Errors. Number of files whose data has not been scanned due to errors (such as errors caused by the absence of access to user details).
- Scan timeouts. Number of files whose data has not been scanned due to scan timeouts.
- Beyond scope of policies. Number of files whose data has not been scanned because the users or SharePoint sites related to them are not specified in the policy settings.
- Total. Number of files processed by the application during the specified period.
- Violation data:
- List of categories whose policies were violated during the reporting period. The number and ratio of category-specific violations to the total number of violations (in percentage points) is displayed for each category.
- Total. Number of violations across all categories.
Viewing the report on users
To view the report on users:
- Open Management Console.
- In the Management Console nodes tree, select the Reports node.
- In the list of reports in the Generate and view reports section, select one for which the Report type column shows Statistics by users.
- Click the View button.
The report opens in the default browser.
The report contains the following information:
- Report parameters:
- Report type.
- Date and time of report generation.
- Number of incidents selected for the report.
- The reporting period.
- The statuses based on which the application has selected incidents for the report.
- The users for which the application has selected incidents for the report.
- The categories and policies based on which the application has selected incidents for the report.
- The incident table.
The Number of incidents by categories on users table contains a list of incidents selected for the report. For each user, the application displays the name of the department where the user works, the number of incidents associated with the user, and the names of categories to which these incidents belong.
Viewing the incident status report
To view the incident status report:
- Open Management Console.
- In the Management Console nodes tree, select the Reports node.
- In the list of reports in the Generate and view reports section, select one for which the Report type column displays the type of Statistics on statuses of incidents.
- Click the View button.
The report opens in the default browser.
The report contains the following information:
- Report parameters:
- Report type.
- Date and time of report generation.
- Number of incidents selected for the report.
- The reporting period.
- The categories based on which the application has selected incidents for the report.
- The incident table.
The Number of incidents by policies table contains a list of incidents selected for the report. Each category is shown with the policies configured for this category. The number of incidents created during policy violations is specified for each policy, along with the current status of all incidents.
Deleting a report
To delete a report:
- Open Management Console.
- In the Management Console tree of nodes, select the Reports node.
- In the list of reports in the View and create reports section, select a report to be deleted and click the Delete button.
You can delete several reports at once.
After you confirm deletion, the application deletes the selected reports permanently.
Page topReports
In this node, you can create and view reports on the status of confidential data protection on SharePoint.
The Report generation tasks section contains a list of tasks for automatic generation of reports. In this section, you can add new tasks and configure their settings.
The Generate and view reports section contains a list of generated reports. In this section, you can create reports in real-time mode, view and save generated reports.
Main settings of the detailed report
On the Basic tab, you can define the main settings of the report:
- Reporting interval
- Selection criteria for incidents to be reported on.
In the Include incidents in report block of settings, you can select incidents associated with specific categories and policies to be reported on.
By all categories and policies
By selected categories and policies
In the Filter by users block of settings, you can select incidents associated with specified users to be reported on.
The application selects incidents associated with the users that you have selected to add them to the report. If you select this option, the list of Active Directory users becomes available. The following buttons are designed for creating a list:
- – add an account to the list;
- – remove the selected account from the list.
The list is empty by default.
Include users missing from Active Directory
Main settings of the report on users
On the Basic tab, you can define the main settings of the report:
- Reporting interval
- Selection criteria for incidents to be reported on.
In the Include incidents in report block of settings, you can select incidents belonging to specific categories for report generation.
In the Filter by users block of settings, you can select incidents associated with specified users to be reported on.
The application selects incidents associated with the users that you have selected to add them to the report. If you select this option, the list of Active Directory users becomes available. The following buttons are designed for creating a list:
- – add an account to the list;
- – remove the selected account from the list.
The list is empty by default.
Include users missing from Active Directory
Additional report settings
On the Additional tab, you can define the advanced settings for report generation:
- Filtering incidents for the report on statuses
- Procedure for grouping information about incidents in reports
- Automatically sending a report to specified email addresses.
Include incidents with the following status in the report
The Email report list lets you select recipients to whom the application will automatically send the generated report.
Incident status
The Incident status window shows a list of all incident statuses. If the check box is selected opposite an incident status, incidents with this status are included in the report. If the check box is cleared, incidents with this status are excluded from the report.
The check boxes are selected for all statuses by default.
Incident data
The Incident details window lets you configure the settings that define the way incident data is displayed. The window shows the following list of incident data:
- Created;
- User;
- Address;
- No;
- Status;
- Violations;
- Action;
- Manager.
This window lets you configure the final appearance of the incident table in the report.
If the check box is selected opposite a list item, the report incidents are arranged in accordance with the details selected. If the check box is cleared, incidents are not arranged according to such details.
You can change the order of incident details in the list using the Up and Down buttons located to the right of the list. The order of list items defines the order in which incidents are arranged in the report.
User data
The Incident details window lets you configure user details included in the report. The window shows the following list of user data:
- Total incidents;
- User;
- Department.
This window lets you configure the final appearance of the incident table in the report.
If the check box is selected opposite a list item, the report incidents are arranged in accordance with the details selected. If the check box is cleared, incidents are not arranged according to such details.
You can change the order of incident details in the list using the Up and Down buttons located to the right of the list. The order of list items defines the order in which incidents are arranged in the report.
System report settings
In this window you can configure the following report generation settings:
- The reporting period.
- Automatically sending a report to specified email addresses.
The Email report list lets you select recipients to whom the application will automatically send the generated report.
Main settings of the statistical report
On the Basic tab, you can define the main settings of the report:
- Reporting interval
- Selection criteria for incidents to be reported on.
Additional settings of the statistical report
The Additional tab lets you configure automatic sending of the report to email addresses.
The Email report list lets you select recipients to whom the application will automatically send the generated report.
Main settings of the detailed report
The Basic tab lets you configure the criteria for selecting incidents to be included in the report.
In the Include incidents in report block of settings, you can select incidents associated with specific categories and policies to be reported on.
By all categories and policies
By selected categories and policies
In the Filter by users block of settings, you can select incidents associated with specified users to be reported on.
The application selects incidents associated with the users that you have selected to add them to the report. If you select this option, the list of Active Directory users becomes available. The following buttons are designed for creating a list:
- – add an account to the list;
- – remove the selected account from the list.
The list is empty by default.
Include users missing from Active Directory
Main settings of the report on users
The Basic tab lets you configure the criteria for selecting incidents to be included in the report.
In the Include incidents in report block of settings, you can select incidents belonging to specific categories for report generation.
In the Filter by users block of settings, you can select incidents associated with specified users to be reported on.
The application selects incidents associated with the users that you have selected to add them to the report. If you select this option, the list of Active Directory users becomes available. The following buttons are designed for creating a list:
- – add an account to the list;
- – remove the selected account from the list.
The list is empty by default.
Include users missing from Active Directory
System report settings
In this window you can configure the following report generation task settings:
- Task run mode
- Automatically sending a report to specified email addresses.
The Email report list lets you select recipients to whom the application will automatically send the generated report.
Main settings of the report on policies
The Basic tab lets you configure the criteria for selecting incidents to be included in the report.
Additional task settings
On the Additional tab, you can configure advanced settings for the report generation task:
- Incident filtering by status
- The method of grouping incident information in the report
- Automatically sending a report to specified email addresses.
Include incidents with the following status in the report
The Email report list lets you select recipients to whom the application will automatically send the generated report.
Page topRun mode
The Schedule tab lets you enable automatic report generation and configure the schedule according to which the application will run the task.
Page topContacting the Technical Support Service
This section describes the ways to get technical support and the terms on which it is available.
Ways to receive technical support
If you cannot find a solution to your problem in the application documentation or in one of the sources of information about the application, we recommend that you contact Technical Support. Technical Support specialists will answer your questions about installing and using the application.
Before contacting Technical Support, please read the technical support rules.
You can contact Technical Support in one of the following ways:
- By calling Technical Support by phone
- By sending a request to Kaspersky Lab Technical Support through the Kaspersky CompanyAccount portal
Technical support by phone
You can call Technical Support representatives in most regions of the world. You can find information about how to obtain technical support in you region and the contacts of Technical Support on the Kaspersky Lab Technical Support website.
Before contacting Technical Support, please read the technical support rules.
Page topTechnical Support via Kaspersky CompanyAccount
Kaspersky CompanyAccount is a portal for companies that use Kaspersky Lab applications. The Kaspersky CompanyAccount portal is designed to facilitate interaction between users and Kaspersky Lab specialists through online requests. You can use Kaspersky CompanyAccount to track the status of your online requests and store a history of them as well.
You can register all of your organization's employees under a single account on Kaspersky CompanyAccount. A single account lets you centrally manage electronic requests from registered employees to Kaspersky Lab and also manage the privileges of these employees via Kaspersky CompanyAccount.
The Kaspersky CompanyAccount portal is available in the following languages:
- English
- Spanish
- Italian
- German
- Polish
- Portuguese
- Russian
- French
- Japanese
To learn more about Kaspersky CompanyAccount, visit the Technical Support website.
Page topUsing Info Collector
When you inform Technical Support of the problem, you may be asked to create an archive with data on the operation of the application using the InfoCollector utility, and to send it to Technical Support.
To get acquainted with the description of the Info Collector utility and download the utility, please go to the Kaspersky Security page in the Knowledge Base , section "Troubleshooting".
Page topSources of information about the application
Kaspersky Security page on the Kaspersky Lab website
On the Kaspersky Security page, you can view general information about the application, its functions and features.
The Kaspersky Security page contains a link to eStore. There you can purchase the application or renew your license.
Kaspersky Security page in the Knowledge Base
Knowledge Base is a section on the Technical Support website.
On the Kaspersky Security page in the Knowledge Base, you can read articles that provide useful information, recommendations, and answers to frequently asked questions on how to purchase, install, and use the application.
Knowledge Base articles can answer questions relating to not only to Kaspersky Security but also to other Kaspersky Lab applications. Knowledge Base articles can also include Technical Support news.
Discussing Kaspersky Lab applications on the forum
If your issue does not require an immediate solution, you can discuss it with Kaspersky Lab specialists and other users on our Forum.
In this forum you can view existing topics, leave your comments, create new topics.
Page topGlossary
Activating the application
Switching the application into full-function mode. Application activation is performed by the user during or after the application installation. You should have a key file to activate the application.
Active key
Key that is used at the moment to work with the application.
Active policy
A policy currently used by the application for Data Leak Prevention. The application can use several policies at once.
Additional key
Key that verifies the use of the application but is not used at the moment.
Anti-virus databases
Databases that contain information about computer security threats known to Kaspersky Lab as of the anti-virus database release date. Anti-virus database signatures help to detect malicious code in scanned objects. Anti-virus databases are created by Kaspersky Lab specialists and updated hourly.
Archived incident
An incident restored from the archive to Management Console (for example, to search for information about similar policy violations in the past).
Archiving
A process of moving closed incidents to an archive in secure format. The application removes incidents from Management Console after archiving them.
Backup
A dedicated storage area intended for saving backup copies of objects that are created prior to their disinfection or removal.
Black list of key files
Database that contains information about the key files blocked by Kaspersky Lab. The black list file content is updated along with the product databases.
Closed incident
An incident that has been processed, with a decision made on this incident.
Confidential data
Information that is not subject to disclosure and distribution beyond a limited circle of people. Confidential data usually include information listed as a state or trade secret, as well as personal data.
Control scope
SharePoint websites for which the application monitors file uploading. When the user uploads a file to a website within the control scope, the application scans the file for data protected by the active policies.
Corporate security
A scope of regulations and procedures aimed at the protection of a company's business interests. This may include, e.g., collection of information about the company's internal environment or competitors, analysis of market trends, and protection of intellectual property.
Data category
A set of data united with a common feature or subject and corresponding to specific criteria (e.g., a combination of words used in text in a certain order). The application uses data categories for recognizing information in files being uploaded and stored on SharePoint. The application allows using preset Kaspersky Lab data categories and creating custom data categories.
Data leak
Unauthorized access to confidential data with further uncontrolled distribution.
Data leak prevention
The scope of a security officer's actions aimed at preventing any unauthorized access to confidential data (such as blocking a file when it is uploaded to SharePoint).
Data search
Search for data from specified categories on SharePoint websites. The application searches for data in accordance with the settings of the search task.
Data subcategory
A nested data category included in a larger category. Each subcategory describes the set of data with a common attribute within a category. For example, the "Magnetic stripe data" subcategory makes part of the "Banking cards" category. You can manage the composition of a category by excluding or including some subcategories. E.g., you can exclude subcategories upon which the application must not monitor data leaks.
Disinfection
A method of processing infected objects that results in full or partial recovery of data. Not all infected objects can be disinfected.
DLP Module (Data Leak Prevention)
Component of Kaspersky Security that is designed for protection of information uploaded to or stored on SharePoint websites against leakage.
DLP Module status
The current state of the DLP Module. Using the DLP Module status, Kaspersky Security informs you of errors in the operation of the DLP Module and ways of fixing them.
Document templates
Files with text data used as patterns for creation of new documents. The application protects against leakage all documents that have been created on the basis of those templates.
False positive incident
This is an incident that has visible signs of a data leak without an actual leak occurring. For example, a false positive incident can be provoked by a user's attempt to send a file that contains no financial information but is a template for preparing financial reports.
File blocking
The application's action aimed at a possible data leak. The application can block a file that initiated a policy violation. If the application blocks a file, the user cannot upload the file to SharePoint.
Full scan
A type of file scan. When performing a full scan, the application searches for data from the specified categories in all files stored on SharePoint servers.
Hash sum
Unique series of alphanumeric symbols that results from algorithmic processing of data.
Incident
The record of an event in the application's operation associated with detection of a possible data leak. E.g., the application creates an incident when a policy is violated.
Incident status
The current state of an incident. The status shows the stage of incident processing. The statuses of incidents are can be used for management of incident processing.
Incremental scanning
A type of file scan. During an incremental scan, the application searches for data on SharePoint servers, only scanning files that have been modified since the previous scan.
Infected object
An object a portion of whose code completely matches part of the code of known malware. Kaspersky Lab does not recommend using such objects.
Kaspersky CompanyAccount
Portal designed for sending online requests to Kaspersky Lab and tracking their processing by Kaspersky Lab experts.
Kaspersky Lab categories
Predefined data categories developed by Kaspersky Lab specialists. Categories can be updated during application database updates. A security officer cannot modify or delete those predefined categories.
Kaspersky Lab update servers
HTTP and FTP servers of Kaspersky Lab from which Kaspersky Lab applications download database and application module updates.
Kaspersky Security Network (KSN).
Infrastructure of cloud services that provides access to the Kaspersky Lab online knowledge base containing information about the reputation of files, web resources, and software. The use of data from Kaspersky Security Network ensures faster responses by Kaspersky Lab applications to threats, improves the effectiveness of some protection components, and reduces the risk of false positives.
Key file
A xxxxxxxx.key file that allows use of a Kaspersky Lab application on the terms of a trial or commercial license. You have to specify the path to the key file after the application has been installed. You may use the application only when you have a key file.
Keywords
Word, phrase, or sequence of characters that the application uses for recognizing data in files being uploaded and stored on SharePoint that need to be protected against leakage. Keywords can be added to data categories.
License certificate
This is a document that is provided to you by Kaspersky Lab together with a key file or activation code. It contains information about the license granted to the user.
License term
A time period during which you have access to the application features and rights to use additional services. Available functionality and specific additional services depend on the license type.
Managed device
Device with an installed security software suite connected to Kaspersky Security Center.
Management Console
Kaspersky Security application component. Provides a user interface for managing administrative tools and enables configuration of the application and management of the server component. The management module is implemented as an extension of the Microsoft Management Console.
Match level
Criterion showing how well the information in files being uploaded and stored on SharePoint matches a table data category. You can configure the match level when creating or editing a table data category.
A security officer can specify the number of cells that will affect the match level. The number of cells is created based on unique crossings between columns and rows of the table.
Object removal
The method of processing objects which ends in it being physically deleted from its original location (hard drive, folder, network resource). We recommend that this method be applied to dangerous objects which, for whatever reason, cannot be disinfected.
On-access scan
A mode of a Kaspersky Lab application whereby files are scanned automatically on being uploaded to the server or downloaded from the server.
Opened incident
An incident that has been assigned New or In progress status.
Personal data
Information that can be used to identify a person, directly or indirectly.
Phishing
A kind of online fraud aimed at obtaining unauthorized access to confidential data of users.
Policy
Collection of application settings that provide data protection against leakage. The policy defines the conditions on which users can handle confidential data, as well as actions that must be taken by the application when possible data leakage is detected.
Policy violation
User actions leading to a violation of the conditions applied to the handling of confidential data on SharePoint servers. The application views an event as a policy violation if the user specified in the policy settings uploads to a SharePoint website or sends by email some data from a category prohibited by the policy.
Probably infected object
An object whose code contains a modified segment of code of a known threat, or an object resembling a threat in the way it behaves.
Quotations from documents
Text fragments from documents that must be protected against leakage.
Search scope
SharePoint websites on which the application searches for data. If files are stored on a website within the search scope, the application scans the files for data from the categories specified in the search task.
Search task
A set of criteria and parameters based on which the application searches for data on SharePoint servers.
Security Officer
Employee who is in charge of controlling compliance with the corporate security requirements on SharePoint websites, as well as monitoring and preventing data leakage.
SharePoint server structure
A tree of nodes that makes it possible to manage the content of a SharePoint server. In nodes, you can select elements and specify the actions to take on them.
Skipping of an object
Processing method in which an object is allowed to pass to the user unchanged. If event logging is enabled for this event type, information about the object detected will be logged in the report.
System KPI (Key Performance Indicators)
It is type of application operation report. It contains information about the key performance indicators of the DLP Module.
Table data
Information organized in a table format that must be protected against leakage. Table data is processed in Kaspersky Security using CSV (Comma Separated Values) files.
Unwanted content
Information that is unsuitable for various groups of users. Unwanted content includes websites and messages that propagate violence, incite acts of terror, contain child pornography or profanity.
Update
A function performed by a Kaspersky Lab application that enables it to keep computer protection up-to-date. During the update, an application downloads updates for its databases and modules from Kaspersky Lab's update servers and automatically installs and applies them.
User category
A data category created by a data security officer.
Violation context
A text fragment with data that violates a policy when uploaded to SharePoint servers. The violation context is required for making a decision of an incident.
Virus
A program that infects other ones by adding its code to them in order to gain control when infected files are run. This simple definition allows exposing the main action performed by any virus – infection.
Working scenario
A sequence of actions that is recommended to a security officer for solving a standard task. A scenario includes both actions in the application interface and preparatory actions beyond the application (such as planning or analysis).
Page topKaspersky Lab AO
Kaspersky Lab software is internationally renowned for its computer protection against various types of threats, including viruses, malware, spam, network and hacker attacks.
In 2008, Kaspersky Lab was rated among the world's top four vendors of information security software solutions for end users (IDC Worldwide Endpoint Security Revenue by Vendor). In Russia, according to IDC, Kaspersky Lab is the first choice among all computer protection vendors for home users (IDC Endpoint Tracker 2014).
Kaspersky Lab was founded in Russia in 1997. Today, Kaspersky Lab is an international group of companies running 38 offices in 33 countries. The company employs more than 3000 qualified specialists.
Products. Kaspersky Lab’s products provide protection for all systems—from home computers to large corporate networks.
The personal product range includes applications that provide data security for desktop, laptop, and tablet computers, and for smartphones and other mobile devices.
The company offers solution and technologies for control and protection of workstations and mobile devices, virtual machines, file servers and web servers, mail gateways, and firewalls. The company's portfolio also includes dedicated products for protection against DDoS attacks, protection of environments managed with industrial control systems, and fraud prevention. Used in conjunction with Kaspersky Lab’s centralized management system, these solutions ensure effective automated protection for companies and organizations of any scale against computer threats. Kaspersky Lab's products are certified by the major test laboratories, are compatible with the software of many suppliers of computer applications, and are optimized to run on many hardware platforms.
Kaspersky Lab’s virus analysts work around the clock. Every day they uncover hundreds of thousands of new computer threats, create tools to detect and disinfect them, and include their respective signatures in the databases used by Kaspersky Lab applications.
Technologies. Many technologies that are now part and parcel of modern anti-virus tools were originally developed by Kaspersky Lab. It is no coincidence that the program kernel of Kaspersky Anti-Virus is integrated into products by many other software vendors, such as Alcatel-Lucent, Alt-N, Asus, BAE Systems, Blue Coat, Check Point, Cisco Meraki, Clearswift, D-Link, Facebook, General Dynamics, H3C, Juniper Networks, Lenovo, Microsoft, NETGEAR, Openwave Messaging, Parallels, Qualcomm, Samsung, Stormshield, Toshiba, Trustwave, Vertu, and ZyXEL. Many of the company’s innovative technologies are patented.
Achievements. Over the years, Kaspersky Lab has won hundreds of awards for its services in combating computer threats. For example, according to tests and researches conducted in 2014 by the renowned Austrian anti-virus lab AV-Comparatives, Kaspersky Lab shared the leadership in the number of Advanced+ certificates awarded, which brought the Top Rated certificate to the company. But Kaspersky Lab's main achievement is the loyalty of its users worldwide. The company’s products and technologies protect more than 400 million users, and its corporate clients number more than 270,000.
Kaspersky Lab website: |
|
Virus Encyclopedia: |
|
Anti-Virus Lab: |
https://virusdesk.kaspersky.com/ (for scanning suspicious files and websites) |
Kaspersky Lab's web forum: |
Page top
Information about third-party code
Information about third-party code is contained in a file named legal_notices.txt and stored in the application installation folder.
Page topTrademark notice
Registered trademarks and service marks are the property of their respective owners.
Active Directory, SQL Server, Microsoft, SharePoint, Windows, Windows Server, Windows Vista, Windows PowerShell, and Excel are trademarks of Microsoft Corporation registered in the USA and elsewhere.
Page top